- Author: milliondollarpuppy
- Date: April 14, 2023
- Updated: April 17, 2023
- Expansion: WotLK Classic
Welcome to Warcraft Tavern’s Ulduar Achievement guide! Now that most guilds have Ulduar on farm, players can change up their strategies to meet the challenge of all the different achievements in the raid.
There are a total of 70 achievements across the various bosses of Ulduar 10 & 25-man modes, and to unlock the two meta achievements and receive Reins of the Rusted Proto-Drake (10) & Reins of the Ironbound Proto-Drake (25), you’ll need to complete the same 13 achievements separately for 10 and 25-man raids; you’ll receive rewards for completing all of the requirements for each raid size independently.
To complete the meta achievements, players will need to complete an achievement for each boss besides Algalon; if applicable, this achievement is usually for completing a boss’s hard mode.
Meta Achievements
Every boss within Ulduar, except for Algalon, has an achievement that contributes to the over-arching meta achievement, Glory of the Ulduar Raider (10) & Glory of the Ulduar Raider (25), that reward the Reins of the Rusted Proto-Drake (10) & Reins of the Ironbound Proto-Drake (25).
Below is a table outlining these achievements, their corresponding encounter, and the objective needed for completion. Beyond this table, you’ll find in-depth strategies in our general achievement catalog.
Boss | Achievement | Requirements |
Flame Leviathan | Defeat Flame Leviathan with all 4 Orbital Defense Systems active. | |
Razorscale | Defeat 25 Dark Rune Guardian Dwarves with Razorscale’s Flame Breath in. | |
Ignis the Furnace Master | Defeat Ignis the Furnace Master in 4 minutes or less. | |
XT-002 Deconstructor | Defeat XT-002 Deconstructor after destroying his heart. | |
Iron Council | Defeat the Assembly of Iron with Steelbreaker as the last member alive. | |
Kologarn | Destroy both of Kologarn’s arms and then Kologarn himself within 12 seconds. | |
Auriaya | Defeat Auriaya without destroying her Sanctum Sentries. | |
Freya | Defeat Freya while leaving all 3 Elders alive. | |
Hodir | Defeat Hodir before he shatters his rare cache. | |
Thorim | Defeat Thorim while Sif is present. | |
Mimiron | Defeat Mimiron after activating his Self-Destruct mechanism. | |
General Vezax | Defeat General Vezax after defeating the Saronite Animus. | |
Yogg-Saron | Defeat Yogg-Saron with the assistance of one or fewer Keepers. |
Achievements
Meta Achievement: Orbit-uary | Orbit-uary
Defeat Flame Leviathan in Ulduar with all 4 Orbital Defense Systems active (this is this boss’s hard mode). This achievement will also unlock Nuked from Orbit, Orbital Devastation, and Orbital Bombardment. Check out our Flame Leviathan (25) & Flame Leviathan (10) guide for an in-depth strategy for beating this Hard Mode.
Flame Leviathan is a fight completed entirely within one of three vehicles, the Siege Engine, Demolisher, and the Chopper.
There are nine achievements in this encounter, and before starting the fight, the group should decide between doing Orbit-uary or not. To start Orbit-uary, talk to the Lore Keeper of Norgannon, who is in the middle of the staging area; if you wish to start normal mode, speak to Brann Bronzebeard instead. You should choose to do all the defense systems or none of them; there isn’t any benefit to doing less than four.
The fight begins with a short gauntlet before you reach the arena where Flame Leviathan spawns; at this stage of the encounter, your team should consider Dwarfageddon | Dwarfageddon, as this is the only achievement related to this bosses trash and is gotten before the fight starts.
Individual Achievements
- Take Out Those Turrets | Take Out Those Turrets: This requires players to be passengers in a Demolisher and load themselves into the catapult; then, the driver will launch them up on top of Flame Leviathan. Once up top, you’ll need to destroy one of the turrets. Since there are only so many opportunities to destroy turrets in the encounter, players will need to be cycled in week by week to get the entire raid the achievement.
- Three-Car-Garage | Three-Car-Garage: Defeat Flame Leviathan in Ulduar while in each of the three vehicles. 3 lockouts are needed to complete this achievement. Players must defeat the raid boss in each of the three vehicles; it doesn’t matter which difficulty.
Team Achievement
- Dwarfageddon | Dwarfageddon: This achievement is the only one related to the gauntlet. Players will need to kill 100 Steelforged Defenders within 10 seconds. The best way to complete this challenge is to use your Choppers to run the length of the gauntlet, pulling as many Defenders as possible back to the start where the stairs are. The Siege Engines and Demolishers should be waiting at the beginning of the gauntlet, ready to DPS the Dwarves on arrival. The Defenders will keep spawning, so it’s not an issue if you need additional tries.
- Unbroken | Unbroken: Defeat Flame Leviathan without anyone repairing their vehicle on the first attempt of the lockout.
- It’s best to travel through the gauntlet in a stacked group to minimize damage, then avoid repairing any vehicles once the gauntlet is complete. It doesn’t need to be on hard mode, so it’s best to deactivate the defenses for this attempt. You only get one shot at Unbroken each lockout, so if you repair a vehicle or wipe, you will need to wait until reset to try again.
- Technically, you can clear the gauntlet with every vehicle in tow, hop out at the end and wait for them to despawn, allowing full-health vehicles to respawn at the entrance so that you can run back down the cleared gauntlet to face Flame Leviathan.
- Shutout | Shutout: Defeat Flame Leviathan without causing a System Shutdown.
- This achievement requires you to avoid the shutdown mechanic initiated when you destroy a turret atop Flame Leviathan and activate the revealed button. Without relying on the stun, groups must focus more on kiting the boss and keeping up a solid stock of pyrite for Demolisher DPS. This can be done in normal mode, so save yourself the headache and skip hard mode when trying this.
Meta Achievement: Iron Dwarf, Medium Rare | Iron Dwarf, Medium Rare
Defeat 25 Dark Rune Guardian Dwarves with Razorscale’s Flame Breath. This achievement is cumulative, so you don’t have to worry about getting all 25 Dwarves in one lockout. The best way to approach this achievement is to use two tanks; one to hold threat on the boss and the other to pick up the correct adds. Once the second tank has a desired amount of Dark Rune Guardians, you should have non-dot, non-cleave DPS damage the mobs down to around 15k HP. At that point, the second tank should bring the pack of Dwarves to the front of the boss and wait for her Flame Breath she uses after breaking her chains and throughout phase 2 (targets the character with the highest threat).
Team Achievements
- A Quick Shave | A Quick Shave: Defeat Razorscale without allowing her to fly into the air more than once in 10-player mode. This is generally a forgiving DPS check; most groups will get this achievement naturally without special tactics.
Meta Achievement: Stokin’ the Furnace | Stokin’ the Furnace
This achievement is unremarkable because it is free. You have a 4-minute window to defeat the boss once the encounter begins. Most logged kills are well within this time frame, so this isn’t much of a challenge at any skill level.
Individual Achievements
- Hot Pocket | Hot Pocket: Survive being thrown into Ignis the Furnace Master’s Slag Pot in Ulduar.
- This achievement comes down to RNG. While this won’t happen to the character with the highest threat, i.e., the tank, Ignis will scoop someone into his firepot. Once inside, players must simply survive the ordeal through self-healing or relying on the raid’s healers to keep them alive.
Team Achievements
- Shattered | Shattered: Defeat Ignis the Furnace Master after shattering 2 Iron Constructs within 5 seconds.
- During the fight, Ignis will cast Scorch, which will leave a fire AoE. For this achievement, we will need to allow two Iron Constructs to stand in this fire until they gain 10 stacks of Heat, making them Molten for 20 seconds. With the Molten debuff, tanks will kite the mobs into the water, which causes them to become Brittle. Brittle constructs will shatter with a single instance of 5000+ damage. Ultimately, we will want to get two Constructs together in this state and inflict those instances of damage in the 5-second window we are allotted. Consider one to two off-tanks to engage the Constructs while the main tank focuses on the Boss. Ignis has buffed damage thanks to Strength of the Creator, which stacks with each active Construct, so completing this achievement will strain your tanks and healers.
Meta Achievement: Heartbreaker | Heartbreaker
To activate this hard mode, you’ll need to first DPS the boss until 75% health, at which point you’ll start phase 2 and reveal XT’s heart.
If your group kills the heart in this phase, you will activate hard mode, which stops adds from spawning, heals XT, increases his damage, and modifies his abilities.
Searing Light will spawn a Life Spark that the DPS must kill as it deals raid-wide damage while alive.
Gravity Bomb will now spawn a Void Zone; affected players will want to run out of the raid with this debuff, mindful to stay within range of healers.
Check out our XT-002 Deconstructor Strategy Guide for a breakdown of activating hard mode and the resulting ability changes.
Team Achievements
- Nerf Engineering | Nerf Engineering: Defeat XT-002 Deconstructor without him recovering any health from XS-013 Scrapbots. The XS-013 Scrapbots will spawn from the scrap piles in the room’s corners, furthest from the raid. If they reach XT-002, they’ll use Scrap Repair, and your group with fail the attempt. The bots can be rooted and slowed but ultimately should be focused and killed.
- Nerf Scrapbots | Nerf Scrapbots: Defeat 20 XS-013 Scrapbots within 12 seconds using XE-321 Boombots. To destroy sufficient Scrapbots, your group must position the boss centered on the back wall or tight it in one of the corners so that the bots will spawn at the two furthest scrap piles when you begin to fight the boss and trigger his heart phase. You want to start the fight as far as possible from the spawns, as even a few extra yards will come in handy when trying to slow and gather all of the Scrapbots. Begin the fight as usual; once you push the boss enough to reveal his heart, damage it, but don’t kill it. While this is happening, you should deploy classes with slows, such as Hunters with Frost Trap or Shaman with Earthbind Totem, toward the scrap piles so that they can intercept incoming bots. Have your slow and root specialists lead the ads toward the boss and try and get as many mobs together before destroying the bomb bots.
- Remember that the Scrapbots will consume themselves once they reach XT, so you may need to kite the boss slightly to compensate.
- This scenario does involve RNG as it is random how many Scrapbots you get, you may also get unlucky with the amount of Pummelers, and these will have to be off-tanked or kited as necessary. You must reset and try again if you do not get enough bots to spawn in two hearts.
- Pushing the boss into additional Heart phases will allow you to spawn more bots, but getting more than 2 Heart phases will depend on your group’s DPS, as you need to damage 25% of the boss’s total health to reach the next Heart phase. If you aren’t quick, you can be overwhelmed by Pummelers and the Tympanic Tantrum cast a minute after the Heart phases end.
- Nerf Gravity Bombs | Nerf Gravity Bombs: Defeat XT-002 Deconstructor without any raid member dying from a Gravity Bombs. The key to this achievement is ensuring everyone handles the Gravity Bomb mechanic appropriately. Any affected player with the debuff will need to move out of the raid while staying in range of the healers; after the bomb goes off, they will need to be healed.
- Must Deconstruct Faster | Must Deconstruct Faster: Defeat XT-002 Deconstructor in 205 seconds. This is a straightforward DPS check with a hard timer. You can complete it on normal or hard difficulty, so if you don’t have the DPS to complete it on hard mode, you can always take the easy route.
Defeating all the bosses from the Siege of Ulduar on any difficulty will reward you with The Siege of Ulduar & The Siege of Ulduar
Meta Achievement: I Choose You, Steelbreaker | I Choose You, Steelbreaker
The Iron Council encounter consists of three unique bosses, each with different abilities. The interesting thing about this encounter is that each time you defeat one of the three council members, the others will heal themselves to full AND will unlock additional abilities.
Because of Meltdown, which will kill your tank after 35 seconds of Overwhelming Power, and how this buffs/heals Steelbreaker, he is the most challenging Council Member to leave up last of the three, and thus represents Hard Mode for this encounter, which rewards this meta achievement.
Check out our Assembly of Iron guide for an in-depth strategy for defeating the Iron Council on hard mode!
Individual Achievements
- But I’m On Your Side! | But I’m on your side!: This achievement requires the player to be under the effect of Iron Boot Flask while successfully finishing the encounter (Sold in Storm Peaks from Olut Alegut (H) and Rok Sharpchin (A) for 10 Relic of Ulduar)
- The flask is a non-consumable item that turns the player into an Iron Dwarf for 10 minutes with a 1-hour cooldown. Luckily, you only have to be in this form while finishing off the last council member and don’t have to wear it for the duration. The achievement is accessible on any difficulty, even as a shapeshifting Druid, as you use the item in the last few moments of the encounter.
Team Achievements
- Can’t Do That While Stunned | Can’t Do That While Stunned: Defeat the Iron Council without having Stormcaller Brundir cast Chain Lightning or Lightning Whirl, both of which can be interrupted; you must coordinate with your group accordingly.
- This achievement is easier in hard mode, as Brundir is first on the kill order for that requirement.
Meta Achievement: Disarmed | Disarmed
You must destroy Kologarn’s arms within 12 seconds of defeating him for this achievement.
If you kill the arms and allow them to grow back, this won’t count. The best way to handle this is to start the fight as usual and get the boss to around 50%; at that point, you should be able to kill both arms at roughly the same time and then push the boss.
Team Achievements
- With Open Arms | With Open Arms: Defeat Kologarn without destroying his arms; the best way to do this is to focus his body, using only instant abilities and no DoTs when switching to the Right Arm to free your teammates. Remember, large hitboxes for Kologarn’s two arms and body mean you can cleave all three targets simultaneously.
- Unless you can kill Kologarn within 3-4 uses of Stone Grip, you will sacrifice subsequent raid members who find themselves getting crushed to death.
- If Looks Could Kill | If Looks Could Kill: No one in your raid can be hit by Focused Eyebeam.
- Aside from being mindful of when Kologarn will use his ability, you can use a holy priest specced into Body and Soul to shield players targeted before the eyebeam. Abilities that help the character’s mobility, such as Blink, or abilities that grant immunity, like Ice Block, can also be used.
- Rubble and Roll | Rubble and Roll: This achievement has you kill at least 25 Rubble; 5 of these mobs will spawn each time you destroy one of Kologarn’s arms. Simply ignore the body, focus on arms, and eventually, after letting this Construct regrow a few limbs, you’ll have a chance to kill enough adds.
Meta Achievement: Crazy Cat Lady | Crazy Cat Lady
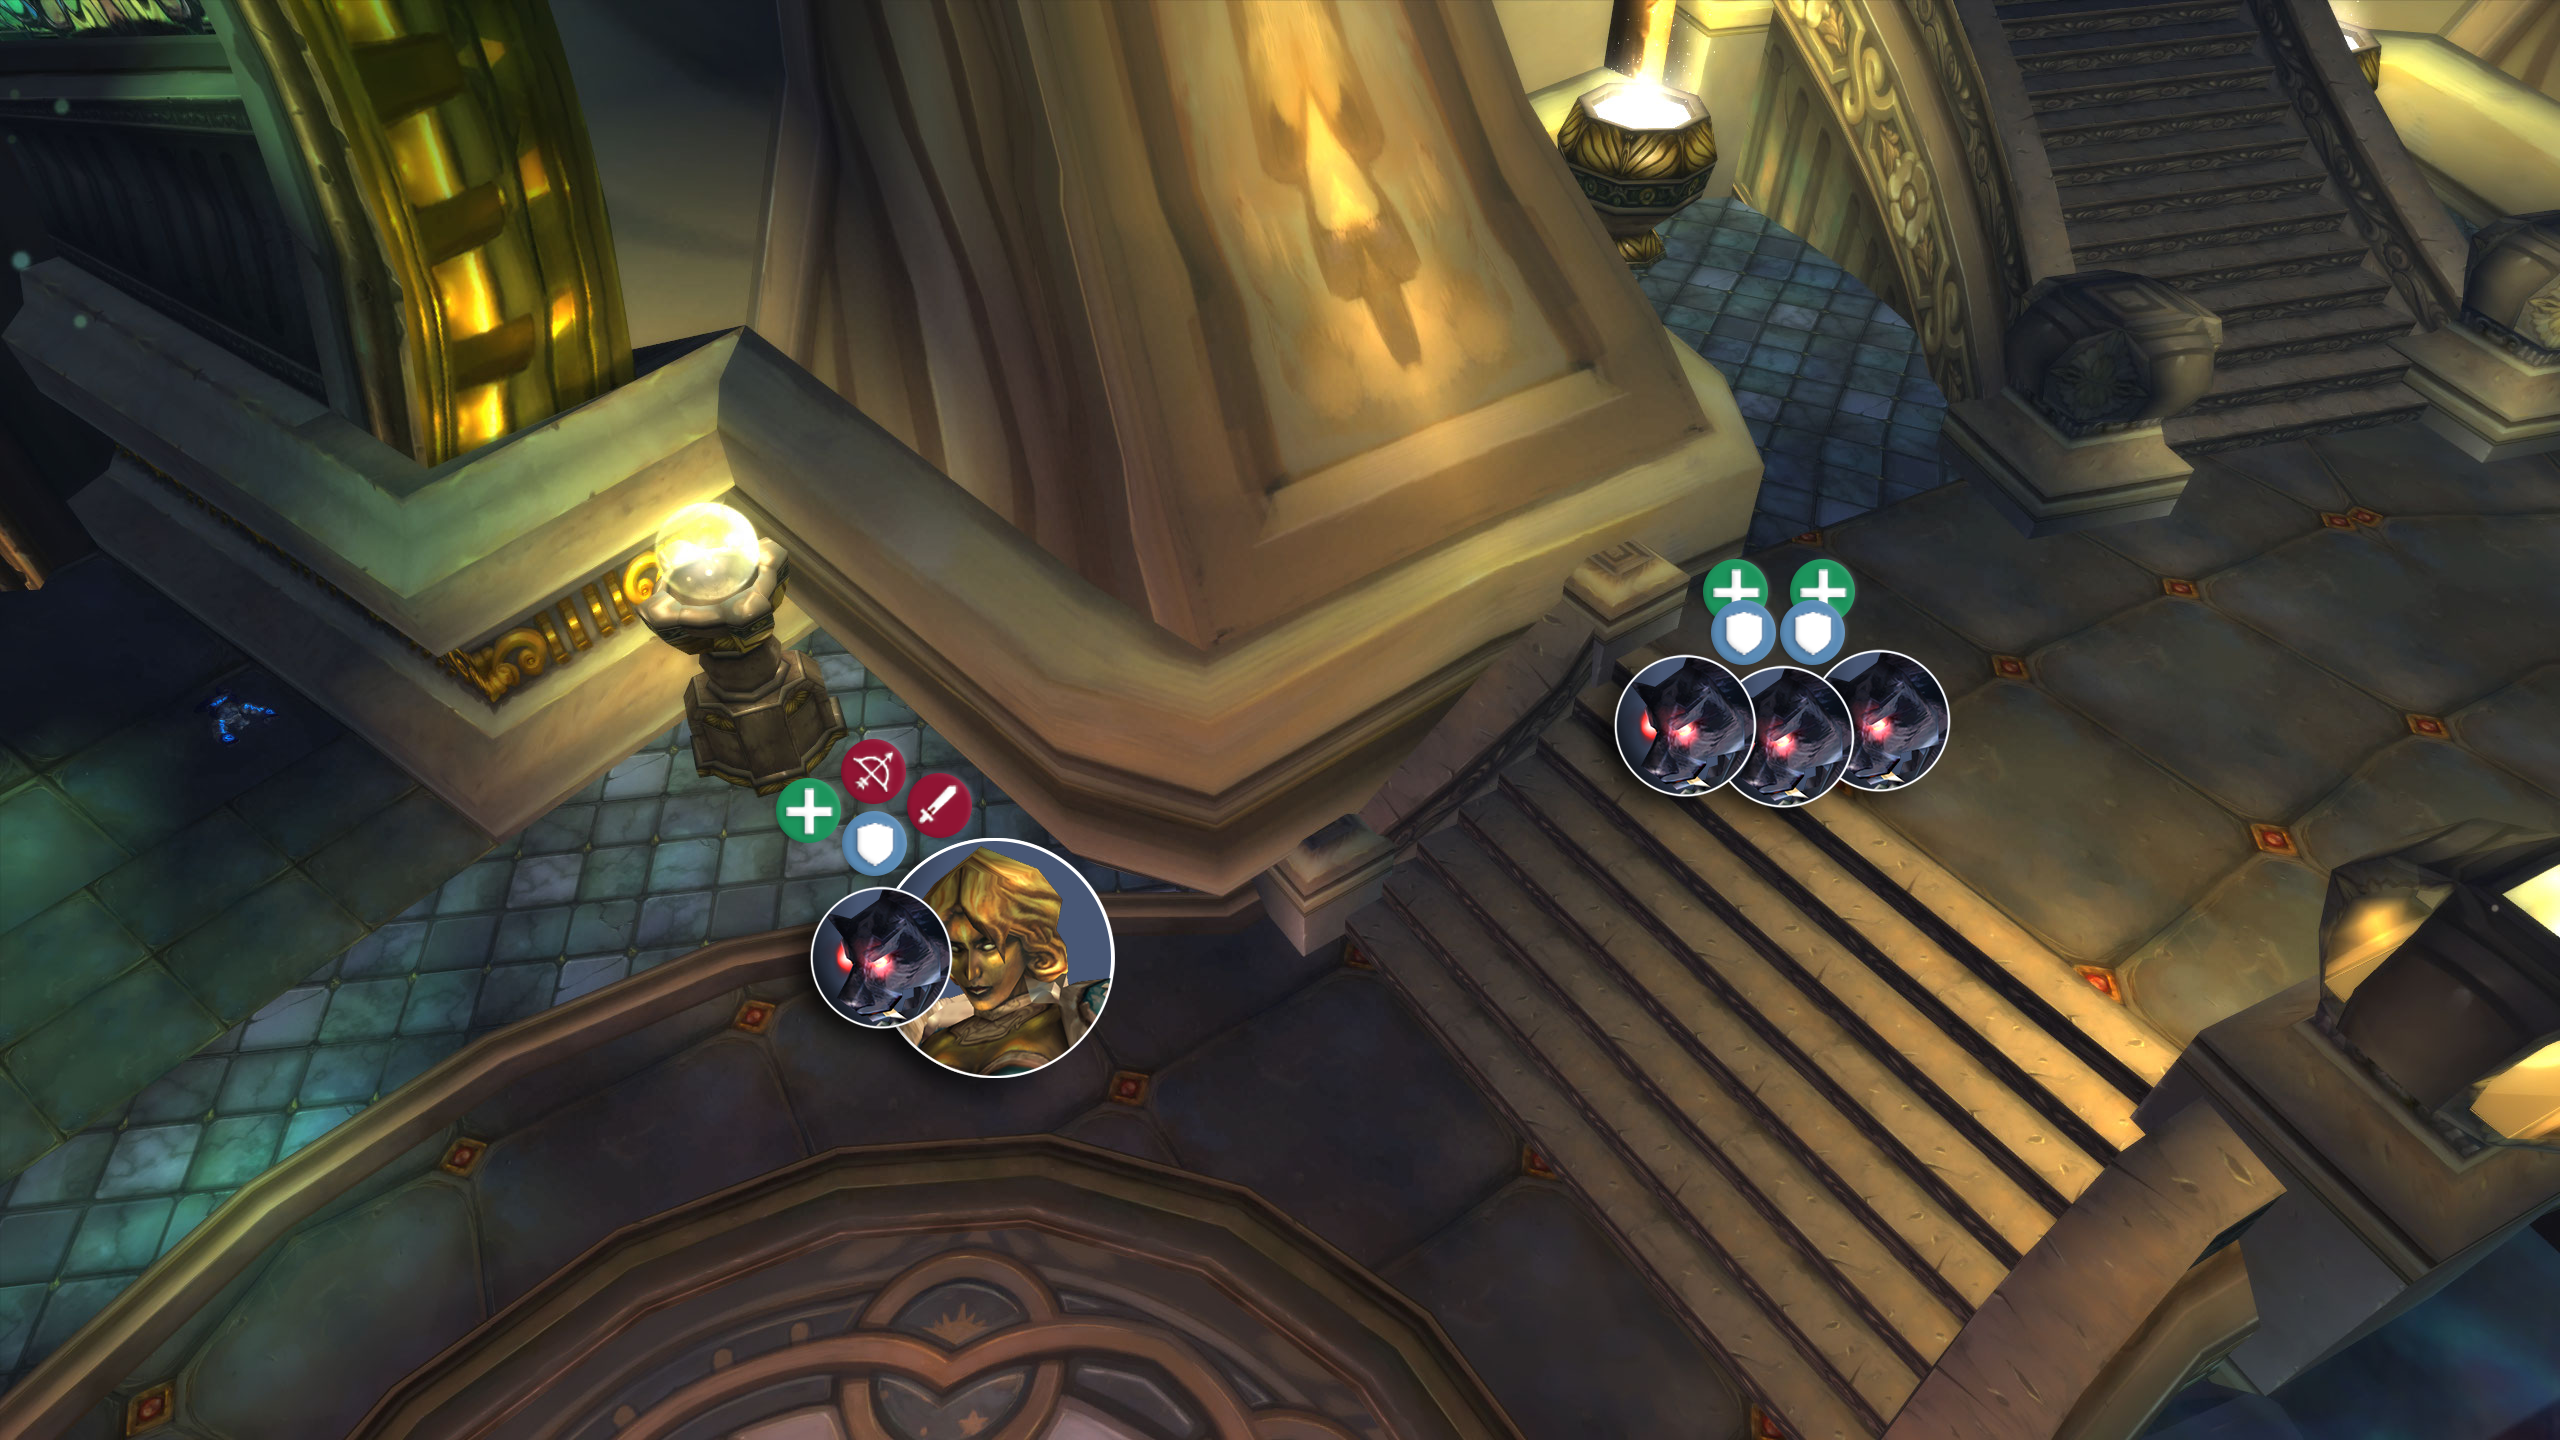
During this boss fight, we must defeat Auriaya without harming her ferocious pack of 4 Sanctum Sentry.
This achievement can be challenging because of the Strength of the Pack aura, which buffs any pack member within 10 yards with 30% damage. In addition, these cats will use Savage Pounce on any character in Line-of-Sight who is at least 8 yards away.
Because of these abilities, we will tank in two groups for this strategy. One group will have everyone stacked around one of the corners of the stairwell in the Ring of Observation, while a second group of 2 tanks and 2 healers will take the corner with 2-3 cats, mindful of moving out of Line-of-Sight of the other group.
Remember that DPS will have to be mindful not to use cleave, AoE, and DoT effects for the duration of the encounter.
Team Achievements
Nine Lives | Nine Lives: Defeat the Feral Defender while defeating Auriaya in Ulduar.
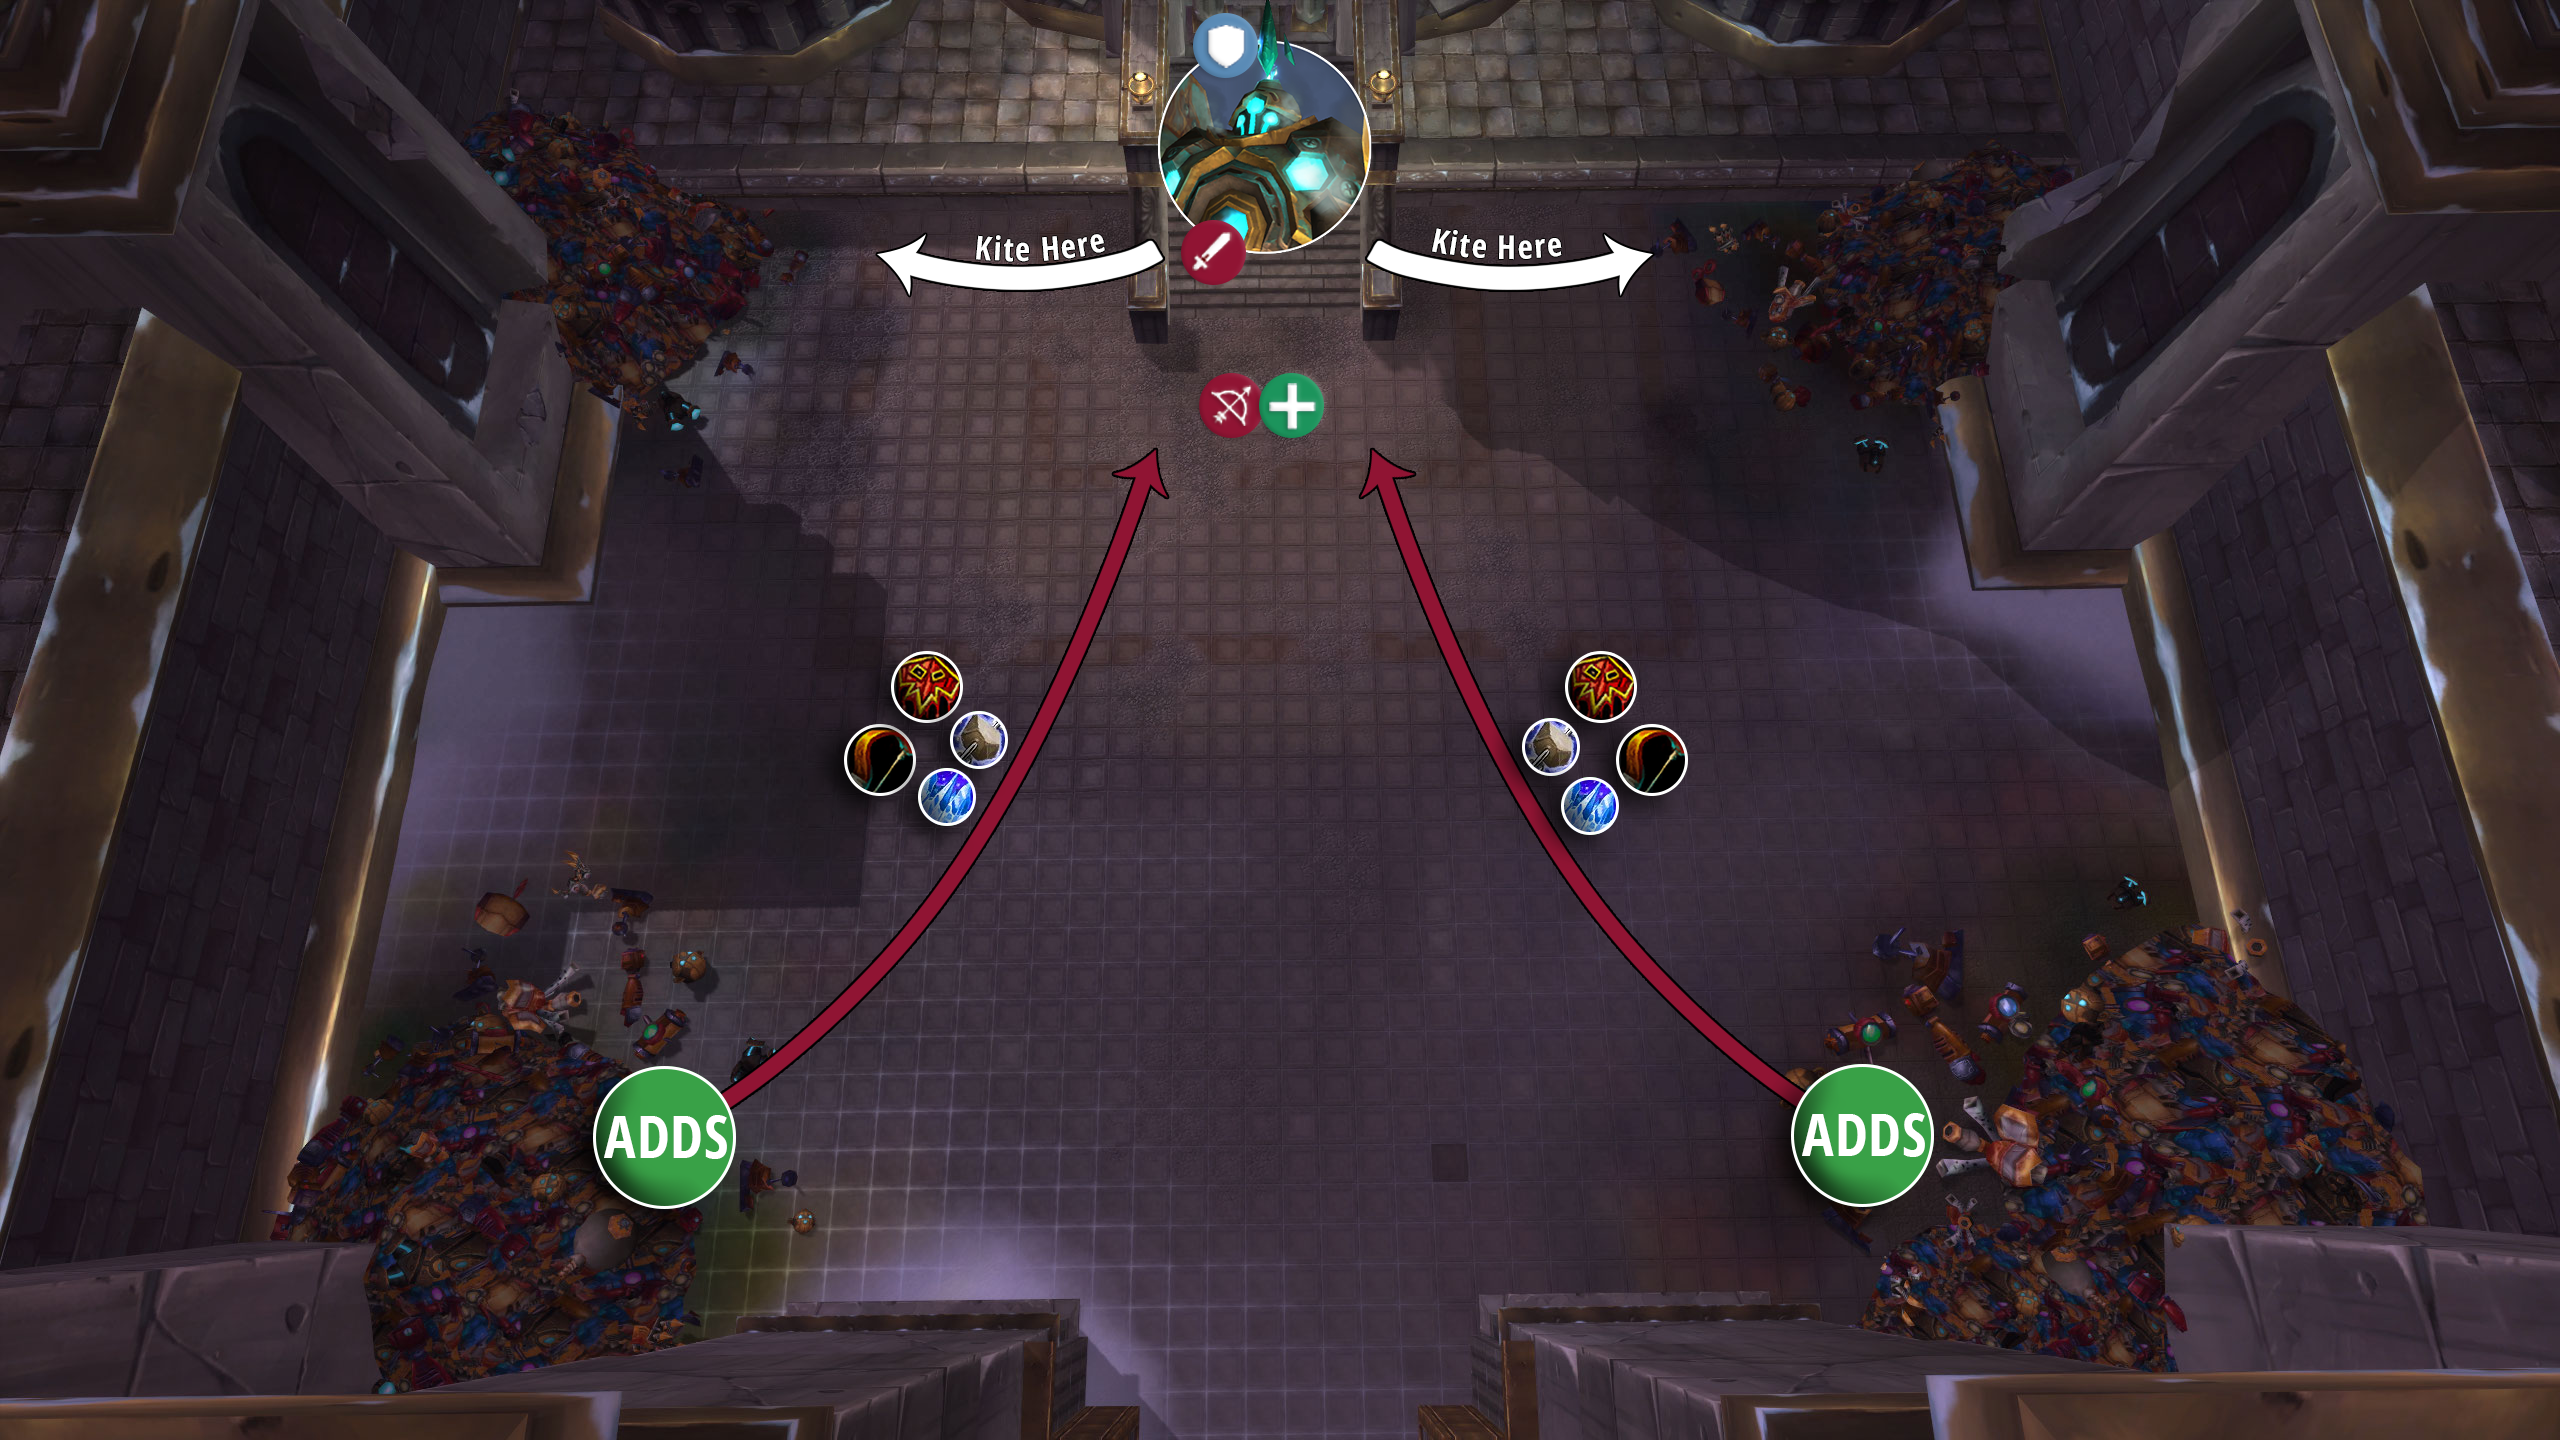
The Feral Defender begins the fight a minute after the pull with 10 stacks of Feral Essence; slaying this fierce feline expends one of these stacks causing it to revive itself 30-40 seconds later. Upon dying, the Defender will leave behind Seeping Feral Essence, a dark purple AoE ground effect that deals heavy damage every second it’s up. Tanks can’t hold this mob’s attention with threat. Instead, it leaps through the raid, attacking random targets; however, taunts, stuns, and silence all work on it, giving the raid time to blow it up without too much havoc. Remember to reposition the raid after each Defender death to avoid excessive Seeping Feral Essence damage, and be mindful of outgoing fear effects to avoid running into the pools. It is important to note that Auriaya is on a 10-minute Enrage timer; this leaves you roughly a minute and 20-second window to defeat Auriaya after her Defender is slain. Repeat the process 10 times to whittle away at those stacks, then defeat Auriaya; this achievement is yours.
Algalon’s achievements are unrelated to the overall 10 and 25-man meta achievements. While he doesn’t contribute to either of the mounts, he offers some out-of-this-world titles in return for completing the achievements below, so he is still worth checking out.
Team Achievements
- Herald of the Titans: Defeat Algalon the Observer in 10-player mode without anyone in the raid wearing equipment with an item level higher than is available in 10-player Ulduar. Getting this achievement means your raid will have to cap their iLvl and only use items available within 10-man Ulduar or from the last phase, up to and including 245 iLvl pieces.
- This achievement does not have a 25-player equivalent.
- Supermassive | Supermassive: Defeat Algalon the Observer after closing 3 Black Holes within 10 seconds. Not only will you eventually have to kill the boss, but during the fight, you will need to coordinate the closing of three Black Holes within a short time window, which means you’ll need to kite the Constellations away until you are ready to close all the holes. You’ll want to kill at least 3 Collapsing Stars before the first Big Bang, ideally clumped close together to make it easier on whoever is tanking/kiting the Living Constellations. Once you’ve accumulated enough Black Holes, you can have the off-tank, and whoever controls the Constellations leads them over the Black Holes, allowing the Constellations to eat the Black Holes, thus closing them. Classes with a taunt are beneficial for this part.
- He Feeds on Your Tears | He Feeds on Your Tears: Defeat Algalon the Observer without any raid member dying to Algalon at any point during that raid lockout period. Like The Undying, you’ll need to complete this encounter with no player deaths (just on Algalon, other bosses do not count) in a single lockout; in addition to that requirement, the group must beat the boss in one shot. If you wipe, the raid must wait until the following week’s lockout to try again. There is only a little to add to the basic strategy; essentially, everyone must execute their roles flawlessly for this to work. Our Algalon Strategy Guide outlines the fight, the boss’s abilities, and the tactics used to deal with all the damage in this encounter and is an excellent reference for this achievement.
Defeating all the bosses from the Antechamber of Ulduar (which does not include Algalon) on any difficulty will reward you with The Antechamber of Ulduar & The Antechamber of Ulduar.
Meta Achievement: Knock, Knock, Knock on Wood |Knock, Knock, Knock on Wood
This achievement is this boss’s hard mode, and starting it is as easy as clearing the trash in the conservatory without engaging the three Elders before you pull Freya.
By leaving Freya’s tree companions alive, they each buff Freya, and you’ll contend with three additional mechanics during the fight.
Brightleaf’s Essence will improve Freya and her allies with increased magic damage and allow her to cast Unstable Energy, which places avoidable beams on the ground that will harm players over time.
Stonebark’s Essence beefs up Freya’s physical damage and allows her to cast Ground Tremor, which deals physical damage to the raid and interrupts spellcasting, so spell users must be mindful of when this goes out.
Ironbranch’s Essence increases the physical damage of Freya’s minions and allows her to use Strengthened Iron Roots, which will put Iron Roots on players that will root them until killed.
Aside from these additional mechanics, the fight is the same, requiring you to kill waves of adds until you deplete Freya’s Attuned to Nature stacks.
Check out our Freya Strategy Guide for more information on handling this encounter.
Team Achievements
- Con-Speed-Atory | Con-Speed-Atory: Once you cross the threshold into Freya’s Conservatory, you’ll have 20 minutes to clear trash and beat the boss. Since the fight will take around 6 minutes, you’ll have to handle whatever mobs and Elders you want from the battle in the remaining 14 minutes. You should have plenty of time, so it should be easy if you don’t wipe it.
- Deforestation | Deforestation: Defeat 2 Ancient Water Spirits, 2 Storm Lashers, and 2 Snaplashers within 10 seconds. Success will come down to your group’s ability to maintain stuns, slows, and interrupts on the Lashers; while that happens, you’ll want to group the six adds, pop Bloodlust/Heroism, and cleave away to your heart’s content. Of course, keep an eye on their health percentages, and adjust focus as necessary. Regarding raid composition, the more players contributing to stuns and interruptions, the better.
- Getting Back to Nature | Getting Back to Nature: Defeat Freya while she is affected by 25 stacks of Attuned to Nature. The easiest way to achieve this is to keep up an Ancient Conservator for the last wave. Have an off-tank handle this extra add and play around with the mushrooms that prevent silence, and you should be able to out-DPS her extra healing. Ensure you always keep a mortal strike effect on Freya (Aimed Shot, Mortal Strike, Wound Poison, etc.).
- Lumberjacked | Lumberjacked: Defeat Elder Brightleaf, Elder Ironbranch and Elder Stonebark within 15 seconds of each other. You’ll need serious coordination for this achievement. Remember that this will exclude you from completing hard mode, as all three Elders must die. We can take two approaches: fight them in three groups with sufficient tanks and healers, or chain pull them in a specific order and AoE them down. For this second option, we will want to begin with Elder Ironbranch, who we will drag to Elder Brightleaf, mindful of the Iron Roots he casts on players- everyone should focus on these. As we reach Brightleaf, we will want to have DoT effects on both Elders while we finally get to Elder Stonebark, at which point we will start anticipating Ground Tremor. Before Tremor, we will cover damage on tanks with Divine Sacrifice and Priest’s Power Word: Shield. Once the trio is down to around 5% HP, feel free to cleave/AoE them down.
- Knock On Wood | Knock On Wood: Defeat Freya while leaving at least 1 Elder alive. This should be completed during hardmode.
- Knock, Knock On Wood | Knock, Knock On Wood: Defeat Freya while leaving at least 2 Elders alive. This should be completed during hardmode.
Meta Achievement: I Could Say That This Cache Was Rare | I Could Say That This Cache Was Rare
The hard mode/meta-achievement for this fight requires you to beat the boss within a two-minute timer. Any longer, and he will smash his rare cache. If you fail, you must wipe if you want another shot at the achievement on the current lockout.
This simply requires a slimmer margin of error as you will have to do everything possible to squeeze out as much damage from Storm Power. For an in-depth guide to this boss’s strategy, check out our Hodir Strategy Guide.
Individual Achievements
- Staying Buffed All Winter | Staying Buffed All Winter: Possess the effects of Toasty Fire, Storm Power and Starlight at the same time. This achievement will take some luck, as you’ll need to get the Storm Power buff. Once you have that, you’ll need to run to a Starlight beam that happens to be close to a Toasty Fire. It might take several lockouts for circumstances to line up for this one.
Team Achievements
- Cheese the Freeze | Cheese the Freeze: Defeat Hodir in Ulduar without any raid member being hit by Flash Freeze.
- Each player must successfully avoid the Flash Frozen mechanic. Once the larger blue rune circles disappear and the texture becomes snowy, move to those locations otherwise, you’ll turn into an icicle during Hodir’s Flash Freeze cast and fail the achievement.
- I Have the Coolest Friends | I Have the Coolest Friends: Defeat Hodir without any friendly NPC dying in Ulduar.
- If you defeat the boss quickly, this won’t be a difficult achievement. Make sure the NPCs are being freed from Flash Freeze and are healed as necessary, and this won’t take many attempts.
- Getting Cold In Here | Getting Cold In Here Team Achievement: Defeat Hodir without any raid member having more than 2 stacks of Biting Cold in Ulduar.
- Your group will need some coordination to avoid more than 2 stacks of Biting Cold. Stick near Toasty Fire, keep moving, or jump to avoid building stacks. Dispellers should be ready to help any characters under the effect of Freeze. If applicable, use any personal abilities that remove roots: Cloak of Shadows, Master’s Call, Hand of Freedom, Divine Shield, etc.
Meta Achievement: Lose Your Illusion | Lose Your Illusion
To activate this hard mode, you’ll need to clear the gauntlet in under 3 minutes; if you do this, Sif will remain and lend her abilities to the fight with Thorim. In addition to her spells, Sif will remove Thorim’s Touch of Dominion debuff; without the debuff, Thorim will deal increased damage and have a more significant health pool.
Our Thorim Strategy Guide has all the information you need to strategize and prepare for this hard mode encounter.
Individual Achievements
- Siffed | Siffed: You’ll get this achievement by passing the gauntlet’s speed check needed to start Thorim’s hard mode. Players in the tunnel will have to complete the gauntlet within 3 minutes, as doing it before Sif leaves will cause her to stay for the fight, triggering hard mode and awarding the raid the achievement. You do not need to defeat Thorim to get credit.
Team Achievements
- Don’t Stand in the Lightning | Don’t Stand in the Lightning: Defeat Thorim without any raid member being struck by Lightning Charge. During the fight, Thorim will cast Lightning Charge every 15 seconds. This ability will progressively buff Thorim’s damage and send forth a burst of nature damage over approximately 1/6th of the arena, telegraphed by sparks floating between Thorim and the arena’s edge. The entire raid must avoid each of these sparks; the achievement is yours if your group can pull it off.
- I’ll Take You All On | I’ll Take You All On: This achievement is awarded by simply completing the encounter on any mode. You need to defeat Thorim and the two mini-bosses. However, it does not matter if you are in the tunnel or the arena for the encounter; everyone in the raid will get credit for the kills.
- Who Needs Bloodlust? | Who Needs Bloodlust?: Defeat Thorim while under the effect of Aura of Celerity. Completing this achievement will invalidate your parse on Warcraft Logs. A Priest will have to Mind Control a Dark Rune Warbringer and buff their group with Aura of Celerity, which increases attack and cast speed by 20%. This buff is not raid-wide, so multiple priests/lockouts are required to get an entire group the achievement. You must have the buff active when Thorim is defeated. You will not get credit if you are killed or the priest loses control of the mob.
Meta Achievement: Firefighter | Firefighter
Initiating Mimiron’s hard mode is as easy as pressing a big red button. But beware, this button activates a self-destruct sequence that will extinguish any adventurer unable to defeat this Mechagnome monstrosity in time.
As this hard mode progresses, you will fight the components of Mimiron’s latest invention just like with normal difficulty. This time, flames will engulf the room, spreading out until they are doused with Frost Bomb (which will consequently douse your raid group if they don’t stay out of range).
Stop by our Mimiron Strategy Guide for more information on the standard encounter and details on the added hard mode mechanic.
Team Achievements
- Not So Friendly Fire | Not So Friendly Fire: Force Mimiron to kill an Assault Bot with a Rocket Strike. For this achievement, you’ll need to bring an Assault Bot below 5% but keep it alive in the transition from phase 3 to 4. You’ll need a separate tank, as the bot can hit quite hard. The raid can use spells like Chains of Ice and Hammer of Justice to slow/stun the bot, but they will quickly experience diminishing returns, so be aware.
- Set Up Us the Bomb | Set Us Up the Bomb: Defeat Mimiron without anyone in the raid being hit by Proximity Mine, Bomb Bots & Rocket Strike. The raid group can incrementally accomplish this, so you don’t have to avoid all three mechanics (Proximity Mine, Bomb Bot & Rocket Strike) in one lockout. Proximity Mine will be present in phases 1 & 3, Rocket Strike will be during phases 2 & 4, and Bomb Bots will appear in phase 3, so keep this in mind as your group decides which mechanics to focus on.
Defeating all four Keepers on any difficulty will grant you The Keepers of Ulduar or The Keepers of Ulduar.
Meta Achievement: I Love the Smell of Saronite in the Morning | I Love the Smell of Saronite in the Morning
For this achievement, you must complete General Vezax’s hard mode, letting each Saronite Vapor live long enough to form the Saronite Animus.
No additional mechanics are added to Vezax; however, because you cannot destroy Saronite Vapor and create mana-restoring puddles, the fight further limits mana usage for its duration.
It takes 4 minutes for all 6 vapors to spawn; when they join, you switch focus and kill the Saronite Animus before finishing off Vezax.
Our General Vezax Strategy Guide is a further resource for any additional questions on general strategy for this boss’s abilities and the methods used to overcome hard mode.
Team Achievements
- Shadowdodger | Shadowdodger: Defeat General Vezax without any raid member being hit by Shadow Crash in Ulduar.
- The simplest way to prepare for this achievement is to have your ranged players form a semi-circle along the center of the room, as spread as possible. This will minimize the odds of a specific player being targeted, so each Shadow Crash should impact fewer people.
- Remember that you’ll avoid Shadow Crash in any strategy for this boss; if your group is focused on the mechanic, you don’t need to follow this advice.
Meta Achievement: One Light in the Darkness | One Light in the Darkness
For one light, we will want to send down Thorim, as he will help us kill the adds in phase 3; without Titanic Storm, Immortal Guardians can quickly overwhelm the raid, causing a wipe. Our Yogg-Saron Strategy Guide thoroughly explains the different phases and each character’s unique role during the encounter.
Individual Achievements
- Kiss and Make Up | Kiss and Make Up: /Kiss Sara in Ulduar while she is angry with you. Sara will begin the fight “friendly” with the player, but once she reaches 0 hp, she will turn hostile, sneak a quick kiss, and this one is yours.
- In His House He Waits Dreaming | In His House He Waits Dreaming: For this achievement, you’ll need to experience the three brain rooms you can see when taking a portal in phase 2. This task doesn’t need to be completed in one lockout, so you can take your time with this one/slowly rotate the raid into the brain room to get everyone credit.
Team Achievements
- Drive Me Crazy | Drive Me Crazy: Defeat Yogg-Saron without anyone’s Sanity debuff reaching 0. This achievement requires everyone to avoid most mechanics, so you should try and beat the boss as quickly as possible so players have fewer opportunities to fail.
- He’s Not Getting Any Older | He’s Not Getting Any Older: Defeat Yogg-Saron within 7 minutes. You can complete this with any difficulty, and it will come down to having solid tanks and DPS who can push the brain room in one phase.
- They’re Coming Out of the Walls | They’re Coming Out of the Walls: Defeat 9 Guardians of Yogg-Saron within 12 seconds. The easiest way to complete this challenge is to start the boss with all four keepers active- you don’t need to kill Yogg for this one; just wipe and reset after killing the Guardians. Just summon enough Guardians by popping green bubbles (rare permission for all you cloud farmers out there), tank them all in the center, and burn through them with cleave, AoE, and Bloodlust.
- Three Lights in the Darkness | Three Lights in the Darkness: Defeat Yogg-Saron with the assistance of three or fewer Keepers in Ulduar. You’ll get credit during your one-light or no-light kills.
- Two Lights in the Darkness | Two Lights in the Darkness: Defeat Yogg-Saron with the assistance of two or fewer Keepers in Ulduar. You’ll get credit during your one-light or no-light kills.
- Alone in the Darkness | Alone in the Darkness: Defeat Yogg-Saron without the assistance of any Keepers. Check out our Yogg-Saron Strategy Guide for all the tactics you need to beat Yogg without help from any of the Keepers of Ulduar.
Completing General Vezax and Yogg-Saron on any difficulty will grant you The Descent Into Madness & The Descent Into Madness.
Once this wing is complete, so long as you have done all other bosses, you will get The Secrets of Ulduar & The Secrets of Ulduar.
With each lockout, you can progress on Champion of Ulduar & Conqueror of Ulduar. To get these, you’ll need to defeat each boss with no one in the raid dying. You do not need to do every boss in one week, so you can space it out once you can farm the instance.
About the Author
