- Author: Furious
- Date: August 22, 2019
- Updated: September 15, 2022
- Expansion: WoW Classic
Hello and welcome to our 1-60 horde leveling guide for WoW Classic! There are multiple ways to level up in Azeroth, but this guide will make things simple for you. The quests and grinding sessions included are sequenced to get you to level 60 as fast as possible!
This guide does use a combination of questing, grinding, and a few dungeons (skippable). It will still take you multiple days of in-game played time to finish, but you’ll get there in due time if you carefully follow each step below. Without further ado, let’s get to leveling!
Guidelines
- Race Choices – This guide is designed to be usable with every horde race. If you’re an orc or troll, this won’t require any extra work from you. Undead and tauren characters can follow this guide if you jump in at level 12. There are a few places where this affects the guide, but we’ll explain them when it happens.
- Hearthstones & Inns – Only change your hearthstone home location when indicated in the guide. You’re going to use it several times to return to specific locations. Additionally, try not to use your hearthstone unless mentioned during the guide so you have it available when needed. Whenever you’re finished with a leveling session, always try and return to an inn so you can accumulate rested experience.
- Chain Quests – WoW Classic is packed full of chain quests. Some of these are quite fun and lead to great rewards, while others are a waste of time. This guide takes chain quests into consideration and only lists chain quests that you should accept. Meaning, if a quest is not listed in the guide and you see it from a quest giver, don’t pick it up! This can cause your quest log to fill up if you take too many quests that aren’t covered.
- Grinding – Grinding is an inevitable part of your leveling journey, but fortunately there isn’t too much of it. Grinding sessions will be distributed evenly throughout the guide so you won’t ever need to spend countless hours doing it. To cut down on the time that you do spend grinding, kill every monster you see when running between quest objectives.
- Dungeons – There are multiple instances where it is recommended to run a dungeon. Dungeons are excellent sources of loot, but they also usually have quests associated with them to give you boatloads of experience. You do need to find a group, but the hassle is definitely worth it. Dungeons are all optional, but you will need to spend more time grinding to make up for it instead.
- Confused? – We tried our best to make this guide as coherent as possible, but everyone makes mistakes! If there is anything that doesn’t make sense or you can’t find something, click the link in the guide to find detailed information and locations of NPCs.
Key
- Blue text means that it is time to accept a new quest.
- Green text means that it is time to turn in a quest.
- Red text means that there is something you should do or know.
Purchase List
Throughout the guide, you will need some items to complete quests. You’ll probably need to purchase these from the auction house, but they aren’t too expensive and are well worth the experience and convenience they offer for following this guide. The level listed next to each item is when you will need it during the guide.
Purchase these items before each level listed:
- Deadly Blunderbuss – Level 26
- Shredder Operating Manual Pages (All) – Level 26
- Strong Troll’s Blood Potion – Level 34
- Frost Oil – Level 42
- Gyrochronatom – Level 42
- Patterned Bronze Bracers – Level 42
- Green Hills of Stranglethorn Pages (All) – Level 43
- Silk Cloth x15 – Level 51
- Mithril Casing – Level 54
- Thorium Bar x2 – Level 59
Level 1-12
Our guide begins in The Valley of Trials, Durotar. Both orc and troll characters naturally spawn here. If you’re a tauren or undead start the guide in the Barrens at level 12.

Level 1
- Accept your first quest: Your Place In The World. Run west and turn in Your Place In The World. Pick up the next quest: Cutting Teeth.
- Kill boars to the north and south until you reach level 2.
Level 2
- Run north from The Den. Begin hugging the mountain as you run north. Eventually you’ll come across a ramp to your left. Run straight across from it to pick up the quest: Sarkoth.
- Climb the ramp and kill the scorpion Sarkoth. Remember to loot him.
- Run back down the ramp turn in Sarkoth. Accept the next quest: part two of Sarkoth.
- Now return to The Den. Turn in Cutting Teeth and Sarkoth. You should be level 3 now.
Level 3
- Accept the quest: Sting of the Scorpid. There should be another quest available specific to your class. It simply requires you to find and talk to your class trainer.
- All trainers should be close nearby, but a few are actually inside The Den. Talk to your trainer and hand the quest in.
- Before leaving, pick up the quests: Vile Familiars and Galgar’s Cactus Apple Surprise. Run a little farther east and accept the quest: Lazy Peons.
- Run just north and stay around the area, killing any grellkin and scorpions you see. Make sure to also collect apples from the cactus bushes and wake up sleeping orcs with your blackjack when you see them.
- Return to the foreman east of the The Den and turn in Lazy Peons. You should now be level 4.
Level 4
- Turn in Sting of the Scorpid, Vile Familiars, and Galgar’s Cactus Apple Surprise.
- Accept the next quest: Burning Blade Medallion. Run back to the foreman and pick up the quest: Thazz’ril’s Pick.
- Now run all the way west to the cave guarded by grellkin. Fight your way inside and take the northern path.
- Eventually you’ll find Yarrog Baneshadow. Kill and loot him. Jump to the level just below you.
- Start hugging the wall on your left until you find another room. Inside will be Thazz’ril’s Pick. After collecting it, use your hearthstone to go back to the Valley of Trials.
- Turn in Burning Blade Medallion. You should be level 5 by now. Accept the next quest: Report to Sen’jin Village.
Level 5
- Find your class trainer and accept the quest they have for you. This will lead to another short quest later on, which you should do as soon as it is convenient. Because each class has different quests, they won’t be covered in the guide. f you are playing a Tauren or Undead character, these class quests will not be available to you. It is advised that you complete your class quests in your own starting zone before getting to the Valley of Trials, or simply skip the level 1-12 section of this guide.
- Start running east and turn in Thazz’ril’s Pick. Run through the gate and pick up the quest: A Peon’s Burden.
- From here, keep run southeast to reach Sen’jin Village. Kill any enemies you see along the way.
- In Sen’jin Village, turn in Report to Sen’jin Village. Pick up all six quests in the village: A Solvent Spirit, Practical Prey, Zalazane, Minshina’s Skull, Thwarting Kolkar Aggression, and Report to Orgnil.
- Now follow the road north to Razor Hill. Kill scorpions and anything else you see until you are at least level 6.
Level 6
- Once you get to Razor Hill, turn in Report to Orgnil. Accept the next quest: Dark Storms. Go inside the inn and set your hearthstone to Razor Hill. Turn in A Peon’s Burden before you leave.
- Go outside and pick up the quests: Encroachment, Break a Few Eggs, and Vanquish the Betrayers. Go into the large building across the inn to learn first aid.
- Run up the hill to the northwest and climb the tower to pick up the quest: Carry Your Weight. Some classes will have a simple quest to complete now, which they should do.
- Run southeast out of Razor Hill until you see a keep in the distance, killing anything in your path.
- Once you arrive at Tiragarde Keep, kill and loot all the humans you find. You also need to enter the keep and reach the main room. On the second floor, you’ll find Lieutenant Benedict. Kill him and loot his body.
- With the key you just acquired, run to the other hallway and climb the stairs to get outside. Up there you’ll find a chest to open with an envelope inside. Use the envelope to acquire the quest: The Admiral’s Orders.
- Jump off the keep and kill humans in the area until your quest is complete and you are level 7.
Level 7
- Run northwest back to Razor Hill. Remember to kill any silly enemy that gets in your way. Once you arrive, turn in Vanquish the Betrayers. Accept the next quest: From The Wreckage….
- Turn in The Admiral’s Orders. Accept the next quest: another The Admiral’s Orders. Run outside and climb the tower atop the hill again to turn in Carry Your Weight. Before leaving town, sell to a vendor to clear out your bags.
- Leave Razor Hill by running mainly east to reach the beach. Make your way into the water and find Gnomish Toolboxes at the bottom.
- Kill everything in the area until A Solvent Spirit is complete. Then run west past Razor Hill until you find some quilboars.
- Kill Razormane Quilboars and Razormane Scouts in the area until you reach level 8.
Level 8
- Head east to go back to Razor Hill. Turn in From The Wreckage…. Now leave Razor Hill by running south. You’ll need to go all the way to Sen’jin Village, killing any beasts that you see along the way.
- Once you’re near Sen’jin village, start heading west until you see some Centaurs (half human, half horse). Enter the opening in the mountain.
- Go all the way through the clearing and enter each tent you see. Find the attack plans at three different locations to finish up Thwarting Kolkar Aggression.
- Leave the clearing back the way you came. Run east to reach Sen’jin Village. Turn in Thwarting Kolkar Aggression and A Solvent Spirit. Sell to clear out your bags and buy some food.
- Run southeast from the village until you hit the water. Now you need to swim all the way to the islands in the distance.
- Once you get to Echo Isles, kill all the tigers and raptors you find. Look for piles of eggs on the ground near trees too.
- In the middle of the isles, you’ll find several buildings and a hill with Zalazane waiting on it. Kill and loot him. Pick up a skull on the ground nearby.
- If you aren’t yet level 9, keep killing trolls and tigers in Echo Isles.
Level 9
- At this point, it is actually faster just to die and resurrect at the spirit angel than it is to swim back. Either die by aggroing a bunch of trolls, or just swim back to Sen’jin Village.
- Turn in Zalazane, Minshina’s Skull, and Practical Prey. Use your hearthstone to head back to Razor Hill.
- Run out of the inn and turn in Break a Few Eggs. Sell and buy food if you need it. Leave Razor Hill by heading west to find more quilboars.
- Kill Razormane Dustrunners and Razormane Battleguards this time. Keep doing this until you finish Encroachment and you’re at least half way to level 10.
- Run north from here until you see a hut in the distance. Enter it and accept the quest: Lost But Not Forgotten.
- Now run to the goblin to your northeast. Pick up the quest: Winds in the Desert. Now run east to the harpies and pick up the sacks there.
- Return to the goblin and turn in Winds in the Desert. Accept the next quest: Securing the Lines. Now go back and kill harpies until you have just a bubble left to reach level 10.
- Run back south to reach Razor Hill. Turn in Encroachment. Sell any junk and repair your armor.
Level 10
- Do your class quest now! Go to the west gate of Razor Hill when you are done and accept the quest: Conscript of the Horde.
If you are playing a Tauren or Undead character, these class quests will not be available to you. It is advised that you complete your class quests in your own starting zone before getting to the Valley of Trials, or simply skip the level 1-12 section of this guide.
- Run out of Razor Hill’s North gate toward Orgrimmar. Once there, go to the Valley of Wisdom and pick up the quest Hidden Enemies. Turn in The Admiral’s Orders as well.
- Leave Orgrimmar to return to Durotar. Run southeast to the harpies and sacks from earlier. Run south this time until you find a cave.
- Run through the cave and kill the harpies you find there for Securing the Lines. Leave the cave the way you came.
- Run northwest back to the goblin and turn in Securing the Lines. Now run west until you reach the river, killing any raptors and scorpions you see on the way.
- Kill crocodiles until you find the amulet for Lost But Not Forgotten. Run south along the river until you it opens up into a clearing. Run east until you see the entrance to Thunder Ridge.
- Run through Thunder Ridge, killing everything you see. Keep exploring until you see Fizzle Darkstorm. Carefully kill him and loot his corpse.
- Kill enemies in Thunder Ridge until you are level 11.
Level 11
- Exit Thunder Ridge the way you came. Now run east to the little hut. Turn in Lost But Not Forgotten.
- Now run southeast back to Razor Hill. Turn in Dark Storms. Pick up the next quest: Margoz. Repair your armor now and sell any junk.
- Run northeast of Razor Hill so you are up above it. Follow the path all the way north until you find Margoz. Turn in Margoz. Accept the next quest: Skull Rock.
- Run north from here until you find a cave filled with cultists. Fight your way through the cave and loot everything.
- Once you have six collars and an insignia, try to find an orc named Gazz’uz. Kill him if you can, but he’s tough so don’t worry if you can’t.
- If you killed Gazz’uz, loot him and use the eye to start the quest: Burning Shadows. Leave the cave and run south back to Margoz.
- Turn in Skull Rock. Accept the next quest: Neeru Fireblade. Run northwest to Orgrimmar and head for Thrall.
- Turn in Hidden Enemies. Accept the next quest: another Hidden Enemies. Now go to the Cleft of Shadows.
- Turn in Neeru Fireblade and Burning Shadows (if you killed Gazz’uz earlier). Accept the next quest: Ak’Zeloth. Talk to Neeru until Hidden Enemies is done.
- Run back to Thrall to hand in Hidden Enemies. Now use your hearthstone to go back to Razor Hill.
- Run all the way west until you get to the Barrens. Turn in Conscript of the Horde. Pick up the next quest: Crossroads Conscription.
- Turn in Ak’Zeloth next to the tower. Accept the next quest: The Demon Seed. Don’t forget to pick up a stone before leaving.
- Run west until you see a way up the mountain. Climb it and fight your way to the cave. Go inside and use the stone on the altar. Avoid the rare elite here unless you have help.
- Now run back South to the road and retrace your steps to the tower where Ak’Zeloth waits. Go to him and turn in The Demon Seed. Then go back west along the road, towards Dreadmist Peak, but instead of going North, head south – killing everything you encounter along the way.
- Keep killing enemies until you need just about 200 experience to reach level 12. Enter The Crossroads and learn the flightpath. Set your hearthstone to The Crossroads now.
- Turn in Crossroads Conscription to reach level 12.
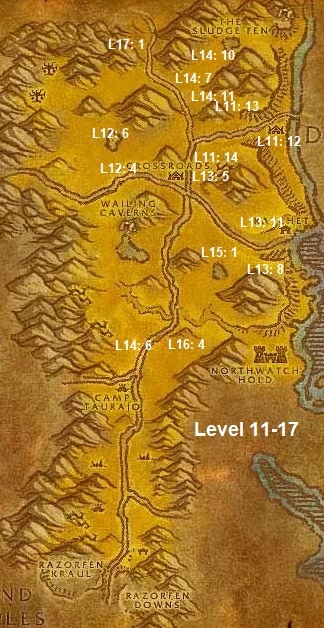
Level 12
- Pick up all of the quests available at The Crossroads. This includes: Plainstrider Menace, Raptor Thieves, Supplies for the Crossroads, Fungal Spores, The Forgotten Pools, Disrupt the Attacks, and Wharfmaster Dizzywig.
- Head out of The Crossroads and start running in a circle around it, killing any plainstriders that you see. You should also kill any raptors you see now and during other quests until you have enough heads to complete Raptor Thieves.
- Head back in to The Crossroads and hand in Plainstrider Menace. Turn it in and accept the follow up: The Zhevra.
- Now you’ll go west out of The Crossroads until you find a bunker with a quest giver that will have two quests – Kolkar Leaders and Centaur Bracers. Accept both of them. Make sure to kill any raptors and zhevra you see.
- Go north from here until you come across a few centaur camps. Ignore the tents for now, but start killing centaurs and go towards the trees. Once you see patches of blue mushrooms then you are in the right spot.
- Pick four of the mushrooms (Fungal Spores) to finish that quest, then run into the nearby lake and dive to the bottom. Look for a bubbling crack and swim over to it to finish up The Forgotten Pools.
- Now you’ll head west to find a larger building up on a small hill. Right next to it is a much tougher centaur, Barak Kodobane. He is level 16 and attacks from range with a bow. However, he does run away at low health. When there are no nearby patrols, fight and kill Barak Kodobane. If you can kill him now go for it, otherwise skip to the next step first and try again.
- Kill centaur back east around the fungal spores until you are level 13.
Level 13-24
Level 13
- After reaching level 13, go south towards the building where you picked up quests earlier. Turn in Kolkar Leaders and accept the follow up quest: Verog the Dervish.
- Now go east to make your way back to The Crossroads. Kill any zhevra if you still need them.
- Turn in The Zhevra, The Forgotten Pools, and Fungal Spores. Accept only two of the follow up quests: Prowlers of the Barrens and The Stagnant Oasis.
- Sell junk items, clear up your inventory, and buy food if you need it.
- Go north out of The Crossroads until you see a camp of quilboars to your right. Run over there and kill quilboars until Disrupt the Attacks is complete.
- From here, go south until you’re run into the east road out of Crossroads, then go east on the road towards Ratchet. Kill any raptors you see along the way.
- Learn the ratchet flightpath. In Ratchet, turn in Wharfmaster Dizzywig and take the follow up: Miner’s Fortune. In the rest of the town, accept the following quests: Southsea Freebooters, Samophlange, WANTED: Baron Longshore, and The Guns of Northwatch.
- Go south from Ratchet, closely following the coast to your left. Kill enough pirates to complete Southsea Freebooters, but don’t worry about Baron Longshore yet.
- Return to Ratchet and turn in Southsea Freebooters. Accept the next quest: The Missing Shipment. Complete this quest by talking to Wharfmaster Dizzywig.
- Pick up the next quest: another Missing Shipment. Immediately turn in The Missing Shipment. Accept the next quest: Stolen Booty.
- Now you can leave Ratchet again by heading west. Circle the cliff to your right (north) and climb up to kill prowlers for Prowlers of the Barrens.
- Once that’s finished, head back to The Crossroads and turn in all your completed quests to reach level 14.
Level 14
- Pick up new quests available to you: The Disruption Ends, Echeyakee, and Stolen Silver. Go to the south part of town to find Mankrik for two more quests to accept: Lost in Battle and Consumed by Hatred. Once you have all of those, you can pick up a timed quest: Apothecary Zamah.
- If you are playing as a tauren, fly directly to Thunder Bluff to skip steps 3-4.
- Since you aren’t tauren, you will instead need to run to Thunder Bluff. Start running south out of The Crossroads towards Camp Taurajo. Make sure to pick up the flight path.
- From here go west to enter Mulgore. Once you get to Bloodhoof Village, start heading north until you get to Thunder Bluff.
- Go to the Pools of Vision, which is located underneath Spirit Rise. Now you can turn in Apothecary Zamah. Accept the follow up quest: Serpentbloom. Go pick up the flight path and fly to Camp Taurajo.
- Go north from the camp until you find two buildings. One of them will house Mankrik’s wife. Interact with the corpse for Lost in Battle. Use your hearthstone to take you back to The Crossroads. Once you’re back in town, turn in Lost in Battle.
- Now go north out of The Crossroads until you find a hut and some Venture Co. peons. Fight your way into the hut to find a control console inside.
- Interact with the console to turn in Samophlange. Accept the follow up quest: also named Samophlange. Go outside and turn all the valves off around the nearby piece of large machinery. You need to find three; one on the back, right, and left.
- After using all three valves, go back into the hut with the control console. Turn in Samophlange and pick up the next quest: also named Samophlange.
- Head northeast from the hut until you find another goblin hut. Inside is Tinkerer Sniggles. Kill him and loot the key off his corpse. Head back to the control console again and turn in Samophlange. Pick up the last follow up quest: no surprise here, also Samophlange. Feel free to destroy your operating manual for the control console because you won’t need it anymore.
- Go south until you find some prowlers and kodo bones. You’re here to kill Echeyakee, so clear out prowlers to have an even fight. Use the Horn of Echeyakee in your bags to summon him. Kill Echeyakee and loot his body.
- Now you’ll keep going south until you find the quilboars from earlier. Now you’ll go east to find the geomancers and defenders. Kill them as you begin to head south towards a larger camp. In this camp, you need to kill Kreenig Snarlsnout.
- Once Kreenig Snarlsnout is dead, make sure to loot his body and then search around for a stack of supply crates for Supplies for the Crossroads. Go back to The Crossroads and turn in Echeyakee and Supplies for the Crossroads. Accept the follow up quest: The Angry Scytheclaws.
- Make your way to Ratchet and turn in Samophlange. Accept the next quest: Wenikee Boltbucket. Head south next to the coast again to revisit the pirates. While you’re here, look for two lockboxes. One is found close to the water and the other is further west near the mountains.
- You also need to kill Baron Longshore while you’re here, who you did ignore earlier. Pick up his head after killing him and go back to Ratchet. Turn in Stolen Booty and WANTED: Baron Longshore. Now you should be level 15 or close enough to continue. While you are still in Ratchet, pick up the quest: Raptor Horns.
Level 15
- From Ratchet, start going southwest to reach The Stagnant Oasis. Kill any centaurs you see along the way. Look for another bubbling crack in this oasis like you did for The Forgotten Pools. Swim towards it to complete The Stagnant Oasis.
- Go west to find another centaur building on top of a hill. This is where Verog the Dervish will spawn, but he won’t show up until you kill enough centaurs. There isn’t a specific amount, but eventually one will shout aloud as they die. When this happens, Verog the Dervish will appear. Slay him and don’t forget to loot his corpse.
- The Stagnant Oasis is one of the best places to grind for your level, so you’ll want to kill centaurs and turtles in the area until you reach level 16. Focus on the Kolkar Bloodchargers, but switch to Oasis Snapjaws when there aren’t any left alive. This will take you somewhere between 50 and 100 kills depending on your RNG for quest item drops and how much grinding you’ve done.
Level 16
- After reaching level 16 start heading west. Pass through The Crossroads to reach Regthar Deathgate. Turn in both Verog the Dervish and Centaur Bracers. Accept the net quest: Hezrul Bloodmark. Make your way back into The Crossroads and turn in The Disruption Ends. Also turn in The Stagnant Oasis and accept followup Altered Beings.
- Now is a great time to sell, repair, and buy any food if you need it. When you are ready to leave, fly to Camp Taurajo. Set your hearthstone to Camp Taurajo!
- When you’re finished with that, start running northeast. Continue running until you reach the Raptor Grounds, avoiding any quilboars you see along the way.
- Once you arrive at the Raptor Grounds, head towards the back of the grounds, killing any raptors that you see along the way.
- When you see a small camp with three raptors around it, you’ve reached the right spot. Kill all three raptors and look around where they were standing to find the Stolen Silver.
- At this point you probably don’t have enough horns for Raptor Horns, so continue killing raptors until you’re finished. You’ll also need 3 Sunscale Feathers as one of the requirements for The Angry Scytheclaws.
- After collecting all three sets of quest items, run north to find some guarded nests. Kill the raptors surrounding them, then use your Sunscale Feather on the nest. Do this for all three nests.
- Once finished, keep running north until you hit the Stagnant Oasis. Now head west to reach Lushwater Oasis. Kill Oasis Snapjaws until you have enough shells to complete Altered Beings.
- You also need to kill Hezrul Bloodmark while you’re still here. He patrols around the oasis and has two bodyguards with him, so try to take them both out and run away so you can fight him one-on-one. When you have a fair fight, kill Hezrul and loot his head.
- Head north and turn in Hezrul Bloodmark. Ignore the next quest for now and start running east until you get to Ratchet. Once you arrive, turn in Raptor Horns. Accept the next quest: Smart Drinks. Make sure you also pick up the quest: Deepmoss Spider Eggs. This is a good time to pick up the quest: Trouble at the Docks if you’re interested in running through Wailing Caverns later.
- Run west to get back to The Crossroads. Turn in Altered Beings. Accept just one of the follow up quests: Hamuul Runetotem. Turn in The Angry Scytheclaws. Get the next quest: Jorn Skyseer. Turn in Stolen Silver and you should now be level 17. Before leaving The Crossroads, pick up the quest: Report to Kadrak.
Level 17
- Head north from The Crossroads and follow the road until you are in Mor’shan Rampart. Turn in Wenikee Boltbucket. Accept the next quest: Nugget Slugs.
- Now go east around the mountain to reach Sludge Fen. Run north a little ways until you find a goblin shredder from which you should accept the quest: Ignition! Start running to the south towards the tower in the middle of the water.
- While you’re running, pick up any tool buckets you notice along the way because these hold the Nugget Slugs you need. Ascend the tower and kill Supervisor Lugwizzle.
- Return to the shredder to the north and turn in Ignition! Pick up the next quest: The Escape. This begins an escort, but it does take a few minutes for the shredder to actually start moving. Kill any drudgers and mercenaries you see in its immediate path.
- Eventually you will reach a ramp and the shredder will stop while two Venture Co. enemies attack you. After killing them the escort will be complete. Before leaving, make sure to collect any Nugget Slugs you need to finish that quest up.
- If you’re an orc, troll, or undead character then skip this step. Tauren characters will need to pick up the flight path for Orgrimmar. To do this, run east until you hit a river and then run north until you find a bridge. Cross the bridge and enter the gate to enter Orgrimmar. Ask a guard for help locating the flight master. Pick up the flight path, then return to Sludge Fen by exiting Orgrimmar the way you came, running south for a few minutes, then running directly west to reach Sludge Fen.
- Now go west to return to Mor’shan Rampart. Turn in Nugget Slugs. Accept the next quest: Rilli Greasygob. Run a little further north into the ramparts and turn in Report to Kadrak. Accept the follow up quest: The Warsong Reports.
- Next you’ll take a lengthy detour into Ashenvale to complete the quest you just picked up, primarily for the flightpaths you’ll pick up along the way. Follow the road north until it splits into two. Head along the Eastern route until you reach Splintertree Post.
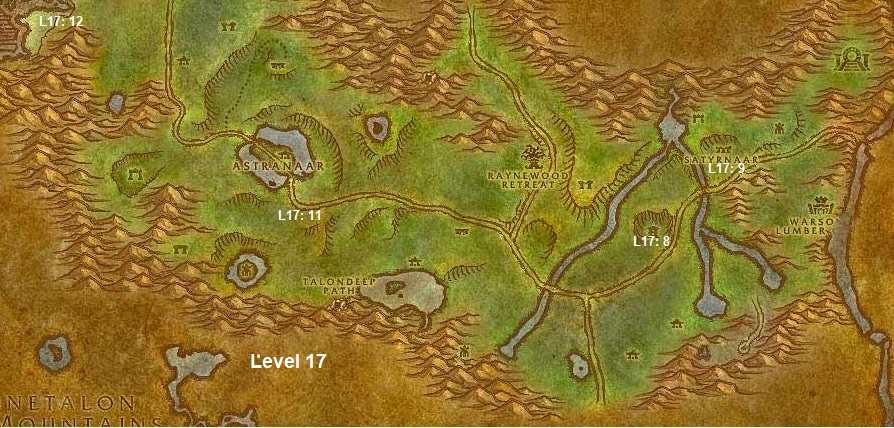
- You can find a guard to give your first warsong report to in the middle of a tower just outside the gates. Head into the outpost and learn the flightpath. Once you finish up, follow the road leading north until you reach Satyrnaar. There is another guard to give a warsong report to here, patrolling the road outside.
- Follow the road leading back to Splintertree Post. After you get there, take the road that leads back to a two-way split and this time head west across Ashenvale. Zoram’gar Outpost is on the opposite side of the zone and can basically be reached by following the road. However, an alliance city, Astranaar, is in the middle of the road so make sure to stay clear of it.
- Keep following the road west through Astranaar until it begins to curve north. Start running along the road north until you get to Maestra’s Post. From here run just a bit further north until you find a path leading to the west. At this point you can run straight west, avoiding the mountain, leading you straight to Zoram’gar Outpost.
- Give your last warsong report to the guard in the outpost. Pick up the flightpath for the area and take a flight back to The Crossroads. Now is an excellent time to sell, repair, and restock.
- Head out the west gate of The Crossroads and keep running until you get close to Stonetalon Mountains. Right before crossing zones, you’ll notice a quest giver on the side of the road. Accept the quest: Avenge My Village.
- Go northwest from here until you find Camp Aparaje. Kill tauren around the village until your quest is complete. Return to the southeast to turn in Avenge My Village. Accept the follow up quest: Kill Grundig Darkcloud.
- From here, take the road leading west into Stonetalon Mountains until you come across a road to your right. Follow the road there and enter the tauren encampment. Within the settlement is a tent with Grundig Darkcloud standing outside.
- Kill him and six Grimtotem Brutes to finish your quest. Before leaving, go back to the tent where you find Grundig. Talk to the tauren there to start the escort quest: Protect Kaya.
- Simply follow Kaya as she goes west out of the camp and south on the road. Once you are attacked by three tauren at once, ensure that all attackers only hit you or else Kaya will quickly die. Now that you’re finished, turn in Protect Kaya and Kill Grundig Darkcloud. Accept the next quest: Kaya’s Alive.
- Get back on the road and start running northwest. Eventually you’ll come across Malaka’jin. Enter the settlement and accept the quest: Blood Feeders. Exit Malaka’jin and return to the road. Keep running northwest until the road begins to point straight north.
- At this point you should head west into Sishir Canyon, which is filled with spiders and eggs. Kill enough spiders to finish up Blood Feeders and pick up enough eggs to complete Deepmoss Spider Eggs.
- If you aren’t yet level 18, continue killing spiders in the area until you are. Leave the canyon and follow the road north until it splits into two. Take the western path and follow it until you end up at Sunrock Retreat. Turn in Kaya’s Alive. Make sure to learn the flight path while you are still here.
Level 18 & 19
- Start following the road south again and follow it all the way until you are back at Malaka’jin. Turn in Blood Feeders. Use your hearthstone now to return to Camp Taurajo. Immediately take a flight to Thunder Bluff.
- When you arrive, go to elder rise and turn in Hamuul Runetotem. Accept the follow up quest: Nara Wildmane. She is inside the same tent, so run over to her and turn in Nara Wildmane. Accept the next quest: Leaders of the Fang.
- Go back to the flightmaster and take a flight to Orgrimmar. Go to the Valley of Honor and turn in Rilli Greasybob. Accept the next quest: Samophlange Manual. Now is a good time to restock, repair, and sell.
- Once you’re all caught up, use the west gate of Orgrimmar to exit. Run southwest across the river until you find the Boulder Lode Mine. Slowly fight through the mine to reach the back.
- Kill Boss Copperplug here and loot his Samophlange Manual Cover. Now make your way back out of the mine. Near the entrance, continue to kill Venture Co. enemies. When you have a Cats Eye Emerald and five Samophlange Manual Pages, you can leave the area by heading west.
- Keep running west until you reach Mor’shan Rampart again. Turn in Warsong Reports. Use your hearthstone to take you back to Camp Taurajo (or fly from Splintertree Post).
- At Camp Taurajo, turn in Jorn Skyseer. In the camp, accept two quests: Ishamuhale and Tribes at War. Proceed by exiting Camp Taurajo to the north and keep running until you find quilboar.
- Once you find the quilboar camp, kill them for their tusks and Blood Shards. When you first arrive you’ll see Water Seekers, but further north there are Thornweavers and even farther you can find Geomancers. Kill quilboar in this area until you have killed 12 thornweavers, 12 geomancers, and 6 water seekers. You’ll also need 60 tusks and 11 shards.
- When you’re finished with the quilboar slaughter, return to Camp Taurajo by running south. Turn in Tribes at War. Accept the next quest: Blood Shards of Agamaggan. Immediately hand in Blood Shards of Agamaggan.
- Take this time to clear out your bags and repair. When you’re ready to go, complete the repeatable quest: Spirit of the Wind. This will give you a speed boost for the long run ahead.
- Run directly east until you hit the mountains. When you find them, start running north along the mountains until you find Northwatch Hold. Keep running on the path leading into the hold until you reach the top of the hill. From here, you’ll need to ascend the western tower. There is a pack of three enemies inside, but once they’re killed you can find Cannoneer Smythe up top. Kill all guards and Cannoneer Smythe.
- Once you finish up with the western tower, you’ll want to head towards the eastern tower. There are also three enemies in here and another cannoneer at the top. Repeat what you did with the western tower and then leave the tower. Keep killing guards in the hold until you have 10 Theramore Medals.
- Go back down the hill and head towards the keep. Kill any enemies you find around both the outside and inside. There are four enemies inside, but you can split them into two pulls. Once they are dead, climb the tower and kill any guards that get in your way. At the top there are four guards and Captain Fairmount.
- Pick all the guards off one-by-one and then kill Captain Fairmount. Now go back down the tower and talk to the elf offering a quest at the bottom. Accept the quest: Free From the Hold. This begins an escort so follow him and keep him alive. It isn’t difficult, but he does die quickly.
- Once you reach Ratchet, the escort will be complete. You should now have several quests to turn in, including The Escape, Free From the Hold, Miner’s Fortune, The Guns of Northwatch, and Deepmoss Spider Eggs.
- After turning in quests, exit Ratchet to the west, but immediately turn and start running straight north towards the mountain. Kill a zhevra and loot their carcass. Once you have the carcass, keep running north until you find a large dead tree. Use your zhevra carcass to summon Ishamuhale and slay him.
- Now you’re headed back to The Crossroads. This is due west of your location, but there is a mountain in the way. Follow the mountain until you are on the other side, then proceed west to reach The Crossroads. Turn in Consumed By Hatred.
- Take a flight to Camp Taurajo. Turn in Ishamuhale. Accept the next quest: Enraged Thunder Lizards. Follow the main road near Camp Taurajo north until it begins to curve to the east. At this point, run just west off the road and look for a kodo named Lakota’mani.
- Kill him and pick up his hoof. From the hoof, accept the quest: Lakota’mani. Kill other Thunderheads in the area until you are finished with Enraged Thunder Lizards. Run south to return to Camp Taurajo. Turn in Lakota’mani. Turn in Enraged Thunder Lizards.
- Now take a flight to Orgrimmar. Go to the Valley of Honor once again and turn in Samophlange Manual. This should get you to level 20.
Level 20
- You should run a couple dungeons now to get some stronger equipment and experience. You have multiple quests for Wailing Caverns already, so that is your best option here. Alternatively you can also do Shadowfang Keep. Either way, do dungeons until you are level 21.
Level 21
- Change your hearthstone location to Orgrimmar! Then take a flight to Camp Taurajo. Accept the quest: Cry of the Thunderhawk. Leave the camp and kill Thunderhawks until one drops the wings you need.
- Return to camp and turn in Cry of the Thunderhawk. Accept the next quest: The Ashenvale Hunt. You should now use your hearthstone to return to Orgrimmar.
- Take a flight to Splintertree Post in Ashenvale. Turn in The Ashenvale Hunt. Accept the next quest, also named The Ashenvale Hunt. This is a simple dialogue quest. Turn in The Ashenvale Hunt again.
- Now you’ll need to take a flight to Zoram’gar Outpost on the other side of Ashenvale. Accept the quest: Naga at the Zoram Strand.
- At this point you should grind on mobs all the way to level 22. Depending on what dungeon you did, you may not need to do this at all. Kill the naga and crabs around Zoram Strand for easy experience. Save any pages of the Shredder Operating Manual that you find.
Level 22
- If you don’t have 20 Wrathtail Heads yet, continue killing the naga until you do. Return to Zoram’gar Outpost and turn in Naga at the Zoram Strand. Use your hearthstone to return to Orgrimmar. Repair your equipment, buy consumables, and store any shredder pages in the bank.
- Run out of Orgrimmar and head for the zeppelin tower to your left. Go to the top and ask the goblins which zeppelin will lead you to Undercity. Ride the zeppelin and go inside Undercity to pick up the flight path (unless you are undead).
- Leave Undercity. Follow the road leading to the west all the way into Silverpine Forest. Keep following this road for several minutes, even as it begins to curve straight south and goes over a bridge. Once you cross the bridge, you’ll soon encounter a path splitting of to your right. Follow the patch to reach The Sepulcher.
- Get the flightpath for The Sepulcher. Accept the quests: Journey to Hillsbrad Foothills and Beren’s Peril. Leave the Sepulcher and continue running along the road to the south. Follow it all the way through the mountains and keep doing so as it opens up into a clearing. Eventually the road will begin to curve east.
- You should now run east, hugging the mountain on your left to find the entrance to Beren’s Peril. Kill six of both enemy types here to complete your quest. Run south to return to the road and follow it all the way east into Hillsbrad Foothills.
- Keep running along the road until you notice a tower to your right. Approach it and accept the quest: Time to Strike. Get back on the road and keep running until you see another tower where the road splits into a north and east path. Take the north road all the way to Tarren Mill.
- Pick up the flightpath for Tarren Mill. Turn in Journey to Hillsbrad Foothills and Time to Strike. Accept all of the following quests: Battle of Hillsbrad, WANTED: Syndicate Personnel, The Rescue, Elixir of Pain, Elixir of Suffering, and Dangerous!
- Now start running southeast. Kill any bears and spiders that you see along the way. Cross the river when you get to it and keep running southeast. Soon you’ll come across Durnholde Keep. Run around the wall until you find the entrance to the south.
- Enter the keep and cross the bridge. Kill enemies around the entire keep until you find Jailor Marlgen and Jailor Eston. Pick up keys from both of them.
- Now you need to find the two prisoners and free them, Tog’thar and Drull. To find Tog’thar, follow the path near the bridge at the entrance as it curves up the hill. As you are running you should see Tog’thar in chains to the right. Drull is in a wooden house on the lower level next to the bridge.
- Once you free both prisoners, you can just start freely killing mobs in Durnholde Keep until you reach level 23.
Level 23
- Now you can leave Durnholde Keep, going northwest to make your way to Tarren Mill. Continue killing any spiders and bears that you see. Once you finally have the ichor for Elixir of Suffering, ran back to Tarren Mill.
- Turn in WANTED: Syndicate Personnel, The Rescue, and Elixir of Suffering. Clear up your inventory and repair while you’re still in town. Start running west until you hit the mountains. Make sure to kill any lions you see along the way. Run south from the mountains to find Hillsbrad Fields.
- Within Hillsbrad Fields, make your way to the smaller of two houses. Near it you should find Farmer Getz, who you should kill. After killing him, go north to find a larger house. Either around the house or inside you will find Farmer Ray. Kill him too.
- After killing Getz and Ray, you should kill farmers in the area until Battle of Hillsbrad is complete. Don’t try to kill footmen.
- Now run northeast to make your way back to Tarren Mill. Along the way and before heading into town, kill lions until you have enough blood. Enter Tarren Mill and turn in Battle of Hillsbrad. Accept the next quest: also named Battle of Hillsbrad. Turn in Elixir of Pain. Accept the next quest: also Elixir of Pain. Pick up another quest in town: Souvenirs of Death.
- Run west and south again to make your way to Hillsbrad Fields. Go to the larger house in the northern field. Look for Stanley the dog to turn in Elixir of Pain. Make sure you kill Enraged Stanley afterwards for a nice chunk of experience.
- Run south from here to the other field. Look for Farmer Kalaba and kill her. Kill at least 15 peasants, then head back to the northern field.
- Continue killing farmers in the north fields until you are just one bubble of experience away from level 24.
- Run northeast to get back to Tarren Mill. Turn in Battle of Hillsbrad. Now you will be level 24. Accept the next quest: yet again Battle of Hillsbrad. Pick up Elixir of Agony while you’re still here.
Level 24
- Now you should fly to The Sepulcher. Turn in Beren’s Peril. Use your hearthstone to return to Orgrimmar. Now is a great time to sell and buy anything you need from the auction house. Try to have 10 slot bags or better before going out to quest again.
- Get any shredder manual pages that you have stored in your bank. Get on a flight to Splintertree Post. Once you arrive, accept the quests: Satyr Horns and Stonetalon Standstill. Run southwest out of town until you find a tower.
- Enter and accept the quests: Ashenvale Outrunners and Warsong Supplies. Exit the tower and keep going along the road until you see a camp to your left. Enter it and take the quest: The Lost Pages. If you have any combinable chapters, do so now to save space. Leave the camp and run northeast to get back to Splintertree Post.
- Take a flight to Zoram’gar Outpost. Accept the quest: Vorsha the Lasher. Walk with Muglash until he stops at a brazier. When he says so, use the brazier and kill a few waves of enemies. Muglash is quite strong and won’t likely die, so let him tank damage for you. Focus the priestess on the second wave.
- Run back to Zoram’gar Outpost and turn in Vorsha the Lasher. Accept the next quests: Between a Rock and a Thistlefur and Troll Charm. Run due east until you get to Thistlefur Village – it will take a couple minutes.
- Kill the furbolgs in the area until your quest is finished. For the charms, go deeper into the village until you find a stone arch that leads to a cave. Down there, you can find chests containing the charms. Don’t do the escort quest here unless you are in a group.
- Once you finish, exit the cave and leave the village. Run west all the way to Zoram’gar Outpost. Turn in Between a Rock and a Thistlefur and Troll Charm. Ignore the next quest and take a flight to Splintertree Post.
- Run south out of town until you cross the road. Look for stealthed Ashenvale Outrunners in the area filled with slimes. They tend to hide around trees and can be targeted with the tab key.
- Once you kill 9 outrunners, go west until you see a band of orcs. Ignore the quest for now, but you will return to do it later. Keep going west to find Silverwing Outpost. Run up to the house and kill all the elves you see.
- Run back to the band of orcs and pick up the quest: Torek’s Assault. Escort Torek and keep him alive during the ambush. After you finish, kill the elves in the outpost until you are level 25.
Level 25-35
Level 25
- Once you reach level 25, leave the elven outpost and run west to reach Mystral Lake. Kill the elementals in the lake, including one named Tideress near the island found in the middle. Tideress will drop a Befouled Water Globe, which will give you a quest to accept: The Befouled Element.
- Before leaving the lake, make sure to visit the structure on the island to finish Stonetalon Standstill and kill 12 elementals. Exit the lake on the west side and keep running straight. When you notice a hill to your right, start looking around for a bear named Ursangous.
- Kill the bear and pick up Ursangous’s Paw. It will give you the quest: Ursangous’s Paw. Run northeast to get to Greenpaw Village. Avoid Silverwing Refuge! Eliminate any furbolg you see. Keep killing them until you pick up a Logging Rope. Don’t stop killing furbolgs until you are 25% of the way to level 26.
- Now run east across the river to get back to Splintertree Post. Turn in Ursangous’s Paw, Ashenvale Outrunners, Torek’s Assault, Stonetalon Standstill, and The Befouled Element. Accept just one follow up quest: Je’Neu of the Earthen Ring.
- Take a flight to Zoram’gar Outpost. Turn in Je’neu of the Earthen Ring. Use your hearthstone to return to Orgrimmar.
- Now is a good time to repair and use the auction house. Buy any shredder manual pages that you are still missing! You should also try and purchase a Deadly Blunderbuss at this time for an upcoming quest.
- Fly to The Crossroads. Accept the quest: Egg Hunt. Take a flight to Camp Taurajo. Accept three quests: Betrayal from Within, Weapons of Choice, and Mahren Skyseer.
- Exit Camp Taurajo to the South and look for silithids. Find mounds in the Field of Giants to collect 12 eggs.
- Run further south, staying close to the mountain, to reach quilboars. You need a drop from each enemy type here. Warfrenzies have the shield, Stalkers have the stabber, and Seers have the wand.
- You also need to find some named enemies here. This includes Lok Orcbane, Nak, and Kuz. Kill and loot all of their skulls.
- Near Lok Orcbane, you’ll see a thunderhawk by the name of Washte Pawne. Kill it to pick up Washte Pawne’s Feather. This gives you the quest: Washte Pawne.
- After you have all three skulls and all three pieces of quest gear, leave the area and run east to the road. Run up and down (north and south) the road to find a tauren quest giver. He has the quest: Gann’s Reclamation.
- Run southeast now until you reach Bael Modan. Go down the slope on the south side to enter. Kill any dwarves you encounter. Make your way to the other side of the excavation site to find and kill Prospector Khazgorm.
- Loot Khazgorm and start to retrace your steps out of the site. Make sure you kill 5 foremen and 15 excavators before leaving. Run northwest back to the road and find Gann again. Turn in Gann’s Reclamation. Accept the next quest: Revenge of Gann.
- Return to Bael Modan to the southeast, but go north of the excavation site to the fortress instead. Kill dwarves in the fortress until Revenge of Gann is complete and you have 1-2 bubbles of experience towards level 27.
Level 26
- Go back to the road to the west. Find Gann and hand in Revenge of Gann. Pick up the next quest: another Revenge of Gann.
- Return to the excavation site southeast and locate the helipad near the entrance. Destroy the flying machine and return to Gann on the road. Turn in Revenge of Gann.
- Follow the road north all the way to Camp Taurajo. Turn in Washte Pawne, Weapons of Choice, and Betrayal from Within. Pick up the next part of Betrayal from Within. Now take a flight to The Crossroads.
- Hand in Egg Hunt and Betrayal from Within. Take a flight to Ratchet now.
- Run south from Ratchet along the coast until you find the Tidus Stair. Turn in Mahren Skyseer. Pick up the next quest: Isha Awak.
- Keep running south next to the coast until you reach Northwatch Hold. Enter the water here and find the dinosaur, Isha Awak. Kill and loot him.
- Run north back to Mahren Skyseer. Turn in Isha Awak. Keep running north to get back to Ratchet. Wait for the boat that will take you to Booty Bay.
- When you get to Booty Bay, loot a crate on the docks near Wharfmaster Lozgil. Pick up the flightpath here. Hearthstone back to Orgrimmar. Make sure to pick up a Deadly Blunderbuss and any other shredder manual pages if you didn’t earlier.
- Now take a flight to Splintertree Post. Trade your blunderbuss with Pixel for the Warsong Saw Blades. Leave the post and run southwest until you get to the road.
- At the road, start running west until you see the camp on your left. Turn in The Lost Pages. Return to the road and keep going west.
- When the road splits into two, head north off the path to find Shadumbra. Kill her and pick up Shadumbra’s Head. Use it to get the quest: Shadumbra’s Head.
- Grind on Laughing Sisters all the way to level 27.
Level 27
- Return to the road and follow it all the way back to Splintertree Post. Stay on the road here and follow it north to get to Satyrnaar. Starting killing the satyrs here and look for Warsong Oil on the ground. If you can’t find any, look in the satyr camp to the north.
- Go back on the road south and follow it until it splits into two. Run south off the road here and look for a hippogryph named Sharptalon. Wait until it paths towards the nearby undead camp and aggro it. With it chasing you, run to the Forsaken Camp for help.
- Return to the road and follow it north back to Splintertree Post. Turn in Satyr Horns and Shadumbra’s Head. Accept the next quest: The Hunt Completed. Now immediately hand in The Hunt Completed. Follow the road out of town and turn in Warsong Supplies.
- This is probably the best time to go ahead and do Blackfathom Deeps over near Zoram Gar Outpost and it is strongly recommended that you do so. You are already on the high end of the level requirement for the dungeon and there are a lot of quests for it at the Outpost. You’ll also find at least one quest for BFD at Sunrock Retreat called Trouble in the Deeps. Another, Allegiance to the Old Gods can be found by killing mobs in the areas leading up to the entrance portal. If you complete all of the quests for BFD, you will find yourself well into your 28th level and then some and you will be bristling with really good loot. If you are determined to avoid the dungeon you can either return to Raynewood Retreat and grind on Laughing Sisters, or alternatively, head back to Satyrnaar and grind on Satyrs. Satyrnaar is closer to Splintertree Post than the retreat and the Satyrs there will not flag you in PvP.
Level 28
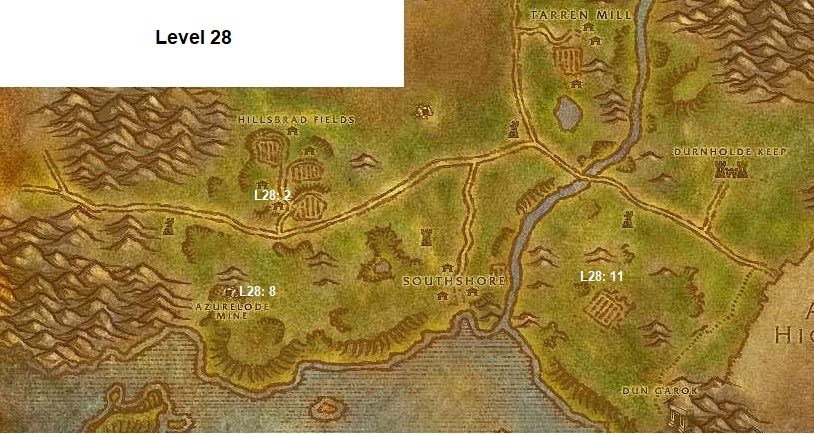
- Use your hearthstone to take you back to Orgrimmar. Use the auction house and repair while you’re here. Leave the city and take the zeppelin to Undercity. Get on a flight to Tarren Mill.
- Once you’re in Tarren Mill, run all the way southwest to Hillsbrad Fields. Now you need to go to the forge near the southfield. Kill Blacksmith Verrington and his apprentices. Pick up the crate of iron inside.
- Run northeast to return to Tarren Mill. Kill any enemies you see along the way. Turn in Battle of Hillsbrad. Accept the next quest: yet another Battle of Hillsbrad.
- Run southwest again to get back to Hillsbrad Fields. Enter the main building in the city near where the forge was. There are several enemies inside, so go slowly and kill everything you see.
- Inside the biggest room of the building, you can find Clerk Horrace Whitesteed and Magistrate Burnside. Kill them both and destroy both the Hillsbrad Town Registry and Hillsbrad Proclamation found on the floor.
- Exit the building and look for Citizen Wilkes near the forge. Kill him and any other councilmen you need for the quest. Keep killing humans here until you have 30 skulls for Souvenirs of Death.
- Run northeast to get back to Tarren Mill. Turn in Souvenirs of Death and Battle of Hillsbrad. Accept the next quest: the latest part of Battle of Hillsbrad.
- Now run southwest of the fields to find a mine across the road. Go in via the lower entrance and follow the path until it forks. Go to the right and kill every miner you see.
- Retrace your steps and go to the left side this time and kill both Miner Hackett and Foreman Bonds. When fighting Foreman Bonds, only attack him and run away from his bodyguards when he dies.
- Kill more miners to finish up the quest and exit the mine. Go back on the road and follow it to the east. Continue running along it past both splits and make your way over the large river in the middle of the zone.
- After crossing the bridge, run south until you find a bunch of gnolls in a field. You’re here for the mushrooms, Mudsnout Blossoms. Grab six of them and leave the area.
- Run west back across the bridge and follow the road as it curves north to reach Tarren Mill. Turn in Battle of Hillsbrad, Elixir of Agony, and Dangerous! Accept the two follow up quests: Elixir of Agony and Battle of Hillsbrad.
- Use your hearthstone to go back to Orgrimmar. Use the auction house and repair. Take a flight to Camp Taurajo. Pick up the quest: Melor Sends Word. Now follow the road all the way south to the Great Lift.
- Accept the quest: Message to Freewind Post. Take the elevator down to Thousand Needles. Once you’re down, run south on the road until it splits into two. Follow it to the east.
- Before the zone starts to narrow in front of you, there will be a large bluff to your right with elevators next to it. Get on the elevator and ride it up to Freewind Post.
- Turn in Message to Freewind Post. Accept the next quest: Pacify the Centaur. Pick up these quests too: Alien Egg, Wind Rider, and Wanted – Arnak Grimtotem.
- Get the flightpath before going back down. Ride down and go northwest until you see a large encampment of centaurs.
- Once you’ve killed all the centaurs needed for Pacify the Centaur, run east and follow the mountain to your left. Eventually you’ll see a way up. Follow it and enter the cave you find.
- Accept the quest: Test of Faith. After being teleported, search for a couple of planks to jump from. Make a leap of faith (you won’t die) off the mountain to return to the cave. Turn in Test of Faith. Accept the next quest: Test of Endurance.
- You should be level 29 now. If you aren’t, run west back to the centaur camp and grind until you are.

Level 29
- Run directly south from the cave to the other side of the zone. Run around mountains when you see them. When you get to the other side, look for a hole in the wall containing an Alien Egg.
- If it isn’t there, run east until you see the next mountain pillar. Run north from here to another pillar mountain behind it. Look near the southwest corner of it for an egg.
- Once you have the egg, run west along the road to get back to Freewind Post. Take the elevator up and turn in both Pacify the Centaur and Alien Egg. Accept both follow up quests: Grimtotem Spying and Serpent Wild.
- Buy more consumables, repair, and sell. When you’re ready, take the elevator down and run straight west past and around every bluff until you reach the wall of the zone. Follow it until you come to Highperch.
- Kill wyverns here and pick up eggs. Once you have 10, look for a pathway leading up to the southwest. Follow it all the way up to accept the quest: Homeward Bound.
- Escort him down to safety. Once you’re done, run east from Highperch to find Whitereach Post. Turn in Serpent Wild and Homeward Bound. Accept the follow up quests: Hypercapacitor Gizmo and Sacred Fire.
- Leave the area by running east. Enter the lake you see there and find Incendia Agave in the water and around it. Collect 10 of them and run just south to find a patch leading up to Darkcloud Pinnacle.
- Make your way up the bluff across multiple bridges until you reach a plateau with two routes to take. Kill any Grimtotem tauren you see during the next few steps. Take the southern bridge for now.
- Once you cross this bridge, run to the west to find another bridge leading to a smaller plateau. Cross the bridge and loot the note from the chest.
- Go back across the bridge and run south to find a building. Enter it to find another note in a chest. Leave the building and go to the east of the bluff to find one more bridge.
- Cross this bridge and find the last chest with a note inside. Go back across the bridge and recross the northern bridge where you originally came from.
- This time take the eastern bridge to another plateau with two routes to take. Go across the northeast bridge. Turn left and run until you find Arnak Grimtotem.
- Kill him and pick up his hoof. Talk to the friendly tauren next to him to start the escort quest: Free at Last. Walk with her and defend her as she exits the area. You’ll be ambushed multiple times.
- Follow the road and run southeast until you are back at Freewind Post. Turn in Free at Last, Grimtotem Spying, WANTED: Arnak Grimtotem and Wind Rider.
- Ride the elevator back down and run west until you find some harpies at The Screeching Canyon. Kill them until you are level 30. You can also grind on the wyverns in Highperch.
Level 30
- Follow the road northwest all the way out of Thousand Needles and into Feralas. Stick to the road until you find Camp Mojache. Learn the flightpath and take a flight to Thunder Bluff.
- Once you arrive, go to the western lift and accept the quest: A Vengeful Fate. Now go to Hunter Rise to the south. Turn in Melor Sends Word. Pick up the next quest: Steelsnap.
- Go to Elder Rise to the east. Turn in Sacred Fire. Accept the next quest: Arikara. Use your hearthstone to return to Orgrimmar. Sell and repair.
- Now you should find a group for Razorfen Kraul, while you are there, you will want to make sure to kill Charlga Razorflank to loot her heart for A Vengeful Fate. This should take you to level 31. If running the dungeon isn’t practical for you, the harpies in Thousand Needles are a good grinding alternative. If you choose to grind for the rest of that level, you will want to abandon A Vengeful Fate.
Level 31
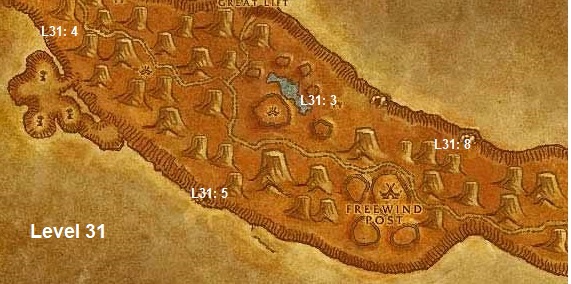
- After reaching level 31, head back to Freewind Post in Thousand Needles. Ride the elevator down and go west along the road. Stop when you reach Darkcloud Pinnacle.
- Ascend the Pinnacle until you reach the peak with a split path. Take the southeastern bridge to find a bonfire. Kill everything around it to prepare for a fight.
- Use the bonfire to summon Arikara. Kill it and loot its corpse. Cross the bridge again to return to the split path. Take the path you came from earlier to descend Darkcloud Pinnacle.
- Now run west until you get to Whitereach Post. Turn in Arikara and then head just north from the Wizlo Bearingshiner, the Goblin that gave you the quest Hypercapacitor Gizmo, until you find the cage holding the Panther. Kill any centaur and other mobs around the cage and then open it. It’s a hard fight, but at this level you should be able to solo him. Loot the gizmo and then return to Whitereach Post to turn in Hypercapacitor Gizmo.
- Now, run west to Highperch, then hug the wall on your left. Find the hyena named Steelsnap, guarded by two other hyenas. Kill her and loot her ribs.
- Turn around and start running southeast, hugging the mountain on your right. Eventually you’ll find Roguefeather Den. Go inside and fight your way to the bottom.
- Use the crates in the corner. This will spawn four waves of enemies, very difficult to do solo. Just focus on killing and looting the harpy named Grenka Bloodscreech.
- Keep killing harpies in the Roguefeather Den until you need just 4,000 experience to reach level 32.
- Leave the den and run east to find the Weathered Nook. Run up to the top and enter the cave. Turn in Test of Endurance.
- Run back down and head west to get back to Freewind Post. Take a flight to Thunder Bluff. Turn in A Vengeful Fate at the Western Lift if you didn’t abandon it. Go to Hunter Rise. Turn in Steelsnap to reach level 32. Accept the next quest: Frostmaw.
Level 32
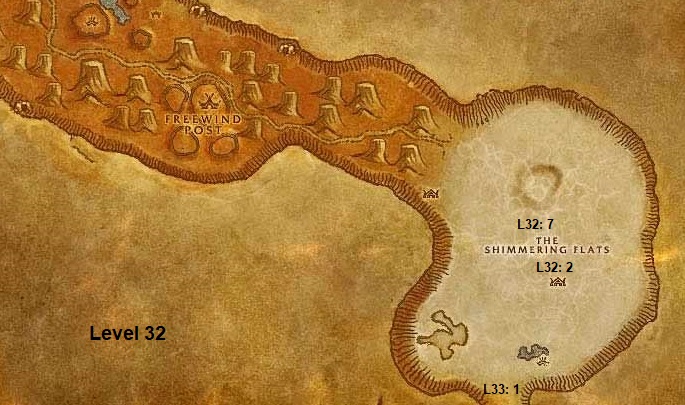
- Use the auction house, repair, and restock your consumables now. Take a flight back to Freewind Post. Ride the elevator down and start following the road east.
- Once you reach The Shimmering Flats, run southeast towards the center. Eventually you’ll find a racetrack area known as the Mirage Raceway.
- Accept all of the following quests: Wharfmaster Dizzywig, Hemet Nesingwary, Hardened Shells, Salt Flat Venom, Load Lightening, A Bump in the Road, and Rocket Car Parts.
- Run around the flats killing everything around your level that you see to finish the five quests you have here. Remember to loot your kills and pick up car parts when you see them.
- Run back to the raceway and turn in Hardened Shells, Salt Flat Venom, Load Lightening, A Bump in the Road, and Rocket Car Parts.
- Accept two follow up quests: Goblin Sponsorship and Martek the Exiled.
- Kill turtles until you have 10 Turtle Meat. Grind on enemies in the area until you are level 33.
Level 33
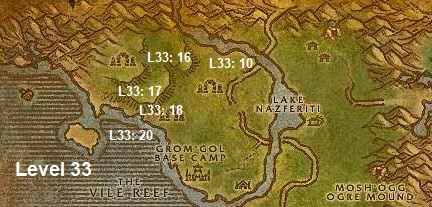
- Now run all the way to the south of the flats to find a path leading to another zone. Follow it to enter Tanaris, and keep going until you enter the town of Gadgetzan.
- Pick up the flightpath for Gadgetzan. Take a flight to Ratchet.
- Turn in Wharfmaster Dizzywig. Turn in Goblin Sponsorship. Accept the next quest: another Goblin Sponsorship.
- Now ride the boat to Booty Bay. Turn in Goblin Sponsorship. Accept the follow up quest: more Goblin Sponsorship.
- Run to the inn and accept the quest: Singing Blue Shards. Climb up and accept three more quests: Investigate the Camp, Hostile Takeover, and Bloodscalp Ears.
- Turn in Goblin Sponsorship. Accept the next quest: yet another Goblin Sponsorship. Run outside and pick up another quest: Supply and Demand.
- Use your hearthstone to return to Orgrimmar. Repair, restock, and sell any junk. When you’re ready, go outside to the zeppelin tower. Take the zeppelin to Grom’gol Base Camp.
- Accept four quests in the camp: Trollbane, Bloody Bone Necklaces, The Vile Reef, and Hunt for Yenniku.
- Keep any Green Hills of Stranglethorn Pages you find while questing in Stranglethorn Vale. Leave Grom’gol by running east until you find the road.
- Run along the road going north. Cross the first bridge you see, but stop at the second one. Now run down the hill to the north to find Nesingwary’s Expedition Camp.
- Turn in Hemet Nesingwary. Accept the quest: Welcome to the Jungle. Turn in Welcome to the Jungle.
- Pick up three quests now: Raptor Mastery, Tiger Mastery, and Panther Mastery.
- Run east to the river and kill River Crocolisks until you have 2 Large River Crocolisk Skins. Cross the river and kill Young Panthers hiding in stealth.
- Run west back across the river, then go south. Kill Young Stranglethorn Tigers in the area. Once Tiger Mastery and Panther Mastery are finished, run north back to Nesingwary’s Expedition Camp.
- Turn in Tiger Mastery and Panther Mastery. Accept the follow up quests: part two of Tiger Mastery and Panther Mastery.
- Head straight west from the camp to find a plateau with tigers and panthers for the quests you just got. Kill them until both quests are finished.
- Head to the southwest corner of the plateau and kill the raptors you see there. Once Raptor Mastery is done, run south to reach Bal’lal Ruins.
- Kill all the trolls here until Bloody Bone Necklaces, Bloodscalp Ears, and Hunt for Yenniku are finished. There are more trolls to the northeast.
- Run west now until you hit the shore. Follow it to the north and kill Crystal Spine Basilisks. Do this for 10 Singing Crystal Shards.
- Now dive into the water and look around until you find some ruins. There will be elite murlocs guarding it. There will be a tablet laying against a wall in the ruins. Dive down and pick the tablet up without drawing attention from the murlocs.
- Exit the water and head northeast until you reach Nesingwary’s Expedition again. Turn in Panther Mastery, Tiger Mastery, and Raptor Mastery. Accept the follow up quests: part two of Raptor Mastery and part three of Tiger Mastery and Panther Mastery.
- Head south through the jungle back to Grom’gol Base Camp. Before going in, if you are more than three bubbles away from level 34, then kill trolls just north of camp until you are. Otherwise, enter the camp.
- Turn in Hunt for Yenniku, The Vile Reef, and Bloody Bone Necklaces. Take a flight to Booty Bay.
- Turn in Investigate the Camp, Singing Blue Shards, Bloodscalp Ears, and Supply and Demand. Pick up the follow up to Supply and Demand – Some Assembly Required.You should now be level 34.
Level 34
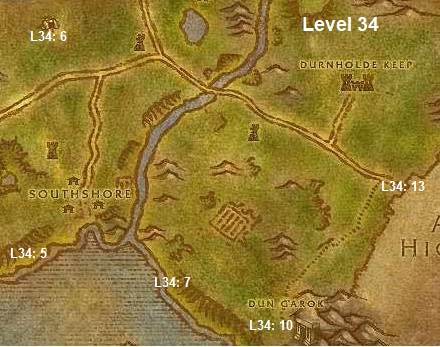
- Use your hearthstone to return to Orgrimmar. You will need a Strong Troll’s Blood Potion for this next section. Make sure to pick up cooking now so you are eligible for the quest using your Turtle Meat from earlier.
- Leave Orgrimmar and take a zeppelin to Undercity. Run inside to the flight master and accept the quest: To Steal from Thieves. Run to the Apothecarium section of the city and turn in Elixir of Agony. Accept the next quest: the next part of Elixir of Agony.
- Take a flight to Tarren Mill. Accept all of the following quests here: Helcular’s Revenge, The Hammer May Fall, Stone Tokens, Prison Break In, Infiltration, and Humbert’s Sword.
- Enter the inn and pick up the quest: Soothing Turtle Bisque. Buy a Soothing Spices from him and turn in Soothing Turtle Bisque. Make sure to set your hearthstone to Tarren Mill now.
- Run southwest out of Tarren Mill. Keep running this direction past Southshore to reach the Western Strand. Kill murlocs here to get your eyes.
- Now go northeast of Hillsbrad Fields until you find a cave of yetis. You need to loot a Helcular’s Rod from the yetis here, which will likely take several kills.
- Exit the cave and run southeast. Keep running across the road and river. Once you cross, go south to reach the Eastern Strand. Kill nagas for their scales here.
- Use your hearthstone to return to Tarren Mill. Turn in Elixir of Agony and Helcular’s Revenge. Accept the follow up quests: the next parts of Elixir of Agony and Helcular’s Revenge.
- Make sure to repair, sell junk, and buy food if you need it. The next part is quite difficult and is much easier in a group, but you can still complete it if you pull slowly and smartly. If you are unable to do it, kill yetis until you are level 35.
- Run south to the main road and follow it east over the bridge. Keep going until you reach the eastern wall. Run southwest from here to reach Dun Garok.
- Fight your way into the fortress and enter a side room. Run downstairs to pick up a Keg of Shindigger Stout. Now look for Captain Ironhill, who is either on the top floor or in the main room at the bottom of the stairs.
- Try to pull Ironhill without any additional dwarves and kill him. Keep killing dwarves in the area until both Battle of Hillsbrad and Humbert’s Sword are finished.
- Leave the fortress and run northeast through the gate to reach Arathi Highlands. Follow the road until you pass the large keep on your right.
- Run north from here to find Boulder’gor. Kill the ogres found here to finish The Hammer May Fall.
- Return to the road and go east. Keep following it past all the splits to the northeast. Keep following it to the northeast corner of the zone to reach Hammerfall.
- Pick up the flight path here. Turn in Trollbane and The Hammer May Fall. Accept the follow up quest: Call to Arms.
- Run south of Hammerfall to find Witherbark Village. Kill the trolls here for Call to Arms.
- Keep killing trolls until you hit level 35. If you loot Pendant of Myzrael from one of the trolls, stop and use it to get and complete the quest: Crystal in the Mountains. If you aren’t level 35 after completing Crystal of the Mountains, then keep killing trolls until you are. If the Pendant never drops, don’t worry about it.
Level 35
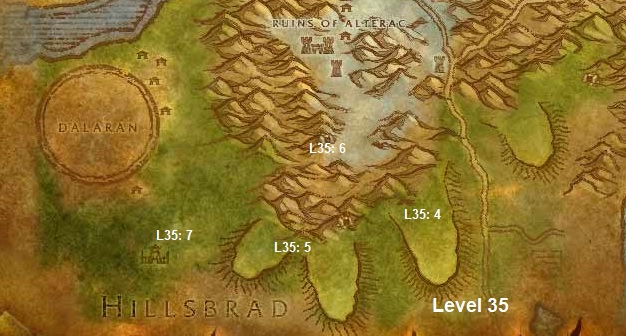
- Use your hearthstone to go back to Tarren Mill. Turn in Elixir of Agony, Battle of Hillsbrad, and Humbert’s Sword. Accept the next quests: the last parts of both Elixir of Agony and Battle of Hillsbrad.
- Enter the inn and go upstairs. Click on the rug to finish Elixir of Agony. Repair, buy level 35 food and water, and clear out our bags.
- Run mostly west and a little to the south to reach the yeti caves again. Go inside and find two braziers. Click on both of them to deactivate them.
- With both flames extinguished, exit the cave and run north. Go up the slope and then head east when you can. Run to the top of the plateau and kill the humans there. Kill them until you find a Syndicate Missive.
- Run run west around the mountain until you find a path into Alterac Mountains. Kill lions around the path to loot a Fresh Carcass.
- Follow the path to reach another cave of yetis. Go inside and find the third brazier. Use the flame. Then, use your Fresh Carcass on the flame to spawn Frostmaw. Kill and loot Frostmaw.
- Leave the cave and follow the path you came from. Head down to return to the grassy area and run west to reach the Lordamere Internment Camp.
- Kill enemies here until you have 10 Worn Stone Tokens and all bloodstone pieces. When finished, use your hearthstone to return to Tarren Mill.
- Turn in Prison Break In, Stone Tokens, and Infiltration. Accept the next two quests: Dalaran Patrols and Bracers of Binding.
- Now leave town and run south all the way to the river. Follow it until you can see Southshore. Look for the graveyard to spot Helcular’s Grave.
- Wait for the patrol of guards to be far away from the area, then hurry and use the grave to turn in Helcular’s Revenge.
- If you aren’t yet level 36, kill the humans near Alterac Mountains until you need 2,500 experience for level 36.
- Return to Tarren Mill and take flight to Undercity. Turn in Battle of Hillsbrad to reach level 36. Don’t forget to pick up the quest: Into the Scarlet Monastery while you are still here.
Level 36-43
Level 36
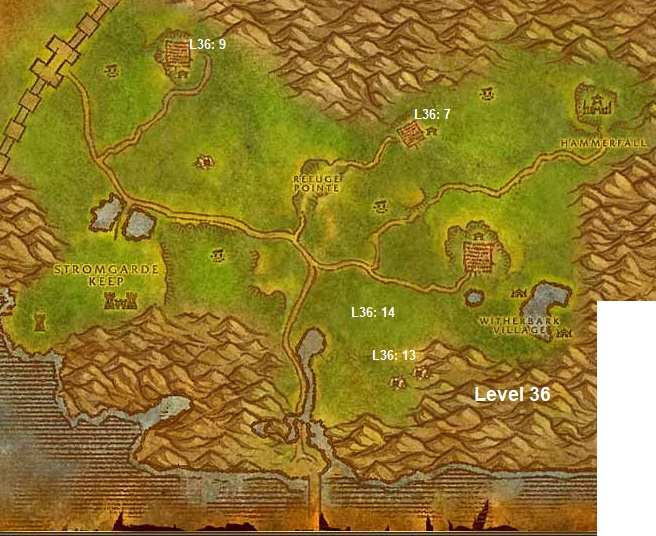
- Clear out your bags, repair, and buy food if you need it. Take a flight to Tarren Mill.
- Run west back to Alterac Mountains. Run northwest around the mountain until you find a large purple dome.
- Go towards the dome of Dalaran and kill enemies there for Dalaran Patrols and Bracers of Binding. Run southeast back to Tarren Mill (or hearthstone if it is available).
- Turn in Dalaran Patrols and Bracers of Binding. Take a flight to Hammerfall.
- Turn in Call to Arms. Accept the follow up quest: the next part of Call to Arms. Accept the quests: Foul Magics and Raising Spirits in Hammerfall.
- Before leaving, make sure to set your hearthstone to Hammerfall. Complete the artisan first aid quest if you have 225 first aid.
- Leave Hammerfall and start running west. Kill and loot any raptors along your way. Run until you reach the Dabyrie Farmstead.
- Kill the three named farmers here, Kenata Dabyrie in the house, Marcel Dabyrie in the stables, and Fardel Dabyrie in the fields.
- Run west from the farm to reach Northfold Manor. Kill humans here to collect 10 Bloodstone Amulets.
- Run east all the way back to Hammerfall. Don’t enter town until you have enough raptor eyes. Turn in Foul Magics and Raising Spirits.
- Accept the next quest: part two of Raising Spirits. Run to the northern part of town and turn in Raising Spirits. Accept the follow up quest: the last part of Raising Spirits.
- Return to where you were and hand in Raising Spirits. Accept the next quest: Guile of the Raptor. Sell junk, buy food, and repair before leaving town.
- Run south all the way to Witherbark Village, then run southwest to reach the Boulderfist Camp. Kill ogres for Call to Arms here.
- Run northwest of here to where there are raptors. Kill them for their hearts. Once finished, run east and grind until you need 10,000 experience to reach level 37.
- Use your hearthstone to return to Hammerfall. Turn in Call to Arms and Guile of the Raptor. Accept the next quest: the next part of Guile of the Raptor.
- Run to the forge and turn in Guile of the Raptor. Wait for a minute, then pick up the quest: Guile of the Raptor. Return to where you were to hand in Guile of the Raptor.
- Get on a flight to Undercity. Turn in To Steal From Thieves. Then take the zeppelin to Orgrimmar. Make sure to set your hearthstone to Orgrimmar once you arrive.
- Run to the Cleft of Shadows and accept the quest: Alliance Relations. Run to the western gate of Orgrimmar and turn in Alliance Relations. Accept the next quest: another Alliance Relations.
- Take a flight to Thunder Bluff. Run to Hunter Rise and hand in Frostmaw to reach level 37.
Level 37
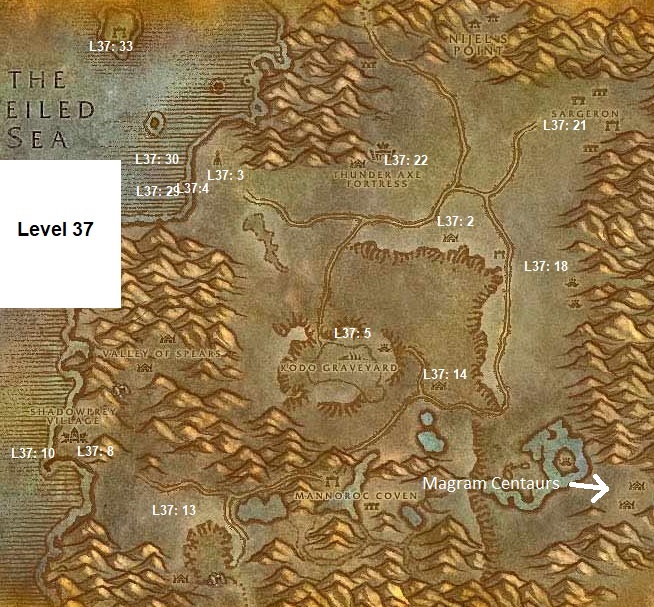
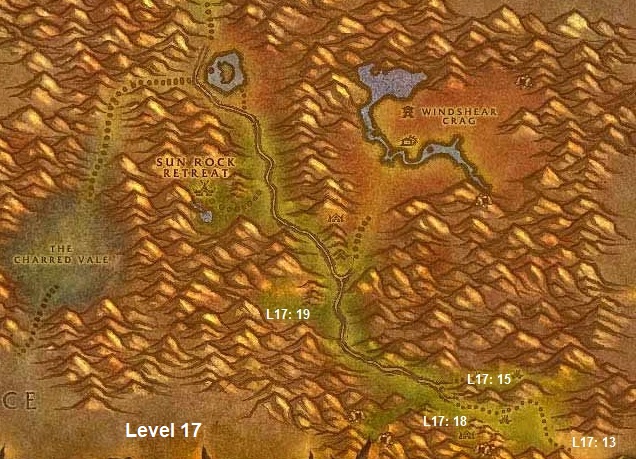
- Take a flight to Sun Rock Retreat. Take the southwest path out of the town to enter The Charred Vale. Exit to Desolace through the southwest.
- Go southeast along the road until you see Kormek’s Hut. Enter and pick up the quest: Bone Collector.
- From here, follow the road all the way west to Ethel’rethor. Accept the quest: Scepter of Light.
- Go southwest from the tower and follow the coast to find a plank with a book on it. Use it to get the quest: Claim Rackmore’s Treasure.
- Now run southeast until you find the road and follow it east, then south to Ghost Walker Post. Pick up the quests: Gelkis Alliance and Khan Dez’hepah south of the entrance.
- Run north to get the quest: Catch of the Day. Then run west and turn in Alliance Relations. Pick up the next quest: the next step in Alliance Relations.
- Accept the quest: Befouled by Satyr too. Turn in Alliance Relations. Accept the follow up quest: The Burning of Spirits.
- Run south to the road and take it all the way west to Shadowprey Village. Pick up the quest: Hand of Iruxos and Clam Bait.
- Run to the docks and accept the quest: Other Fish to Fry. Learn the flightpath for Shadowprey Village.
- Jump in the water and look for Shellfish Traps at the bottom. Loot them to collect 10 Shellfish. Once you have them, head back to the docks.
- Look for a troll by the name of Jinar’Zillen. Exchange your shellfish to get two Bloodbelly Fish. Make sure you don’t eat the fish!
- Before leaving town, make sure to stock up on food and repair. Run east along the road out of town. Keep running, past the Mannoroc Coven, until you reach the far side of the zone map. To the Southeast is a village of Magram Centaurs.
- You’re going to kill 50 Magram Centaurs now to raise your reputation with the Gelkis Centaurs. This will take you to friendly status.
- Once you’re done, follow the road northeast. Keep going until you’re nearly back to Ghost Walker Post. A little ways before, you should notice a house and some kodos to your right.
- Run over to Scrabblescrew’s Camp. Pick up the quest: Kodo Roundup. Run west to the graveyard of kodos and use your newly-acquired Kodo Kombobulator on a kodo here.
- Once your kodo is following you, head back to Scrabblescrew’s Camp. Inspect the kodo when Scrabblescrew prompts you to. Repeat this four more times to finish the quest.
- Turn in Kodo Roundup. Run back west to the graveyard and pick up Kodo Bones from the ground. Once you have 10, start running east.
- After the path stops going to the east, run south to reach Kolkar Village. Enter a tent to find Khan Dez’Hepah. Kill him and loot his corpse.
- Run west back to Ghost Walker Post. Turn in Catch of the Day and Khan Dez’hepah.
- Now run northeast to find Kormek’s Hut again. Turn in Bone Collector.
- From here, run northeast to find Sargeron. Kill satyrs here until Befouled by Satyr is complete.
- Now head west until you hit the mountains. Run south to find Thunder Axe Fortress. Go inside and assign the Burning Gem in your inventory to a hotkey.
- Kill enemies inside the fortress. Before they die, use the Burning Gem on them when they have less than 20% health.
- Fight your way inside the main room. Make your way to the center and kill everything in the room.
- Use the crystal to spawn a Demon Spirit. Kill and loot it. Exit the building afterwards.
- Fight your way to the top of the guard tower by the main gate. Kill everything in the top room and loot the rod at the top.
- Keep killing mobs until you have 15 Infused Burning Gems and a Flayed Demon Skin. Pick up the quest: The Corrupter from the skin.
- Exit the fortress and head west to go back to Ethel’Rethor. Turn in Scepter of Light. Accept the next quest: Book of the Ancients.
- Run west until you hit the water. Follow the shore south until you find a shipwreck. Dive down near the ship and loot the clams nearby.
- Once you have 10 Soft-Shelled Clam Meat, go kill the lobsters. Keep killing them for a Silver Key.
- After this, start heading north. Stop when you see nagas. You’ll need Rackmore’s Golden Key, which can drop from any naga here.
- Once the key is in your possession, start swimming northwest to the island in the distance. While you’re swimming, kill nagas you see along the way.
- After reaching Raznajar Isle, look for a chest by a tree on the east side of the island. Turn in Claim Rackmore’s Treasure.
- Run to the north part of the island and kill the nagas around the statue. Click it to spawn Lord Kragaru. Kill and loot him.
- Kill naga on Raznajar Isle until you need four bubbles of experience to reach level 38.
- Once finished, head back southeast across the water. Before leaving the coast, make sure to finish Other Fish to Fry.
- Head east back to the tower and turn in Book of the Ancients. Run southeast back to Ghost Walker Post afterwards.
- Turn in The Burning of Spirits, The Corruptor, and Befouled by Satyr. Accept the next quest: yet another Alliance Relations.
- Run south along the main road until it curves west. Keep following it until you see Gelkis Village on our left. Enter it and find Uthek the Wise.
- Turn in Gelkis Alliance. Leave the village and follow the road back to Shadowprey Village.
- Turn in Other Fish to Fry, Hand of Iruxos and Clam Bait. This should take you to level 38. If it doesn’t, head to Magram Village on the other side of the zone and kill centaurs until you are.
Level 38
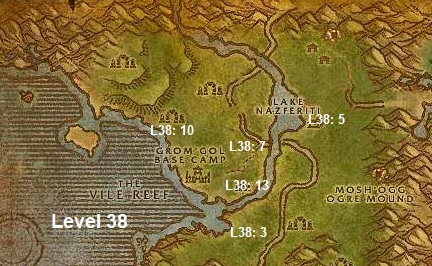
- Use your hearthstone to return to Orgrimmar. Run to the west gate and turn in Alliance Relations. Before leaving, use the auction house, repair, and clear out your bags.
- Leave the city and get on the zeppelin to Grom’gol Base Camp. When you get there, accept the quests: The Defense of Grom’gol, Headhunting, Split Bone Necklaces, and Mok’thardin’s Enchantment.
- Run southeast out of the camp until you find Shadowmaw Panthers hiding in stealth. Kill them and the tigers nearby until you Mok’thardin’s Enchantment and Panther Mastery are finished.
- From here, head northeast until you find crocodiles. Run along the river killing crocs until Some Assembly Required is done.
- Head north to find the camp of Venture Co. goons. Ascend the main structure to find Foreman Cozzle.
- Kill and loot Foreman Cozzle. Run south of the structure and enter the house. Loot the box to get Fuel Regulator Blueprints. Keep killing goons until Hostile Takeover is done.
- Afterwards run southwest across the road to find Lashtail Raptors. Finish Raptor Mastery and start heading north to get to Nesingwary’s Expedition Camp.
- If you didn’t finish Tiger Mastery earlier, make sure to do that before reaching camp. Turn in Raptor Mastery, Panther Mastery, and Tiger Mastery.
- Accept the next follow up quests: only the next parts of Raptor Mastery and Tiger Mastery.
- Head southwest now all the way to the coast. Follow it northwest until you reach the Ruins of Zuuldaia. Kill the trolls here for Shrunken Heads.
- Once you have 20, follow the coast back to Grom’gol Base Camp. Turn in Headhunting, The Defense of Grom’gol, and Mok’thardin’s Enchantment.
- Accept the next quests: Bloodscalp Clan Heads, The Defense of Grom’gol and Mok’thardin’s Enchantment.
- Run east out of Grom’gol to find the Ruins of Mizjah. Kill ogres here until The Defense of Grom’gol is done.
- Head back to Grom’gol Base Camp by running west. Turn in The Defense of Grom’gol. Afterwards take a flight to Booty Bay.
- In Booty Bay, turn in Hostile Takeover, Some Assembly Required and Goblin Sponsorship. Pick up the next quests: Excelsior, Skullsplitter Tusks and Goblin Sponsorship.
- At this point, you should get a group for Scarlet Monastery. Do all the quests for some nice experience and rewards. This will definitely get you to level 39. Alternatively, you can skip ahead to the next section and spend a longer time grinding at the end to level 40.
Level 39
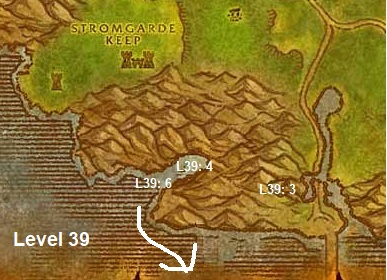
- Use your hearthstone to return to Orgrimmar. Repair and clear out your bags. Buy any missing Green Hills of Stranglethorn Pages now. If you have potions of swim speed or underwater breathing, take them out of the bank now.
- Go outside and get on the zeppelin for Undercity. Enter the city and take a flight to Hammerfall.
- Run southwest all the way to the eastern side of Stromgarde Keep. Run south and hug the cliff to your left until you see a cave. Enter the cave and follow it until you see water. Swim through the water to reach the boat.
- Pick up the quest Land Ho!. Immediately go hand in Land Ho!. Now pick up the quests: Deep Sea Salvage and Drowned Sorrows.
- Pick up a third quest now: Sunken Treasure. This begins a fairly simple escort quest. Once finished, turn in Sunken Treasure, then pick up the followup, Sunken Treasure.
- Swim west and look for some shipwrecks in the water. Use your swim speed and/or underwater breathing potions now.
- Dive down to the sunken ships. You’ll need to collect the charts and logs from both ships. Both logs are guarded by three nagas.
- After collecting all four items in the ships, equip your Goggles of Gem Hunting. Collect 10 Elven Gems using the yellow dots on your minimap as guidance. Kill any nagas you see if Drowned Sorrows is not finished.
- Head east back to Faldir’s Cove. Turn in Drowned Sorrows, Sunken Treasure, and Deep Sea Salvage. Accept the follow up quest: another Sunken Treasure.
- Immediately turn in Sunken Treasure. Accept the next quest: the next step in Sunken Treasure.
- Swim south out of the cove until you reach Wetlands. Now run southeast until you hit the road. Follow the road all the way south to Dun Algaz.
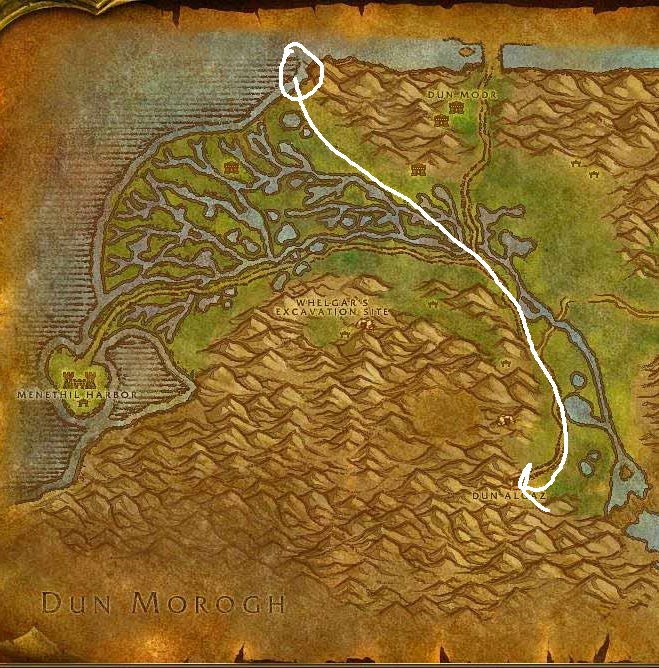
- Through Dun Algaz, enter Loch Modan. Once in Loch Modan, run southwest until you find The Loch. Run south of The Loch to find the path to Badlands.
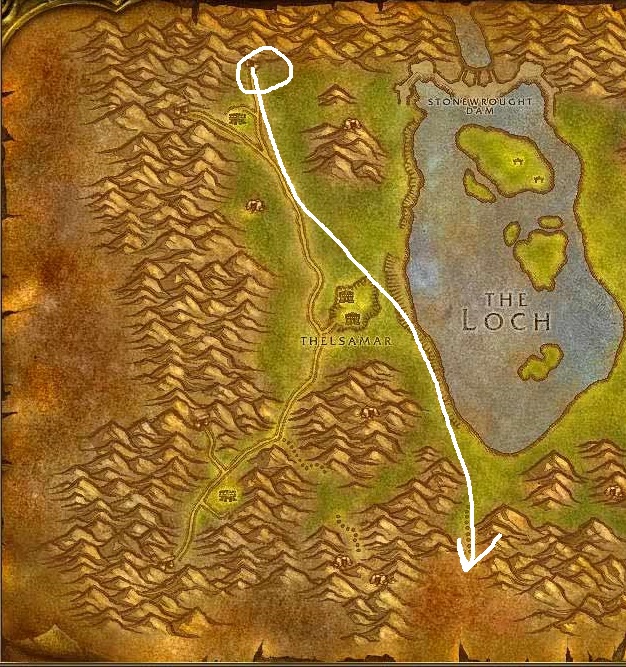
- Once in Badlands, go south and hug the mountain to your right. Continue following it as it curves to the west.
- Stop off when you see a camp of gnomes. Pick up the quest: Study of the Elements: Rock. Keep heading west afterwards.

- On the way west, kill all the elementals you see. Eventually you’ll arrive at Kargath. Pick up the flightpath here.
- Return east to the Lesser Rock Elementals and kill them until you reach level 40.
Level 40
- Run northeast to the gnome camp and turn in Study of the Elements: Rock. Use your hearthstone to return to Orgrimmar.
- If you have enough gold, learn riding training and buy a mount! This will make leveling much smoother. Anytime you need to travel, ride your mount!
- Repair, buy consumables, and sell your junk. Once finished, go outside and take the zeppelin to Grom’gol Base Camp.

- Head north from Grom’gol until you find a hill in between two ruins. Atop it is Sin’dall. Kill and loot Sin’dall.
- Head northeast from here to reach Nesingwary’s Expedition Camp. Turn in Tiger Mastery. Run east across the river to reach the road.
- Ride along the road all the way north to Duskwood. Follow the road as it goes north, then turn east and continue following it. Avoid Darkshire.

Stanglethorn Vale To Deadwind Pass 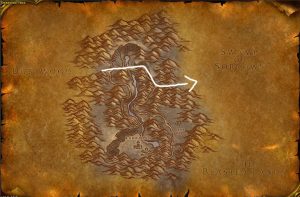
Deadwind Pass To Swamp Of Sorrows - Run out of the east side of Duskwood along the road to reach Deadwind Pass. [BE CAREFUL IN THE PASS The mobs here are higher level, but can be avoided if one is careful.] Continue on the road, through the pass, until you reach the Swamp of Sorrows where the road will split in two.
- Take the right path (southern) and follow it into the city of Stonard. Take the flightpath here. Only take the following quests: Lack of Surplus, Neeka Bloodscar, and Pool of Tears.
- Head north from Stonard to find a smaller island. Kill things in the area until you find Noboru the Cudgel.
- Kill Noboru and loot him for his cudgel. Use it to start the quest: Noboru the Cudgel. Keep killing in the area until Lack of Surplus is done.
- Go west now to reach the Harborage. Turn in Noboru the Cudgel. Pick up the quest: Draenethyst Crystals.
- Turn around and run east, hugging the mountain on your left. Keep going until you arrive at Fallow Sanctuary. Collect the six crystals you need here.
- Then run east to a wrecked caravan. There is a quest here, but first run southwest and kill all of the Lost One enemies you see.
- Head back northeast and accept the escort quest: Galen’s Escape. Let him soak all the damage.
- After the escort, run southwest to a tent. Enter the tent and use the strongbox to turn in Galen’s Escape.
- Leave the tent and head all the way west until you reach the Harborage again. Turn in Draenethyst Crystals.
- Now head southeast to Stonard. Once you get there, go east to reach the Pool of Tears.
- Dive into the water and collect the artifacts scattered across the floor. Once you have 10, exit the water and go southeast until you find Misty Reed Post.
- Turn in Lack of Surplus. Pick up the next quest: another Lack of Surplus. Now head northwest to get back to Stonard.
- Turn in Pool of Tears, then take a flight to Kargath. Turn in Neeka Bloodscar. Accept the next quest: Report to Helgrum. Pick up the quest: Coyote Thieves too.
- Head for the inn and accept the quests: Broken Alliances and Badlands Reagent Run. Repair, sell junk, and buy food if needed.
- Head northeast, hugging the mountain to your left. Kill any buzzards and coyotes that you see. When you see the gnome camp, pick up the quest: Study of the Elements: Rock.
- From here go east. When you hit a mountain, go around it to the south side to turn in Martek the Exiled. Take the next quest: Indurium.
- While you’re still here, accept the quests: Barbecued Buzzard Wings and Power Stones.
- Head south from here until you see troggs in Agmond’s End. Kill them until Indurium is finished.
- Keep going south after you’re done until you hit the mountains. Follow it to find Theldurin the Lost. Pick up the quest: Solution to Doom.
- Now run west from here to find Mirage Flats. Kill and collect everything you see here. You need 3 Large Stone Slabs and 5 Rock Elemental Shards.
- Once your quests are done, keep grinding on the elementals here to reach level 41.
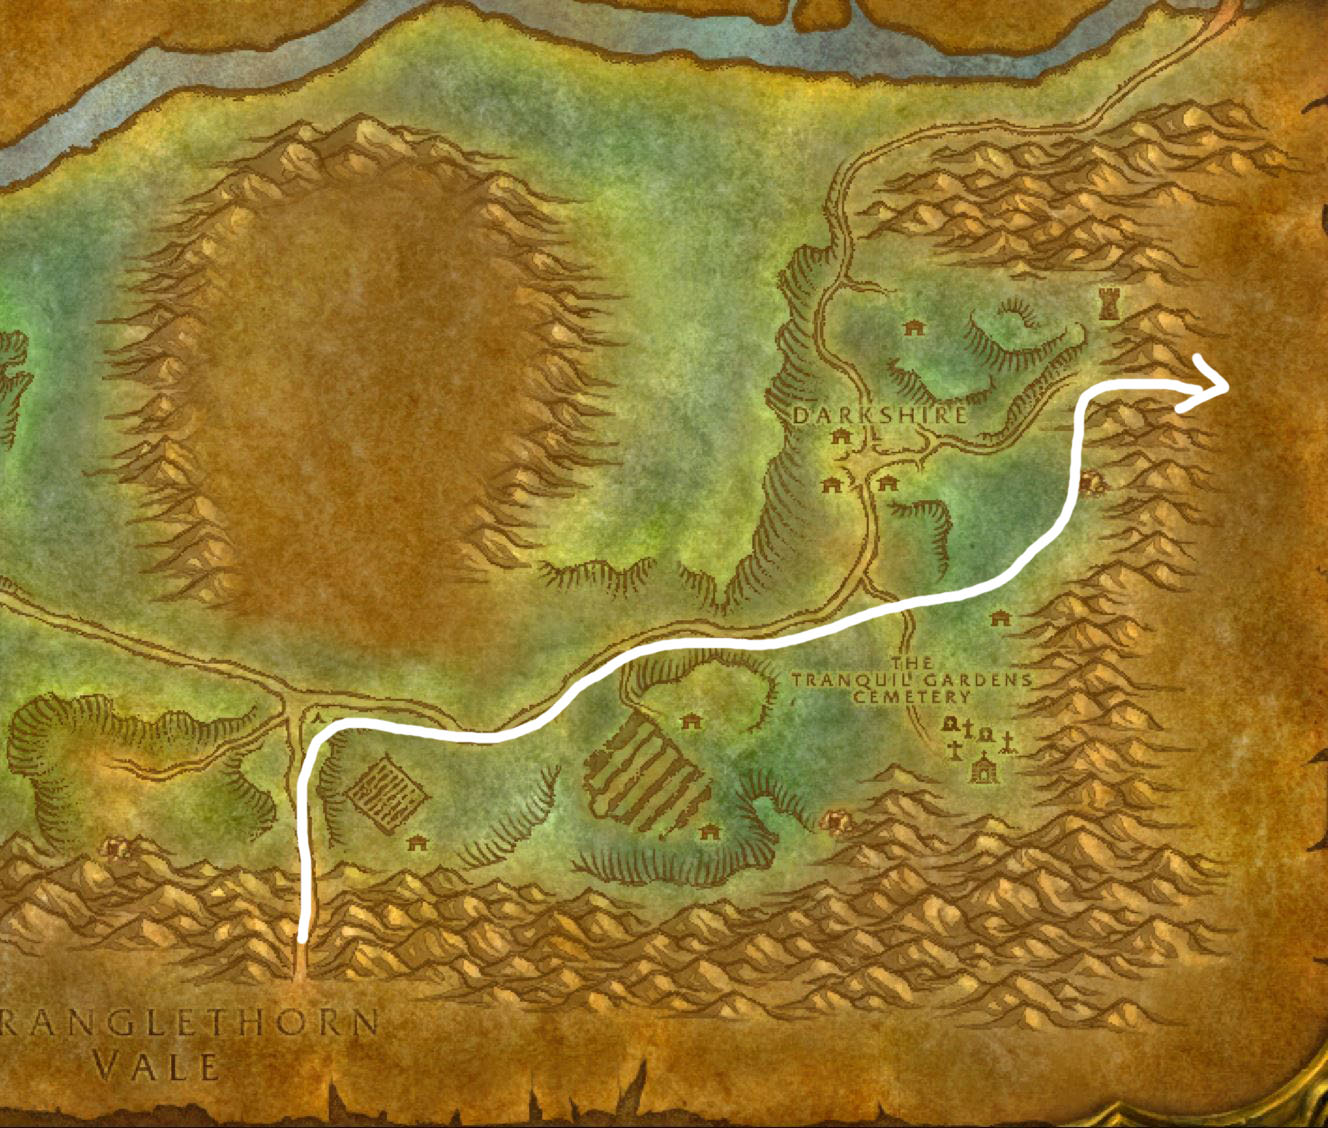
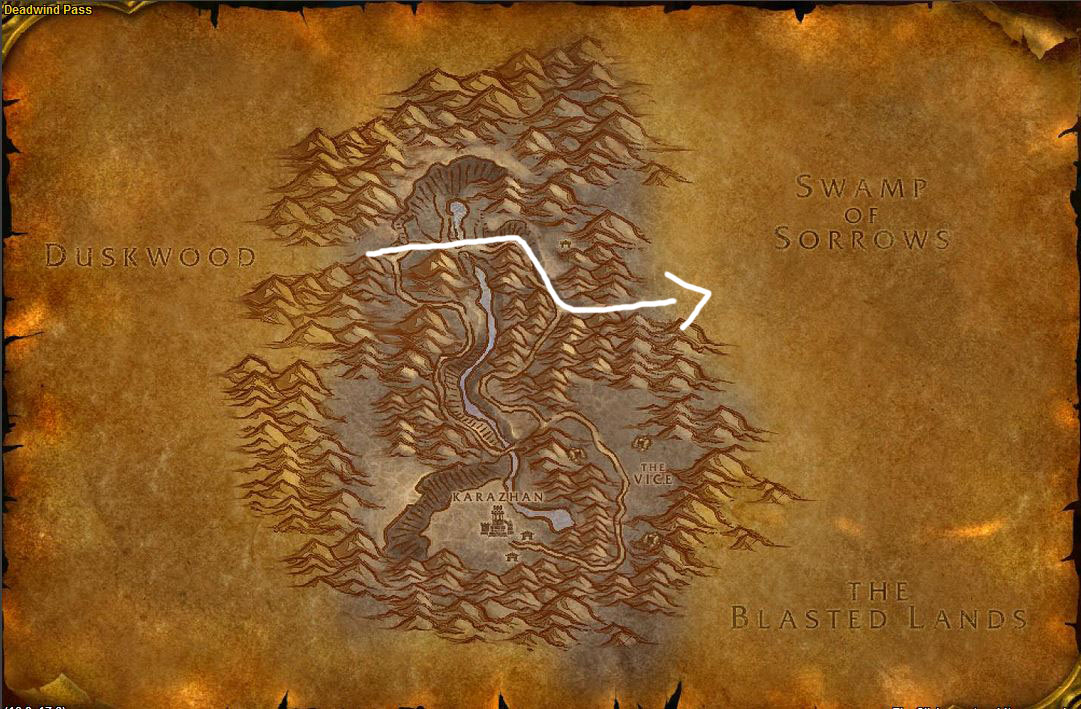
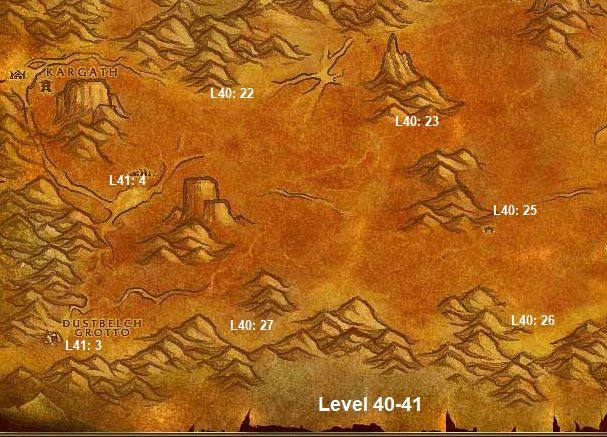
Level 41
- From the elementals, head northwest around the mountain until you find a bunch of buzzards and coyotes. Kill everything you see here.
- Once you have 30 Coyote Jawbones and 10 Crag Coyote Fangs, go southwest and look for some ogres.
- Find an ogre named Boss Tho’grun. Pull him when isn’t near his bodyguards. Kill and loot him.
- Now go north until you reach Apocryphan’s Rest. Kill buzzards to finish Barbecued Buzzard Wings and Badlands Reagent Run.
- Head east from here to get back to Martek the Exiled. Turn in Barbecued Buzzard Wings and Indurium. Pick up the next quest: News for Fizzle.
- Go northwest back to the gnome camp. Turn in Study of the Elements: Rock. Pick up the next quest: the next part of Study of the Elements: Rock.
- Now go west all the way back to Kargath. Turn in Badlands Reagent Run, Coyote Thieves, and Broken Alliances.
- Unfortunately your best choice now is to grind all the way to level 42. Fortunately, there are several great spots in Badlands. Head just east to the elementals, go further northeast to the dwarves, or go southeast to the troggs.
Level 42

- Use your hearthstone to return to Orgrimmar. Before you leave, make sure to acquire a Frost Oil, Patterned Bronze Bracers and Gyrochronatom. You’ll need these for quests during level 43 and won’t return to Orgrimmar for a while.
- Leave the city and take a zeppelin to Grom’gol Base Camp. Take a flight to Stonard.
- Turn in Report to Helgrum. Pick up the quest: Fresh Meat while you are here.
- Leave Stonard and heard northeast to find Sawtooth Snappers. Kill them to collect six claws.
- From here head south until you reach Misty Reed Post by the coast. Turn in Lack of Surplus. Take the next quest: Threat From the Sea.
- Immediately turn in Threat From the Sea. Accept the follow up quest: the next part of Threat From the Sea.
- Run south east to the shore. Kill all 30 of your murlocs along this shore. Flesheaters can be found further north.
- After killing flesheaters, go north to find Monstrous Crawlers. Collect the last of your legs for Fresh Meat here.
- Head south back to Misty Reed Post. Turn in Threat From the Sea. Take the next quest: another step in Threat From the Sea.
- Immediately turn in Threat From the Sea. Pick up the next quest: Continued Threat.
- Go northeast back to the shore and kill murlocs again. You can find oracles underwater further north.
- Once finished with Continued Threat, return to Misty Reed Post. Turn in Continued Threat.
- Head west to get back to Stonard. Turn in Fresh Meat. Get on a flight to Kargath.
- Go southwest out of Kargath until you see Greater Rock Elementals. Collect the five bindings you need here.
- Run east of here and kill Lesser Rock Elementals until you need 10,000 experience to reach level 43.
- Head north to the gnome camp and turn in Study of the Elements: Rock. Pick up the quest: Coolant Heads Prevail.
- Immediately turn in Coolant Heads Prevail. Pick up the following quest: Gyro…What? Immediately turn in Gyro…What?
- Pick up the next quest: This is Going to Be Hard. Immediately turn in This is Going to Be Hard.
- Once again take the next quest: the next part of This is Going to Be Hard. Immediately go hand in This is Going to be Hard.
- While you’re still here, get the quest: Stone is Better than Cloth. Immediately hand in Stone is Better than Cloth to reach level 43.
Level 43
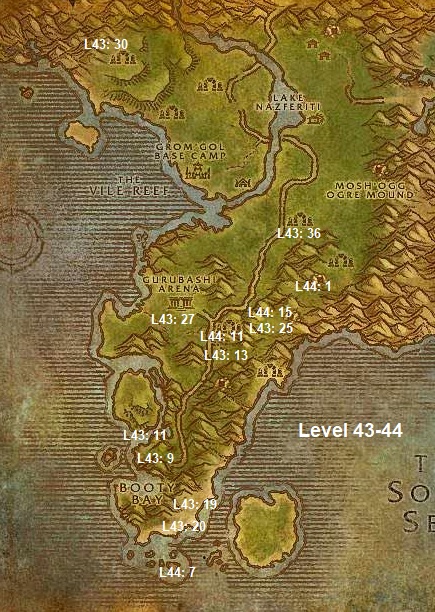
- Now pick up the quest: the next step for This is Going to Be Hard. Kill the elemental that spawns and loot it. Turn in This is Going to Be Hard.
- Remember to equip the trinket, Nifty Stopwatch! It will increase run speed by 40% for 10 seconds, but does have a 30 minute cooldown.
- Now go west to make your way back to Kargath. Take a flight to Booty Bay.
- Turn in Sunken Treasure. Go to the inn and pick up these quests: Tran’rek, Zanzil’s Secret, and Venture Company Mining.
- Make sure to set your hearthstone to Booty Bay while you’re still here. Leave the inn and go towards the bank to pick up the quest: Akiris by the Bundle.
- While you’re here, check for any Green Hills of Stranglethorn pages you are missing on the auction house.
- Now go up a level on the docks to enter a house and pick up the quests: Scaring Shaky and Stoley’s Debt from “Sea Wolf” MacKinley.
- Make your way to the northern exit of Booty Bay. Pick up one more quest: The Bloodsail Buccaneers.
- Go through the exit and head west. Eventually you’ll find some pirates and tents. Kill the pirates and use the Bloodsail Correspondence to turn in The Bloodsail Buccaneers.
- Accept the follow up quest: part two of The Bloodsail Buccaneers. Leave the camp by running northwest across the bridge. Follow the coast until you reach the nagas.
- Kill naga here to complete Akiris by the Bundle. Head southeast back along the coast and over the bridge.
- Run east towards the entrance of Booty Bay, but head north once you reach the road.
- When you see gorillas on the right, head over there and kill them. Stay here until Scaring Shaky is finished.
- Head back towards the road and follow it south into Booty Bay. Turn in Scaring Shaky. Accept the next quest: Return to MacKinley.
- Make your way towards the inn and turn in The Bloodsail Buccaneers. Accept the follow up quest: the next part of The Bloodsail Buccaneers.
- Head up the docks and turn in Return to MacKinley. Accept the next quest: Voodoo Dues.
- Go to the inn and hand in The Bloodsail Buccaneers. Accept the next quest: another step in The Bloodsail Buccaneers. Pick up the quest: Up to Snuff while you are in the area.
- Head towards the exit again, but before leaving, go to the forge. Accept the quest: Keep an Eye Out.
- Now go out the exit to Booty Bay and head east this time. Kill any pirates you see and go to the northernmost pirate camp.
- Search for a clickable map and chart on the ground. If they aren’t here, head south and check the boat. If not there, keep running south to reach a larger pirate camp. Pull this camp slowly. Look for the map and chart here.
- Once you have the map and chart, kill all the pirates you can find. Once The Bloodsail Buccaneer, Up to Snuff, and Keep an Eye Out are finished, you can use your hearthstone to return to Booty Bay.
- Run upstairs and hand in The Bloodsail Buccaneer and Up to Snuff. Accept the next quest: the last part of The Bloodsail Buccaneer.
- Make sure you have all your Green Hills of Stranglethorn pages now. Repair, buy consumables, and sell junk.
- Head towards the exit of Booty Bay. Turn in Keep an Eye Out before leaving. Run out of the gates.
- Follow the road north for quite a while north until you see the Ruins of Jubuwal on your right. From here, go northeast to find a path up with Venture Co. goons.
- Go along the path, killing the goblins to finish Venture Company Mining. Return to the road and keep going west across it.
- After crossing the road, you should find raptors surrounding Gurubashi Arena. Kill them to collect 10 Jungle Stalker Feathers.
- Now run north, swimming across the water, to reach Grom’gol Base Camp. Hand in Mok’thardin’s Enchantment. Accept the follow up quest: the next step in Mok’thardin’s Enchantment.
- Follow the shore northwards to locate an Elder Saltwater Crocolisk. Kill and loot it for an Elder Crocolisk Skin.
- Go northwest now until you see a back way into the troll ruins. Follow it to find Nezzliok the Dire and Gan’zulah . Kill and loot them both to get their heads.
- Leave the ruins and go east towards Nesingwary’s Expedition Camp. Turn in Raptor Mastery. Accept the quest: The Green Hills of Stranglethorn.
- Accept all four of the following quests: Chapter I, Chapter II, Chapter III, and Chapter IV.
- Immediately turn in Chapter I, Chapter II, Chapter III, and Chapter IV. Now hand in The Green Hills of Stranglethorn.
- Now go south back to Grom’gol Base Camp. Find the cauldron next to Nimboya and click it to turn in Bloodscalp Clan Heads.
- Pick up the next two quests: Speaking with Nezzliok and Speaking with Gan’zulah. Sell junk and repair before leaving town.
- Head southeast and cross the river. Keep going until you find ruins with trolls. Kill all of the trolls you see. Head to the camp and click on the skull to pick up the Ziata’jai Trophy.
- From here, there is a path leading to the east it. Go along it to access Balia’mah Ruins. Fight your way to the camp in the center to get the Balia’mah Trophy from the skulls.
- Go southeast from here to get to the Ruins of Zul’Mamwe. Here you can find another set of skulls containing the Zul’Mamwe Trophy.
- Keep killing trolls in the ruins until Skullsplitter Tusks and Split Bone Necklaces are both finished. Continue grinding here until level 44.
At this point, you’re probably going to want to do a dungeon to pad out your xp and get closer to the next level before continuing. Otherwise, you’ll find a number of the quests in the next section to be a bit overwhelming. There are a few options for which dungeon you can go to, but Razorfen Downs is probably the most give for your gold, especially if you’re Horde, as getting there will be convenient. Almost all of the quests for RFD can be acquired either from Varimathras in Undercity, if you are Horde, or Archbishop Benedictus in Stormwind if you are Alliance. The rest are picked up from NPCs just outside RFD’s entrance, or inside the dungeon itself. Good luck.
Level 44-50
Level 44
- Now find the main path through the Ruins of Zul’Mamwe until it ends in a cave. Enter the cave and kill Ana’thek the Cruel. He has two bodyguards, so consider focusing him first, looting, and then running away.
- Kill any remaining trolls that you need for Speaking with Gan’zulah. Then head directly northwest and across the river to get back to Grom’gol Base Camp.
- Hand in Split Bone Necklace. Use the cauldron and turn in Speaking with Gan’Zulah and Speaking with Nezzliok. Accept the next quest: The Fate of Yenniku.
- Immediately hand in The Fate of Yenniku. Accept the follow up quest: The Singing Crystals. Take a flight to Booty Bay.
- Turn in Skullsplitter Tusks. Run outside and turn in Excelsior. Head down to turn in Venture Company Mining.
- Exit Booty Bay via the north exit and head east to the Wild Shore. This time you need to swim out to the pirate ships in the water and kill the captain aboard all three of them.
- Pull slowly and fight your way through each ship to the captain. The hardest is Fleet Master Firallon. Try to save long cooldowns and potions for him.
- Keep an eye out for Cortello’s Riddle on the ground on the bottom of each ship too. This contains Cortello’s Riddle. Use it to begin the quest: Cortello’s Riddle.
- Once you’ve cleared all three ship’s captains and picked up the riddle, head west back to the shore. Go northwest to get back to the road.
- Follow the road northeast and return to Mistvale Valley. Kill gorillas until you get a sinew.
- Jump back onto the road and go north to arrive at the Ruins of Jubuwal. Slowly kill everything around Jon-Jon the Crow. Once you can fight him with just one extra enemy, do so and loot his corpse.
- Continue behind Jon-Jon to find Maury ‘Club-Foot’ Wilkins. Pull and focus one of his adds until they die. Run away to reset him and eat to restore your health. Repeat this until you can fight him alone. Kill Maury and loot him.
- Return west back to the road. Follow it south and go east at the first opportunity. Continue along the path as it goes south to reach the Ruins of Aboraz. Fight through it to find Chucky ‘Ten Thumbs’. Kill and loot Chucky.
- Stay in the area and kill trolls until Zanzil’s Secret is finished. Return the road to the west once finished.
- Follow the road to the north. Keep going past the Ruins of Jubuwal and then immediately head east. Follow the path to reach Crystalvein Mine.
- Kill the basilisks here to collect three Pulsing Blue Shards. Use your hearthstone to return to Booty Bay once finished.
- Hand in Zanzil’s Secret. Run upstairs and turn in The Bloodsail Buccaneer. Go outside to turn in Voodoo Dues.
- Get on a flight to Stonard. Take the western road out of Stonard until it splits. Follow the northern path as it curves back eastward.
- Keep going until you find a bridge. Check underneath it to find A Soggy Scroll. Click it to turn in Cortello’s Riddle. Pick up the next quest: the next part of Cortello’s Riddle.
- Head southeast back to Stonard. Take a flight to Grom’gol Base Camp.
- Turn in Mok’thardin’s Enchantment and The Singing Crystals.
- If you are not level 45 yet, go kill the trolls in the Ruins of Jubuwal until you are.
Level 45

- Get on the zeppelin to Orgrimmar. Use the auction house, repair, and buy food if you need it. Then take a flight to Camp Taurajo.
- Run south from Camp Taurajo until you see a way into the zone to the east. Run to the east when you can to enter Dustwallow Marsh.
- Once in Dustwallow Marsh, follow the road northeast to reach Brackenwall Village. Pick up all of the following quests in the village: Identifying the Brood, Overlord Mok’Morokk’s Concern, and Army of the Black Dragon.
- Leave the village and head directly south until you reach The Den of Flame. Circle around to the southeast to head inside.
- Pick up Mok’Morokk’s Grog near the entrance. Fight through the cave to find Mok’Morokk’s Strongbox. Loot it and exit the cave.
- Now go just east of here to get to Stonemaul Ruins. Kill all the dragonkin you see here too. Look for Mok’Morokk’s Snuff inside the fortress.
- Now turn around and run west past The Den of Flame to reach Bloodfen Burrow. Fight your way through the cave and to the end of it to find a Musty Scroll.
- Click and use the scroll to turn in Cortello’s Riddle. Accept the next quest: the latest part of Cortello’s Riddle.
- Run east back to the area near Stonemaul Ruins. Kill the dragonkin there until both Identifying the Brood and Army of the Black Dragon are finished.
- Head north all the way back to Brackenwall Village. Turn in Overlord Mok’Morokk’s Concern, Identifying the Brood, and Army of the Black Dragon.
- Take a flight to Gadgetzan. Turn in Tran’Rek. While you’re here, pick up the quests: Water Pouch Bounty and Wastewander Justice. Make sure to set your hearthstone to Gadgetzan too.
- Repair, sell your junk, and buy any food if needed. Head northeast out of town to reach Noonshade Ruins. Kill any bandits you find here.
- Proceed east to Steamwheedle Port once the ruins are empty. Accept all of these quests here: WANTED: Andre Firebeard, WANTED: Caliph Scorpidsting, Southsea Shakedown, Pirate Hats Ahoy!, and Screecher Spirits.
- Before leaving, tun in Stoley’s Debt. Accept the next quest: Stoley’s Shipment.
- Make your way west back to Noonshade Ruins. This time stay here to kill enough bandits to complete both Water Pouch Bounty and Wastewander Justice.
- Run southwest into Gadgetzan. Turn in Wastewander Justice and Water Pouch Bounty. Accept the next quest: More Wastewander Justice.
- Now go north across the border into Thousand Needles. Head to Mirage Raceway and turn in News for Fizzle and Goblin Sponsorship.
- While you’re here, also take the quests: Gahz’Rilla and Keeping Pace. Now Find Zamek to the south and begin his mini-quest: Zamek’s Distraction.
- Once Rizzle leaves his house, go pick up the Unguarded Plans. Now go turn in Keeping Pace. Accept the next quest: Rizzle’s Schematics.
- Immediately hand in Rizzle’s Schematics. You can destroy the ore after the quest. Use your hearthstone to return to Gadgetzan.
- Get on a flight to Camp Mojache. Once you arrive, accept the following quests: A New Cloak’s Sheen, Gordunni Cobalt, The Mark of Quality, A Strange Request, War on the Woodpaw, and The Ogres of Feralas.
- Make sure to set your hearthstone to Camp Mojache. Head south out of camp and keep running past the lake.
- Once you reach the gnolls, start killing them. Stay here until War on the Woodpaw is finished. Don’t turn it in yet!
- Grind on the gnolls to reach level 46.
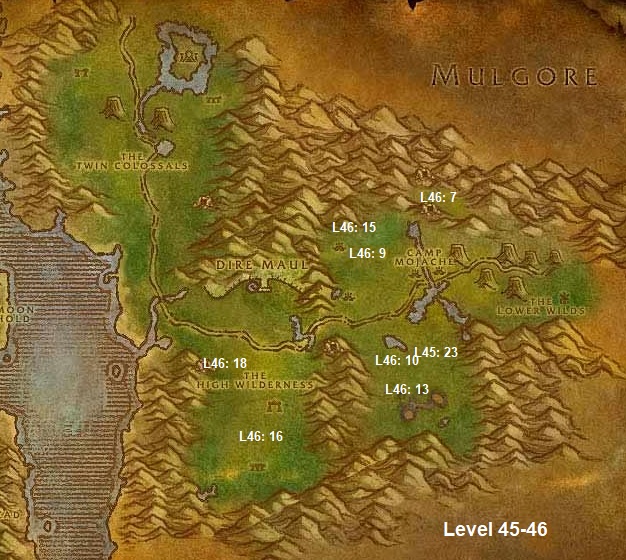
Level 46
- Head north from the gnolls to return to Camp Mojache. Take a flight to Orgrimmar and head for the Cleft of Shadow.
- Hand in A Strange Request. Accept the next quest: Return to Witch Doctor Uzer’i. Prior to leaving, repair, use the auction house, and buy any necessary consumables.
- Use your hearthstone to return to Camp Mojache. Turn in Return to Witch Doctor Uzer’i. Hang around a few minutes then accept the quests: Natural Materials and Testing the Vessel.
- Now go turn in War on the Woodpaw. Accept the follow up timed quest: Alpha Strike.
- Now to complete the timed quest. Head southwest back to the gnolls. Look for the stronger alphas and kill five.
- Once finished, go back to Camp Mojache and turn in Alpha Strike. Pick up the next quest: Woodpaw Investigation.
- Run directly north from Camp Mojache until you arrive at Gordunni Outpost. Kill all the ogres you see here. Anytime you find a blue glowing spot on the ground, use Orwin’s Shovel in your inventory to discover a pile of dirt containing Gordunni Cobalt.
- While you’re here, look for a scroll on the ground too. Pick it up and use it to begin the quest: The Gordunni Scroll. Once you have the scroll and all the cobalt you need, exit by going southwest.
- Keep running southwest to find several Sprite Darters. Stay here and kill darters to collect 10 wings.
- Now run south past Camp Mojache to return to the gnoll camps. Head to the western encampment and clear it out. Use the map lying on a crate to turn in Woodpaw Investigation.
- Accept the next quest: The Battle Plans. Then go north to return to Camp Mojache. Turn in The Ogres of Feralas, The Gordunni Scroll, The Battle Plans, Gordunni Cobalt, and A New Cloak’s Sheen.
- Take all of the following quests: The Ogres of Feralas, Stinglasher, Zukk’ash Infestation, Dark Ceremony, and A Grim Discovery. Clear out your bags and repair before leaving camp.
- Head southwest again, but this time go past the gnoll camps to arrive at the Writhing Deep. Head in the eastern entrance and kill Stinglasher. Loot his corpse.
- Stay in the Writhing Deep and kill the bugs to finish up Zukk’ash Infestation. Once you’re done, run north past Camp Mojache to find Grimtotem Village.
- Collect 20 Grimtotem Horns from the tauren here. Then run south back to the road and follow it west. Go over the bridge.
- After crossing the bridge, go south until you find the Ruins of Isildien. Kill the Gordunni Warlocks and Gordunni Maulers you need here.
- Go further south and you can find Gordunni Shamans. Kill them to finish up The Ogres of Feralas. Make sure to kill Gordunni Mage-Lords too to pick up a Gordunni Orb.
- Once done with ogres, go northwest from here to locate Feral Scar Vale. Kill all the yetis around here to finish up The Mark of Quality.
- Now exit the cave and head west to reach the shore. Kill the Rogue Vale Screechers you find. Once they die, use Yeh’kinya’s Bramble in your inventory to spawn a spirit. Click the spirit to update your quest. Repeat this until Screecher Spirits is done.
- Use your hearthstone to return to Camp Mojache. Turn in Zukk’ash Infestation, Stinglasher, The Ogres of Feralas, Dark Ceremony, The Mark of Quality, and A Grim Discovery.
- Accept all of the following quests: The Sunken Temple, Improved Quality, Zukk’ash Report, A Grim Discovery, and The Gordunni Orb.
- If you aren’t yet level 47, head west and kill the darters until you are.
Level 47
- Head back to Camp Mojache and take a flight to Gadgetzan. Make your hearthstone location Gadgetzan now. Repair, sell junk, and buy food if you need it.
- Now head east from town and a little to the south to find Waterspring Field. You’ll know you are in the right spot when you see several Wastewander enemies around.
- Kill everything you see and make your way to the towers. Wait for Caliph Scorpidsting to come around so you can kill and loot him. Ignore his bodyguards and run away after looting.
- Keep kill humans here until More Wastewander Justice is finished. From here, go east to find a tunnel. Make your way through to arrive at Lost Rigger Cove.
- Kill everything you see as you run south to the large encampment. In the center by the fire, you can find Andre Firebeard. Try to fight him alone.
- Once Andre is dead, enter the house on your right. Fight your way to the upper floor and loot the crates.
- Exit the house and kill the pirates outside to finish up Pirate Hats Ahoy! and Southsea Shakedown. Once done, leave Rigger Cove by going north through the cave from earlier.
- Follow the coast all the way north to reach Steamwheedle Port. Turn in Screecher Spirits, Pirate Hats Ahoy!, Andre Firebeard, Southsea Shakedown, and Stoley’s Shipment.
- Pick up the next quests here: Deliver to MacKinley and The Prophecy of Mosh’Aru. Now use your hearthstone to return to Gadgetzan.
- Here in Gadgetzan, turn in WANTED: Caliph Scorpidsting and More Wastewander Justice. Hand in any water pouches to Spigot Operator Luglunket if you have them.
- While in town, pick up all of these quests: The Thirsty Goblin, Thistleshrub Valley, The Dunemaul Compound, and Gadgetzan Water Survey.
- Leave town and head west to reach Sandsorrow Watch. Go to the water there and use your Untapped Dowsing Widget in your inventory to spawn two enemies.
- Run east to return to Gadgetzan. Hand in Gadgetzan Water Survey. Pick up the next quest: Noxious Lair Investigation.
- Head directly south from Gadgetzan. Go around the hill and keep going south to find Broken Pillar. Turn in The Sunken Temple. Accept the next two quests: The Stone Circle and Gahz’ridian.
- Now run west until you see a camp of ogres to your left. Run south and fight your way to the cave in the Dunemaul Compound.
- Kill and loot Gor’marok the Ravager inside the cave. Exit the cave and kill ogres until The Dunemaul Compound is done. Then run around the hill so you can go southeast.
- Ride southeast to find Eastmoon ruins. Kill everything you find there where you look for Gahz’Ridian Ornaments on the ground.
- Once Gahz’ridian is finished, keep killing ogres until you need 30,000 experience for level 48.
- Head directly west to reach Thistleshrub Valley. Kill and loot everything you see here until both The Thirsty Goblin and Thistleshrub Valley are completed.
- Leave the valley and head north to access the Noxious Lair. Kill all loot all the bugs there to finish up Noxious Lair Investigation.
- Now run east to return to Broken Pillar. Hand in Gahz’ridian. Use your hearthstone to return to Gadgetzan once finished.
- Turn in The Dunemaul Compound, Noxious Lair Investigation, Thistleshrub Valley, and The Thirsty Goblin to reach level 48. Pick up the next quest: In Good Taste.
- Immediately turn in In Good Taste. Pick up the next quest: Sprinkle’s Secret Ingredient. Also accept the quest: The Scrimshank Redemption while still in town.
Level 48
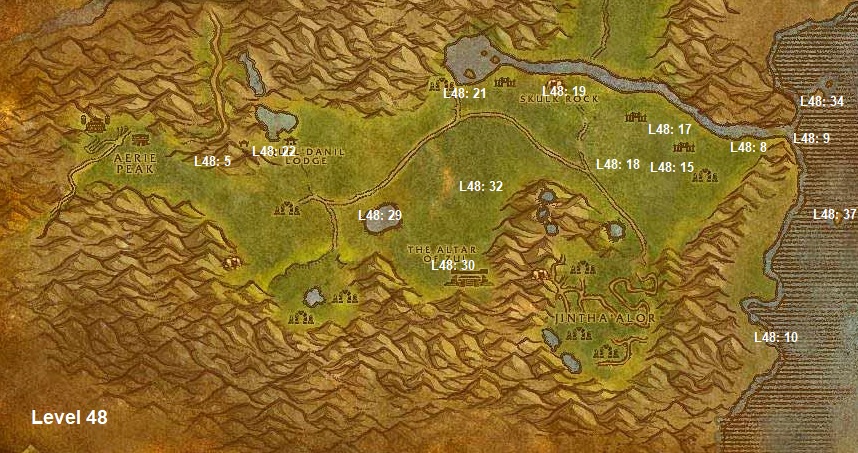
- Take a flight to Orgrimmar. Head to the Drag and hand in Zukk’ash Report. Head to Dran Droffers below and pick up the quest: Ripple Recovery.
- Immediately turn in Ripple Recovery. Pick up the next quest: the next part of Ripple Recovery. Leave the city by taking a zeppelin to Undercity.
- Head to the Magic Quarter and pick up the quest: Lines of Communication. Take a flight to Tarren Mill.
- After landing, head southeast to Durnholde Keep. Go around the northern wall to find a path leading north out of Hillsbrad Foothills. Follow it to enter The Hinterlands.
- Continue along the road until you see the alliance city of Aerie Peak. Run east from here until you arrive at Shindigger’s Camp in the mountains.
- Turn in Ripple Recovery. Accept the next quest: A Sticky Situation. Now you’re going to run a very long distance east to find the steep cliff edge.
- Along your way, kill any owlbeasts you find. Make sure to use the Wildkin Muisek Vessel on their corpse afterwards.
- Head for the northeast corner of the cliff where the river drops off into a waterfall. This area is called The Overlook Cliffs. Jump off the cliff and aim for the water to not take any damage.
- Right where you jumped in the water, dive down to the bottom and look for a chest. Click it to turn in Cortello’s Riddle. Make sure to equip the 14-slot bag afterwards!
- Leave the water and follow the coast all the way to the south. Eventually you will arrive at Revantusk Village.
- Learn the flightpath at the end of the docks. Repair, buy and food you need, and sell your junk now.
- Pick up only these eight quests in the village: Lard Lost His Lunch, Stalking the Stalkers, Snapjaws, Mon!, Avenging the Fallen, Message to the Wildhammer, Vilebranch Hooligans, Hunt the Savages, and Cannibalistic Cousins.
- Run north out of the village and kill the Saltwater Snapjaws you see until Snapjaws, Mon! is finished.
- Make your way up the large ramp that scales the cliff. Once you reach the top, start heading north.
- Along the way, kill any wolves that attack you, stealthed or not. Keep running until you get to Shaol’watha.
- Check the ruins to find Slagtree’s Lost Tools. Pick them up. Don’t worry if you don’t find them because they might be in the other camps.
- Run just north of Shaol’watha to find a bunker. Kill all the trolls there, then head northwest and do the same there.
- Once all the trolls are dead, run southwest to find some Razorbeak Skylords. Kill all of the wolves, owlbeasts,and gryphons that you see here.
- When the forest is cleared, head northwest to find a small mountain covered in slimes named Skulk Rock. Head to the top of the ruins and check for Slagtree’s Lost Tools here.
- Now run to the west and clear the camp of trolls you find. A little further west and you’ll reach Agol’watha.
- Here you should kill any slimes you find. Keep an eye out for Horde Supply Crates that contain Hinterlands Honey Ripples. Slagtree’s Lost Tools can also be here.
- Run around the mountain and go west until you reach Quel’danil Lodge. Keep killing wolves if you haven’t finished Stalking the Stalkers yet.
- Don’t go inside the lodge, but instead run around it by going west. Behind the lodge, burn the Highvale Notes you find next to a well.
- From the well, head north to find another building. Underneath will be the Highvale Report. Burn that too and then return to the lodge entrance.
- Fight your way inside the lodge and go east. At the end of the wing, burn the Highvale Records next to the barrels.
- Clear all the elves in the area, then go talk to Rin’ji. Begin the escort quest: Rin’ji is Trapped! Be prepared for two separate occasions of needing to fight three or more enemies, but let Rin’ji soak some damage to make it easier.
- After the escort is done, head back to Quel’danil Lodge to finish Message to the Wildhammer. Once you’re finished, go southwest around the mountain to get back to Shindigger’s Camp.
- Turn in A Sticky Situation. Take the next quest: Ripple Delivery.
- Now head southeast until you find Valorwind Lake. Go underwater and click on the mushroom to pick up a Violet Tragan.
- Exit the lake and run southeast to find the Altar of Zul. You can now kill everything you see here except the elite trolls atop the altar.
- If you haven’t yet killed 10 Vilebranch Soothsayers, continue killing here until you have.
- Run northeast from here and clear the forest area of any gryphons, wolves, and owlbeasts that you find.
- Once the forest is clear, keep going northeast to Shaol’watha again. Proceed to clear both camps of trolls again. Stay here until Cannibalistic Cousins is finished.
- Run further northeast to return to the waterfall at The Overlook Cliffs. Jump off again. This time swim towards the island to your north.
- On the island, look on the ground under some trees to find Lard’s Picnic Basket. When you click it, you will be ambushed by three trolls.
- You only need to kill and loot one for Lard’s Lunch. Feel free to swim southwest back to the coast once you have it.
- Follow the coast south until you see an island in the distance to the east. Swim out to it to find Rin’ji’s Secret.
- Use it to turn in Rin’ji is Trapped!. Take the next quest: Rin’ji’s Secret. Go west back to the shore.
- Make your way south to return to Revantusk Village. Turn in Lard’s Picnic Basket, Cannibalistic Cousins, Message to the Wildhammer, Vilebranch Hooligans, and Snapjaws, Mon!.
- Run north out of the village and go back up the cliff. Run west to return to the forest area with gryphons, wolves, and owlbeasts. Stay killing stuff here until all three remaining quests are done.
- Continue killing beasts here or grind to the northeast on the trolls until you need just a bubble and a half to reach level 49.
- Then run southeast back to the slope leading down. Follow it to Revantusk Village. Turn in Stalking the Stalkers, Hunt the Savages, and Avenging the Fallen to reach level 49.
Level 49
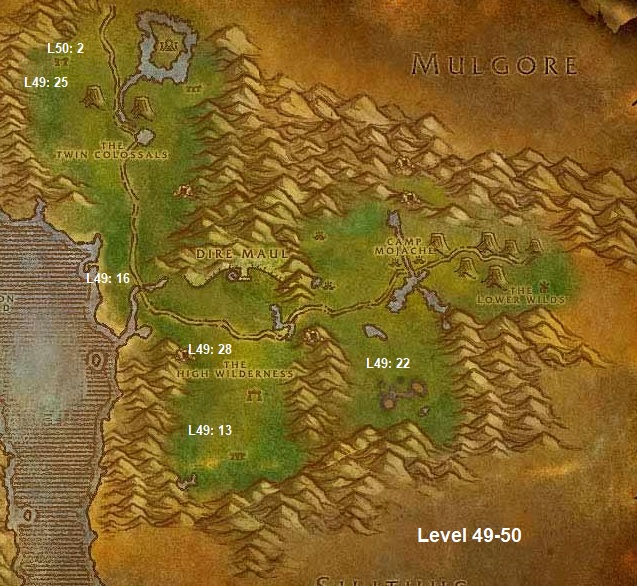
- Take a flight to Undercity. Head to the Magic Quarter. Turn in Rin’ji’s Secret and Lines of Communication.
- Use your hearthstone to return to Gadgetzan. Sell junk and repair now.
- Now is a great time to get a group to run Zul’Farrak. There are several quests you can do there to give you a nice boost of experience. If you don’t want to do Zul’Farrak, then you can just spend longer during the grind session coming up.
- Turn in Sprinkle’s Secret Ingredient. Take the next quest: Delivery for Marin.
- Immediately hand in Delivery for Marin. You can now buy Noggenfogger Elixirs here.
- Before leaving, repair, sell junk, and buy food if needed. Now head all the way south to the other end of the zone to reach the Gaping Chasm.
- Fight your way through the chasm until you find a downward-spiraling entrance. Enter the northern tunnel and take the first right.
- Proceed through the room and take another right. Check the corner of the next room to find Scrimshank’s Surveying Gear.
- Exit the chasm and run all the way north back to Gadgetzan. Hand in The Scrimshank Redemption. Accept the follow up quest: Insect Part Analysis.
- Immediately turn in Insect Part Analysis. Pick up the next quest: the next part of Insect Part Analysis.
- Once again go turn in Insect Part Analysis. Get the next quest: Rise of the Silithid. Now you can leave by taking a flight to Camp Mojache.
- When you arrive, hand in Testing the Vessel. Accept the next quest: Hippogryph Muisek. Go to the Innkeeper and Set Camp Mojache’ to your new home. While you’re still here, take these quests: The Strength of Corruption, Vengeance on the Northspring, and Dark Heart.
- Now go west along the road until you hit the bridge. Cross it, then head southwest. Pass the yeti cave and keep going south until you find hippogryphs in the Frayfeather Highlands.
- Kill them and use the Hippogryph Muisek Vessel afterwards. Repeat this 10 times.
- Keep killing hippogryphs until you have 33 Metallic Fragments and 20 Resilient Sinews.
- Run north until you reach the road again. Follow it west and run to the shore. Stop when you see a quest giver and accept the quests: Zapped Giants and Fuel for the Zapping.
- Now go south and kill any elemental that you see. You should also kill the giants, but make sure to use Zorbin’s Ultra-Shrinker on them first. Make sure to loot everything.
- Once both quests are finished, return north and turn in Zapped Giants and Fuel for the Zapping. Use your hearthstone to return to Camp Mojache after.
- Turn in Hippogryph Muisek. Take the next quest: Faerie Dragon Muisek.
- Go west now and kill Sprite Darters. Use your Faerie Dragon Muisek Vessel on them after they die. Repeat this until the quest is done.
- Go back to camp and turn in Faerie Dragon Muisek. Accept the next quest: Treant Muisek.
- Head southwest to the gnoll camps. Look for a treant running around and kill it. Use your Treant Muisek Vessel. Kill gnolls until it respawns. Do this until the quest is finished.
- Return to Camp Mojache. Turn in Treant Muisek. Pick up the follow up quest: Mountain Giant Muisek.
- Follow the road west back to where you previously picked up the zapping quests. Accept the quest: Again with the Zapped Giants.
- Return to the road and follow it north until you reach The Twin Colossals. Run west until you hit the mountain, then go north.
- When you find the giants, use Zorbin’s Ultra-Shrinker before killing and looting them. Remember to use your Mountain Giant Muisek Vessel afterwards. Repeat this until the quest is done.
- You can abandon Again with the Zapped Giants now. Run east back to the road and follow it all the way south.
- When you see the yeti cave, get off the road and kill yetis. Stay here until you have all 10 Rage Scar Yeti Hide. You’ll also need to get a Perfect Yeti Hide. Use it to start the quest: Perfect Yeti Hide.
- Continue grinding on yetis here to reach level 50.
Level 50
- Jump back on the road and follow it north to The Twin Colossals again. This time keep going past them and run west once you pass the western colossal.
- Continue running straight to reach the Ruins of Ravenwind. Kill all the harpies that you see until you pick up a Horn of Hatetalon.
- Run north until you find a pair of pillars. Use the horn to summon an elite harpy, Edana Hatetalon. Kill and loot her to finish up Dark Heart.
- Return south and kill any harpies you still need for Vengeance on the Northspring. Then use your hearthstone to return to Camp Mojache.
- Hand in Mountain Giant Muisek, Natural Materials, Perfect Yeti Hide, Dark Heart, Vengeance on the Northspring, and Improved Quality. Accept the follow up quest: Weapons of Spirit.
- Immediately hand in Weapons of Spirit for a nice weapon reward. Now take a flight to Orgrimmar.
- Once you land, head to the Valley of Spirits. Hand in The Gordunni Orb. Accept the quest: Shadowshard Fragments while you are still here.
- Head for the Drag and hand in Rise of the Silithid. Accept the follow up quest: March of the Silithid.
- Jump down and turn in Ripple Delivery. Proceed to the Valley of Honor. Run straight and turn in A Grim Discovery. Pick up the quest: Betrayed while you are here.
- Set your hearthstone to Orgrimmar now! Use the auction house, repair, store stuff in the bank, and buy consumables now.
- When ready to go, take a flight to Ratchet. Board the boat for Booty Bay.
- Once you arrive, run towards the inn and turn in Deliver to MacKinley. Then take a flight to Stonard.
- Run south out of Stonard and follow the road to Blasted Lands. Keep going until you see a few elves with quests for you.
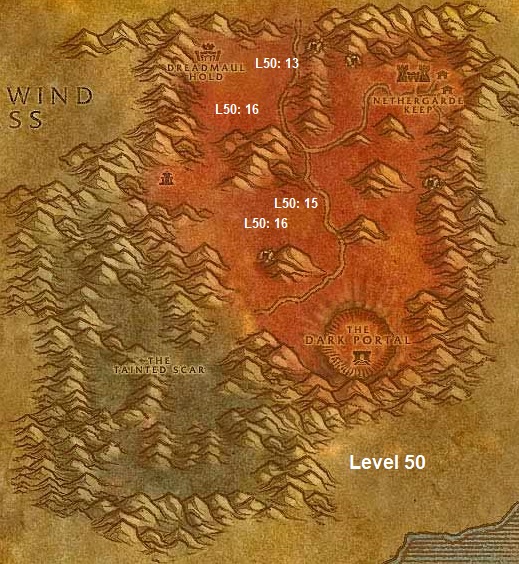
- Pick up five quests: The Basilisk’s Bite, The Decisive Striker, A Boar’s Vitality, Snickerfang Jowls, and Vulture’s Vigor.
- From this point on, kill and loot any beast that you see. If you pick up any Imperfect Draenethyst Fragments, head to Kum’Isha the Collector to hand them in.
- Kill beasts around Blasted Lands until all five quests are finished. You can turn them in as you complete them to receive a useful buff to a primary stat.
- In no specific order and whenever you feel like it, turn in The Basilisk’s Bite, The Decisive Striker, A Boar’s Vitality, Snickerfang Jowls, and Vulture’s Vigor.
- Continue grinding on the beasts of Blasted Lands until you reach level 51.
- This will take a long time, so consider doing any (or all three) of the Find OOX escort quests in Gadgetzan, Feralas, or The Hinterlands. These can be started via Distress Beacons (OOX-09/HL, OOX-17/TN, and OOX-22/FE). Completing all three unlocks an additional quest offering free experience.
Level 51-55
Level 51
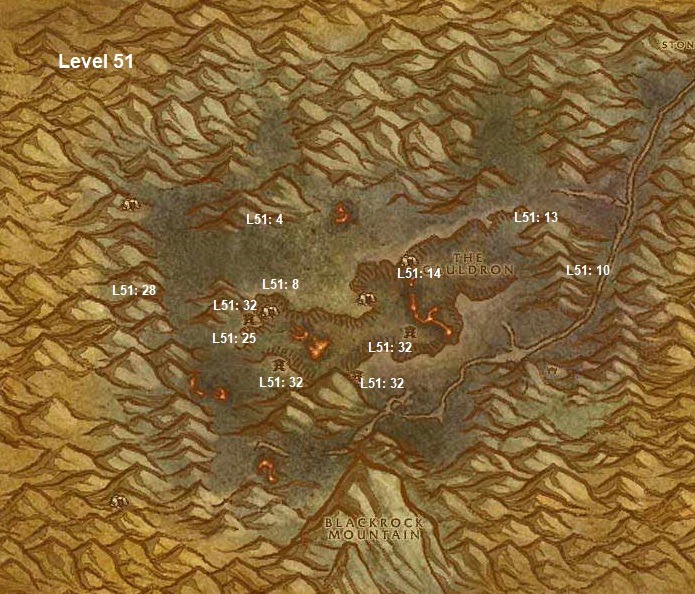
- Use your hearthstone to return to Orgrimmar. At this point, you should definitely get a group for Maraudon for loot and quests. If you don’t want to do this, you can spend longer during the grinding session at the end of the level.
- Before leaving, use the auction house, repair, and sell junk. Make sure to have 15 Silk Cloth before leaving this time. Exit the city by taking the zeppelin to Grom’gol Base Camp.
- Once you arrive, take a flight to Kargath. Run south and hug the wall to your right. When you see a path leading out of Badlands, follow it west to reach Searing Gorge.
- Go north along the path until you are past The Cauldron, then run west. Keep going along the mountains to find Thorium Point. Go just south to find Kalaran Windblade.
- Accept the quest: Divine Retribution. Talk to him and then turn in Divine Retribution. Get the next quest: The Flawless Flame.
- Go west to find the path leading up to Thorium Point. Get the flightpath here.
- Pick up all of these quests in Thorium Point: Incendosaurs? Whateverosaur is More Like It, Fiery Menace!, Curse These Fat Fingers, STOLEN: Smithing Tuyere and Lookout’s Spyglass, JOB OPPORTUNITY: Culling the Competition, WANTED: Overseer Maltorius, and What the Flux?
- Now head south until you see a big wheel in the distance. Kill all loot all the dwarves there.
- Run east from the wheel. Kill any dwarves, golems, and elementals you see along the way.
- Once you pass The Cauldron, start running southeast. Keep going until you reach Grimesilt Dig Site.
- Look for the wooden outhouse. Talk to it to get the quest: Caught! Kill all the golems and dwarves you see in the camp.
- Once you’ve killed enough Dark Iron Geologists, return to the outhouse. Turn in Caught!
- Leave the area by heading north. Look for a way down into the cauldron on your left. Make your way down and kill any elementals, golems, and dwarves that you see.
- Keep going west until you find a way into the cave above. Follow it to enter the Slag Pit.
- Run across the bridge in the Slag Pit and look for a gate on your left. Enter it and fight your way through the room.
- Enter the next room you see containing Enslaved Archeologists. Run up the ramp and keep going straight to enter another room.
- Fight your way through the room and look to your right. Try to find a partner to kill Overseer Maltorius and his bodyguards. If you manage to kill him, pick up the Secret Plans: Fiery Flux behind him. Don’t worry if you can’t find someone to help you. Just abandon the quest and spend longer grinding later.
- Turn around and run straight to cross the bridge. Once you cross, jump down and start heading east.
- Shortly after you will see Incendosaurs. Kill the 20 you need here, then make your way back up.
- Jump down to return to The Cauldron. Fight your way west again towards the entrance of the Slag Pit. Ignore the entrance and go for the lift instead.
- Don’t get off the lift until you reach the third floor. Exit The Cauldron when you arrive and kill all the Dark Iron Steamsmiths in the area.
- Run north again to find Kalaran. Hand in The Flawless Flame. Accept the follow up quest: Forging the Shaft.
- Run northwest to climb up to Thorium Point. Turn in Incendosaurs? Whateverosaur is More Like It, WANTED: Overseer Maltorius, and What the Flux?
- Clean out your bags, buy food, and repair. If you don’t have a Smithing Tuyere yet, run south and kill all the steamsmiths at the wheel to the south. Otherwise run west of the wheel and start heading south around the edge of The Cauldron.
- Start going in a circle around The Cauldron. Kill any golems, dwarves, and Greater Lava Spiders you find. Kill the Dark Iron Lookouts at the bottom of each watchtower to try and find a spyglass.
- Continue doing this until Forging the Shaft is finished. Return to Kalaran and hand in Forging the Shaft. Take the next quest: The Flame’s Casing.
- If you don’t have the tuyere yet, return to the wheel and kill the steamsmiths again. Now try and find a partner to help you with The Flame’s Casing.
- Once you find help, head west to the camp of twilight enemies. Kill them until you loot a Symbol of Ragnaros. Run north back to Kalaran and turn in The Flame’s Casing.
- Accept the next quest: The Torch of Retribution. Immediately hand in The Torch of Retribution.
- Wait a minute, then accept the quest: The Torch of Retribution again. Click the green stick to turn in The Torch of Retribution. Now pick up the quest: Squire Maltrake.
- Immediately hand in Squire Maltrake. Pick up the next quest: Set Them Ablaze! Now make your way to all four watchtowers around The Cauldron.
- For each one, you’ll want to fight your way up the tower and look for a bowl on the ground. Click it to light it and immediately run away from the elite.
- After lighting the watchtower over the bridge, run back to Kalaran near Thorium Point. Turn in Set Them Ablaze!
- Wait a minute, then click the quest that appears to pick up the quest: Trinkets… Immediately hand in Trinkets… to the chest in front of you.
- Open the box you just received in your inventory. Destroy the Torch of Retribution now.
- If you need more kills for JOB OPPORTUNITY: Culling the Competition, go kill the dwarves in the Slag Pit. If you need kills for Curse These Fat Fingers, kill the golems right around you. Continue killing the lookouts and steamsmiths until you have a spyglass and tuyere.
- Then return to Thorium Point. Hand in JOB OPPORTUNITY: Culling the Competition, Curse These Fat Fingers, Fiery Menace, and STOLEN: Smithing Tuyere and Lookout’s Spyglass.
- Now head back to the Slag Pit and grind on dwarves to reach level 52.
Level 52
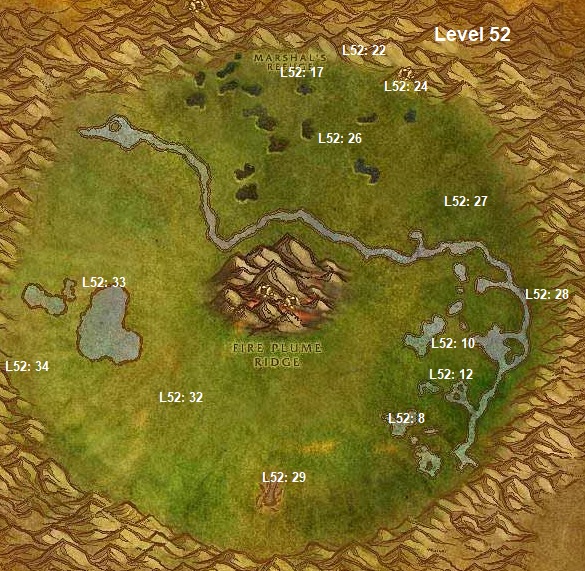
- Use your hearthstone to return to Orgrimmar. Take the quest: Assisting Arch Druid Runetotem. Head towards the Drag and pick up Bone-Bladed Weapons from Jes’rimon.
- Use the auction house, repair, buy consumables, and clear out your bags before leaving. Take a flight to Thunder Bluff.
- Head to Elder Rise. Turn in Assisting Arch Druid Runetotem. Pick up the next quest: Un’Goro Soil.
- Leave Thunder Bluff by taking a flight to Gadgetzan. Hand in March of the Silithid. Accept the quests: Super Sticky and Bungle in the Jungle while you are here.
- Ride southwest of Gadgetzan to the area of land south of The Noxious Lair. Look for a ramp leading downwards and follow it to enter Un’Goro Crater.
- Partway down the ramp, walk off the side path and accept the quests: The Fare of Lar’korwi and The Apes of Un’Goro.
- Keep an eye out and loot any power crystals you see on the ground. You need seven of each color (blue, yellow, red, and green). Loot the piles of dirt you find around as well to collect Un’Goro Soil. By the end of your questing here, you want to have 50 Un’Goro Soil.
- Wherever you go, kill any non-elite dinosaurs within your level that you see. Start heading northwest until you come across a raft offering you a quest. Pick up the quest: It’s a Secret to Everybody.
- Head underwater here and use the bag you find to turn in It’s a Secret to Everybody. Pick up the next quest: the next sequence in It’s a Secret to Everybody.
- Leave the water and head northeast until you find a large dead dino. Use it to collect a Piece of Threshadon Carcass.
- Head south back to the entrance of Un’Goro and turn in The Fare of Lar’korwi. Accept the follow up quest: The Scent of Lar’korwi.
- Now go west back into the zone and look for purple eggs. Step on them after killing the raptors around them. Kill and loot the Lar’korwi Mate.
- There are more eggs north of here. Keep jumping on both piles of eggs until you have two glands. When you have them, go east and turn in The Scent of Lar’korwi.
- Go west again and kill the Ravasaurs in the area. Run around the zone and collect all seven colored powered crystals.
- Keep killing Ravasaurs until you have 8 White Ravasaur Claws and A Mangled Journal.
- When you have the journal, use it and accept the quest: Williden’s Journal.
- Head to the northernmost part of the zone to locate Marshall’s Refuge. Pick up the flightpath here.
- Turn in Williden’s Journal. Accept all of these quests: Expedition Salvation, Alien Ecology, Shizzle’s Flyer, Larion and Muigin, Beware of Pterrordax, Roll the Bones, and Chasing A-Me 01.
- Now use the bag in your inventory that you found underwater earlier. Hand in It’s A Secret to Everybody. Accept the next quest: another part of It’s A Secret to Everybody.
- Now enter the cave and follow it through. Accept the quest: Crystals of Power. Immediately hand in Crystals of Power.
- Accept the next three quests here: The Northern Pylon, The Eastern Pylon, and The Western Pylon. Exit the cave and sell, repair, and buy food if you need it.
- Leave the camp and hug the wall of the crater by running east until you see a ramp leading up. Walk up to the pylon on top of the hill. Use it for quest credit.
- Kill the Pterrordaxes here, then keep running east. Go out of your way to kill any Pterrordaxes, Diemetradons, and Bloodpetals until your quests are complete for the next few steps.
- Keep heading east to reach Fungal Rock. There will be a bunch of gorillas here. Fight your way through the cave to find A-Me 01. Hand in Chasing A-Me 01.
- Keep killing gorillas in the area until The Apes of Un’Goro is finished. Then exit the cave and head south to the black pools of tar.
- Kill Tar Creepers and Tar Beasts in the area until Super Sticky is done. From the tar pools, head southeast to find a run-down encampment.
- Pick up the Crate of Foodstuffs there. Then head east towards the wall of the zone. Start going south once you get close. When you see another ramp leading to a pylon, head over to it.
- Use it for quest credit. Ride all the way south from here and turn in The Apes of Un’Goro at Torwa Pathfinder.
- Now start running west to reach the Slithering Scar. Fight your way inside the entrance and go left.
- Clear all the enemies in the room you enter and use the Unused Scraping Vial in your inventory. Repeat this until you pick up a Hive Wall Sample. Keep killing bugs in the area until you have a Gorishi Scent Gland.
- From the Slithering Scar, go south towards the mountains and follow it west, killing all the pterrordaxes you see.
- Run just southeast of the lake to your northwest to find a small camp. Look for crates here and loot it to finish Expedition Salvation.
- Swim through the lake and circle the rock you find. Here you’ll find Krakle. Pick up the quest: Finding the Source.
- Now run directly west to find another ramp up to the western pylon. Use it for quest credit.
- Now head directly northeast to go back to Marshall’s Refuge. Before heading in, go east of the tar pools and finish up Larion and Muigin.
- At this point, head northwest and enter Marshall’s Refuge. Turn in Larion and Muigin, Alien Ecology, Expedition Salvation, The Northern Pylon, The Western Pylon, and The Eastern Pylon.
- Pick up the next quest: Making Sense of It. Immediately hand in Making Sense of It. Run outside and accept the quest: Marvon’s Workshop.
- Sell, repair, and stock up on consumables. Take a flight to Gadgetzan.
- Once you land, turn in Bungle in the Jungle and Super Sticky. Then take a flight to Thunder Bluff.
- Go to Elder Rise and turn in Un’Goro Soil. Enter the main tent and pick up the quest: Morrowgrain Research.
- Immediately turn in Morrowgrain Research. Pick up the next quest: the next part of Morrowgrain Research.
- Every two minutes, use the Evergreen Pouch you just acquired. This will consume some Un’Goro Soil and will create an herb pouch. Open the pouch.
- You need to collect 10 Morrowgrain doing this. This will take about half-an-hour if you are diligent about using the pouch on cooldown.
- While you’re doing that, use your hearthstone to return to Orgrimmar. Head to the Drag and turn in Bone-Bladed Weapons.
- Take a flight to Splintertree Post. Take the road going northeast to reach Azshara.
- On your right, find Loh’atu and accept the quests: Spiritual Unrest and A Land Filled With Hatred.
- Cross the road to the north to find Shadowsong Shrine. Kill the elves here until Spiritual Unrest is done.
- Then go northeast to find a satyr camp. Kill the satyrs here to complete A Land Filled With Hatred.
- Run back south and turn in A Land Filled with Hatred and Spiritual Unrest. From here go northeast again to return to the satyr camp.
- Once there, run directly north to reach Valormok. Pick up the flightpath.
- Hand in Betrayed. Accept the next quest: the next part of Betrayed. Pick up the quest: Stealing Knowledge while you are here.
- Head northeast from here. Don’t kill any Timbermaw furbolgs you see. Keep going past Ursolan until you find a mountain. Circle it to the north and climb up to find Kim’jael.
- Accept the quest: Kim’jael Indeed!. Go southeast now to the Thalassian Base Camp.
- Loot all the crates you see here to find all of Kim’jael’s equipment.
- Keep grinding elves until you are four bubbles into level 53.
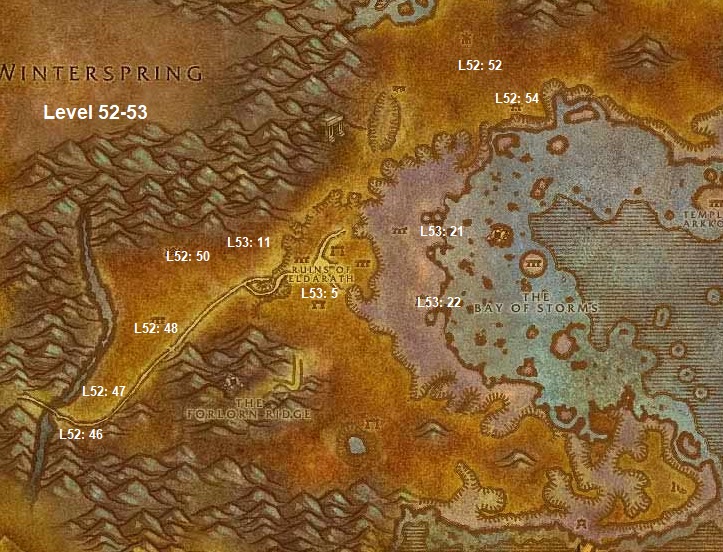
Level 53
- Once you’re finished with Betrayed, Kim’jael Indeed, and have four bubbles of experience towards level 54, run south of the elf camp. Use the altar and hand in Betrayed.
- Accept the next quest: the next stage of Betrayed. Destroy one of the crystals that appears, then run away from where you are standing and kill the enemy that attacks you.
- After it is dead, kill and loot Magus Rimtori who spawned where you were previously standing. Run northwest back to Kim’jael.
- Hand in Kim’jael Indeed. Accept his next quest: Kim’jael’s “Missing” Equipment. Leave the area by riding to the south until you find a path leading down.
- Follow the path and start killing all the nagas. Head southwest once you reach the bottom of the ramp until you arrive at the Ruins of Eldarath east of Valormok.
- Kill all the nagas that you see here while looting any tablets you see on the ground to finish Stealing Knowledge. Keep grinding here until you are half-way to level 54.
- Don’t forget to use your Evergreen Herb Pouch to try and find Morrowgrain. Keep killing the naga until you have the rune for your quest.
- Run north around the mountain to find a ramp leading back up. Follow the ramp, then return to Kim’jael north of you.
- Turn in Kim’jael’s “Missing” Equipment. Now start going southwest to return to Valormok.
- When you arrive, hand in Betrayed and Stealing Knowledge. Accept the five follow up quests: Delivery to Magatha, Delivery to Jes’rimon, Delivery to Andron Gant, Delivery to Archmage Xylem, and the last part of Betrayed.
- Head east from here and hug the mountain. Look for someone offering you a repeatable quest. Talk to him to complete Meeting with the Master.
- After you are teleported, head up the path and climb the tower. Turn in Delivery to Archmage Xylem. Accept the next quest: Xylem’s Payment to Jediga.
- Use your hearthstone to return to Orgrimmar. Go to the Drag and turn in Delivery to Jes’rimon. Pick up the next quest: Jes’rimon’s Payment to Jediga.
- Now go to the Valley of Honor and head straight to hand in Betrayed. Use the auction house, sell junk, and repair before leaving town.
- Leave Orgrimmar by boarding a zeppelin to Undercity. In the Apothecarium, turn in Delivery to Andron Gant. Accept the next quest: Andron’s Payment to Jediga.
- While you’re still here, accept the other quests here: A Sample of Slime…, …and a Batch of Ooze, and Seeping Corruption. Leave the Undercity by taking the zeppelin back to Orgrimmar.
- Board a flight for Thunder Bluff. Go to Elder Rise and hand in Delivery to Magatha. Accept the next quest: Magatha’s Payment to Jediga.
- By now you should be finished with the evergreen pouch, so turn in Morrowgrain too. Take a flight to Valormok when you are done.
- Hand in Magatha’s Payment to Jediga, Jes’rimon’s Payment to Jediga, Andron’s Payment to Jediga, and Xylem’s Payment to Jediga.
- Head northeast afterwards to find the ramp back down to the naga below the cliff. Instead head east at the bottom to reach the water.
- Look for a pool of water near here and use your Empty Vial Labeled #4. Look for a tower south of you and run over there to find another pool. Use Empty Vial Labeled #3 here.
- Keep going south to find another pool for Empty Vial Labeled #2. Continue going south near a mountain to find the final pool for Empty Vial Labeled #1.
- Kill the nagas in the area until you reach level 54.
Level 54

- Use your hearthstone to return to Orgrimmar. You can bank all the vials you just filled. Take a flight to Splintertree Post.
- Head west across the river to the road, then follow it all the way north into Felwood. Keep running until you see a furbolg offering you the quest: Timbermaw Ally across the road from the Emerald Sanctuary.
- Run across the road and enter the sanctuary. Accept the quests: Forces of Jaedenar and Verifying the Corruption.
- Go southwest from here to find Deadwood furbolgs. Kill everything you see here until Timbermaw Ally is finished.
- Go north back to Grazle and turn in Timbermaw Ally. Accept the next quest: Speak to Nafien.
- Follow the road until it starts to curve north. Accept the quest: Cleansing Felwood from the tauren here.
- Continue on the road until you see a pool filled with slimes to your left. Run over there and kill slimes until you get 30 Felwood Slime Samples.
- Keep following the road north. Stop off and kill any slimes you see, making sure to loot them. Continue doing this until Bloodvenom River, at which point you should turn and run west.
- Keep going west to find Bloodvenom Post. Kill oozes outside if you don’t have slime samples yet.
- Pick up the flightpath here. Accept the three quests: Wild Guardians, A Husband’s Last Battle, and Well of Corruption. Clear out your bags and repair before leaving town.
- Run south until you find a path leading you into Jaedenar. Kill everything you need here for Forces of Jaedenar.
- Make your away around the mountain to your south to find the Ruins of Constellas. Fight your way through to the moonwell in the area. Use your Hardened Flasket once you are standing inside it.
- Go east back to the road and follow it south to the Emerald Sanctuary. Turn in The Forces of Jaedenar. Accept the next quest: Collection of the Corrupt Water.
- Head southwest back to the furbolg village. Fight your way all the way to the southwest corner of the camp. Kill and loot Overlord Ror here.
- Head northeast back to the road. Follow it all the way to Bloodvenom River, then head west to return to Bloodvenom Post.
- Hand in Well of Corruption and A Husband’s Last Battle. Accept the next quest: Corrupted Sabers.
- Run south back to Jaedenar. Fight your way to the moonwell here, then use your Empty Canteen inside it.
- Head east to the road and follow it south to the Emerald Sanctuary. Turn in Collection of the Corrupt Water. Accept the next quest: Seeking Spiritual Aid.
- Return to the road and follow it north. Stop at the Ruins of Constellas and fight your way through to the moonwell again. Make sure to kill everything you see.
- This time use Winna’s Kitten Carrier in the moonwell. Leave the area and head north back towards Bloodvenom River.
- Make sure the kitten is following you. Head west at Bloodvenom River to reach Bloodvenom Post. Walk up to Winna Hazzard and right click your Corrupted Saber and release it.
- Turn in Corrupted Sabers. Sell junk and repair before leaving.
- Head east to the road and start going north. Cross the bridge, then head northeast to find Shatter Scar Vale. Kill the enemies here and make sure to fully explore the area to finish Verifying the Corruption.
- Head to the northeast part of the vale to find a path leading north. Follow it and kill all the wolves and bears you see. Keep going until you find Irontree Cavern.
- Run back and forth between Irontree Cavern and the area to the south. Kill all the elementals near the cavern and loot them when you are there. Stay here until you finish both The Strength of Corruption and Cleansing Felwood.
- From Irontree Cavern, follow the road to the north as it goes northeast. Before Timbermaw Hold, hand in Speak to Nafien. Accept the next quest: Deadwood of the North.
- Now head west down the cliff to reach Felpaw Village. Kill the furbolg you find here until you need just 150 reputation to reach unfriendly with Timbermaw Hold.
- Run east back up the cliff and hand in Deadwood of the North. Accept the next quest: Speak to Salfa. Turn in Deadwood Headdress Feathers if you have at least five.
- Enter Timbermaw Hold and go east once you cross the first bridge to reach Winterspring. Right after exiting, turn in Speak to Salfa.

- Accept the quest: Winterfall Activity. Run south along the road until it begins to curve east. Run off the path south here to hand in It’s A Secret to Everybody.
- Wait a minute, then accept the two quests: Threat of the Winterfall and The Videre Elixir.
- From here head east and kill all the furbolgs you see. Also kill any owlbeasts you see for the next few steps.
- Finish up Threat of the Winterfall here and keep killing until you pick up an Empty Firewater Flask. Use it to accept the quest: Winterfall Firewater.
- Head northeast towards the road and follow it all the way east to Everlook. Pick up the flightpath.
- Here, accept the quest: Are We There, Yeti? Repair, sell junk, and buy food. Leave town by running southeast.
- Eventually you should find a bunch of yetis here. Kill them until Are We There, Yeti? is finished.
- Leave Everlook to the northwest and kill any beast that you see. Stay in this area until you finish Wild Guardians.
- Return west to the main road and follow it all the way west. Keep going until you return to Donova Snowden. Hand in Winterfall Firewater and Threat of the Winterfall.
- Accept the next quest: Falling to Corruption. Return to the road and head north towards Timbermaw Hold. Once through, go south to return to Felwood.
- Once you exit the tunnel, jump down to Felpaw Village. Stick to the right and fight your way towards the upper camp.
- Kill everything you see around the Deadwind Cauldron. Click it and turn in Falling to Corruption. Pick up the next quest: Mystery Goo.
- Run east and make your way back up the cliff. Go through Timbermaw Hold and go east to Winterspring.
- Run all the way south to turn in Mystery Goo. Accept the next quest: Toxic Horrors. Immediately run away to safety.
- Use your hearthstone to return to Orgrimmar. Use the auction house, repair, and sell junk now. Make sure to have a Mithril Casing before leaving. When you’re finished, take a flight to Ratchet.
- Turn in Marvon’s Workshop. Accept the next quest: Volcanic Activity and don’t forget to pick up the Stone Circle from Marvon’s Chest before leaving.
- Follow the coast south out of Ratchet. Eventually you will find Islen Waterseer. Hand in Seeking Spiritual Aid.
- Wait a minute, then accept the next quest: Cleansed Water Returns to Felwood. Run back to Ratchet now.
- Take a flight to Shadowprey Village. Follow the road southeast out of the village. When it splits, follow the south road to enter Feralas.
- Once entering Feralas, head west to the ruins. Kill the gnoll, Miblon Snarltooth. Pick up an Evoroot while you are here.
- Now run south of the left colossal to find Gregan Brewspewer. Hand in The Videre Elixir.
- Get on the road now and follow as it curves south, then east to Camp Mojache. Here, turn in The Strength of Corruption.
- Take a flight to Gadgetzan. Head south from here to reach the Broken Pillar.
- Turn in The Stone Circle to reach level 55. Accept the next two quests: Into the Depths and Secret of the Circle.
Level 55
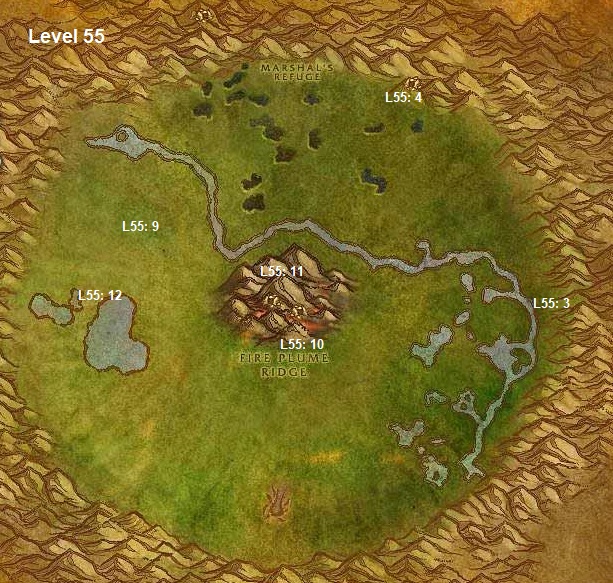
- Head back to Un’Goro Crater and talk to Torwa Pathfinder at the bottom. Pick up his two quests: The Bait for Lar’Korwi and The Mighty U’Cha.
- Go north from here, hugging the mountain to your right. When you reach the eastern pylon, follow the ramp up. Keep going east to find a large skeleton.
- Open up Torwa’s Pouch in your inventory. Combine the meat and mixture, then use the meat to summon Lar’korwi. Kill and loot him.
- Keep running north along the wall until starts to go north. Follow it to Fungal Rock and go inside. Fight your way to the end of the cave to find U’cha. Kill and loot him.
- Now fight your way out of the cave and kill any gorillas outside. Head back into the cave and turn right. Clear the gorillas you see and keep going to find A-Me 01.
- Turn in Chasing A-Me 01. Pick up the next quest: the next part of Chasing A-Me 01.
- Immediately hand in Chasing A-Me 01. Now pick up the escort quest: the last part of Chasing A-Me 01. Let A-Me 01 soak most of the damage to make this easy.
- Finish the escort, then immediately hand in Chasing A-Me 01. Run north to Marshall’s Refuge and accept the quest: Lost!
- Run southwest to the river past the tar pools and cross it. Stay and kill stuff until Shizzle’s Flyer, Roll the Bones, and Beware of Pterrordax. You’ll also need 30 Un’Goro Slime Samples.
- Now head east to Fire Plume Ridge and make your way to the southern base. Find your way up to the top of the mountain, killing and looting any elemental you see along the way.
- At the top of the ridge, look for a Fire Plume Ridge Hot Spot. Walk up to it and use Krakle’s Thermometer. Stay in the area until you finish Volcanic Activity.
- When you’re done, run west past the lake to Golakka Hot Springs. Turn in Finding the Source. Accept the next quest: The New Springs.
- Now make your way southeast back to the entrance of Un’Goro. Turn in The Bait for Lar’korwi and The Mighty U’cha.
- Run northwest to return to Fire Plume Ridge. Begin to climb it, but this time enter the cave on the east side. Hand in Lost!
- Accept the next quest: A Little Help From My Friends. Assign the Spraggle’s Canteen you just got to a hotbar.
- Now start running north back to Marshall’s Refuge. Keep an eye on Ringo behind you and use the canteen whenever he faints. Do this until you reach Marshall’s Refuge.
- When you arrive, turn in A Little Help From My Friends, Roll the Bones, Shizzle’s Flyer, and Beware of Pterrordax. You can destroy the canteen now, then use your hearthstone to return to Orgrimmar.
- Now is a great time to find a group for Sunken Temple. There are several quests to complete there and good drops. Alternatively, you can go grind on furbolgs near Timbermaw Hold in Felwood. Pick one of these to take you to level 56.
Level 56-60
Level 56
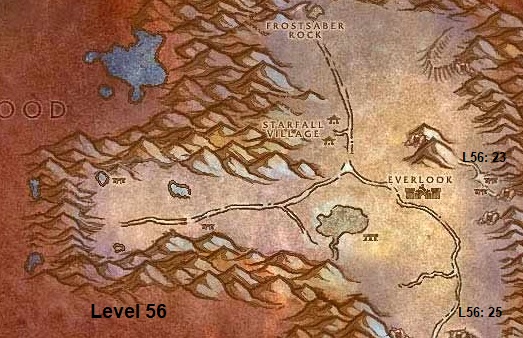
- Now use your hearthstone to return to orgrimmar. Use the auction house, repair, and clear out your bags now. This is a good time to collect your filled vials from earlier.
- Take a flight to Everlook. Take the road west to Donova Snowden. Hand in The Videre Elixir. Accept the next quest: Meet at the Grave.
- Now go east to Everlook. Get on a flight to Ratchet. When you land, turn in the quest: Volcanic Activity.
- Then get on a flight to Gadgetzan. Run east to the graveyard and drink the Videre Elixir. It will kill you. Release spirit, but don’t return to your body. Instead head north as a ghost and climb the mountain.
- Turn in Meet at the Grave. Accept the next quest: A Grave Situation. Return down the mountain and south and resurrect.
- Click the nearby gravestone and turn in A Grave Situation. Pick up the next quest: Linken’s Sword.
- Now get on a flight to Marshall’s Refuge. Hand in Linken’s Sword. Take the follow up quest: A Gnome’s Assistance.
- Head into the cave and hand in A Gnome’s Assistance. Wait a minute, then accept the next quest: Linken’s Memory.
- Use your hearthstone to return to Orgrimmar. Take a flight to Splintertree Post.
- Head northwest across the river to the road. Follow it north to reach Felwood.
- Run north to reach Emerald Sanctuary. Turn in Cleansed Water Returns to Felwood, Verifying the Corruption, and Linken’s Memory. Accept the next quests: Dousing the Flames of Protection and Silver Heart.
- Run west to turn in Cleansing Felwood. Pick up a Cenarion Beacon from Maybess Riverbreeze. Go back to the road and follow it to Jaedenar.
- Fight your way west and go inside the Shadow Hold. Go down the first tunnel to find two braziers. Click and turn both of them off.
- Leave the tunnel and enter the other tunnel. Fight your way through and turn off both braziers.
- Exit Jaedenar and follow the road north again until Bloodvenom River. Head west to Bloodvenom Post and turn in Wild Guardians.
- Accept the next quest: another part of Wild Guardians. Continue along the road until you see the Irontree Woods on your right.
- Go fight the slimes there to collect three Toxic Horror Droplets. Kill any Irontree Stompers you see too.
- Once both quests are done, go east to an area filled with wolves and bears. Collect 11 Silvery Claws here.
- Now that all three quests are done, head north along the road and through Timbermaw Hold to reach Winterspring.
- Head south along the road and then turn in The New Springs and Toxic Horrors at Donova. Pick up the next two quests: Strange Sources and Winterfall Runners.
- Follow the road east to Everlook. Try and find a group of three Winterfall Runners. Kill them and loot to pick up a Winterfall Crate.
- Once you arrive in Everlook, pick up the quest: Are We There, Yeti? Repair, sell junk, and buy food if needed.
- Run east to Winterfall Village. Kill the furbolgs you see here, then head south to the yeti cave.
- Kill the yetis inside the cave to finish Are We There, Yeti? Then head west back to Everlook. Hand in Are We There, Yeti?
- Accept the next quest: the last part of Are We There, Yeti? Use Umi’s Mechanical Yeti on Legacki right next to you. Run southeast from Everlook to the mountains, then follow them south to reach Owl Wing Thicket.
- Kill all the owlbeasts you need here, then continue south on the road. Cross the bridge and don’t stop until Strange Sources is finished.
- Now use your hearthstone to return to Orgrimmar. Take a flight to Splintertree Post. Run northwest to the road and follow it into Felwood.
- Head north to Emerald Sanctuary and turn in Dousing the Flames of Protection and Silver Heart. Accept the next two quests: A Final Blow and Aquementas.
- Head north until you reach Jaedenar. Fight through and enter Shadow Hold. On the way inside, you might find A Blood Red Key from one of the Warlock’s outside, which starts a quest to find Captured Arko’narin. He, in turn, starts the quest Rescue from Jaedenar, which is not recommended if you are not in a group. Go down the first tunnel to find two braziers. Click and turn both of them off.
- Continue fighting through until you find an altar room. Avoid aggroing Rakaiah for now. Kill the warlocks here and especially their imps. If you accidentally aggro the demon run away until the warlocks ignore you. then return and kill their imps.
- Continue through the altar room and head down a spiraling ramp. Continue across the bridge and then go down to your left.
- Keep going this direction to find Shadow Lord Fel’dan and some bodyguards. Kill him and loot him.
- Now fight your way out of Shadow Hold and Jaedenar. Get on the road and ride it south to reach Emerald Sanctuary.
- Hand in A Final Blow and Rescue from Jaedenar if you completed it after turning in the key, then follow the road up to Bloodvenom River. Ride west and enter Bloodvenom Post. Turn in Wild Guardians.
- Accept the next quest: another part of Wild Guardians. Take a flight to Everlook now.
- Head southeast to return to Owl Wing Thicket. Kill owlbeasts there to finish Wild Guardians. Keep killing owlbeasts here until you find a Blue-feathered Necklace. Use it to get the quest: Guarding Secrets.
- Head north back to Everlook. Run along the roads if you haven’t killed a Winterfall Runner yet. Once you’re done, head to the northwest of the zone near Timbermaw Hold.
- Turn in Winterfall Activity. Go south now and stop off the path. Turn in Strange Sources and Winterfall Runners.
- Immediately run away and go east to Everlook. Accept the three quests: The Everlook Report, Sister Pamela, and Duke Nicholas Zverenhoff.
- Take a flight to Bloodvenom Post. Turn in Guarding Secrets and Wild Guardians to reach level 57. Pick up the next quest: another Guarding Secrets while you are still here.
Level 57
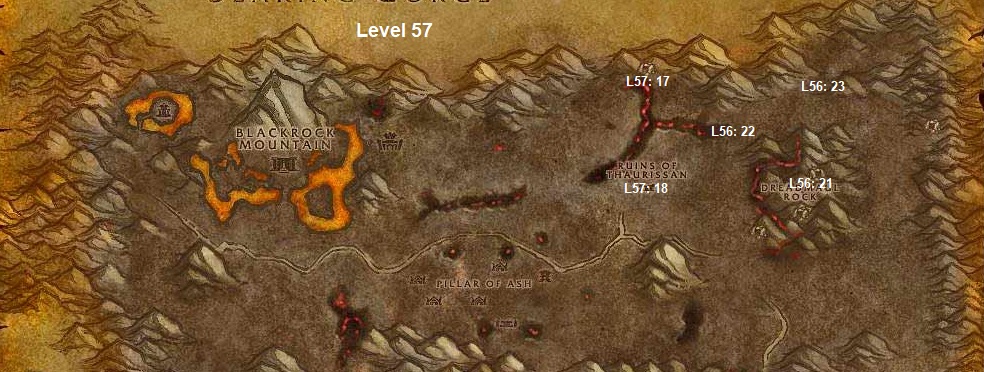
- Take a flight to Thunder Bluff. Go to Elder Rise and hand in Guarding Secrets. When you’re done, take a flight to Gadgetzan.
- Go towards the exit of Gadgetzan and use Umi’s Mechanical Yeti on Sprinkle. Head southeast towards all the pirates at Lost Rigger Cove. Cross through the cave and stop on the other side.
- Head west to arrive at Circle of Aquementas. Open Eridan’s Supplies in your inventory. Then use Book of Aquor in the middle of the circle to spawn Aquementas. Let him attack you, then head back to Gadgetzan.
- Take a flight to Marshall’s Refuge. Go into the cave and turn in Aquementas. Accept the next quest: Linken’s Adventure.
- Immediately hand in Linken’s Adventure. Use Umi’s Mechanical Yeti on Quixxil. Hearthstone back to Orgrimmar when you are done.
- Board the zeppelin to Undercity. Withdraw any quest items you put in the bank earlier. Use the auction house, repair, and sell junk now.
- Run to the Apothecarium and turn in Seeping Corruption. Accept the next quest: the next part of Seeping Corruption.
- Immediately turn in Seeping Corruption. Accept the last quest: the last part of Seeping Corruption.
- Click the green pot next to Chemist Fuely. Hand in the last part of Seeping Corruption.
- Now click the green pot again to receive an Un’Goro Tested Sample. Loot it to receive a Pure Un’Goro Sample, although this is not a guaranteed drop. Repeat this until you have five of them.
- Click the red pot to collect a Corrupted Test Sample. Open it to find a Corrupted Felwood Sample, also not a guaranteed drop. You need five of these too.
- Now turn in A Sample of Slime… and …and a Batch of Ooze. Accept the next quest: Melding of Influences.
- Go visit Sylvanas and accept the quest: The Champion of the Banshee Queen. Head to the inn and set your hearthstone to Undercity.
- Take a flight to Kargath. Accept two quests: The Rise of the Machines and Dreadmaul Rock.
- Go south out of Kargath until you find the western path leading to Searing Gorge. When you get through, follow the path leading west and then go south through Blackrock Mountain.
- Make your way through the mountain to the other side to enter Burning Steppes. Follow the road until there is a large orc tower to your right.
- Head north from here to reach Flame Crest. Pick up the flightpath here. Accept the quests: Tablet of the Seven and Broodling Essence.
- Run southwest from here to find the Ruins of Thaurissan. Kill all the golems here. Proceed to the furthest building and look for a tablet. Click it to transcribe it.
- Continue killing golems to finish The Rise of the Machines. When you’re finished, go east to until you arrive at Dreadmaul Rock.
- Climb up the mountain and fight the ghost next to an altar. Turn in Dreadmaul Rock. Accept the next quest: Krom’Grul.
- Krom’Grul can be in any of the caves in Dreadmaul Rock. Fight your way through them and explore them all until you find him. Kill and loot the Sha’ni’s Nose-ring you need.
- Circle around to the north of Dreadmaul Rock to locate Black Broodlings. Assign Draco-Incarcinatrix 900 to an action key. Before you kill broodlings, use the device at low health.
- Collect eight Broodling Essence. Enter the cave to your northeast. Accept the quest: A Taste of Flame.
- Speak to the quest giver, then hand in A Taste of Flame. Accept the next quest: the dungeon variant of A Taste of Flame.
- Run west all the way back to Flame Crest. Hand in Broodling Essence and Tablet of the Seven. Accept the quest: Felnok Steelspring.
- Get on a flight to Kargath. Turn in Krom’Grul and The Rise of the Machines. Pick up the next quest: the next part of The Rise of the Machines. Head east and find Lotwil’s Camp almost directly east of Kargath along the northern road that runs east to west. Turn in the second part of The Rise of the Machines. Pick up the final part of The Rise of the Machines.
- Use your hearthstone to return to Undercity. Use the auction house, repair, and sell junk now. Go out of Undercity and follow the road heading east.
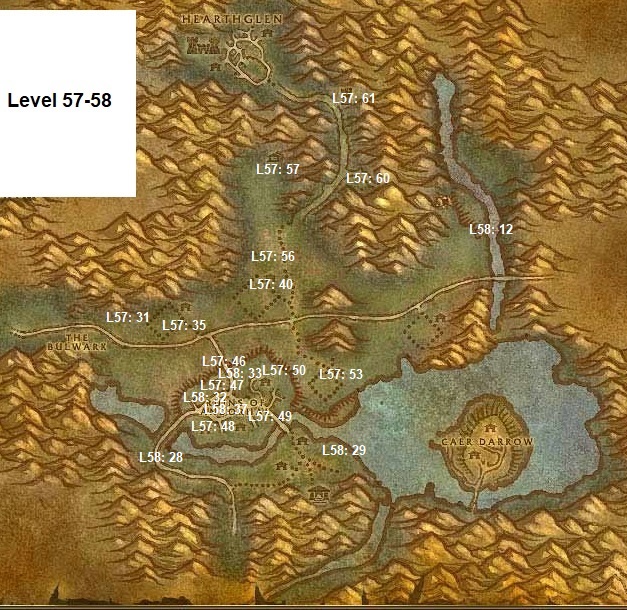
- Stop when you reach The Bulwark. Hand in The Everlook Report. Accept his quest: Argent Dawn Commission. Immediately turn in Argent Dawn Commission.
- Whenever questing in Western or Eastern Plaguelands, equip the Argent Dawn Commission to get a variety of scourgestones. These will increase your reputation with the Argent Dawn.
- Accept the quest: Scarlet Diversions. Pick up a Flame in a Bottle from the Box of Incendiaries next to High Executor Derrington.
- Following the road heading deeper east into Western Plaguelands. Go north when you see the camp of Scarlet humans. Kill all the humans you see there.
- Once the camp is clear, click on the Command Tent to destroy it. Use your Scourge Banner afterwards.
- Head west along the road to return to The Bulwark. Hand in Scarlet Diversions.
- Accept the next two quests: The Scourge Cauldrons and All Along the Watchtowers. Immediately turn in The Scourge Cauldrons.
- Accept the follow up quest: Target: Felstone Field. Leave The Bulwark by heading east along the road. Stop at Felstone Field to your left.
- Fight your way to the cauldron in the field. Kill and loot Cauldron Lord Bilemaw when you get close.
- Click the cauldron and turn in Target: Felstone Field. Accept the next quest: Return to the Bulwark. Head north from here and fight your way into the large house.
- Accept the quest: Better Late Than Never here. Leave and go inside the other house to find Janice’s Parcel. Click it to turn in Better Late Than Never.
- Accept the next quest: part two of Better Late Than Never. Now head west along the road to reach The Bulwark again. Hand in Return to the Bulwark.
- Pick up the next quest: Target: Dalson’s Tears. Leave The Bulwark by heading east. This time instead of stopping at Felstone Field, go further east to reach Dalson’s Tears.
- Fight your way to the cauldron again. Kill and loot Cauldron Lord Malvinious. Click the cauldron to turn in Target: Dalson’s Tears. Accept the follow up quest: Return to the Bulwark.
- Head north now to reach the houses. Fight your way into the right house and look for Mrs. Dalson’s Diary. Accept the quest: Mrs. Dalson’s Diary.
- Immediately hand in Mrs. Dalson’s Diary. Leave the house and go to the barn and kill a Wandering Skeleton. Loot him and find the outhouse behind the barn.
- Open the outhouse. Kill and loot Farmer Dalson. Return to the houses.
- Head to the left house now and fight your way upstairs. Use the Locked Cabinet to accept and instantly turn in the quest: Locked Away.
- Exit the house and run all the way south across the road to find the Ruins of Andorhal. Run west to find the entrance, but get off the road and instead stick to houses as you fight enemies in here.
- Head for a tower to your right. Place your Beacon Torch outside.
- Run southwest to the next tower. Place your Beacon Torch outside here too.
- The next tower is to the southeast. Stay away from Araj the Summoner in the middle of town. When you arrive, place your Beacon Torch outside.
- From here, go north to find yet another tower. Place your Beacon Torch outside this one too. Now you can exit the Ruins of Andorhal.
- Run west on the road back to The Bulwark. Turn in All Along the Watchtowers and Return to the Bulwark. Accept the follow up quests: Scholomance and Target: Writhing Haunt.
- Immediately hand in Scholomance. Accept the follow up quest: Skeletal Fragments.
- Now go east out of The Bulwark. Follow the road until you see a field to your south. Run over to it to access Writhing Haunt.
- Fight your way to the cauldron. Kill and loot Cauldron Lord Razarch. Click on the cauldron and hand in Target: Writhing Haunt.
- Accept the next quest: Return to the Bulwark yet again. Go north to the houses here to find a tauren inside. Accept the quest: The Wildlife Suffers Too.
- Head north from here to return to Dalson’s Tears. Kill any Diseased Wolf that you find along the way. Go north of here and kill wolves here until The Wildlife Suffers Too is done.
- Go further north until you find the Northridge Lumber Mill. Head northeast of it to find a trail. Follow the trail to accept the quest: Unfinished Business.
- Run southeast of here until you find a scarlet camp. Kill any humans that you need here, then run further north to find the other types.
- Return northeast of Northridge Lumber Mill and turn in Unfinished Business. Accept the next quest: the next part of Unfinished Business.
- Return to the road east of you. Follow it and take the path to the right. Go up the slope to kill and loot Huntsman Radley.
- Run back to the road you were on and go left this time. Fight you way towards the tower and wait for Cavalier Durgen to come down. Kill and loot him.
- Head southwest back to Kirsta Deepshadow and turn in Unfinished Business. Kill scarlet humans east of here to reach level 58.
Level 58

- Use your hearthstone to return to Undercity. Turn in Better Late Than Never. Accept the next quest: The Jeremiah Blues.
- Immediately hand in The Jeremiah Blues. Accept the next quest: Good Luck Charm. Use the auction house, repair, and buy food if you need it.
- Head out of Undercity and follow the road back to The Bulwark. Hand in Return to the Bulwark. Accept the next quest: Target: Gahrron’s Withering.
- Head east out of The Bulwark and stop off at Felstone Field. Run up to it and enter the house on the left. Go to the second floor and turn in Good Luck Charm. Accept the next quest: Two Halves Become One.
- Exit the house and run to the barn. Kill and loot a Jabbering Ghoul. Return to the house. Use the charm in your inventory to combine the two pieces. Turn in Two Halves Become One.
- Run south back to the road and start following it east. Stop when you can see Writhing Haunt and run south.
- Fight your way into the house so you can turn in The Wildlife Suffers Too. Pick up the next quest: the next part of The Wildlife Suffers Too.
- Head east from here along the coast to find Gahrron’s Withering. Kill any Diseased Grizzly bears that you see.
- Fight your way to the cauldron in the middle of Gahrron’s Withering. Kill and loot Cauldron Lord Soulwrath. Click the cauldron and hand in Target: Gahrron’s Withering.
- Accept the quest: Return to the Bulwark once again. Run southwest of the field and kill as many bears as you need to finish your quest.
- Then run back to Writhing Haunt to your southwest and turn in The Wildlife Suffers Too. Accept the follow up quest: Glyphed Oaken Branch.
- Run northeast back to the road now. Follow it as you cross the bridge into Eastern Plaguelands. Once you’re in Eastern Plaguelands, start running north.
- Don’t stop running until you find a house with Tirion Fordring nearby. Accept the quests: Blood Tinged Skies, Carrion Grubbage, and Demon Dogs.
- Start heading south the way you just came. For the next several few steps, kill any Plaguehound Runts, Carrion Grubs, and Plaguebats that you see. Run east when you can and find the Marris Stead.
- Hand in The Champion of the Banshee Queen. Accept the following quests: Un-Life’s Little Annoyances, To Kill With Purpose, and The Ranger Lord’s Behest.
- Start running southeast and across the road. In addition to everything in step 14, kill any Noxious Plaguebats and Monstrous Plaguebats that you see. Keep going until you reach Darrowshire.
- Head to the western house and turn in Sister Pamela. Accept the next quest: Pamela’s Doll. Search all the houses in Darrowshire to find Pamela’s Doll’s Right Side, Pamela’s Doll’s Left Side, and Pamela’s Doll’s Head. They are often on the second floor and can be found on the ground.
- Combine the pieces to form Pamela’s Doll. Hand in Pamela’s Doll.
- Accept her two quests now: Uncle Carlin and Auntie Marlene. Leave the area and head northwest back across the road.
- Now you’re going to kill all the beasts needed for your quests. First go near the Marris Stead for Blood Tinged Skies and Plaguehound Runts for Demon Dogs.
- From there, go east near the Infectis Scar. Kill worms there for Slabs of Carrion Worm Meat. Stay in the area until you’ve killed enough Plaguehounds and Noxious Plaguebats for your quests.
- Then go north and kill the Monstrous Plaguebats and Frenzied Plaguehounds you find until Un-Life’s Little Annoyances and Demon Dogs are done.
- You should now be south of Blackwood Lake and the river that connects to it. Go straight east until you arrive at Light’s Hope Chapel.
- Pick up the flightpath here. Hand in Uncle Carlin and Duke Nicholas Zverenhoff. Accept the quest: Defenders of Darrowshire.
- Run south and accept the quest: Zaeldarr the Outcast from Caretaker Alen. Go further south and kill worms until Carrion Grubbage is done.
- Use your hearthstone to return to Undercity. Use the auction house, repair, sell junk, and buy food if needed.
- Then leave Undercity and follow the road back to The Bulwark. When you arrive, turn in Return to the Bulwark. Pick up and instantly finish the quest: Mission Accomplished!
- Accept the next quest: A Plague Upon Thee. Follow the road out of The Bulwark southeast until you see Andorhal. Head across the water on its western side and run south on the road.
- Continue following the road east until you get to Chillwind Camp. Keep going east now to reach Sorrow Hill. Turn in Auntie Marlene Here. Accept the next quest: A Strange Historian.
- Go north and look for Joseph Redpath’s Monument. Click it to loot Joseph’s Wedding Ring.
- Run west until you’re back on the road and follow it all the way west. Continue on the path to enter Andorhal.
- Run north and enter the house. Go up to the second floor and hand in A Strange Historian. Accept the next two quests: A Matter of Time and The Annals of Darrowshire.
- Exit the house and run towards the north gate. Look east of the watchtower you see. Run over to those wooden structures and use your Temporal Displacer.
- Kill the worms that spawn and loot them. Repeat this until you kill 15 Temporal Parasites.
- Head southwest back to Chromie in the house. Turn in A Matter of Time. Accept the follow up quest: Counting Out Time.
- Leave the house and head northeast. Check all of the destroyed buildings and look for Small Lockboxes. Loot them to find an Andorhal Watch. Repeat this five times.
- Go towards the center of town and enter the large building. Open Musty Tomes until you find Annals of Darrowshire. Pick the one that has only white pages (not white and brown).
- Run southwest back to the house Chromie is in. Hand in Counting Out Time and The Annals of Darrowshire. Save the Attuned Dampener for level 60. Pick up Brother Carlin.
- Continue killing skeletons in Andorhal to finish Skeletal Fragments. Then, leave via the north gate. Head northeast to the main road.
- Follow the road all the way east to the river. Cross it and head north until you find Tirion Fordring again. Turn in Demon Dogs, Carrion Grubbage, and Blood Tinged Skies.
- Accept his next quest: Redemption. Wait a minute, then turn Redemption in. Pick up another quest: Of Forgotten Memories.
- Head south to make your way to the main road. Follow it into Eastern Plaguelands.
- Continue on the road until you are south of the Marris Stead. Run south of the road to find the Undercroft. Find Tirion Fordring’s Grave behind the back of the crypt.
- This next part is very difficult solo, try to find someone to help you. You can do it if you have enough crowd control and use cooldowns. Click the Loose Dirt Mound.
- This will spawn Mercutio Filthgorger and three bodyguards. Whether you do it alone or in a group, kill Mercutio and loot him. Don’t worry if you can’t kill him. Just grind on trolls for a while outside the crypt to compensate.
- Head down into the crypt now. Fight your way to the bottom to find Zaeldarr the Outcast. Kill and loot him. Click the Torn Scroll while you are here to pickup the quest: Hameya’s Plea.
- Run north back to the road and follow it west. Head north at the river and turn in Of Forgotten Memories to Tirion. Accept the next quest: Of Lost Honor.
- Run south back to the road. Follow it east until you reach the split at Corin’s Crossing. Head north from here until you can go east around the Pestilent Scar.
- Go around the Pestilent Scar and go east to Light’s Hope Chapel. Turn in Zaeldarr the Outcast and Brother Carlin. Accept the next quests: Heroes of Darrowshire and Villains of Darrowshire.
- You should be level 59 now. If not, go west and kill worms until you are.
Level 59
- Head south out of town until you can go west past the Pestilent Scar. Continue going until you reach the road. Go across Corin’s Crossing and enter Infectis Scar. Search for the Shattered Sword of Marduk and pick it up.
- Leave Infectis Scar and run north towards the lake. Jump into the lake and dive towards the center. Look for some fighting ghosts and swim towards them.
- Click and loot the Horgus Skull. Exit the lake via the north coast. Head northeast until you reach Plaguewood.
- Look for Large Termite Mounds while you are here. You also need to kill Cannibal Ghouls to spawn aspirit. Click the spirit to release it.
- Stay in the area until Defenders of Darrowshire and A Plague Upon Thee are both finished. Kill any undead you see here while you’re running around.
- Leave Plaguewood and head east until you find the road going north. Follow it to reach Quel’Lithien Lodge.
- Fight your way inside the main building here. Go to the right and kill the Quel’Lithien Protectors you see. Loot them for the Quel’thalas Registry.
- Keep killing elves in the area until The Ranger Lord’s Behest is finished. Leave the lodge and follow the mountain going east.
- Fight your way up the path when you see it to reach Zul’Mashar. Look for Infiltrator Hameya near the bottom of the pyramid. Wait for him to be alone, then kill and loot him.
- Make our way back down the ramp and start going southeast to reach Northdale. Look for the pool of water south of here. Fight your way into the water and look for a cage. Swim down there and pick up the Symbol of Lost Honor.
- Get out of the water and head southeast to return to Light’s Hope Chapel. Turn in Villains of Darrowshire and Defenders of Darrowshire. Accept the next quest: Heroes of Darrowshire.
- Head west around the Pestilent Scar again to reach Corin’s Crossing. Kill the undead there to collect Living Rot. When you have seven of them, use the Mortar and Pestle in your inventory to create Coagulated Rot.
- Now go west along the main road now until you are south of Marris Stead. Head south and go to the Undercroft. Go behind the crypt and use the dirt to turn in Hameya’s Plea.
- Now go north past the road to Marris Stead. Turn in Un-Life’s Little Annoyances, To Kill With Purpose, and The Ranger Lord’s Behest. Pick up the next quests if you’d like, but you won’t need them to reach level 60.
- Head west and then north when you can along the mountain to reach Tirion Fordring. Turn in Of Lost Honor. Accept his next quest: Of Love and Family.
- Head south to the road and then cross the bridge west into Western Plaguelands. Follow the road all the way west to reach The Bulwark.
- Turn in A Plague Upon Thee and Skeletal Fragments. Accept the next two quests: Mold Rhymes With… and part two of A Plague Upon Thee.
- Run back and follow the road east until you see Dalson’s Tears. Head north past it until you reach Northridge Lumber Camp. Make your way to the lumber mill.
- Look for the Northridge Lumber Mill Crate here. Click it and then use your Termite Barrel. Use the green barrel that appears to turn in A Plague Upon Thee.
- Pick up the next quest: the next sequence of A Plague Upon Thee. Run all the way south now back to the main road. Follow it east until you arrive at Gahrron’s Withering. Run south and then head into the water.
- Swim through the water to reach the island on the other side, Caer Darrow. Enter the house on the west side and turn in Of Love and Family. Accept his next quest: the next part of Of Love and Family.
- Use your hearthstone to return to Undercity. Then leave and take the zeppelin to Orgrimmar. Purchase your dungeon set 1 bracers now and make sure you have two Thorium Bars.
- Then take a flight to Everlook. When you arrive, turn in Felnok Steelspring and Are We There, Yeti?
- Take a flight to Thunder Bluff. Head to Elder Rise and turn in Glyphed Oaken Branch. Once finished, take a flight to Gadgetzan. Turn in Mold Rhymes With… Then accept his next quest: Fire Plume Forged.
- Now get on a flight to Marshall’s Refuge. Go south to Fire Plume Ridge and climb to the top. Run near some lava and use your Skeleton Key Mold to receive an Unfinished Skeleton Key.
- Head to the south side of the mountain. Keep an eye out for a Primal Ooze here. Pull it and drop it to 20% health or so, then use the Encased Corrupt Ooze you have in your inventory.
- Kill and loot the Gargantuan Ooze that results from this. Leave the area by going northwest. Look for a ramp leading out of Un’Goro Crater near the northwest corner.
- Follow the path to take you into Silithus. Continue going along the ridge as it goes south and curves west until you reach Cenarion Hold. Pick up the flight path here and then immediately hearth to UC.
- Return to the Bulwark and turn in Fire Plume Forged, then pick up the quest next quest Araj’s Scarab from Apothecary Dithers.
- Return to The Ruins of Andorhal and defeat Araj the Summoner to get Araj’s Scarab. Note: This is not an easy task, as he is a level 61 Elite. If possible, you might want to get a group together to take him on, which will transition well into the last steps of this guide.
- Once you have the scarab, immediately return to The Bulwark and turn in Araj’s Scarab, then pick up The Key to Scholomance, as well as Barov Family Fortune from Alexi Barov.
- At this point, you are going to want to do the dungeon Scholomance. If you are a rogue and your lockpicking is high enough, you can technically skip the Key to Scholomance and its lead up quests, but you will miss out on all of the xp, so don’t. There are about four other quests to get for the dungeon, besides Barov Family Fortune. If you return to Lights Hope Chapel, you can pick up Plagued Hatchlings, which will unlock the repeatable quest Healthy Dragon Scale. On the island of Caer Darrow, outside the dungeon itself, you can find the ghost of Eva Sarkhoff. Speak to her and read through the dialogue. Once done, she will offer the quest Doctor Theolen Krastinov, the Butcher which is part of a chain that you should also finish.
- Once you’ve completed Scholomance, you can turn in Doctor Theolen Krastinov, the Butcher to Eva, just outside of the dungeon. Then Barov Family Fortune at the Bulwark and Plagued Hatchlings at Lights Hope Chapel. At this point, you should have dinged to 60, or be very, very close. If not, pick up The Last Barov from Alexi Barov at the Bulwark when you make the turn in to him. Completing that quest rewards a very unique trinket the Barov Peasant Caller. If you are still not at 60, you can pick up Krastinov’s Bag of Horrors from Eva and Healthy Dragon Scale at Lights Hope Chapel when you turn in Plagued Hatchlings, then run dungeon again.If you’d rather not group up again before 60, there are a handful of quests at Cenarion Hold in Silithus that you can finish to get you there. Just hop on the zeppelin and take a flight there, since you got the FP earlier. At that point, you should definitely be level 60.
Level 60
Congratulations on reaching level 60! We hope this guide made things easier for you and that you had a blast along the way. Thanks for taking this journey with us and happy hunting on your fresh level 60 character!
About the Author

Missing: Turn in Akiris by the Bundle.
Excellent guide, worked great on my path to 60. I will note that none of the Silithus quests at the end appear to have been implemented in Classic as of yet. However, I was able to reach 60 in the middle of the eastern plaguelands quests, so this wasn’t an issue.
Thanks, yeah this was brought to our attentions and the end of the guide has been fixed to help with it.
Thank you for this guide! It’s great and easy to understand.
But i think, i can give you a suggestion for improvement 🙂
At the section of level 34 point 18 you wrote, that the player should keep killing trolls until hitting level 35 AND getting [Pendant of Myzrael]. Since i farmed those trolls for about 90 minutes (i got half way to lvl 36 doing this) without getting that necklace dropped, i checked the drop rate here:
https://classic.wowhead.com/item=4614/pendant-of-myzrael
If the list of wowhead is correct, the drop rate from the Witherbark Trolls is around 0.04%. I guess, before you see this item, you hit lvl 60. 😛
Maybe it’s better to take this quest item out of the guide (or rewrite the sentence). All the other informations are correct and efficient, nice work!
This.. Should we just give up on that item?
That part has been updated, thank you!
Heya, If this is intended for Blizzards Classic WoW servers then the quest chain starting from level 58 part 23 (An Earnest Proposition) is not available yet and wont be until phase 5.
Also the map to Swamp of Sorrows at level 40 part 6 is a little off. The path you’ve mapped takes you to Redridge Mountains.
Nice guide 🙂
Thank you we’ll get that updated!
Was this ever fixed?
Zapper Fuel is picked up at level 54, but the guide doesn’t have us do anything with it.
This was a good catch, Klint, thank you. We decided to simply remove the quest as the reason it’s never finished is that it isn’t a very efficient one to have picked up in the first place. Sorry if this interrupted your experience at all. Again thanks for helping us to improve the guide.
The guide is really well written and very helpful. It was just something I noticed and thought I would share. Thank you for your diligence and hard work!
Great guide! Been using it a lot!
Just a FYI for level 49, you mention hearthing back to Mojache, but you’ve never said to set the hearth there from gadget. Not a big deal since it’s a short flight from gadget, where the hearth was previously set.
Used this for a horde toon and it is phenomenal. It has spoiled me though as I cannot find an alliance equivalent. Does anything exist?
Great to hear! For alliance you can use Judgement’s Alliance Leveling Guide:
https://www.warcrafttavern.com/guides/judgements-wow-classic-alliance-leveling-guide-1-60/
Tyr! Thank you so much for your input on this. You’re absolutely correct, this part is somewhat confusing, actually. We added a line at line 12 in level 49 to clear up that confusion. Thank you so much again for helping us to improve out guide, along with your other, much appreciated positive feedback. Hope you’re having a wonderful day.
chapter 15 of lvl 25 have a typo in it, I think you meant lvl 26?
Fixed, thank you!
Awesome guide, i started it just now from lvl 21 !!, any further recommendations for a undead mage ?
You can also check out the Mage leveling guide, lot’s of good stuff in that one for Mages
https://www.warcrafttavern.com/guides/mage-leveling-guide/
Is there a backup of Bustea’s leveling guide that used to be here? My link redirects me to Nightfall’s guide now but I prefer the light hearted banter writing style of the previous one + Bustea’s had the extra nostalgic effect cuz I had found that exact guide 10 years-ish ago 🙂
Apologies, but that version is no longer available.
I am an undead who went to the ork region. The trainers won’t give me quests.
When mentioning the Magram Marauders you have the wrong location on the map, you marked where the gelkis are and say kill Magram… they are in the South-East.
Lvl 37 Step 30 you say to collect clams from clam shell for the quest “clam bait”. the guide never says to pickup that quest so when I got there I couldnt loot the clams..
There are some things missing from the guide – When do we turn in Pool of Tears, when do we pick up Some Assembly Required, the picture showing you where to go from duskwood to swamp of sorrows is wrong you turn right way before the end of that arrow trough the deadwind pass while on the picture you are sending us into redridge mountains
Level 37 – 13.
Magram Centaurs are not there, those are Gelkis.
Hey, love the guide , thank you very much. Noticed something a bit off though. Level 37, step 13. You mentioned to pick up Gelkis Alliance and then run east out of Shadowprey to a village of centaurs, however the centaurs there are the Gelkis. The Magram cenaturs you need are actually in the southeast corner. Maybe that’s what you meant by “Run east along the road out of town to reach a village of centaurs.” however it seems a little confusing to me. Could you clarify? Thanks!
Hey there! Thank you, this has been updated!
Level 40, step 6. That path will take you to Redridge Mountains. Do you mean to go through Deadwind Pass?
On level 38 you say grind for Some Assembly Required. But never say to accept this quest.
Thanks for the guide, currently following it and it’s working nicely 🙂
I think there’s an error with 38.4/38.15, it is assumed that “Some Assembly Required” was picked up but the pickup isn’t done in the guide (at least I didn’t have it and can’t find it with ctrl+f).
Also “Skullsplitter Tusks” is never picked up before first being mentioned at 43.39 I think.
Got it, thank you. We have some updates being pushed out this week so that helps!
“Level 10
[…]
Take a flight to Orgrimmar. Go to the Valley of Wisdom and pick up the quest: Hidden Enemies. Turn in The Admiral’s Orders too.”
There is no flight master in Razor Hill.
Following the guide since level 01. I’m in 24 at the momment and loving it. Congratulations.
Heya, at level 54 part 45 the guide instructs players to pickup the quest Volcanic Activity, which is completed at level 55 Part 11. Then at level 56 part 3 it says to once again pick-up the quest Volcanic Activity, I’m assuming at this point it’s meant to say to turn in the quest.
Great guide! Is this an add-on by chance?
In Desolace, the guide tells you to pick up 10 Soft-Shell Clams, but it doesn’t tell you to pick up the quest first. So I had to walk all the way back lol
Same thing with Some Assembly Required in STV.
At level 38 step 11, the guide tells you to hand in “An Unusual Patron”, but it has not previously told you to pick up this quest
At level 39 step 9, it is said that you should hand in the quest “Sunken Treasure”, but it is not previously specified that you should pick up this part of the quest.
This is fixed, thanks!
Thank you this is corrected!
This is fixed, thank you!
Yep, apologies there the instructions and the images have been updated!
Thank you this has been fixed!
Sorry about that, undead and taurens should start at level 12.
Looks like it forget to turn in the quest too. Thanks for the guide been loving it so far.
Darn, okay got that fixed too. Thank you!
Fixed, thank you!
I noticed you have us Pick up A New Ore Sample, but never do anything with the quest regarding its completion.
Fixed, thanks!
Syndicate Missive. 2am-6am grinding this, gave up in the end. no way can that quest be worth the XP
i dont see a point in the guide when you turn in to steal from thieves?
Fixed!
U should hand in To Steal From Thieves. in Undercity at the end of lvl 36 (part 17)
Level 26 you have us pick up a new ore sample but never indicate when to complete it or turn it in.
Thanks, got that updated!
On level 29 you say to pick up hypercapacitor gizmo but then never put when to complete or turn it in
Fixed, thank you!
Hey. Been following this guide since classic release. I really like this guide, It’s very easy to understand what to do! Currently level 47 on my druid!
At 26-3 you have us pick up the quest A New Ore and then at 28-13 you have us turn it in. Nothing in between there says when or where to do it. I have Questie so I knew where to go but just a heads up.
The guide mentions turning to “To Steal From Thieves” in order to reach level 36, but it doesn’t actually tell you to kill the required targets until you are already level 36. A little bit of inconsistency there.
lvl 58 #47 Head East is West and is not first time i find East instead of west or west instead of east in the past 3-4 levels. about 4-5 mistakes but overall very good guide Already recommending it to friends
lvl 58 #49 Says turn in brother carlin…. step #37 should have said to pick it up.
Fixed, thank you!
This should be fixed, thank you!
Great guide thank you. I noticed yesterday though none of the quest names are a different color anymore. Has something changed or did I mess something up on the webpage? Thank you for any input.
Sorry about that, happened during one of our updates to the guides. All fixed now!
I think you should note to turn in A Peon’s Burden at 6-1, as well as WANTED: Arnak Grimtotem at 29-14 as otherwise these quests are picked up and completed but simply not turned in. Great guide nonetheless!
That’s been updated. Thanks so much for the catches!
At level 56 step 30 it says to go into Shadow Hold and kill Rakaiah, for the quest Retribution of the Light, which is a follow up to the quest Rescue from Jaedenar, which you can start around level 56 step 13 by looting the start item. Would be helpful to include that and not waste ppls time with running anymore than they already have to.
At level 57, part 26. It should say to hand in The Rise of the Machines, before using HS to UC.
But great guide! helped me loads. Cheers!
“Once the guards here begin to attack Sharptalon, help them kill the beast” I killed him 3 times with the guards without it allowing me to loot it. Those undead are ninjas. Also really not a fan of the kill mobs until you ding end to each levl up
From levl 27-28 is litteraly turn in 4 quest and farm some then grind laughing sisters until 28 which is more than 10 bars off.
There is no information about turning in the quest A Vengeful Fate which you accept at the section of level 30, step 2.
Looks like it should be at level 31, step 10 when you fly to Thunder Bluff to turn in the quest Steelsnap.
Am i right or i missed something ?
It seems none of the dungeon quests are marked to be turned in, possibly to assist those who can’t or won’t do dungeons for whatever reason. Personally, I just went ahead and turned them in immediately upon completion, which seemed like the correct thing, e.g. hitting 31 after Razorfen Kraul requires you to turn in not only A Vengeful Fate but the other RFK quests as well.
We’ve caught a number of these and corrected them. If you see any others, please feel free to let us know about them and thank you!
Thanks for catching this. We’ve made changes to the guide to fix this and you’re absolutely correct about where that turn in should go. Thanks again.
You’re right. Unfortunately there aren’t a lot of quests for Hordies in Ashenvale at this patch. Some of the more interesting ones, like the ones for Felfire Hill, don’t appear until later patches. That being said, one aspect of Ashenvale that is very important to Horde players WAS missing and that was Blackfathom Deeps. Changes have been made to the guide directing players to the dungeon, along with some suggested quests for it. Thank you for seeing this and letting us know, so that we could make those corrections.
Hey CLEAVUS, sorry you had to do it three times. This quest has since been removed from the guide, as at that level, it’s more of a group quest and shouldn’t be attempted solo. Yes, the grinding is a slog. If you’re having trouble with leveling, perhaps you might try running Blackfathom Deeps? It was realized that almost no mention of the dungeon was made in the guide and BFD is an important milestone for Horde level progression. I hope that helps. Thanks again for bringing this to our attention.
Safety, you are 100% correct. We’ve got that fixed and thank you very much for the catch.
Yeah, thanks Gurashu, this one was kind of complicated since you don’t get Retribution of the Light two quests AFTER Rescue from Jaedenar. We’ve since made changes advising players to be wary of the rescue quest, as it is difficult and to not engage the Rakaiah if they can avoid it. Sorry it was such a bear and thank you again for letting us know about this.
Thanks for catching this one. It’s been addressed and fixes were implemented.
Yes it was added at level 36 step 17.
This ones been fixed. Thanks for catching that!
In Classic P2 u cant Quest in Silithus tbh , just the 2 Quests and the Graveyard and the one from Azshara
P1 Sorry
Hey snooker, thanks for bringing this to our attention. You’re 100% correct, those quests just aren’t there. We had to figure out a reasonable fix for this, which was why it took so long to address your comment. Sorry about that, by the way. Anyway, we’ve changed the end of the guide to help players navigate the last few bars of their xp and it should get the great majority of players to 60.
Thanks again for pointing this out, it was a great help.
For A Sample of Slime, you said collect 10 samples, and 30 for the Un Goro one; went to hand it in and got 0 Felwood samples after 10 tries so might wanna update this to 30 as well.
Hey Jake. Sorry you had to do go back and get those samples. This was a really good suggestion and the guide has been updated to reflect it. Thanks so much, man and sorry again.
No problem, just skipped that part; doing some extra dungeon quests was more than enough to get to 60 at the start of your level 60 portion. Loved the guide and even did some quests I never knew existed, thanks for the nice guided tour to 60!
Jez, it was driving me crazy looking for that quest, ty.
The part for the D2 Set bracers is still up in the guide btw. Thanks for this awesome guide!
Great guide however level 54 Felwood Slime Sample (collect 10) was not enough to complete the quest at Undercity at 57 from the 10 advised I got 3 [Corrupted Felwood Sample] out of the 5 required to complete the quest. RNG maybe advise collecting more than 10 to save returning.
Hey I think it never says to turn in Fiery Menace in Burning Steppes. Love the guide been a huge help. Lvl 53 warrior with about 7 days played.
Hello! Thanks a lot for a great guide, that I am happily following.
I will be posting some remarks.
To start, the Level 8, entry #2: “Once you’re near Sen’jin village, start heading west until you see some humans. Enter the opening in the mountain.” should probably be “see some centaurs” (or half-humans)!
Aka, thanks! You are absolutely correct about this and the guide has been fixed to reflect your suggestion. We even put in a note for folks who don’t actually know what centaurs are. Thanks again.
Hey Conine. You’re absolutely correct, we forgot to get that turn in noted. It’s been fixed, so thank you very much for catching that. Very glad that you’re enjoying the guide and finding it useful!
In 1.12 dont get quests in Silithus
Seems a bit sadistic to recommend approaching Helcular’s Grave from the North East instead of from the South East, solo at level 35. Most classes will just die repeatedly.
Hey! Great guide, I can see that at level 43 point 30, you write to kill Nezzliok, but don’t mention that you also have to kill Gan’zulah the same place
You are absolutely correct, Xiara and thank you very much for bringing that to our attention. Gan’zulah has been added to that line as a target, as have more detailed instructions about why they must both be killed. Again, thanks and let us know if you spot anything else.
Is it possible to start this guide flawless at lv18?
I haven’t done any of these quests yet.
Hey! Observation: Level 49 point 28, you send us way south to some yetis, well.. these are the wrong yetis. The yetis we’re looking for are in the upper cave!
You should mention that this guide doesn’t work on a PvP server since you explicitly tell people to grind in heavily farmed areas. (Blasted lands isn’t really a zone you can do on a PvP server).
Level 13 step 6 should say: From here, go SOUTH until you hit the road…
It currently says go NORTH, then EAST to Ratchet. But that won’t take you to Ratchet. Just a heads up.
Hey Berlin Ghosts,thanks for your input here. Yeah, the language here was kind of confusing, wasn’t it? Thanks so much for catching that for us! The guide has been updated to be much more clear about those directions. Thanks again for helping to improve the guide and have a wonderful day.
The Bloodsail Captains quest at level 44 is WAY WAY WAY too early unless you’re a Mage. They’re each 2+ levels (Farallon being 4 levels) above you and the “take it slow” doesn’t work with a 6 minute respawn.
Anyone that did this guide has a /played?
Not lvl 60 yet, but sitting at 5d 1h currently at lvl 56.
hello, i just wanted to bring to your attention that in level 42 the guide tells you to pick up the quest “broken alliances”, then tells you to turn it in, but does not mention when to actually do the quest, and it is also a level 50 elite quest. the guide has been working wonderfully at this point, there doesnt seem to be anything connected to the rest of the guide with this quest so i have skipped it for now. Thank you so much for your hard work.
Hey ShadowProfit, sorry for the delay in response, but this took some looking into! What we’ve surmised is that you must have been looking at the second half of the quest Broken Alliance (https://vanillawowdb.com/?quest=793) which is, as you’ve pointed out, meant for a higher level, or for a group. However, the preceding quest in the chain and the one we linked in the guide (https://vanillawowdb.com/?quest=782) is of a lower level and appropriate for leveling at that point. If it makes you feel any better, this confused the heck out of us at first too. I hope that’s helpful. Thanks so much for your input and have a wonderful day.
At level 16, line 10, the quest “Raptor Horns” is not marked blue.
At level 17, line 7, the quest Warsong Reports is written twice.
Hey there Zoast,
Thanks so much for your feedback. You are absolutely correct, except that the Raptor Horn did indeed need to be colored, it just needed to be colored green – not blue. We’ve made all of these changes to the guide and we appreciate once again your help with improving the guide. Have a wonderful day.
Are there alternate things to do becides grinding? I’d rather do quests that are slower but more fun than just grind.
What’s the point of picking up power stones and solution to doom at level 40 if it never tells us to do Uldaman?
Love this guide, thank you so much!
Small correction, when you say:
“Exit the lake via the north coast. Head northeast until you reach Plaguewood. “
The Plaguewood is northwest from the user’s location at that point.
is this still relevant in TBC? or are there more efficient ways to level with the changes? loved this guide in classic
You’ll end up around 15% to 20% ahead I think. It’s still usable you’ll just want to apply discretion on when best to move on if you out level an area.
Level 26 – Line 8: Should probably emphasize that you are looting the crate at the BB docks for the “Warsong Axe Shipment” and color code it, similar to other quest items you have in the guide, for consistency.
As far as I can tell, the only thing i’ve seen missing is the Regthar Deathgate chain pickup in hillsbrad. You have us picking up the chain in Desolace, but it is not available without having started the chain beforehand; at least, not on my patch. Otherwise, great guide!
Not sure if this is maintained anymore but found a few issues:
Level 38: 14. Head back to Grom’gol Base Camp by running east. (Should be west.)
Level 40: 20. Turn in Pool of Tears, then take a flight to Kargath. Take a flight to Kargath.
Thanks for the correction Fenix, I’ll get that fixed!
Level 27, Step 2: Doesn’t mention to actually loot Sharptalon’s Claw (item) and use it to get Sharptalon’s Claw (quest), with associated colors and links. (See Level 26, Step 11 Shadumbra’s Head for reference.)
Level 27, Step 3: Doesn’t mention to turn in the quest Sharptalon’s Claw.
For Level 17, Step 19, have you considered picking up the quest Arachnophobia? The mob Besseleth is found around the spider eggs, seems pretty easy to solo, and can be turned in at Sun Rock Retreat in step 20.
Forget this guide as several classes….I would say this guide is only doable as a DPS player solo!
Hm so between 39 and 40 you basically say “Kill lesser Rock elemental” ? Come on!
At level11 when entering the Barrens, you say to avoid the rare elite near the altar at the top of the mountain. He is right at the altar so how the heck can you avoid him? Also, Thal offers another quest for Hidden Enemies that takes you into RC at level 16
IS there a good “starting point” if you’ve already been leveling without a guide? I use an add-on but sometimes it isn’t great, so I wanted another good reference but im not sure where would be a good place to start implementing the steps here without missing and pre-reqs.
First off this guide is amazing. Using it for new anniversary realm but can i skip decolate at lvl 37 and grind monastery or is it intended for something later on?
For level 17 Section 8, is it just me or is it near impossible to get to Splintertree Post as described due to the level 24 Ashenvale Outrunners that pop up out of nowhere along the way? I actually started this guide late at level 21 so I’m 4 levels over this guide and still can’t get through.
It’s easy possible at lvl 17 to get to the mentioned place. You just have to stay on the road and look around for (stealthy) enemies. Sometimes you pull them anyway and need to use your class skills to flee. Depending on your class, you can use stealth, sprint or maybe even freeze (mage) or roots (druid).
And if your attacks missed and you die, revive your char at the maximum possible distance to your dead body heading towards the Splintertree Post. In most cases you revive out of the mob’s pull range and continue walking without any problems.
Why does this guide assume players will automaticly go to Barrens
I’m going to quest in Silverpine instead
Its not assuming, they are providing a route for u ( which u can either take or not)