
- Author: Furious
- Date: December 3, 2018
- Updated: June 28, 2023
- Expansion: WoW Classic
The Dreadsteed of Xoroth is the level 60 epic warlock mount in World of Warcraft Classic. The Summon Dreadsteed spell, which enables a warlock to ride a Dreadsteed, is learned from a long quest line which is outlined below. As with all other epic mounts in the game, the Dreadsteed gives the warlock a speed increase of 100%.
Shopping List
Throughout the quest line, you will be required to hand in certain components to move forward. Some of the items you will have to collect yourself from an NPC, however most are obtained via some form of profession, so be sure to check if any friends or guildmates can help with what you cannot collect yourself. Below is a list of all the items required in the order you need to hand them in:
Material Collections
- Black Dragonscale x35
- Elixir of Shadow Power x10
- Large Brilliant Shard x6
- Dark Iron Ore x25
- Arcanite Bar x3
The Xorothian Glyphs
The Ritual*
* The three items used in the end stage of the quest are the only items you don’t need to purchase if you know someone who already has them. For more details on how to obtain these items, please see the relevant section of the quest below.
F.A.Q.
Q) One of the first quests shows a level of 58 required, can I start the quest before level 60?
A) Unfortunately not, you must attain level 60 in order to receive the first quest from your Demon Trainer. You can however start collecting some of the materials listed above as early as you like.
Q) I heard that if you know another warlock with the mats, you can save money. Is this true?
A) Yes, if you know another warlock with the final three components of the quest, you can save yourself up to 250g! Read below for more information…
Q) If I know another warlock with the mats, do I have to do any of the quest stages?
A) Yes, regardless of if you know someone with the mats or not, you must still complete all the quest steps until you have the quest titled “Dreadsteed of Xoroth” in your quest log.
Q) What items do I need to purchase if my friend has some?
A) If you know someone with the J’eevee’s Jar, Black Lodestone, and Xorothian Glyphs, those are the only pieces you do not need to purchase. You will still have to collect the other items such as the Dark Iron Ore, Large Brilliant shards etc, as well as the Shadowy Potion and Xorothian Dust.
Q) Okay, so how do I find someone with the mats?
A) Well, the first step is to look at your friends list, see if you already know any warlocks who have done it. Along with your friends list, the other good way is to ask any of the other warlocks in your guild if they might have them, or perhaps do they know someone who might help.
Q) Can more that one warlock speak to the spirit of the Dreadsteed?
A) There is no limit to how many warlocks can complete the quest at one time, so bring multiples with your group if they are up to the final step. In fact, until the spirit despawns you can have warlocks join the group, enter the instance, get summoned to the circle, talk to the spirit, and complete the quest, as long as they’re done with every quest in the series but “Dreadsteed of Xoroth.”
Q) Do I have to purchase the riding skill before I do my quest?
A) Although patch 1.12.1 changed the way riding skills and mounts were purchased, warlocks have always received their riding skill upon completion of their quest, and this is still the way it works. Once you complete the final stage of the Dreadsteed quest and the spell is in your spell book, you are automatically given the Journeyman (150) riding skill.
Q) If I didn’t have to purchase the materials to complete my quest, can I purchase them later on if I want to?
A) Yes, if you wish to purchase the three items used in the ritual process down the track, they are available to buy from Gorzeeki Wildeyes.
Have a friend help
As mentioned above, you can save yourself up to 250g if you can find another warlock with the final three components of the quest to come and summon the spirit of the Dreadsteed for you. The three items used – J’eevee’s Jar, Black Lodestone, and Xorothian Glyphs – do not get destroyed when you summon the spirit, instead staying with the warlock who originally purchased them, allowing the items to be used repeatedly.
You will still need to complete all the steps of the quest until you have the one titled “Dreadsteed of Xoroth”, which is the one that requires you to enter Dire Maul and summon the spirit. Once you have this step, you can enter the instance with the other warlock who has the items, clear your way to the summoning spot and have them place the bell, wheel, and candle. Once the fight is over and the spirit is ready, you can talk to it and complete your quest!
As mentioned above, you will still be required to purchase all the other items on the shopping list above. The only ones you don’t have to purchase are:
A little history: when the quest was originally implemented, there was a lot of confusion if the reusable components were bugged. On the 4/23/2005 Fangtooth made the following post on the official warlock forums.
The reagents required to open the portal are not consumed when you use them, that is correct. It was done this way so that warlocks who have the reagents will be able to open the portal for themselves or others at a later time. The trade off for this is that any warlock who does not have the reagents will not be able to create their own portals and they will be at the mercy of others.
Warlock Epic Mount Quest Walkthrough
Getting Started
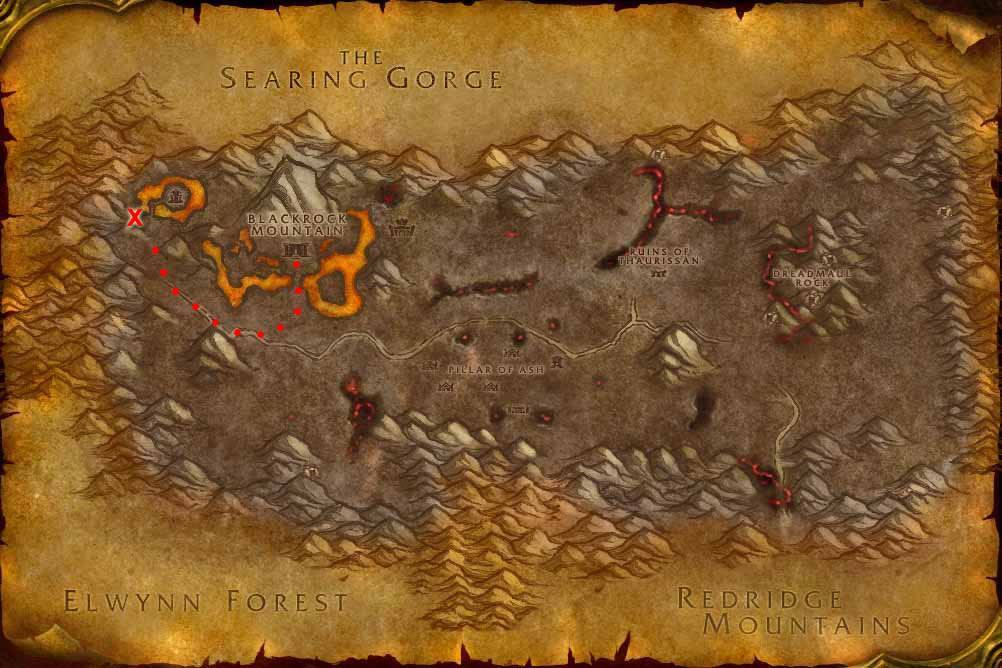
Okay, so upon reaching level 60, the Demon Trainer in a major city (Kurgul in Orgrimmar for Horde or Jubahl Corpseseeker in Ironforge for Alliance) will give you a quest simply directing you to Mor’zul Bloodbringer who is located in Burning Steppes. If you have already quested in this zone, you can simply fly to your respective areas and make your way to the northwest end of the zone, past the path leading to Blackrock Mountain. You will find Mor’zul on a hill across the road from the Altar of Storms.
Note: Just to clarify, there is also an Altar of Storms in the Blasted Lands. This is not the altar you seek.
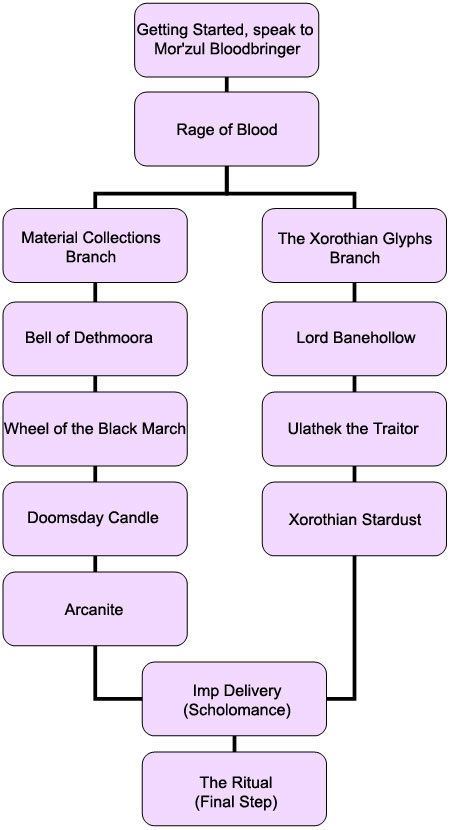
Rage of Blood (Step 1)
After you locate and speak to Mor’zul, you are given the next step in the quest chain which is [58] Rage of Blood. The dreadsteeds dwell on another world, on the fiery Plains of Xoroth, and to bind one of those famed beasts you must invoke powerful glyphs. Mor’zul can scribe the glyphs on a parchment for you, but first he will need a special ink, and it seems as if the blood of Raging Owl Beasts will do the trick.
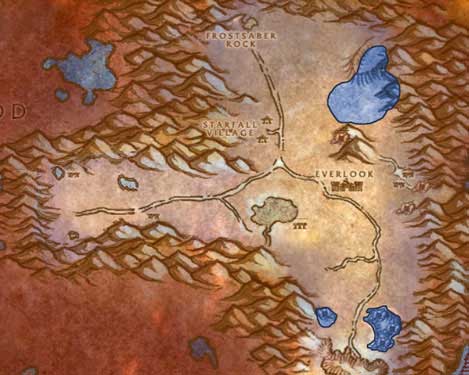
The Raging Beast’s Blood (of which you need 30) drop off any of the Owlbeasts in Winterspring – crazed, beserk, raging, moontouched etc… basically kill every owlbeast you pass. Some warlocks say the drop rate is around 20 – 25%, other’s claim as high as 30 – 40%. If you play on a PvP server, be on guard as you will have both Horde and Alliance in the same area after the same items. You will find the highest concentrations of Owlbeasts at the blue-marked locations in the image on the right. You can also find some wandering owls in the west of the zone, to the north and south of the road. They are all easily solo’d, but bringing a friend or two to help you will speed things up.
Once you have your 30 blood, return to Mor’zul. When you hand in the quest, Mor’zul packages the blood into Case of Blood and wants you to deliver it to Gorzeeki Wildeyes — luckily, Wildeyes is standing just a few feet away. This is where the quest line branches off into two sections, one of which simply requires you to hand in the materials listed below, the other which requires you go off killing. If you haven’t collected any of the materials prior to now, you can do both quest lines at the same time. The first three material collection quests listed below can be done in any order.
Material Collections
[60] Bell of Dethmoora
Given by: Mor’zul Bloodbringer
Objective: Bring 10 Elixirs of Shadow Power to Gorzeeki Wildeyes in the Burning Steppes.
Elixirs of Shadow Power are created by those with the Alchemy profession and can be created upon reaching a 250 or higher skill level. (The recipe is sold by Maria Lumere in Stormwind City and Algernon in Undercity.)
The somewhat tricky part to creating these potions is that they require 3 x Ghost Mushrooms each (so 30 in total), and these rare herbs can be found only in The Hinterlands (in the cave beneath Skulk Rock), Razorfen Downs, Maraudon and Dire Maul as they grow exclusively underground, in caves and the like. If you have Herbalism as one of your professions, I recommend camping the cave below Skulk Rock as there are 3 herbs which continually grow there, however they do have a 20 minute respawn timer.
The alternative to obtaining them yourself is to of course check the Auction House, however given they only help those who cast Shadow Damage (warlocks and priests), and the rare herb required to make them, don’t be surprised if they are not found for sale often.
[60] Wheel of the Black March
Given by: Mor’zul Bloodbringer
Objective: Bring 6 Large Brilliant Shards and 25 Dark Iron Ore to Gorzeeki in the Burning Steppes.
Large Brilliant Shards can only be obtained from disenchanting items above level 55. Only Enchanters gain the ability to disenchant, so unless you have the skill yourself, you will have to seek out an Enchanter who might sell you the materials, ask your guild if it has a bank, or check the Auction House for any up for sale.
Dark Iron Ore can be found inside Dark Iron Deposits and require the mining skill to obtain. Dark Iron deposits can be found in Blackrock Depths, Molten Core, Searing Gorge, and the Burning Steppes, as well as the ore itself dropping from the elite golems in the BRD instance. Thankfully us warlocks only require the substance in it’s “ore” form as it requires 8 ore to create just 1 bar… and all Dark Iron smelting and smithing must be performed at the Black Forge and Black Anvil, respectively, found only inside BRD.
[60] Doomsday Candle
Given by: Mor’zul Bloodbringer
Objective: Bring 35 Black Dragonscales to Gorzeeki Wildeyes in the Burning Steppes.
Black Dragonscales are obtained via the Skinning profession, which given it complements leatherworking the best, may not be a skill many warlocks have (unless taken purely to profit from). With that in mind, many will have to rely on friends, guildmates or the Auction House for this step.
If you are running a lot of Upper Blackrock Spire (UBRS) groups and have a skinner, the dragonkin here drop scales from skinning at about a 10-15 percent drop rate. Also, scales of any color can be skinned off the chromatic dragonkin, which are found in the Rend encounter and at the end boss, General Drakkisath. The dragons in Blackwing Lair can also drop scales, and occasionally you can find a stash of dragonscales in Knot Thimblejack’s Cache in Dire Maul.
Outside of instance runs, the Black Dragonkin, drakes and whelps south of Blackrock mountain in Burning Steppes also drop the scales you need, a good place to try if you and a skinner want to do some farming.
[60] Arcanite
Given by: Gorzeeki Wildeyes
Objective: Bring 3 Arcanite Bars to Gorzeeki in the Burning Steppes.
Once you have handed in all three of the quests above, Gorzeeki Wildeyes gives you the forth materials quest which requires you to hand in 1 x Arcanite Bars. These bars are created by Alchemists and require 1 x Arcane Crystal and 1 x Thorium Bar, both of which are obtained by Miners. Once the Alchemist has both components, they can use the Transmute: Arcanite ability to create one Arcanite Bar… and the ability is on a 2 day cooldown.
If you are an Alchemist yourself, you can try to locate the mined components and create the bars at your leisure, otherwise you may be left to scour the Auction House unless you’re really good friends with someone who will create it for you.
Thankfully, that is the last of the material collecting sequence.
The Xorothian Glyphs
As mentioned above, you can complete the following quests while collecting the components listed above if you didn’t already have them. This saves some time. Gorzeeki Wildeyes informs you that that the scroll’s paper needs to be infused with Xorothian Stardust before the proper glyphs can be inscribed upon it, and the only being on Azeroth known to possess this stardust is Lord Banehollow.
Tip: Before embarking on these steps in the quest, ensure you have a minimum 156g, you will need to purchase two items from NPC’s along the way.
[60] Lord Banehollow
Given by: Gorzeeki Wildeyes
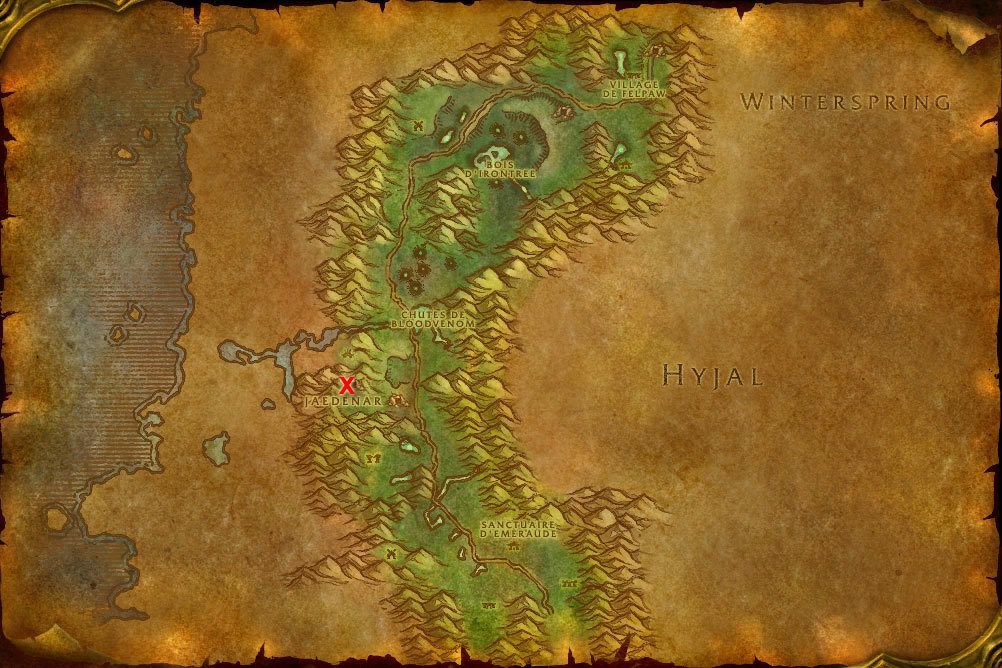
Objective: Purchase 3 Shadowy Potions from Gorzeeki in the Burning Steppes, then use the potions to travel through Jaedenar, and speak with Lord Banehollow.
Once you have the quest in your log, purchase 3 shadowy potions from Gorzeeki (6g each, 3 charges per potion), which will make you friendly to the Jaedenar inhabitants for 20 minutes, more than enough time to get down to him. Once you have the potion, make your way to Felwood, and then up to Jaedenar. When you drink the potion is completely up to you… if you are wanting to bypass all the mobs completely, you can drink it as you arrive and just run down, or if you’ve got time to spare and want to make the most of your potion, you can kill your way down and drink it just as you arrive at Lord Banehollow.
Note: This potion does not change your faction with the 5 or 6 slimes that you find in the Shadow Hold. You have to kill them or with some creative jumping and walking, you can bypass them.
Most of you should be somewhat familiar with Felwood and Jaedenar. Lord Banehollow is located down the very bottom of the second underground area, which you enter at the furthest end away from the main path. Follow the tunnels down, pass the oozes and to the very back where you will find the elite Dreadlord.
Speaking to him while under the effects of the shadowy potion will lead you to the follow on quest.
[60] Ulathek the Traitor
Given by: Lord Banehollow
Objective: Confront Ulathek, then bring The Traitor’s Heart to Lord Banehollow in Jaedenar.
Before Lord Banehollow will sell you the Xorothian Stardust, you must complete a task. Lord Hel’nurath, rival back on Xoroth, is plotting against him and has an Orc named Ulathek spying on him inside Shadow Hold. Banehollow knows you want to steal one of Hel’nurath’s Dreadsteeds, and he’s perfectly willing to help you humiliate Hel’nurath as long as you do something in exchange — you have to find Ulathek, kill him, and bring back his heart.
Ulathek is located in one of the side rooms you passed on your way down to Lord Banehollow and as such isn’t too hard to find. Upon speaking to him, he will turn hostile, and along with his four guards (Howl of Terror if you can will help here) will attack you. Ulathek is a non elite level 58 and as such should be no trouble at all to take down, however his guards hitting on your at the same time can drop your health a bit. This step is more than soloable so long as you go in prepared and aware of what’s going to happen. Fear the guards, DoT them up and ensure you have a healthstone and soulstone on your just in case.
Note: Only these four mobs turn hostile, the rest of the demons in Jaedenar remain friendly while you’re under the effect of the potion, so fearing is definitely the way to go.
Once you are done, loot Ulathek’s heart and deliver it back to Lord Banehollow, who will be happy with you… well, as as happy as a Dreadlord snacking on the freshly-ripped-out heart of his enemy can be, Mmm mmm.
Xorothian Stardust
Given by: Lord Banehollow
Objective: Purchase Xorothian Stardust from Ur’dan. Bring it to Gorzeeki Wildeyes in the Burning Steppes.
While munching away on his fresh heart, Lord Banehallow pushes you to speak to his servant named Ur’dan who is about five feet away, and he will sell you the Xorothian dust for the price of 150 gold each. Once purchased, all you need to do is head back to Gorzeeki Wildeyes in the Burning Steppes and hand it in.
Imp Delivery (Scholomance)
Given by: Gorzeeki Wildeyes
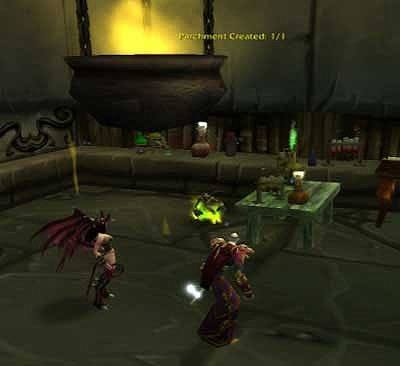
Objective: Bring the Imp in a Jar to the alchemy lab in the Scholomance. After the parchment is created, return the jar to Gorzeeki Wildeyes.
After you hand in the Xorothian Stardust to Gorzeeki, he informs you that the parchment must be infused with the Stardust before the glyphs can be inscribed upon it. Unfortunately he can’t do this here as the only place with the equipment capable of the task is inside Ras Frostwhisper’s laboratory in Scholomance. Gorzeeki packs up a highly-trained imp named J’eevee who knows the procedure and sends you on your way… time to find a group and head to Scholo!
While there are those who say you can complete this step solo, I recommend finding yourself a group as it makes it quicker and easier. You will need to clear a fair chunk of the instance before heading to Ras Frostwhisper’s lab, which is located just after you pass The Viewing Room – that’s the room with all the neutral NPC’s you shouldn’t talk to. Rattlegore is the one who drops the key to pass through the viewing room, so be sure someone loots it along the way.
Once you get to the lab and clear the first few groups, you can release your imp safely without aggro’ing Ras Frostwhisper at the end. Right click the jar with J’eevee’s inside near one of the tables on the right side of the room. He will run around muttering to himself, do what he needs to do and you should notice the “Parchment Created 1/1” message appear on your screen. That’s it… no enemies spawn, nothing dangerous happens, you’re done. Head back to Gorzeeki Wildeyes once you are finished the instance.
The Ritual (Final Step)
Congratulations, you are now up to the final stage of the Dreadsteed quest! Once you have the quest titled “Dreadsteed of Xoroth” in your log, Gorzeeki Wildeyes will now sell you the three ritual items to summon the Spirit of the Dreadsteed – J’eevee’s Jar (150 gold), Black Lodestone (50 gold), and Xorothian Glyphs (50 gold), or you can try to find a warlock that already has them. When you are ready, find a group and make your way to Dire Maul.
Dire Maul, the instance located in Feralas is a winged instance similar in construction to The Scarlet Monastery. It contains 3 wings in 2 instances and the wings are known as Dire Maul East, West and North. (West and North are contained in a single instance, the Library connecting them). The west wing of Dire Maul is the one we are interested in today, and you will find the entrance on your left as you enter the Broken Commons – the outdoor area with the three entrances and the PvP Arena. To enter the instance, one of your group members will need to have the Crescent Key or use a rogue or seaforium charge to pass through.
You will enter the instance at the side of a big court yard, and to start with your group is going to pull the mobs back to you here so stay put. The first mobs you are going to clear are the large tree elementals, and once those are clear, your group can make it’s way to the middle section to clear all the elementals surrounding the pylon. There are five of these pylons in the instance that you must clear in order to drop the magical prison holding Immol’thar, who you need to kill before starting the ritual. Each pylon is surrounded by elite blue energy elementals called Arcane Torrents, or “light blue Voidwalkers” as we will probably akin them to.
This is where it can be helpful to have more than one warlock as you tend to get the elementals in pulls or two or three, and we are able to banish (or enslave) the adds. Although these elementals don’t have a large pool of hitpoints, they have a small blink ability, use Arcane Missiles which can hurt and the Mana Aberration’s will cast one final spell as they die that drains your entire mana pool. Be sure to check your Priest’s and other casters are ready before continuing pulling after those.
Each pylon will take three or four pulls to clear and destroying all the arcane torrents by a pylon shuts down that pylon however you do not have to click on the pylon and there is no visible change in the pylon once it shuts down.
Tendris Warpwood
Once you have cleared the pylon and wandering tree elementals, you can continue through the middle of the courtyard and kill Tendris Warpwood, a straight forward boss elemental that is not too hard to kill. Note: you must kill all the Ironbark Protectors before engaging this boss as they are linked and will come to his aid upon aggro. Once you have finished killing and sorted any loot that dropped, now is the time to cast Detect Invisibility on all your group members as you are about to pass through an area of both visible and invisible ghosts.
On the west side of the Gardens where there are three exits – the middle one leads to a ramp and a courtyard with Tendris Warpwood, the north and south ones lead to a balcony that surrounds Tendris’ courtyard. Take the north exit onto the balcony and head counterclockwise around the courtyard. On the north end of the courtyard is a room full of ghosts and a ramp leading upward to another balcony. Clear the ghosts near the ramp (you may have to clear them all, as they have a wide aggro radius) and climb it to the upper balcony. This upper balcony has two pylons, one each at the north and south ends and on the way to each are groups of hostile undead high elves which you will have to clear.
You will most likely clear the north pylon first, before continuing clockwise to the south pylon, passing Shen’dralar Ancient, a neutral highborne who gives the quest The Madness Within on the way. Beyond the southern pylon is another ramp down leading to a ghost room (the southern counterpart to the north room you passed through), but it is easier to jump down to the lower balcony than to fight more ghosts. The southern end is also patrolled by Illyanna Ravenoak and her pet bear Ferra, which is another reason to avoid it unless you have time and want extra loot. From the lower balcony you can jump down to the ramp that leads to Tendris or jump directly into the safe northeast corner of his courtyard.
Immol’thar
Beyond the door is a hallway with patrolling visible and invisible undead highborne, once you clear those you can rest and prepare for the battles in the next room, Immol’thar’s Prison. By now you should have cleared three pylons and still see the magical wall imprisoning Immol’thar. The final two pylons are in this round room, one to your right, and the final one to your left. As you make your way to each of the pylons, you will see large packs of grey wind like elementals as well as singular Residual Monstrosities, all of which can be avoided by hugging the outer wall and watching their movements. Once you clear the final two pylons, the magical prison wall will drop and you can cross to the middle room once you see a clear path.
Note: Once the wall guarding Immol’thar is down, the beast is free however he will attack his highborne jailers first, so wait until you can see he has stopped fighting before heading in.
Once your group is ready, have your tank engage the beast. The fight is fairly straight forward, although he does have a fair chunk of hitpoints. The one thing you will need to look out for however is the Eyes of Immol’thar that will spawn every six seconds, these nasty’s will “stare” at someone and attack them, reducing their melee or spell casting speed by half. Thankfully the eyes are non elite and only have around 900 hitpoints each, so assign someone in the group to watch and take them out asap.
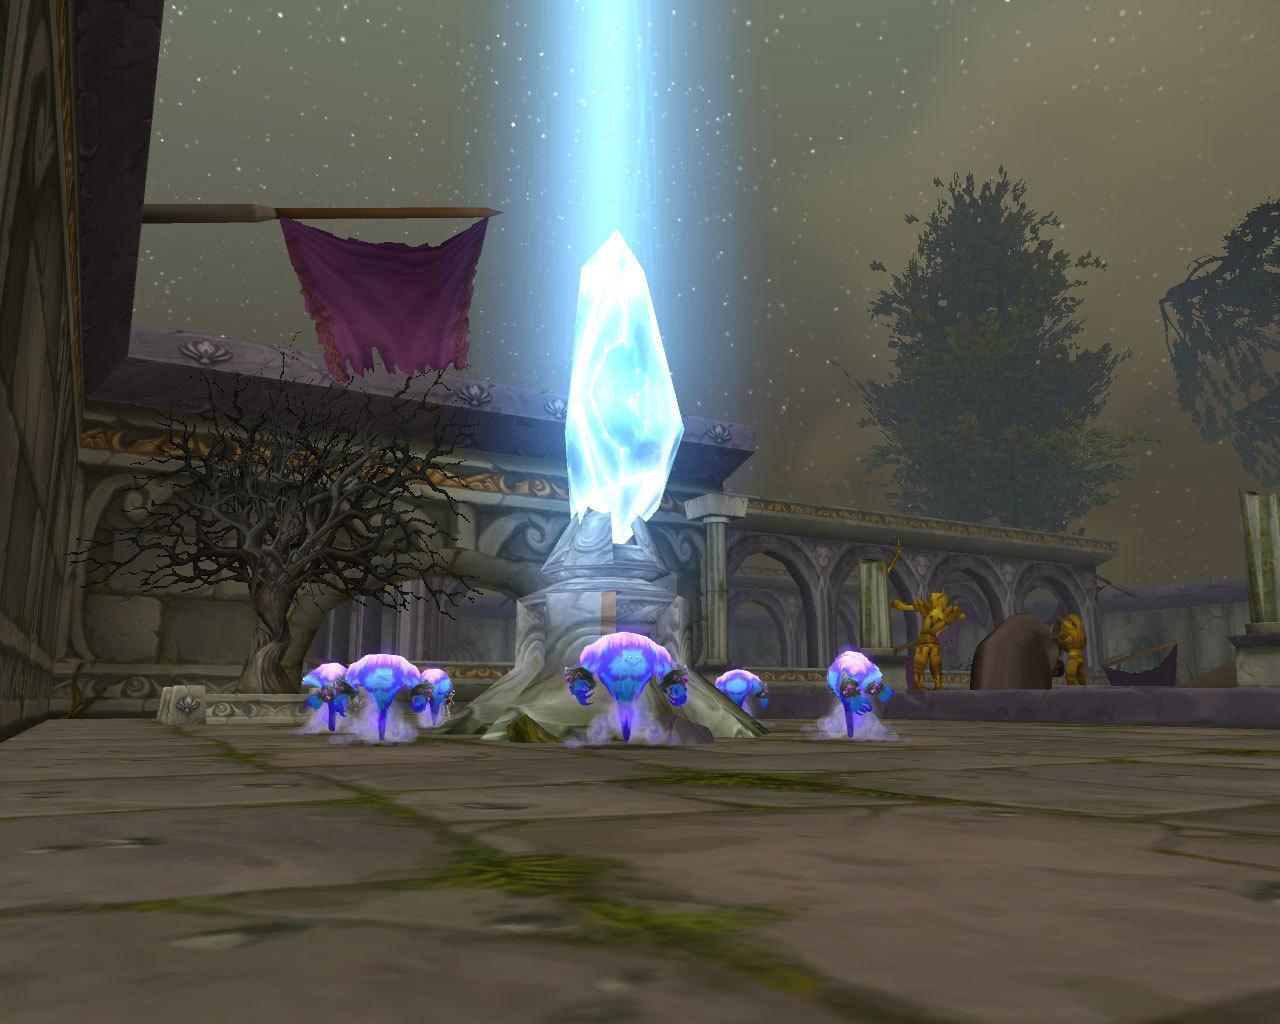
The Summoning
Once you have defeated Immol’thar and are rested and ready to begin, the warlock with the components activate J’eevee’s Jar. Right clicking the jar in the spot you killed Immol’thar will release J’eevee and he will place the Bell, Wheel and Candle out in their correct positions as well as starting the process of forming the Circle of Greater Summoning. This process will last approximately six minutes and attract a lot of demons for you to kill – both groups of Xorothian Imps as well as the occasional Dread Guard.
Fortunately for your group, the three artifacts help with this invasion of demons! The Bell of Dethmoora restores restores 150 health and 150 mana to any warlocks in the party with the Ritual Bell Aura, while the Wheel of the Black March protects all party members by absorbing 100 points of damage from every hit with it’s Black March Blessing. Lastly is the Doomsday Candle which burns anyone not in the party with 250 fire damage every second, and the Xorothian Imps aren’t part of your party.
Because of the Wheel and Candle, you can pretty much ignore the Imp’s bar an AE taunt or possible AE damage if you or the mages have some mana spare, so the main focus of the party should be the Dread Guards that spawn. The amount that attacks the party will vary each time, however they can hurt (especially clothies) if not taken care of. They are both banishable and enslaveable by any of the warlocks in the group, and if you choose to enslave one, can really help take care of the imps.
Recharging the artifacts
Each of the three artifacts – Bell, Wheel and Candle, which need recharging from time to time (they sag, tilt and make a noise to let you know when they need attention); this requires the Black Lodestone, but recharging an item with it costs a Soul Shard so if you are the warlock doing this, be sure to stock up on lots of shards! Recharging an artifact has a 3-second casting time and is interrupted by any damage, even the damage the Imps do, so be sure to have your group members keep the mobs off you, or use a Voidwalker or Felguard to taunt. Any warlock in the party who has a Black Lodestone and a Soul Shard to spend can recharge a failing node, it doesn’t have to be the one who started the ritual. It takes around 10 Soul Shards to keep them all going until the circle is complete and if all three of the ritual nodes are allowed to fail completely, the ritual will end and will have to be restarted.
You will know when the ritual process ends because all the demons attacking will evaporate, including any you have enslaved once the enslave timer is up. You now have an opportunity to rest, heal and rebuff as the next step doesn’t start until you activate your Xorothian Glyphs.
Activate the Glyphs
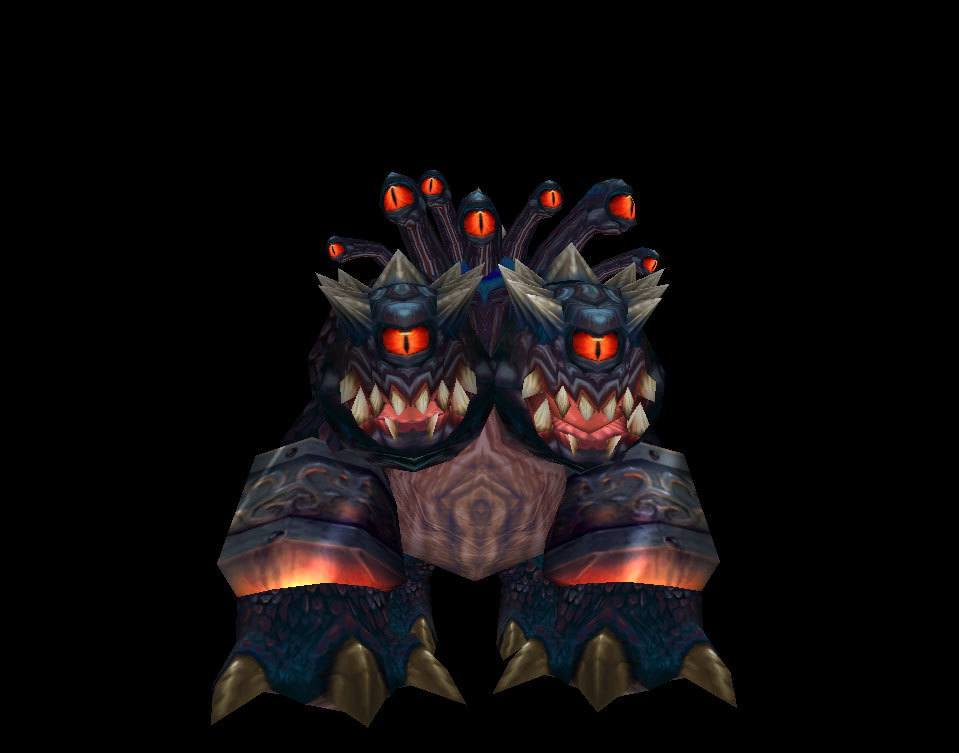
When your group is ready for the final fight of the quest, activate the Xorothian Glyphs to open the portal and have a Xorothian Dreadsteed appear. When the Dreadsteed is at about 50% health, Lord Hel’nurath himself appears, and as he hates people who steal his horses, which is basically what you’re doing, you will have to kill him too. He is, however, the only add in this fight. Once the Xorothian Dreadsteed dies, the spirit of the Dreadsteed will appear, and once it is safe (ie both targets are dead) you can walk up and speak to him, thus completing the quest line and placing the Summon Dreadsteed spell in your spellbook.
Congratulations, you are done!
This guide was originally published on The Warlocks Den, a site that is sadly no longer available.
About the Author

Is it still necesary to do this quest in TBC ? Or do you just learn the summon epic mount from trainer ?
Yes, this is still necesary in TBC. In Wrath you can buy it from the trainer!
so we cant do this until phase 2?
Correct, have to wait until phase 2 for the epic class mount. For an epic mount prior to that would just have to buy one same as any other class.
Just heads up, WoW classic does not give you your riding skill. You must purchase that if you wish to ride any other mount that requires riding skill.
Wait your shopping guide tells me I need 10 Elixir of Shadow Power 3 Arcanite Bar and 35 Black Dragonscale. But when I read threw the quest here I don’t need 1/2 that. Am I missing something? If not you might want to update the shopping list so people don’t waste gold like I did.
Hey sethern, there was quite a bit discussion around that prior to Classic launch. We reviewed and updated based upon your comments, apologies for the issue there.
EDIT:
Guys, the mats are updated correct as far as we can tell after as much verification as possible. The current values on the page should be correct.
Some of the confusion here is that the current material list seems to reflect the TBC values and not the values from 1.12.1 based upon the historical information available but they seem to be correct anyway for WoW Classic.
Dang I just did the same thing…which I would have seen this comment. sooner. So it isn’t 3 arcanite bars?
Wait, so? Do we need
35 x Black Dragonscales
10 x Elixirs of Shadow Power
6 x Large Brilliant Shards
25 x Dark Iron Ore
3 x Arcanite Bar
or half of that?
Yes that is what you need.
Can you update the required mats?
they are not updated??
Yeah, but what got updated? The shopping list still says
35 x Black Dragonscales
10 x Elixirs of Shadow Power
6 x Large Brilliant Shards
25 x Dark Iron Ore
3 x Arcanite Bar
like it did befor?
It still shows 10 Elixir of Shadow Power in the Shopping List but when I read through the Quests later it states “Objective: Bring 2 Elixirs of Shadow Power to Gorzeeki Wildeyes in the Burning Steppes.” same goes for the Arcanite Bar (1 vs 3 pieces) and Black Dragon Scale (3 vs 35 pieces). What are the correct values?
Sounds like your looking at a classic wow list (this one) and comparing it to a retail wow quest log….
For those who are doing the quest now in wow classic.
I can confirm the amount of the mats are correct.
Some additional info: the fight against imps and dread guards are very tough and longer than you expected, don’t watch old stream/videos guide on YouTube. They only showed 60-80% of difficulty level comparing the real one in classic. Make sure you use 4-5 extra soul shards on inslaving the dread guards, they help aoe tank a lot. And the group might get wiped out towards the end, normally around 8-10min. But it is ok, just get res and run back close to the circle, all the demons will disappear anyway and thus the ritual is completed. So go ahead summon the final bosses.
I calculated the price for the “Material collection” which is all from AH if you want, on my server (Gehennas Horde side) it would run you about 280g
Q) What items do I need to purchase if my friend has some?
A) If you know someone with the J’eevee’s Jar, Black Lodestone, and Xorothian Glyphs, those are the only pieces you do not need to purchase. You will still have to collect the other items such as the Dark Iron Ore, Large Brilliant shards etc, as well as the Shadowy Potion and Xorothian Dust
Why would you still need to buy the xorothian dust if its used to make the glyph…and you can hve your friend provide the glyph.
You need to complete that quest as its a prerequisite