- Author: Dwarflord
- Date: July 10, 2023
- Updated: September 6, 2023
- Expansion: WoW Classic
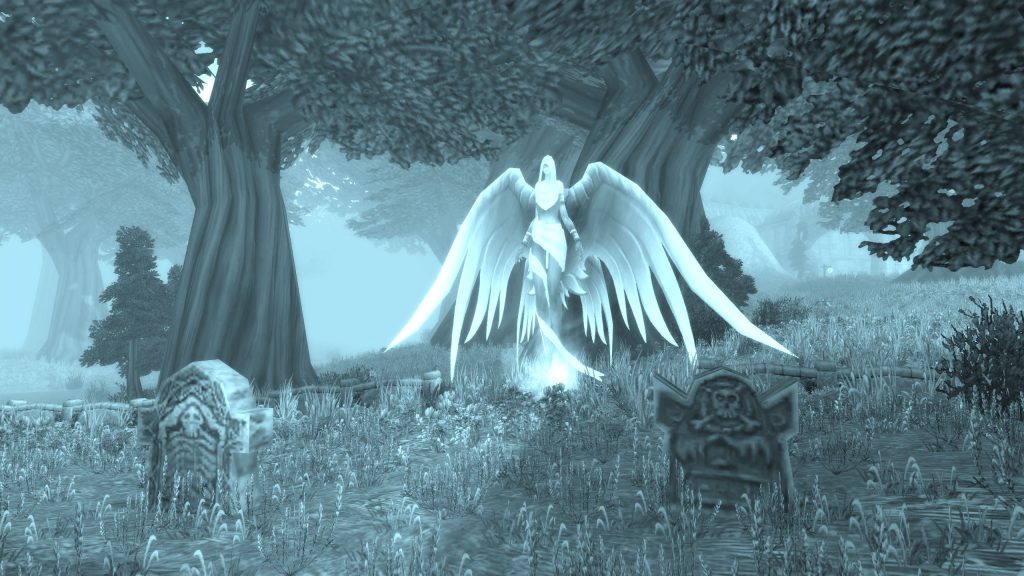
Hardcore started as a self-imposed challenge mode for World of Warcraft Classic, where the death of the player means deletion of your character, to most Hardcore players anyway. Now Blizzard has made an Official Hardcore server for people to play on!
How Hardcore Came to Be
On May 13th, Blizzard announced that official Hardcore servers are coming to Classic Era where the character will no longer be playable upon death, though they will have the option to transfer to a normal server to continue playing their character. And on August 24th Hardcore Servers were live!
This guide will assume you are playing on Official servers, though there will be some mention comparing the old servers as the rules did change a bit. In fact, this potential rule change has the community somewhat split. Many Hardcore players are excited about the recognition of the Hardcore play-style and the creation of official servers, though the old rule set was much more difficult than it currently is in Offical Hardcore as it used to be a solo journey except for dungeons. Previously, you could only zone into each dungeon a single time, could not trade, and could not group for quests. The official server will allow players to enter a dungeon once per 24 hours rather than one single time on their journey to level 60 in addition to trading, using the Auction House, and grouping for quests.
The current players raiding Hardcore do want to be the first to kill Ragnaros in Molten Core (which was done on Sept 2nd 2023!!); whether they continue after that or return to the current realms that they are playing on is yet to be decided.
World of Warcraft is not the first game to have a community-made Hardcore mode. Runescape has an official Hardcore game mode that was started by the community. Even other Blizzard games have an official Hardcore mode such as the Diablo series. Even Minecraft has a Hardcore mode where your character has one life. The difference here is that Hardcore World of Warcraft is in its infancy.
What started as a tiny amount of people playing this way during the early days of Classic has spread like wildfire. Blizzard recognized this in Season of Mastery where players could get the Soul of Iron buff which would track if and when they died. Players who kept their Soul of Iron buff got another buff on their character for defeating Ragnaros without dying. This turned into the highly publicized event, Road to Ragnaros. Now that Season of Mastery has ended Hardcore players are primarily playing on Classic Era, but there is also a population of Hardcore players on Wrath Classic servers. This write-up is aimed toward Classic Era Hardcore, but a lot of the information can carry over to later expansions.
Why Play Hardcore?
Let me give you my first-time personal experience playing Hardcore. I am a Warrior main. Warrior, for those that are unaware, is considered the most difficult class to level in Classic. This becomes even more apparent on Hardcore. I had a few close calls, and the higher the level I got, the more invested I was in my character.
I grew to really care about not only my character but others around me participating in the same challenge. That’s a big part of the fun. When someone dies, it gets broadcast on your screen and in guild chat. This is usually followed by a cascade of F’s in the chat, to pay their respects. You really get a sense of community even though it is a solo challenge for most of your journey.
I got to level 57 and I felt invincible. I was juiced up on consumes, and even managed to snag a few world buffs. Thinking I could take on the world, I accidentally pulled two freezing-ghouls in Western Plaguelands. They taught me an important lesson. I was not invincible. I was dead. I had lost days of leveling, and the character that had been with me that entire time. But I didn’t come away empty-handed. I had learned countless lessons. I could do it again, I could do it better. After the initial shock and adrenaline had settled, it was time to go again.
There are many tips to come, but here’s one to start you off: Never get lazy, overconfident, or complacent.
Hardcore has the power to draw together players into their own culture and community, even if they aren’t playing together. You’re all in the same boat, you can all relate. Players will try their best to help each other out through small acts like announcing in General chat when a vendor has restocked an item. Players in starting zones will announce their “blessed run”, having found a bag from a Boar at level 3. This is often followed by a swift death and them being pulled back down to earth. Sometimes you’ll find yourself following the progress of certain players, seeing them consistently leveling, and then suddenly you see it. They died, and you only feel a fraction of what they must be feeling.
Players can run each dungeon once per 24 hours prior to level 60, Whereas previously the Hardcore Addon only allowed one dungeon run per character. This makes Official Hardcore a little bit easier as you could farm some great items by running Deadmines two or three times on your levelling journey. Doing any dungeon could be a massive risk, and any miss-steps could cause the deaths of 5 characters not just one. During a run to the Wailing Caverns, one of our group members failed to survive the journey there, leaving them without a character and us without a 5th member. You never know when a wrench will get thrown in the works and your plans will need to adjust on the fly.
How to Get Started
Previously, players would want to download the Hardcore Addon found here. Now, on Official Hardcore you do not need an addon though Death Log is a great addon that announces when people die. Simply log into one of the official Hardcore servers; Defias Pillager or Skull Rock on NA, and Stitches or Nek’Rosh. The old servers that Hardcore players used to populate; Bloodsail Buccaneers for NA players, and Hydraxian Waterlords for EU players are now low population.
For more information on the functions of the Hardcore Addon, as well as the rules enforced by it, make sure to check out the official website. It is worth mentioning that the addon is not mandatory, and if you simply want to play with your own rules, no one will stop you. The unfortunate result of this will be that you cannot do end-game raiding with people participating in the Addons challenge.
This addon is quite amazing and has gone through many quality-of-life developments. It tracks played time, as well as when and if you died. This addon also blocks you from using the Auction House, accepting trades, and even checking your mail. It even allows you to participate in even more challenge modes if Hardcore is too easy for you; as discussed at the end of this article. You will also want to join the Hardcore Discord here.
Which Class to Choose?
Ranking classes for levelling in hardcore from easy to difficult is somewhat subjective, though most would agree with this list or something very similar.
Races
Choosing a race for Hardcore is a bit different than in Softcore. in Softcore you consider the Racials for PvE and PvP use. In Hardcore we need to consider the Racials for max level content, but also solo leveling.
Professions
Professions are an important consideration. We will discuss the two most popular Professions: Engineering and Alchemy. Some other Professions may be used temporarily to help level these professions, or gain an item to level your character easier. On Official Hardcore servers players may opt for other professions in hopes of providing a service and making money along the way such as Blacksmithing or Enchanting. This is possible because trading is allowed now and there is an economy on the Auction House. Still, Engineering would be the SAFEST profession, and then you could buy potions from alchemists and sell your excess ore.
Getting Your Mount
Keep in mind that this is a solo self-found journey. In normal play, you can use the Auction House and use Gathering Professions to easily afford your Mount by level 40; that is not the case in Hardcore. You will need to be careful with what you spend Gold on. There are many spells you may want to train but the reality is that they cost a lot of Gold and if they are not a main Spell you use, do not train them until later. Often times Rank 1 of a Spell such as gouge or hamstring does the same thing that higher ranks do and are not worth the Gold. Some people like to spend Gold on bind-on-equip items from vendors, you can do this for upgrades but be careful how much you spend. Try to plan item upgrades out by making sure you do key quests that reward awesome upgrades rather than spending a hefty price on a bind-on-equip item from a vendor. Very few people that make it to level 40 will be able to afford their mount without proper planning.
Staying Alive
Caves are dangerous
Make sure you always have a way out! You may be safe one minute, but then mobs respawn behind you, blocking your exit. Some areas have very fast respawn times and going inside the cave may not be worth it. If other people are inside a cave it may give you a false sense of security, everything around you is dying. Then they all leave, and you are left alone with 3 respawns on you and that could be the end of your journey.
Mob Leashing
Whenever you run from an enemy that you have aggroed a timer starts once you begin pulling it away from the point that you pulled aggro. Low level mobs will give up the chase after around 8 seconds, but higher level mobs will chase a few seconds longer. If you are looking to escape from a mob you need to not attack them. If you hit them or heal yourself it will reset the timer, doing so could keep mobs on you until they kill you.
Successful melee and spell hits, including applying debuffs extend the leash. Non damaging spells such as heals, as well as resisted spells, and immune hits also extend the leash. Damage-over-time ticks will not extend the leash, and neither will reflective damage such as thorns. Unsuccessful melee hits such as Dodges, Parries, and Misses will also not extend the leash.
Split Pulling
Split pulling is purposefully creating a staggered leash timer on a group of mobs so that one single mob continues to follow you and the rest of the pack resets. An easy way to do this is throw a grenade at a pack, and then while they are stunned you attack the single mob, such as with a ranged attack. Now the mobs will have a staggered leash timer and all but one mob should reset once you run far enough.
Daze
Running from mobs often leads to players being dazed. This is a 50% Slow for 4 seconds, but it can be applied repeatedly. You will only be dazed when attacked from behind. You can use a Weapon Swing Timer Addon or WeakAura to help track when enemies are about to attack. To avoid being dazed, jump and spin 180 degrees, making sure their swings hit you in the front instead of the back.
Parry Haste
Whenever an enemy successfully parries a melee swing, their next auto attack will hit up to 40% faster, based on their swing speed. In a worst case scenario, a fast attacking character like a Rogue is fighting a mob with a big slow attack. The mob hits the Rogue, and then parries the next 2 or 3 attacks, it will be able to hit again much quicker than expected. This can at times feel like being hit by a Shamans windfury-weapon. A string of parries could make a low health Rogue a dead Rogue against a relatively tough foe with a slow swing timer. This problem is of course not specific to Rogues, and impacts every melee class to some extent. Remember, enemies cannot parry from behind, so take advantage of that whenever possible, especially at end game!
Mob Types
You might have noticed some trends with the enemies. Sometimes you’ll find a strong melee enemy, other times you’ll fight a caster type that is much more fragile. There are 3 mob “classes” in Classic. To quickly identify these types easily, you can use various Addons, such as MobInfo2, but you can also make educated guesses based on appearance. These types are: Mage, characterized by low health and armor, but high damage. Paladin, which has low armor and low health, and finally Warrior, having high armor and health. This can be useful information, allowing you to assess a situation before diving head first into it.
Hidden Abilities
Some enemies have unique abilities. Some of these are used if certain criteria is met, such as self-healing spells. This guide will cover a handful of them, but for a more comprehensive look, consider using an Addon such as ClassicBestiary. This will tell you about these abilities before you get into a sticky situation.
The most common abilities that catch people off guard are thrash and charge. There is a long list of enemies with thrash, however the crabs in Darkshore, Raging Reef Crawlers are wanted for crimes against humanity. thrash is similar to a Paladin’s reckoning talent, allowing extra attacks to be stacked up. thrash however stacks extra attacks when the monster is not in attack range. A player at low health kiting an enemy with thrash may be in for an unpleasant surprise when the enemy finally lands their hit(s).
Similarly, charge will only be used when out of melee range. charge adds a considerable amount of damage to the next attack and if it crits can nearly one-shot a cloth wearer. The Boars in the level 9-10 range can really hurt as players have only basic items equipped at that point. As a Warrior I took a 100 damage crit using Mail gear, a Mage would be hit for much more. I witnessed many deaths to the Boars, never kite Boars.
Some mobs can mind-control you if there are multiple targets in combat with them, including pets. jadefire-tricksters in Felwood can cause-insanity. This can easily lead you to be in some disadvantageous positions, surrounded by enemies.
I want to highlight two mobs that Horde will encounter that are extremely dangerous for fast attacking melee characters like Rogues and Warriors, if they are dual-wielding. These are the syndicate-shadow-mage and the dalaran-shield-guard.
syndicate-shadow-mages are dangerous due to their 3-minute long curse-of-thorns that gives you a 50% chance to take high damage on every melee swing. These enemies can be found in Eastern Hillsbrad and are level 21-22. Several procs in quick succession will drain your health bar very fast.
dalaran-shield-guard are very similar to the Mages above. They may seem harmless at first, but when they use their violent-shield-effect, they gain increased armor for 8-seconds, alongside retaliating back with 85 damage to melee attackers on every hit. While this effect is active, they are immobile. Use this to your advantage, and simply back away, waiting out the buff. This enemy is located on the border between Hillsbrad and Alterac Mountains and are level 31-32.
Underwater
Any time you go underwater, play very cautiously. An unfortunate disconnection while underwater can easily be the end of a run. A common bug having to do with the camera angle above and below the surface can cause a disconnect, even with a stable connection. Sometimes this can loop, disconnecting you multiple times. If you have an enemy on you, or worse, you are low on breath it will not end well. Do not go underwater without a breathing potion if you can avoid it.
Roaming Monsters
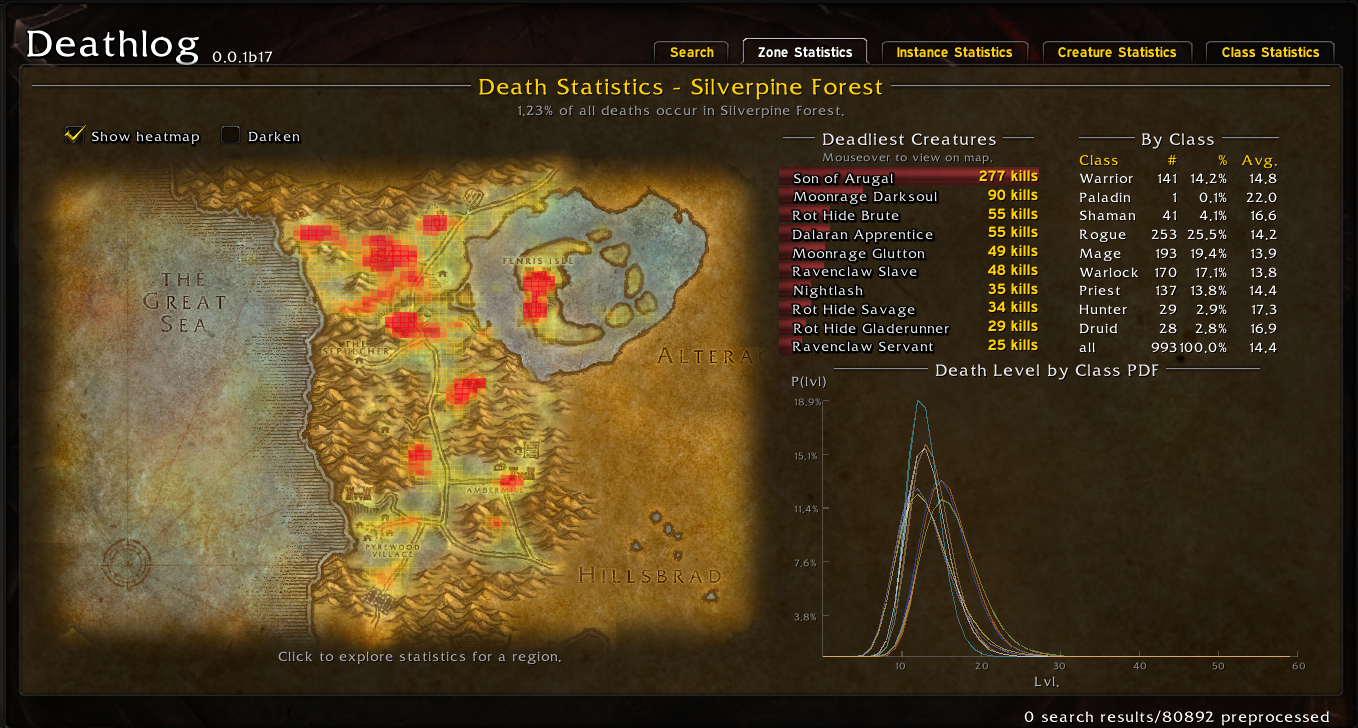
Out in the world there are plenty of patrolling monsters that can be very dangerous. Addons such as NPCScan can alert you when they are nearby, in addition to notifying you of nearby Rare mobs that may have good drops. Darker zones such as Silverpine Forest and Duskwood have a lot of incredibly dangerous roaming enemies, such as the son-of-arugal. These are level 20 elite Worgens found in Silverpine Forest.
Duskwood has two very common run-enders in stitches and Mor’ladim. stitches is a level 35 Elite that patrols from Darkshire almost along the entire main road. Pick your poison when dodging this big feller, either run into him on the main road, or fight your way through Spiders and Worgen off the beaten path. Mor’ladim is a fan “favorite”. A level 30 Elite found in the Duskwood Cemetery. Quest mobs here are generally in the 24-28 range, and due to the cemetery layout, you won’t always see him coming, nor will you be able to create distance without angering the dead.
Other examples include the Night Elf patrol in The Barrens, the Horde patrol in Loch Modan, and narillasanz, a level 44 Elite Dragon in the Alterac Mountains. It is very easy to stumble into these, even while heavily underleveled. If you are not paying attention and one chases you, it might just be game over. NPCScan does not scan for all of these enemies by default, and only scans for Rares. To fix this, you can manually add anything to NPCScans warnings, by typing “/npcscan”.
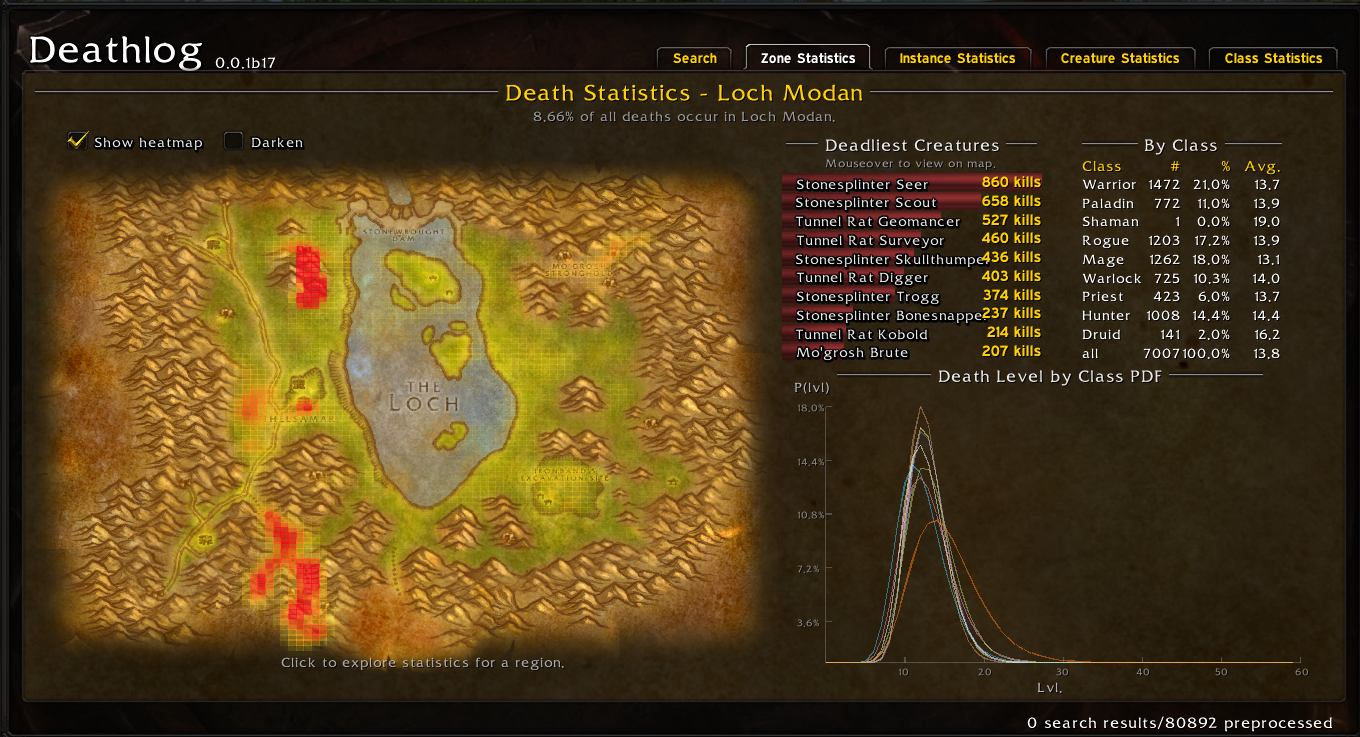
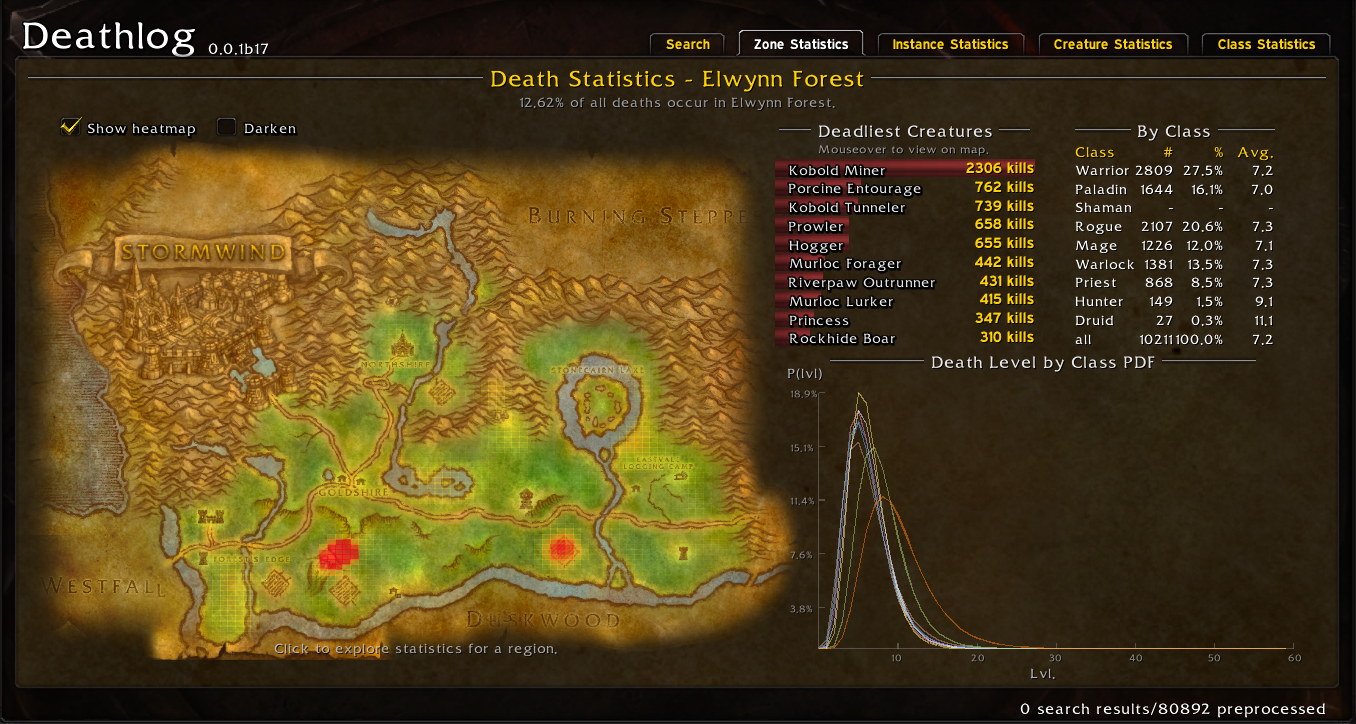
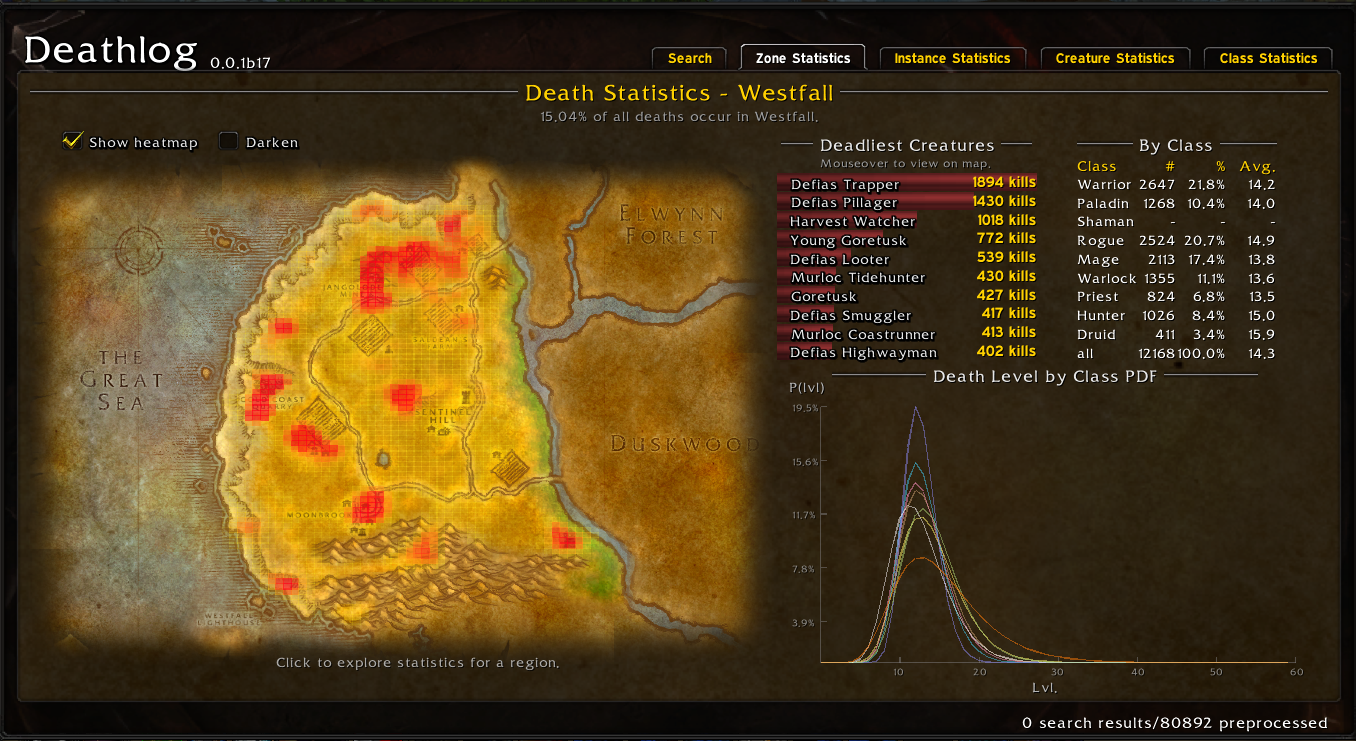
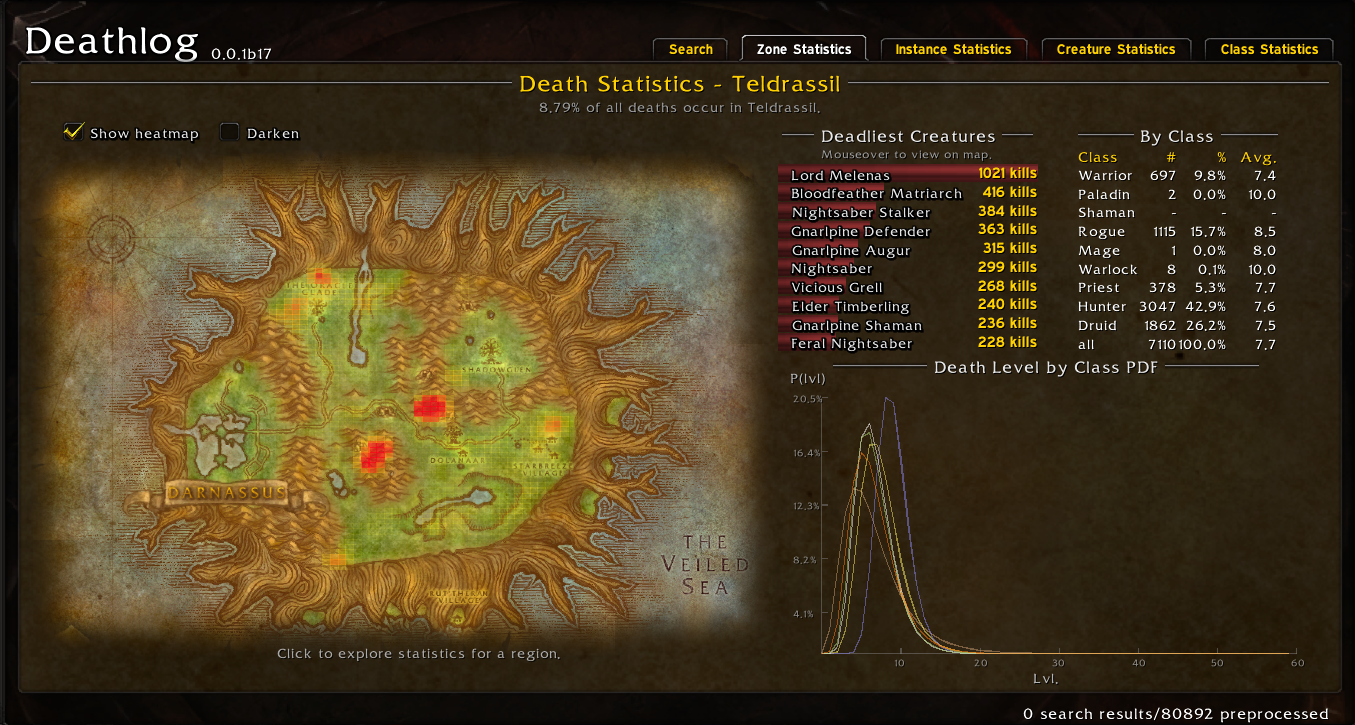
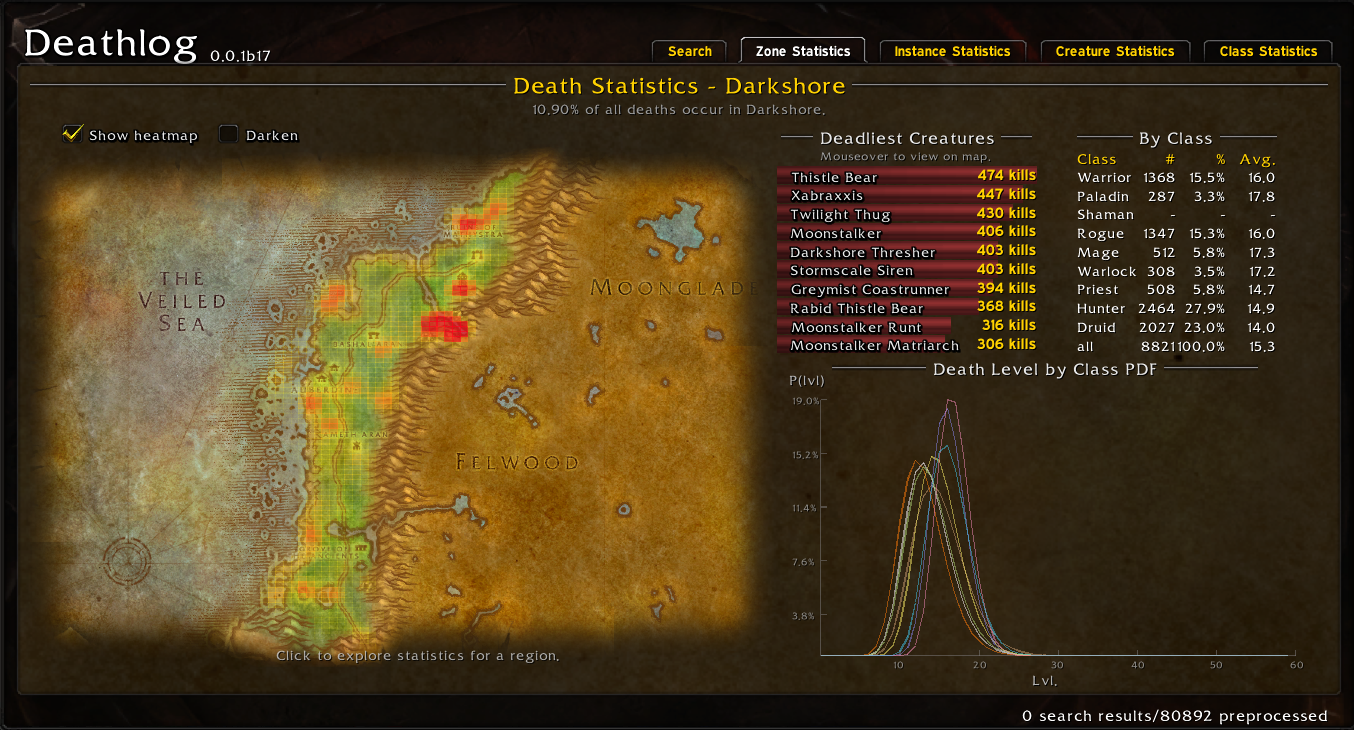
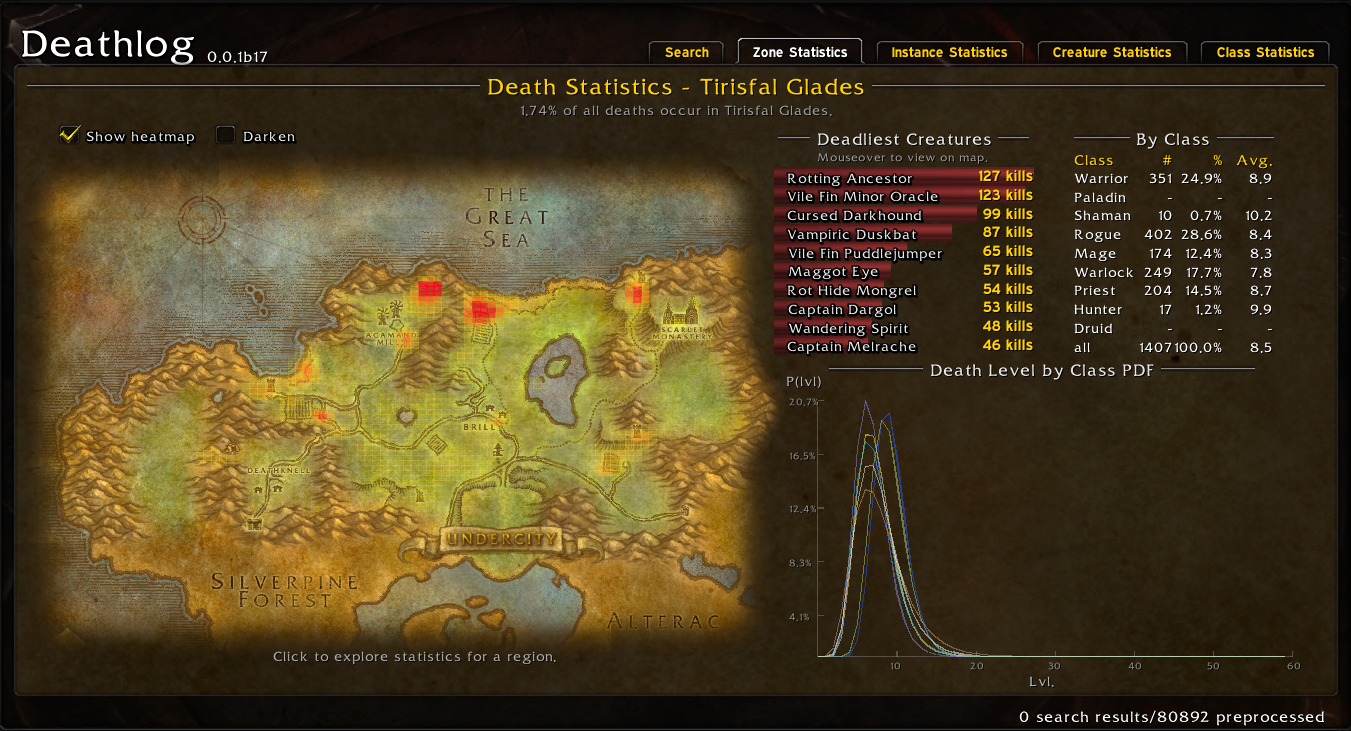
Death Hot Spots
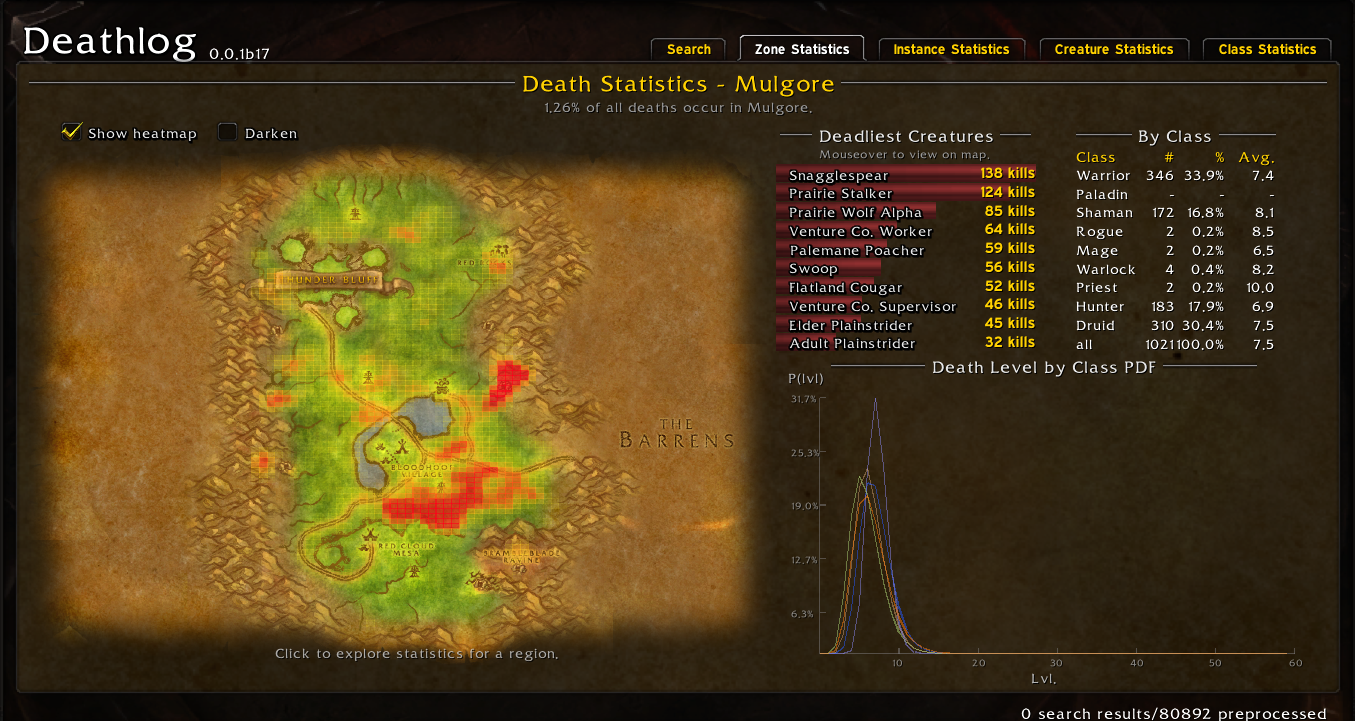
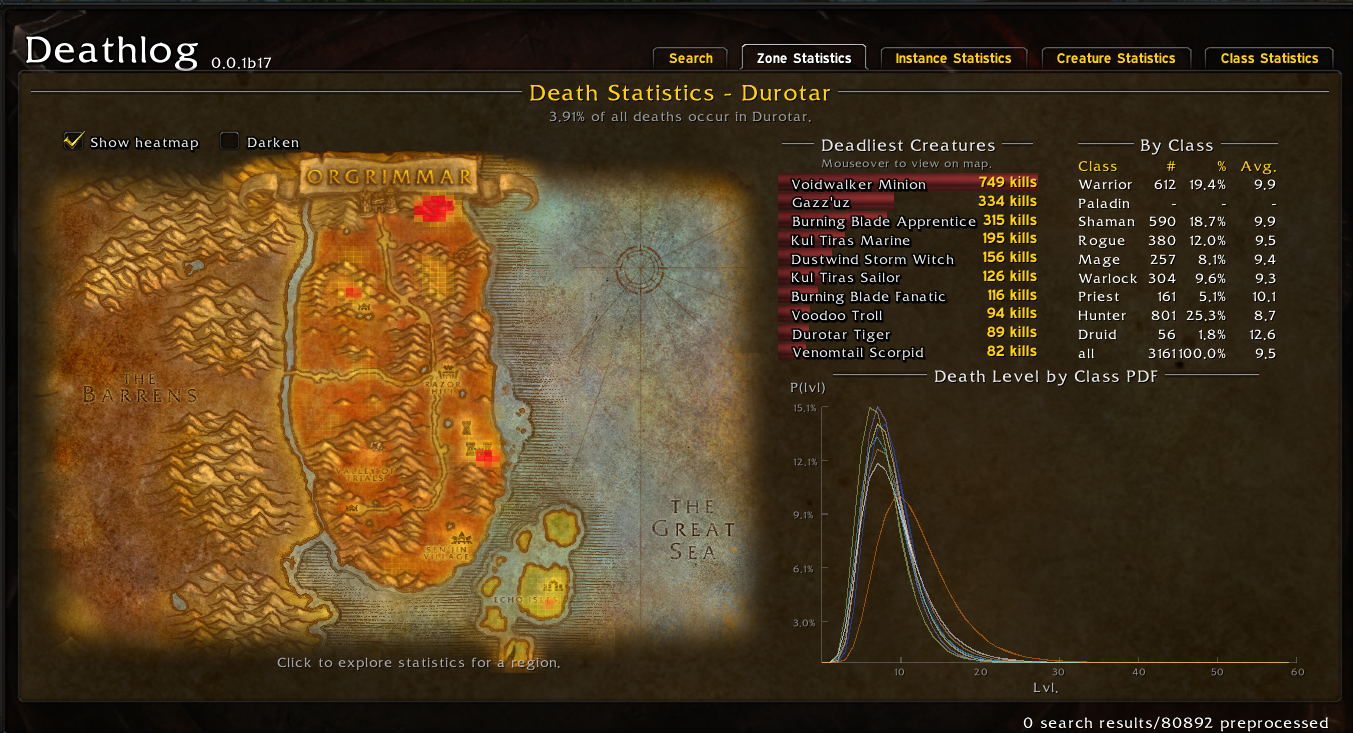
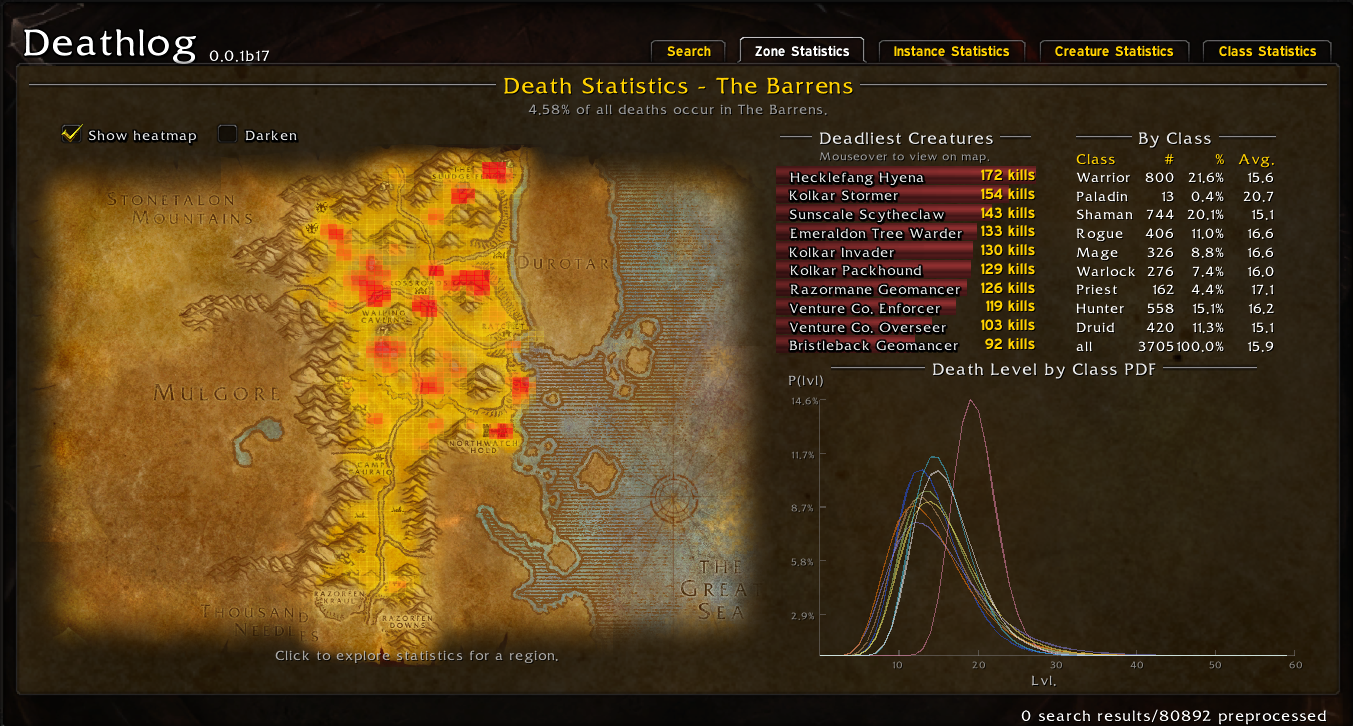
There are many areas in the game where players frequently die. These hot spot maps give an idea of some of the most dangerous areas a Hardcore player may find themselves in. Usually it is an area like a cave with no easy escape, high damage, fast respawns, or large pack size. The following screenshots are from an Addon called Death Log. This is essentially an interactive map of the entire game that shows death rates for all zones, and gives death data for every mob in the game. It is very interesting to view and I suggest you download it. As examples, I have included screenshots of some early zone death maps.
The starting zone of the stoutest race out there! Along with their little Gnomish friends, Dwarves have three level 5-10 caves. One for each of the Trolls, Wendigo, and Troggs. Be careful in those spots as they have a fast spawn rate, and it is easy to aggro more than one at a time. You will also notice that many players die to Boars. As mentioned above, Boars use the charge ability if they are out of melee range, and are found all over the zone.
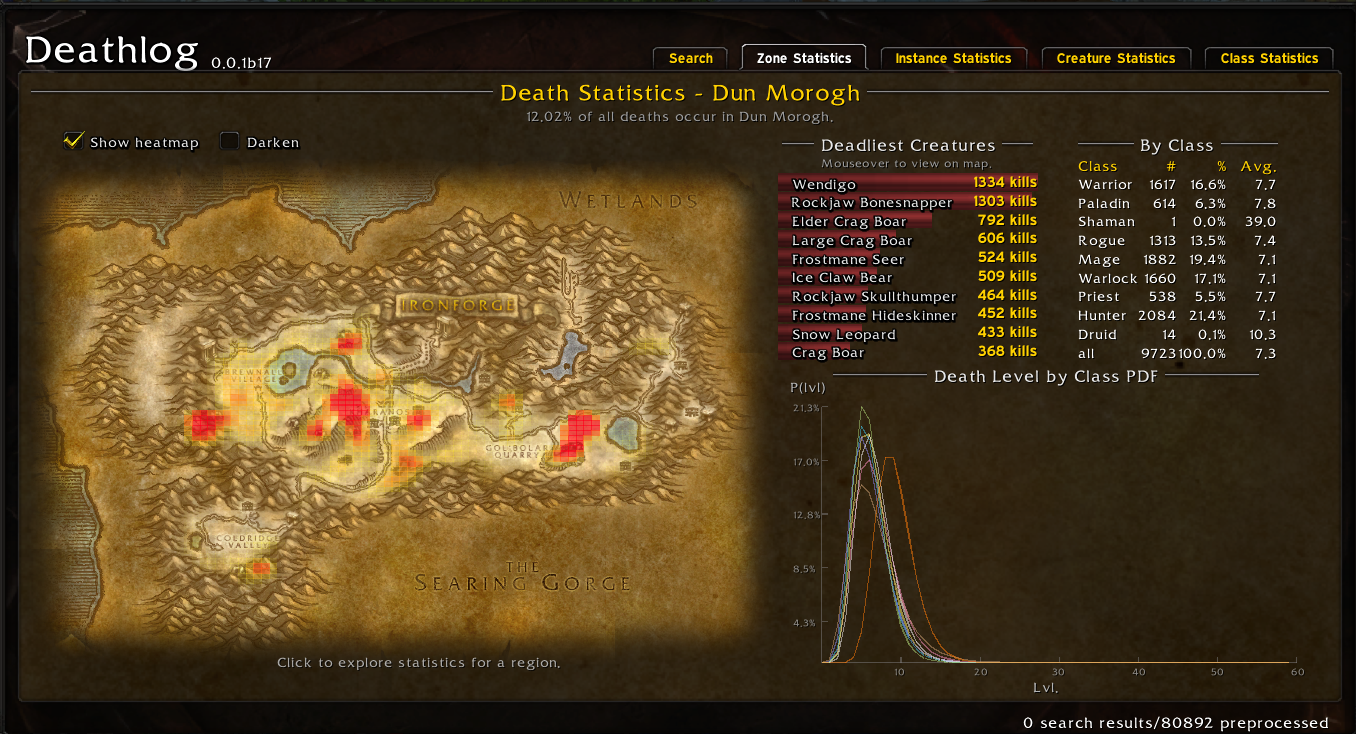
The high mob density of the Troggs in the South and the Kobolds in the Northern cave pose real threats. stonesplinter-seers do a lot of damage with their lightning-bolts and accidentally pulling two at time is dangerous. If you make it past that point the Eastern side of the Loch is much sparser, making it safer. Just watch out for the Elite Horde patrol that I mentioned earlier. This is a group of three Elites that patrol the East side of Loch Modan from the dig site area near to the ogre camp.
If you are dead set on rolling a Human, and no doubt a bald one at that, be very careful in the Kobold mines. The mines have a fast spawn rate and tightly packed mobs. For safety you could wait till the quest is green. Additionally, remember that princess and her entourage have ended many Hardcore journeys. Fighting four mobs at a time at low level is a risky play and overlevelling this quest is a good idea as well. Many brave players have also thought to themselves “Yeah I can manage hogger, it’ll be fine”.
This is a popular questing area and it is difficult to avoid. I recommend overleveling it a bit, instead of heading here right after your starting zone. Almost every enemy in this area is worth watching out for.
defias-pillagers have been a classic slayer of low levels for almost 20 years now. In fact, back in 2006, they were the 9th most common cause of player deaths, just behind onyxia, a 40-man raid boss. Pillagers cast a high damage fireball, however this can be exploited by using line-of-sight with a corner, ensuring they never get a cast off. Unfortunately, this comes with its own risks, namely aggroing more Defias. defias-trapper will root you at low health, just before they run for help. If you can’t kill them while rooted, they might just bring friends back. harvest-watchers have a large aggro range, and are also immune to many forms of Crowd Control, Bleeds, and Poisons. The Boars are also back. Don’t trust the Boars.
This area is surprisingly safe, at least until you get to the last quests. A lot of players here find themselves on the receiving end of lord-melenas. He is in a large cave system underneath a tree. This cave is absolutely littered with enemies that you’ll have to fight before Melenas gets his turn.
Many areas pose a challenge in this zone, as you can see by the many lightly highlighted areas. Be especially mindful of the mushroom cave, the Crabs up north due to their thrash ability, and the Bear cave, as the Bears have the potential to chain stun.
I find this zone to be very linear, simple, and safe. The exception, of course, being the three red areas. These contain Undeads, Murlocs, and Scarlet enemies respectively. All of these are very easy to over-pull.
This area ramps up in level very quickly and you will want to head to The Barrens before the zone becomes too high level for you. Remember, you can always come back later, however many of the Southern quests that take you into a building are not worth attempting at all. The son-of-arugal is a level 20 elite mob in an area that you will be questing in around level 11-12, if you aggro this mob you are almost sure to die. The rot-hide-gnolls on the island to the East are also dangerous.
The majestic plains of Mulgore have two main areas that have been painted red with the blood of would be Tauren heroes. The Venture Company, and the local wildlife do not play games.
This zone is fairly straight forward and safe as long as you do the quests in order of easiest to to most difficult. That is until Thrall suggests that you go into the cave in the North. Do not listen to Thrall, let him fix his own damn problems.
The iconic melting pot of the Horde. Join in on the general chat in The Barrens. There are a lot of dangerous spots but you cannot level a Horde without doing some or most of The Barrens.
Useful Quest Rewards
Throughout the leveling journey, you will receive some awesome quest rewards that are one of a kind. Some of these are one-time use, some have several charges, and others are permanent items that you equip.
Alliance Rewards
Horde Rewards
Neutral Quests
Griefing – VERY Difficult and unlikely on Official Hardcore Servers
This is when another player does something malicious to another player. Due to the nature of Hardcore, some players like to do things that will get you killed. This will be less common on official Hardcore servers. The makers of the Hardcore Addon allow you to appeal most griefs, but sometimes only once you are a certain level. Recent updates made it so that the Addon can tell automatically what is a grief or wrongful death and the Addon does not count this as a death. Here are some common methods used.
Infernal
Once per hour a level 60 Warlock can use their inferno spell, summoning an Infernal. The Infernal lands dealing Fire damage to nearby enemies, while also being hostile, attacking anyone around. Using this ability next to a low health low level character is likely to end up in their death. If the Warlock kills themselves using Life Tap and Hellfire, the Infernal is loose and free to attack whoever.
PvP Flag Tricks
There are two common ways that enemy players might trick you into PvP flagging. Hiding in stealth on top of a Quest Giver or Flight Master, or with a gnomish-mind-control-cap. If you right click a PvP flagged Rogue you will attack them even if you did not see them. This will flag you and either guards will kill you, or they will kill you. If a Rogue is stealthed and uses their gnomish-mind-control-cap right as your spell hits a target, that target becomes the enemies minion, and because your spell hits their minion, you are now flagged for PvP. gnomish-universal-remote does the same thing on mechanical enemies. Guess where there are a lot of these types of enemies? Westfall.
Fortunately, this is not possible on Official Hardcore Servers. Players will have to manually flag themselves for PvP in order to attack another player, accidentally or otherwise.
Kiting
Hunters and Rogues can kite various high level mobs, then they can vanish or feign-death. If you’re unlucky, they might end up on you instead. Keep your head on a swivel! Official Hardcore Servers have made this less of a thing, preventing players from kiting mobs between zones. This means that you won’t see teremus-the-devourer destroying Stormwind anytime soon, but this doesn’t help if you are in the Blasted Lands already.
Achievements
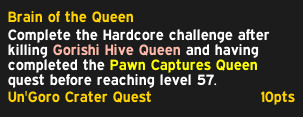
Throughout the leveling process there are Achievements that can be earned for bragging rights. Usually these are earned by doing a quest at a level that makes it challenging. These can be viewed in the Hardcore Addon, which is not actively used by many on Official Hardcore servers.
Optional Challenge Modes
If getting to level 60 without dying was not enough of a challenge for you, here is a small sample of challenges that some players partake in. There are also class specific challenges that you can find on the Hardcore Addon. For example, Warriors not being able to use any Stance other than battle-stance, Druids not allowed to Shapeshift, or Mages restricted to a single school of magic. NOTE: on official Blizzard servers the Challenge Modes of the old Hardcore addon are not offered, though you could still do it for fun, you just would not get any achievement.
Duos and Trios
While playing with a partner or even a group of three makes the game much easier, sometimes these players get overzealous and make risky plays. If one player dies, the other members of the party must also die. You better trust your partner to not jump off a cliff and die at level 50.
Insane in the Membrane
You must be PvP flagged at all times.
Nudist
Your character is not allowed to wear any armor at all. Weapons, Shields, and Bags are allowed.
Stadic’s Challenge
You may not take any damage at all, and must also gain 45000 reputation across the four major factions. Somehow this one has been completed by people much crazier than I.
Bloodbath
Ever see the episode of South Park where they had to kill thousands of Boars to reach max level? In this challenge mode players are not allowed to do a single quest. This leads to unexpected consequences, such as certain professions cannot be maxed, for example Engineering, which requires a quest.
Tunnel Vision
In this challenge players must be zoomed in all the way at all times.
Self Made
In this challenge you can only equip items that you have made with a profession. You cannot use items dropped by enemies, bought from vendors, or rewarded by quests.
White Knight
You are only able to use items of Common or Poor quality. This means no Uncommons, Rares, or Epics. This includes bags!
I hope that you learned a lot about surviving Hardcore from this guide and that you can make it all the way to level 60! Remember, World of Warcraft is full of dangers at every turn, remember the basics and try not to bite off more than you can chew!
About the Author

No need get hardcore addon anymore as blizzard release SF (Self Found) mode soon, no ETA but “early 2024” was told on Q&A streams.