
- Author: Furious
- Date: November 15, 2021
- Updated: July 26, 2024
- Expansion: WoW Classic


Welcome to this comprehensive Molten Core Raid Guide! All raiding guilds will spend several months in the fiery depths of Molten Core, so you’ll surely want to know about each boss encounter and the trash mobs found throughout. Like any other raid, you’ll need to utilize the full toolkit of your entire raid team to effectively clear the Core. Studying mechanics beforehand is the best way to help your guild swiftly complete these encounters. There’s a lot to cover in this guide, so let’s get started!
What is Molten Core?
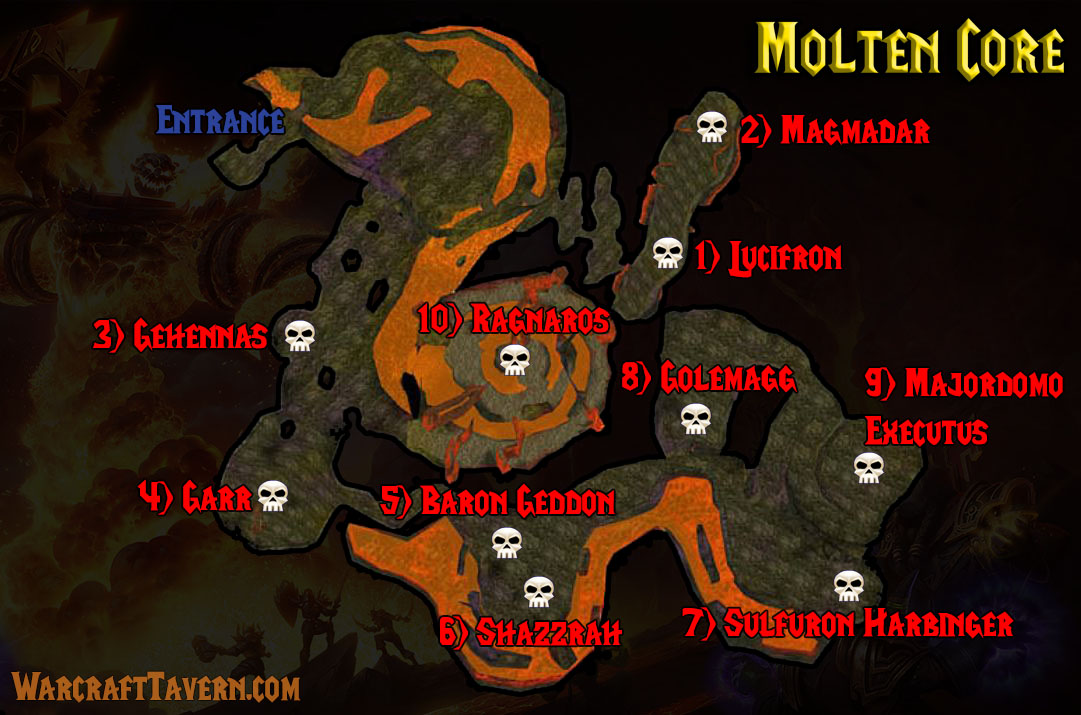
Molten Core is a 40-player raid dungeon, which serves as the seat of the Fire Lord Ragnaros. This is a difficult scenario and will pay out accordingly, but it’s important to focus on appropriate preparations and foreknowledge to make sure everything goes smoothly. Molten Core is interlaced with lava rivers and lakes which can cause significant damage. Interspersed throughout are eight Runes of Warding, which must each be put out in order to summon the final two bosses. This scenario relies on good communication and attention to each player’s role within the group.
What’s Covered?
This guide will address the components of a successful Molten Core raid, starting with some basics like group composition and necessary preparations. We’ll also take a look at the various Trash Mobs in the instance and their mechanics. Finally, we’ll chronologically break down each boss fight within Molten Core up to and including Ragnaros!
For a full list of items that can be acquired please see our WoW Classic Molten Core Loot List!
Season of Discovery Changes
In Season of Discovery, Molten Core has been retuned for raid teams of 20 players instead of 40. Most loot has been revamped as well, with some new items and tier sets for every class and role. There are also new difficulty levels and a new optional boss.
New Difficulty Levels: Heat
Upon entering the Molten Core raid, and every time you douse a boss rune, you’ll be met with a Hydraxian Waterlords NPC who you can speak to in order to change the raid’s difficulty level. There are three progressively more challenging levels, known as Heat levels:
- Sweltering Heat (Level 1): The easiest difficulty, requiring the least coordination and preparation.
- Blistering Heat (Level 2): This difficulty will be a little more challenging and will require some fire resistance gear (Blizzard recommends 96 or higher). For your trouble, most bosses will drop an extra piece of loot.
- Molten Heat (Level 3) The hardest difficulty, with a recommended fire resistance of 226 or higher. This difficulty awards some unique loot and weapon cosmetics. It’s also the only difficulty in which you will be able to face the new optional boss.
New Boss: The Molten Core
When your group has defeated the mighty Firelord Ragnaros on Molten Heat, the hardest difficulty, you’ll be faced with a new challenge: fighting The Molten Core itself. This giant fireball only appears on Heat level 3, and it does not drop any unique loot, leaving it as an optional challenge for some extra items. If you face this boss, you’ll be dealing with a number of Primal Flame Elemental adds and a lot of fire damage, for which fire resistance gear will be crucial.
Basics
Group Composition
It’s important to make sure each player is clear on their function within the raid. Having the right blend of each type is essential to success, so try to have about 4-5 of each available class to make up the total 40. It’s advised that any raid party is including (but not limited to) the following:
- Main Tanks (MT): You’ll need to designate a main tank, whose function is to bear the brunt of the main target’s attacks (ie Warrior). Sometimes, like with Molten Giants, you’ll have a second target, so you should also designate an:
- Off Tank (OT): to back up the MT when facing multiple targets. This guide indicates when an OT is appropriate.
- Healers: You’ll want at least three healers assigned to heal each tank, and at least one per group. Each healer must be perfectly clear about who they’re in charge of healing (ie tank or raid group).
- Cleansers: any unit type capable of removing curses should be prepared for this. Cleansing is instrumental in a few of the Boss fights. (i.e. mage)
- Pullers: It’s typically best to use Hunters for this. Pullers play several key roles in Molten Core, which will be detailed in the Action section. Their key responsibility is to draw the intended target into a more ideal position for the rest of the raid to combat. Designate a main Puller and a secondary one, for instances involving more than one target, and make sure they know which is which.
Fire Resistance
Each player should have 300+ buffed fire resistance. That means varying amounts of necessity for fire resistant gear, but everybody really should have at least 100 unbuffed (even hunters), knowing that paladins can’t include aura. Unbuffed means your base fire resistance stat including benefits from gear. Melee units planning to approach anywhere near Ragnaros need to be more like 200+ unbuffed.
Gear
Note that you will receive a fire resist ring as part of the series of quests for the Hydraxian Waterlords detailed in the following section. Try to accumulate as much fire resist gear as possible leading up to the raid. Because the healers will be occupied with the MT/OT each player will need at least a stack of bandages and Major Healing, plus Major Mana if appropriate. You will also wish to bring plenty of food, any helpful buffs, and Fire Protection Potion, especially if you’re not quite to 300FR.
Eligibility
Molten Core Attunement
Attunement to the Core is a quest which creates a shortcut via portal into the instance, bypassing Blackrock Depths (BRD). You’ll need to speak to Lothos Riftwaker the blood elf, who is just outside BRD. He’ll ask for a core fragment that’s located near the entrance to the MC, inside BRD. 6600 XP for completion.
Hydraxians and Aqual Quintessence
At least eight raid members will need to have completed a set of six quests for Duke Hydraxis who is on a small island near the Azshara coast. After the fourth of these quests, you’ll have reached honored with the Hydraxian Waterlords, and everything in MC should give reputation. The final quest, Hands of the Enemy, will involve spoils from the Molten Core raid. Each player who completes this set of side quests will receive an Aqual Quintessence they will need later to douse one of eight runes being guarded by the bosses leading up to Majordomo Executus.
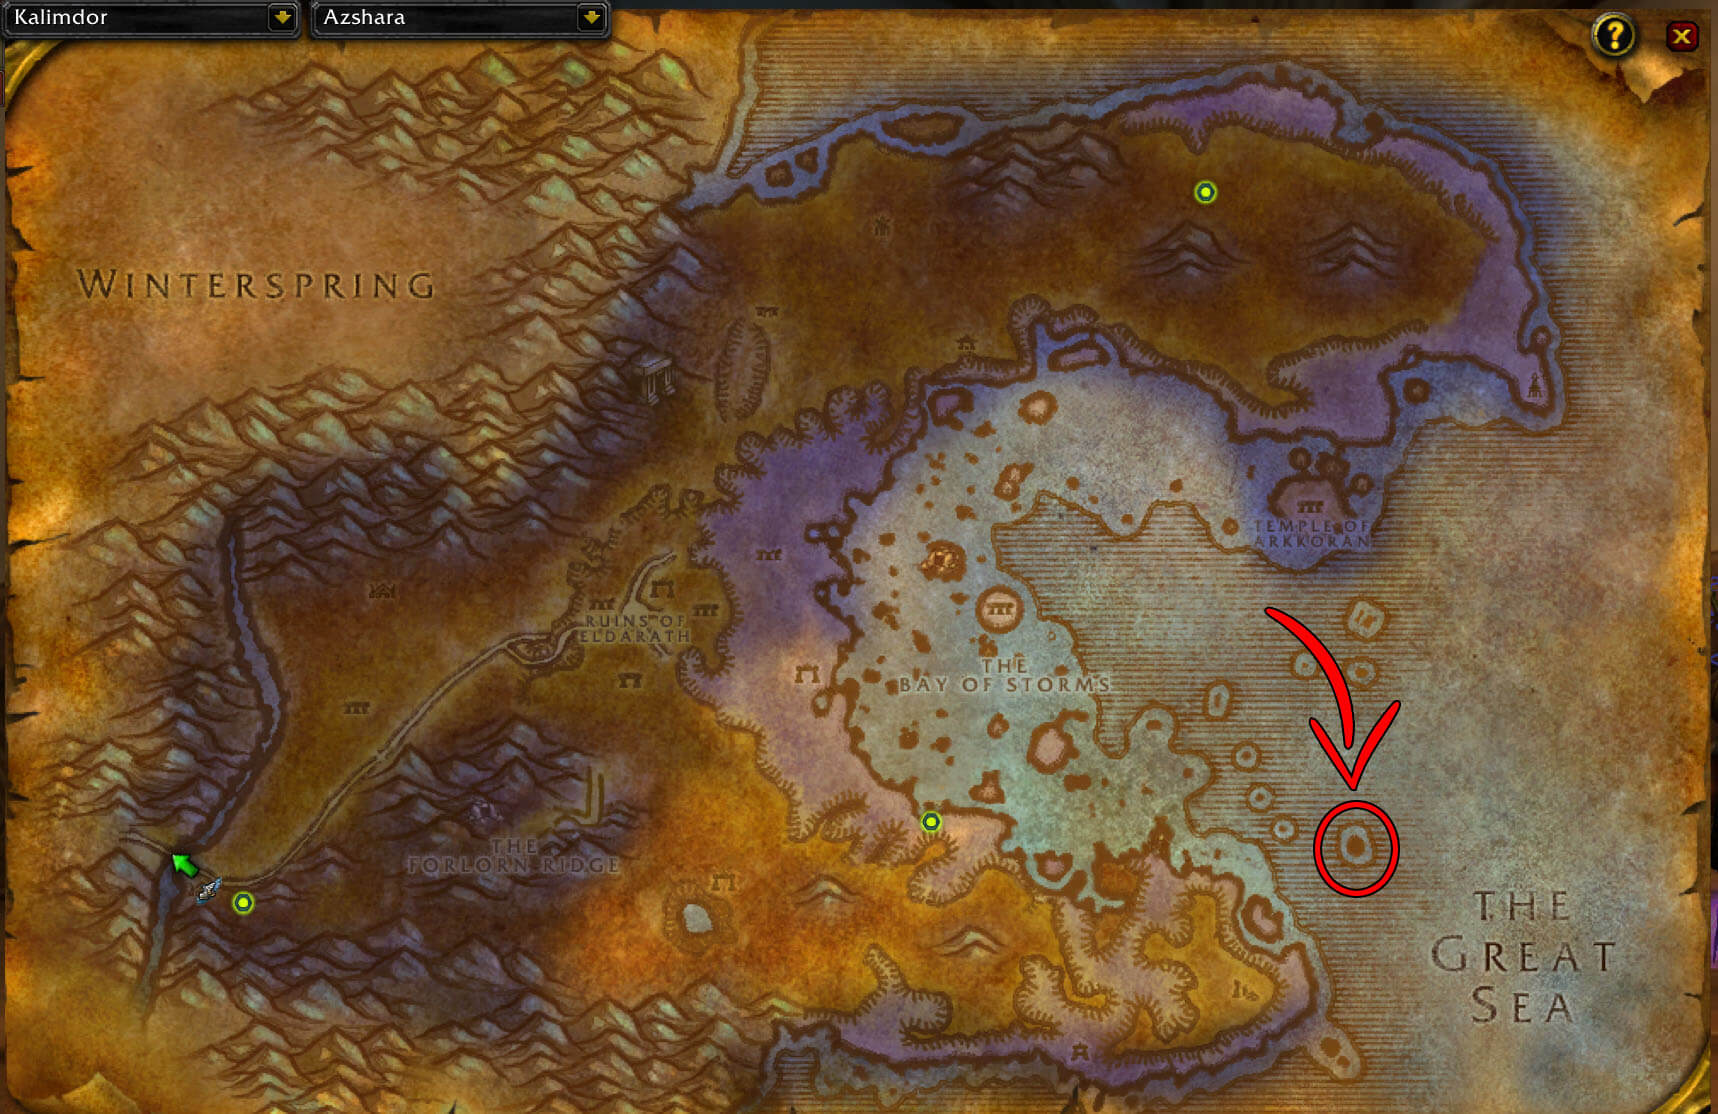
In order to acquire the Aqual Quintessence needed to douse a rune of the Firelords in Molten Core, you’ll need to complete a series of quests offered by Duke Hydraxis in Azshara. This will require you to make your way through Upper Blackrock Spire, and also make significant progress through Molten Core itself.
All quests are picked up and turned in with Duke Hydraxis in Azshara. Here’s how you can complete the Duke Hydraxis questline to get your hands on an Aqual Quintessence:
- Accept the first quest: Poisoned Water, and the second quest: Stormers and Rumblers from Duke Hydraxis. You can pick up both these quests at the same time.
- For Poisoned Water, go to Eastern Plaguelands and use the Aspect of Neptulon on poisoned elementals that you find. You’ll need to kill enough to loot 12 Discordant Bracers.
- For Stormers and Rumblers, you’ll want to head to Silithus and make your way to Crystal Vale. Simply kill 15 Dust Stormers and 15 Desert Rumblers to satisfy the requirement for the second quest.
- After turning in both Poisoned Water and Stormers and Rumblers, accept the third quest: Eye of the Emberseer. This requires you to delve deep into Upper Blackrock Spire to kill the Pyroguard Emberseer. You’ll need to loot his Eye of the Emberseer from his corpse.
- After finishing Eye of the Emberseer, accept the fourth quest: The Molten Core. For this bad boy, you’ll actually need to kill some trash mobs within Molten Core. To be exact, you’ll need to kill 1 each of the following: Molten Giant, Firelord, Ancient Core Hound, Lava Surger.
- After handing in The Molten Core, accept the fifth quest: Agent of Hydraxis. This quest is entirely a reputation gate, requiring you to reach honored status with the Hydraxian Waterlords. To earn reputation with them, your best option is from any monster within Molten Core. Alternatively, you can kill elementals in Silithus or Burning Steppes for a slower grind.
- Once you’ve finally reached honored with the Hydraxian Waterlords, accept the sixth and final difficult quest: Hands of the Enemy. This is undoubtedly the hardest quest in the entire series, as it requires you to loot the hand of four bosses in Molten Core. To be specific, you’ll need to kill and loot: Lucifron, Sulfuron, Gehennas, and Shazzrah.
- After slaying Ragnaros’ lieutenants, make your way back to Duke Hydraxis to accept the rewarding seventh quest: A Hero’s Reward. This isn’t really even a quest, but more a prompt to retrieve your reward for all your hard work! Loot Hydraxis’ Coffer to earn the choice between two blue rings with fire resistance, but more importantly, the Aqual Quintessence!
- Each time you use your Aqual Quintessence, you’ll need to return to Duke Hydraxis in Azshara to get another. However, once you become revered with the Hydraxian Waterlords, you’ll receive an Eternal Quintessence, which won’t disappear upon use!
Classic Era Boss Strategies
This additional will help give an idea for how the raid could go. On the way to fight Lucifron, you should encounter a pair of Lava Giants. Position the MTs slightly away and pull the Giants to them. Then either a Lava Annihilator or Fire Lord will appear to the left. Banish it if not a Fire Lord.
Keep an eye out now for a roving Lava Surger and Core Hound in the area at this time. Do not cross over the bridge, you’re now facing, but pull the giants across the way back toward the raid. As you move forward and along the left side, ignore the mobs on the right for now, knowing you’ll return to the passage on the right side later on.
Another bridge lies ahead guarded by a series of mobs. Kill the giants, then the Fire Lord (or Annihilator) and the Core Hound after, then you’ll need to fight a Lava Surger across the next two bridges. Lava Imps appear in groups of ten or so. There may be another surger here so try to separate it from the Imps. Try to stay tight to the right to pull as few imps as necessary, as it’s very difficult. When you do need to pull them try to use a Paladin.
Lucifron
A large Naga with two adds who can perform Mind Control. He is the first boss and one of the easier ones to face. Mages should focus on cleansing Lucifron’s Curse from the Priests. Don’t let anybody in the raid remain under Mind Control. There will be packs of Core Hounds in Lucifron’s area, and you’ll need to address some of them first. You’ll gain tranq shots from defeating Lucifron that you’ll need against Magmadar.
Lucifron Abilities & Attacks
- AoE Curse: use of any ability or spell costs 2x need to use mages or druids to lift it
- AoE Magic: after ten seconds, it hits for 2k, need to use priests or paladins to lift it.
Lucifron Fight Strategy
Entering Lucifron’s chamber, there will be some packs of Core Hounds to deal with before you engage with him to make room. You’ll need five tanks. Start by having the leader target one hound with an MT and an OT, then move to another, and so on. Be careful to kill them all within ten seconds of one another. Stay toward the right wall and back wall, so as not to accidentally aggro the Imps through the passage there. Then pick 3 MTs and an OT. Priests need to dispel Lucifron’s guards’ Mind Control, and have the warriors use Intimidating Shout beforehand for that reason. Also watch for Lucifron’s mana curse and have cleansers ready. Remember your promise to Hydraxis if you succeed. Lucifron also drops Tome of Tranquilizing shot, which will be instrumental in the next boss fight.
Magmadar
This is a large Core Hound at the end of the tunnel after Lucifron. He guards the Rune of Kress, which you’ll need to use a quintessence to douse. His AE Fear attack extends about 90 feet. The MT should have some kind of fear protection, like Fear Ward or Will of the Forsaken. Any warriors not the MT or OT can switch to Berserker to avoid his AE Fear. Hunters will want to dispel his Frenzy with those tranq shots procured from Lucifron. He also drops large fireballs which cause heavy damage to anybody in them. Have casters stay at maximum range, and generally try to get him to face away from the rest of the raid.
Magmadar Abilities & Attacks
- AoE Fear: every 30 seconds on everything inside 90 feet
- Frenzy: enrages every 20 seconds
- Fire Globs: balls of fire drop from him and cause major damage.
Magmadar Fight Strategy
Additional Core Hound packs hinder the path to Magmadar. It’s a good idea to have a dedicated Priest to dispel his AoE Fear attack, and have healers at the ready to deal with the magma balls. This is where you’ll have a hunter use Lucifron’s Tranquilizers: neutralize Magmadar when he enrages every 20 seconds. It’s best to have the MT tank him toward the middle of the cave and make sure other DPS units are safely back from his AoE breath attack. This leaves you at the end of the tunnel, so it might be worth considering to either port out or remove armor and die.
Take care of healing and buffs before re-entering. Go down the right-side tunnel you avoided last time. There will be two Lava Annihilators (or Fire Lords) by the entrance. Keep right and there are two more Lava Giants as you descend. Directly across the cave is another pillar with two more giants behind. Pull the two by the entrance over to the left of the giants by the pillar. There should be one more pair of Giants and a Fire Lord or Lava Annihilator moving south (left from the pillar). Take care of these before moving to Gehennas.
Gehennas
This extra powerful Shadow Flamewalker with two Elite Flamewalker adds protects the Rune of Mohn. The typical approach is to pull the two guards to the southwest with a hunter, and tank Gehennas in the middle of the room. Keep a decurser on the MT handling Gehennas.
Gehennas Abilities & Attacks
- Gehennas:
- Shadow Bolt: 2k+ shadow bolt to one non-tank unit
- Rain of Fire: about 1k damage per two seconds for six seconds in about a 30 ft circle
- Gehennas’ Curse: hinders healing of enemies in range by 75% (five minutes).
- Elite Flamewalkers:
- Fist of Ragnaros: Stuns enemies for four seconds for about 25 feet
- Sunder Armor: hits enemies’ armor for 1k reduction per sunder armor. Can stack 20x.
- Strike: regular damage +35
Gehennas Fight Strategy
Separate his two guards and tank them apart from the rest. Have the MT and healers break east. Have a couple hunters target one guard each and pull them to two OTs, being careful to keep some distance so their Stun attack only hits the tanks. Maintaining aggro on the guards is important. Stay focused here also on scrubbing Gehennas’ anti-healing Curse.
Garr
A lava elemental melee boss with eight Firesworn guards who looks after the Rune of Blaz. Use warlocks to banish as many as possible of his adds, because Garr grows stronger each time a guard is killed. Go back for the remaining ones once he’s dead.
Garr Abilities & Attacks
- Garr
- Antimagic pulse: removes one positive spell effect (buff) from enemies closeby
- Magma Shackles: -60% to enemy movement speed within range
- Firesworn
- Immolate: about 800 fire damage plus about 400 every three seconds for 21 seconds.
- Eruption: blows up, costing around 2k damage inside 50 feet
- Separation anxiety: will hit for around 5k damage if too far away from Garr
Garr Fight Strategy
From here you’ll head to the south to face Garr. Pull targets on the ramp: attack the Lava Annihilator at the pillar, bring the giants over to the right, then work on the left side of the room. Watch out for his exploding guards (they’re banishable), and retreat when it seems imminent. Set up the party in the south at the bottom of the ramp with the MT and healers by the opening to the passage with a unit to pull Garr over. He can try to kamikaze the guards before they’re dead if his health is bad. The most important thing is getting Garr far enough away to get around. Garr’s guards can be predicted based on his movement. Have somebody pick the targets and give them to the MTs. Nobody let go of your target for any reason. Go back for any banished Firesworn after Garr is dead.
Using the right units to pull becomes more important than ever. When dealing with the Lava Packs that arise, target the firewalker first then the Flameguard, then if it’s two elementals, banish them. If it’s a Lava Reaver, just watch out for the stun attack. Use one MT per target in the Lava Pack.
Baron Geddon
Another laval elemental in MC – he moves around in Shazzrah’s locale and should be fought in Garr’s room. Baron Geddon is decidedly easier to fight than Garr. The Rune of Zeth is his responsibility. Have the MT wait in the middle of the room and have a puller with high FR bring him over. It’s important for players to run for the low edges of the cave if they have been turned into the bomb (see below).
Baron Geddon Abilities & Attacks
- Inferno: ten second pulses that deal heavy fire damage and increase DoT
- Living Bomb: can turn an enemy within range into a bomb which will explode after eight seconds for 3k+ damage (can be negated by Ice Block or Cloak of Shadows).
- Ignite Mana: DoT attack that removes 400 mana and does 400 damage (five minutes) can resist with 250+FR
- At 2% health Baron Geddon will prepare to explode, be sure to get all members out of the AoE
Baron Geddon Fight Strategy
The passage here bottoms out in a room full of trash mobs: one close to the front, two toward the rear, one on the left side and one in the middle. Most of these will need to be cleared, but you can save the left-side pack for later. Have a hunter use Eyes of the Beast to draw Baron Geddon to the middle.
Get everybody out of the way of his Inferno attack, but also make sure every player knows to run to where the roof is low if Geddon has turned them into the bomb. There are some UIs that will let a player know if they are the bomb. It’s helpful to mark the central spot for the MT’s position. Try to have all units as far from Geddon as possible while still able to attack. Other DPS units can sneak in between inferno attacks. Remove fire resist gear now.
Shazzrah
A Flamewalker who guards the Rune of Mazj. He is fought in Garr’s room once a hunter pulls him. Form a circle just outside Shazzrah’s AoE with at least a healer per group. Fire resist gear may not actually be helpful here. Mages need to stay on top of Shazzrah’s Curse. Proper spacing can minimize fallout from his Blink.
Shazzrah Abilities & Attacks
- Arcane Explosion: Point-blank AoE for around 1k damage
- Shazzrah’s Curse: x2 to magical damage for five minutes
- Magical Grounding: halves magical damage to caster (30 seconds)
- Counterspell: cancels any magic (10 seconds)
- Gate of Shazzrah: teleports him forward
- Blink: he will blink to a target about every 45 seconds. That target needs to corral him back to the center
Shazzrah Fight Strategy
Shazzrah’s melee is pretty weak. Attack Shazzrah the same way you did Baron Geddon–be ready to cleanse the MT of Shazzrah’s Curse. Try to steer clear of his Arcane Explosion, and definitely stay on top of cleansing his amplify action. Remember to grab those hands! Put fire resist gear back on and Proceed into the passage ahead into a large chamber with an entrance leading up and left. Lava Annihilators, Fire Lords, and Lava Packs are the population here.
Sulfuron Harbinger
He is another flamewalker, and one of the tougher bosses, because he has four tough guards with some special abilities. It’s important to try to intercede during their spells. Each guard and Sulfuron need dedicated MTs. Pull the adds away from the group and kill them individually. Cleansing units need to focus on dispelling.
Sulfuron Harbinger Abilities & Attacks
- Sulfuron
- Demoralizing Shout: -300 to attack strength
- Inspire: autobuff for 2x attack speed and -25% damage. Can’t be dispelled
- Flame Spear: 1k damage fire attack
- Sulfuron’s Guards
- Can heal any mob unit
- Shadow Word: DoT that does about 400 shadow damage per three seconds. (can use Prayer of Shadow Protection to counter)
- Immolate: DoT for about 400 damage per three seconds
- Immune to poisons and to Curse of Tongues
Sulfuron Harbinger Fight Strategy
You want to try to progress up the left side and stay to the left, but don’t go all the way to Golemagg yet. Next is Sulfuron and his healers. You’ll want to select 5 MTs, using your leader to assign the targets. Sulfuron should be pulled aside from the others and tanked. Prevent him from using Demoralizing Shout if you can, and keep him engaged to stop his ranged spear attack.
Golemagg the Incinerator
Golemagg is a Molten Giant with two unkillable Core Hound adds. MT will need plenty of FR and healers need to stay focused on mana as this is a longer encounter. A backup tank is also essential here for the same reason. Offtank the two hounds away from the main group tanking Golemagg; they’ll disappear when he dies. The Rune of Theri, which they guard, is the last of the eight you’ll need to douse with the Aqual Quintessences.
Golemagg the Incinerator Abilities & Attacks
- Golemagg
- Golemagg’s Trust: buffs the Core Hounds for +500 damage and 2x attack speed
- Magma Splash: fire DoT spell that reduces target’s armor. Starts with 50 damage and 250 armor reduction per, but can max out at 10x that
- Pyroblast: 2k damage to a random member plus DoT component for 200 every three seconds (12 seconds).
- Earthquake: at 10% health, he casts earthquake and attacks faster. He will also cast Attract Rager at that point which increases aggro to everybody except the tanks on the core rager at the time.
- Core Ragers
- Separation Anxiety: if the hounds are too far from Golemagg, he resets
- Mangle: reduction to movement by half, plus 300 damage per two seconds
- The guard hounds can regain health when reduced below 50%
Golemagg the Incinerator Fight Strategy
You can go up the path to the left toward Golemagg once Sulfuron is dead. Prepare an OT group for each of Golemagg’s two invincible Core Hounds, and be sure to include a priest, a druid, a warlock, and a warrior. The healer will need to watch for the bleed effect from the hounds. Try to pull the hounds away from Golemagg, as they’re stronger when close to him. You might grab one dog to the entrance and the other over to the jets of fire to the right. Golemagg should stay centered. Everybody needs to watch for his DoT fireballs. Pets can be decoy targets here. Go easy on the hounds because they get stronger with additional damage taken: they will die when Golemagg does.
Majordomo Executus
He is the right hand to the Fire Lord and will only generate after all eight runes have been put out. Majordomo is a very powerful flamewalker with a entourage of eight Flamewalker adds: four healers and four elite guards, who are actually the focus here. Majordomo will submit when his adds have been destroyed. The best way to go about that is to off one Elite, then go for the Priests, then return for the other Elites. You’ll want to put a mage on each healer as well. Mana potions will also really come in handy for stamina here. Really let loose on usage of Shadow Protection Potions and bandages for other members as you’re almost through.
Majordomo Executus Abilities & Attacks
- Majordomo Executus
- Aegis of Ragnaros: absorbs 30k damage, ricochets 250 onto melee attacks, and brings his health to full.
- Shield: he applies this to all guards
- Purple shield: 100 damage protection and reflection onto attacker
- White shield: all magic attacks have 50/50 chance of reflecting onto the caster (Do not cast Polymorph during white shield)
- Teleport: transports target into the lava pit (get out quick as it deals 1-2k damage, and get healed immediately if possible).
- Blast Wave: AoE flame attack ranged at about 100ft
- Flamewalker Guards:
- Fire Blast for 1k+ damage
- About 900 damage hits to MT
- Shield – Majordomo applies
- Blast Wave – just like Majordomo
- Snowballs: Healers can hit non-tankers with shadow bolts for about 1k damage
- Once the others are dead, the last guard will grow to double size and hit harder until he dies.
Majordomo Executus Fight Strategy
This is the part where you need to go back through if you haven’t already and deactivate–or douse–each of the eight runes next to the previous bosses, in order to summon Majordomo Executus. Unlike the last fight, here we want to focus on killing the eight adds while managing the boss. It’s best to space the elites apart, and try to hit Majordomo and his adds in between shielding, except for hunters who may still use autoshot.
BE WARNED that domo will go berserk when he is down to one guard, which will heal the remaining add and cause Majordomo to deal extra damage. Pick out four groups with a warrior, a priest, a dps/hybrid unit, a rando, and a warlock, if possible. One group will have a hunter, who will need to maintain aggro on Majordomo as long as possible. He will be using his Distracting Shot and possibly Deterrence to help maintain control over Majordomo’s aggro. The groups of four-five will function like individual units together during this battle. The suggested kill order is two Elites first, then polymorph the four healers, but after four, the remaining units will be immune to sheeping.
Ragnaros
The final and toughest boss in this dungeon, located off a side path near Gehennas’ area. Ragnaros’ showdown is fought in two distinct segments: a three minute period of fighting Ragnaros alone, then a 90 second period where he will submerge and you’ll face his Sons of Flames spawn. Ragnaros has a vicious ranged knockback, so spacing is important. Avoid narrow walkways for the same reason. It’s also important to keep healers safely back from his lava splashes. The two halves of this battle will repeat if you don’t reduce Ragnaros to maximum 40% health in the first three-minute segment before he retreats to let his sons battle. Be ready to tank him as soon as he re-emerges after 90 seconds, otherwise Ragnaros will hurl Magma Blasts. It’s possible to still win if you haven’t killed Ragnaros within the second three-minute portion, but it will be extremely difficult, and Ragnaros has to be around 3% for a chance at killing him when he re-emerges.
Ragnaros Abilities & Attacks
- Ragnaros:
- Wrath of Ragnaros: knockback effect every 25 seconds. Reduces threat for target.
- Hammer of Ragnaros: ranged knockback that hits target with mana bar and knocks back all other players within 60 feet.
- Lava Splash: damage to those hit by lava splashes. Expec about -25% damage for every 100 Fire resistance
- Elemental Fire: damage debuff targeted on whoever holds aggro. About 5k damage over eight seconds
- Magma Blast: range attack triggered if Ragnaros is not engaged upon resurfacing. 4k-6k damage per hit.
- Melt Weapon: Melee attack that can damage weapons used to target him. -1pt durability per shot. Bring extra weapons and make sure there is a repair bot for the raid.
- Sons of Flame
- Mana burn aura: converts mana to damage
- Fire attack: about 1.5k damage per
Ragnaros Fight Strategy
Everybody scrape all available fire protections for the final fight. That means the fire protection ring from Lord Hydraxis and optimizing all further fire-resist options, including potions (try to have two per person). Head back to where you fought Gehennas. A nearby passageway breaks east and heads down to the central chamber. Do not try to jump across the lava spiral, just walk around it. Place the MTs on the left side of the inner circle and the other warriors around the rest, with healers farther out but tank-adjacent. Basically we need any melee units toward the inner circle. Space everybody well to minimize issues from the Knockback. Once everyone is buffed and positioned, have Majordomo summon Ragnaros, who rises up out of the center.
This is part I of the fight with Ragnaros. Three minute duration. For this part let the MT have aggro, and watch for Ragnaros’ fire-based 1k knockback; you’ll need a lot of FR to resist it. Listen for the heads-up to get back to the inner ring. You really want the healers ready to remove Ragnaros’ target debuff. The other big thing for this part is making sure there’s always somebody in melee range so that Ragnaros never uses Magma Blast. Once this has gone on the full three minutes, Ragnaros really needs to be down around 35% health as he submerges into the laval and spawns his Sons of Flame. Move ranged units back before he spawns his sons, which will appear toward the south end of the outer ring.
Eight banishable fire elementals appear around the inner ring on every side but South. Try to deal with as few at a time as possible, and never banish all eight, as this can trigger Ragnaros to rise back up. This is pretty much your only shot to handle the sons without Ragnaros so timing is of the essence. Remember to have an MT and OT ready to pull aggro on Ragnaros as soon as he emerges (still trying to avoid those Magma Blasts)
Trash Mobs
These are various units located throughout the core that will hamper your progress to and through the bosses. Their special abilities are included here.
Lava Surgers
Fast-moving banishable earth elementals which patrol the Core. It’s impossible to really maintain aggro (a system whereby the target ranks its threats to decide where to focus its attack) because they will typically target the person on their threat list who is physically farthest away, then do a knockback on them and everyone between the two, but will randomly change target. Remember to stick to areas where the knockback ability will cause minimal issue.
- Respawn Time: Every 28 minutes until Garr is defeated
- Charge: 1k damage random attack
- Knockback: can knock everybody back between the Lava Surger and target
Lava Annihilators
These are somewhat weak rock elementals in fixed locations which charge randomly and can hit for about 1k damage. They function much like Lava Surgers, but without the knockback ability, and in one location. If you’re ever caught between two units, it’s best to have a Warlock banish the Annihilator and fight the other unit first. Use the MT to establish aggro, then all join in. Any area which can spawn a Lava Annihilator or a Fire Lord may do either one.
- Respawn Time: 2 hours
- Charge: 1k damage random attack
Fire Lords
These are fire elementals that use a combination of fire resist debuff and short range attack. They’re immune to Crowd Control, and they periodically cast a flamestrike-type spell that creates fire spawn. Cleansers need to stay on them, and mages should cast nonstop blizzard in their area, while single-target attackers focus on the spawn, to prevent them dividing. If you’re fighting two Fire Lords, make sure the MT and the OT know which one to focus on. If they spawn, be sure to kill those before going back to the Fire Lord.
- Respawn Time: 2 hours
- Incinerate: augments fire damage
- Soul Burn -magic: 4k fire damage during a 16 second period. Physical damage to the Fire Lord reduced by 50%
- Spawn: creates multiplying adds
Molten Giants
these come in pairs with Molten Destroyers. The best move is typically to split them up and focus on aggro control and on mana conservation. A warlock might use Curse of Doom on the second target while the rest of the raid goes after the first. Destroyers are stronger and have an Area of Effect (AoE) knockdown when they stomp.
- Respawn Time: Does not respawn
- Attacks hit tank for 600 – 800 damage
- Knockback: Single target knockback dealing ~600 damage
- Stomp: An AoE melee range attack, affects up to 8 players
Molten Destroyers
Come in pairs with Molten Giants. They are definitely the tougher mob and won’t show up until after entering the tunnel toward Gehennas. When faced with them, focus on the Giant before the destroyer. Consider starting with range.
- Respawn Time: Does not respawn
- Attacks: Hit tank for 700 – 800 damage
- Smash Attack: Hit tank for 1000 – 1100 damage
- Knockdown: Knocks down single target
- Trample: An AoE attack dealing 1000 damage
Ancient Corehound
This is a somewhat powerful unit with a forward-facing AoE and several debuffs, including an AoE Fear. The advised course of action is to have the MT pull it to face away from the raid to avoid any other units taking damage while they DPS from behind it. Have the OT ready in case MT loses aggro. Make sure to grab loot, because it can’t be skinned for Core Leather before being looted.
- Respawn Time: Every 18 minutes until Magmadar is killed
- Can detect Stealth use
- AoE Fire Attack: forward-facing fire damage (about 800)
- Stomp: stuns units in AoE (5 seconds)
- Ancient Dread: hinders spells and melee speed by half.
- Ancient Despair: confusion (3 seconds)
- Fire Resist Debuff: 200 FR debuff
- Withering Heat: max hp -15% (15 minutes)
Core Hound Packs
These are a total of five packs of five Core Hounds each, going up to Magmadar. They are immune to Crowd Control, These each need to be killed within ten seconds of each other, or they’ll revive. Like Ancient Core Hounds, they have to be faced away from the raid to neutralize their forward AoE attack. There are different kinds of Core Hounds: they can have an AoE Fear, a Stun, or an attack speed debuff.
- Respawn Time: 2 hours
- Damage over Time (DoT): 50 dps attack (30 seconds) can stack 10x
- Frontal AoE attack for about 400 damage
Flame Imps
Groups of about ten of these block the way to the first boss, Lucifron. They respawn extremely quickly, at seven minutes. Speed is of the essence with these, so everybody with AoE be ready to use it.
- Respawn Time: 7 minutes
- Small AoE fire attack
- Hits tanks for about 200.
Lava Packs
These are one of the big reasons to really have that fire resist gear. Later in the instance, packs of four or five units appear which are comprised of a Firewalker, a Flameguard, and a lava reaver OR two lava elementals. Make sure you kill them in order: Firewalker, Flameguard, then banish the last two. Fire elementals can hit for 3k, so healers really focus on which unit you’re looking after.
- Firewalker: fire resist debuff and fire attack for 3k
- Flameguard: Frontal AoE and AoE with Armor Debuff
- Lava Elemental: Front-facing Stun AoE plus DoT
- Melee attack
About the Author

MISSLEADING!
Warning: This Guide is NOT updated for Season of Mastery. If anything its for the regular Classic / 1.12.1.
Also:
This guide is mostly copy pasted from other already wrong guides.
You don’t need any fire resistance at all besides the Main and Off-Tank ONLY for Ragnaros – this alone tells an experienced person that nothing to follow can be of any good guidance.
The information of the abilities are useful.
Sounds like you are looking at the Classic Era boss strategies instead of the updated individual boss guides written for SoM that are linked in the guide menu at the top.