- Author: Passion
- Date: September 10, 2022
- Updated: September 19, 2022
- Expansion: WotLK Classic


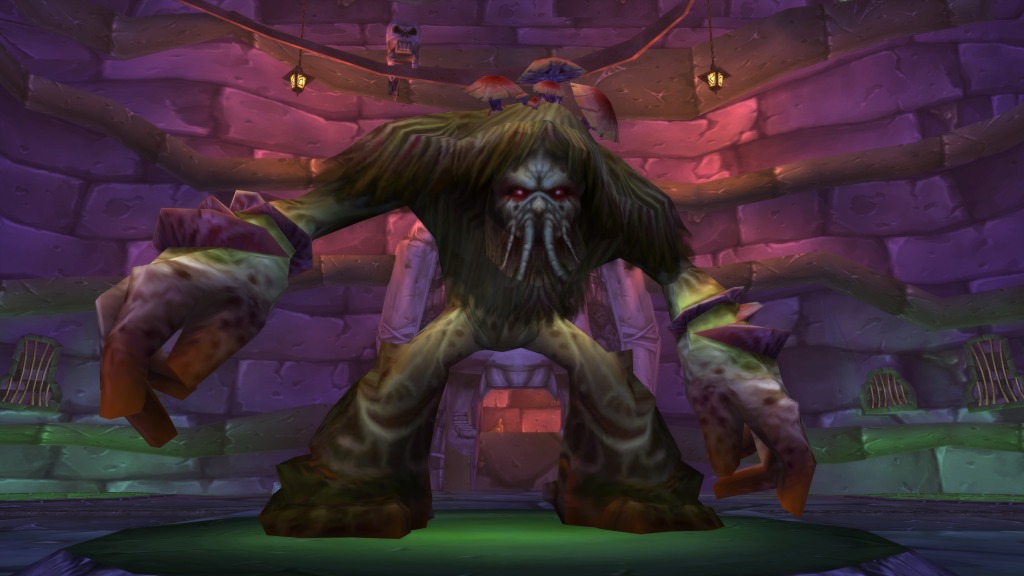
Loatheb is the third and final boss of the Plague Quarter in Naxxramas. A monstrous amalgamation of plague and bog beast, Loatheb controls and corrupts healing magic while attacking the raid with spores and rot.
“The hideous result of fusing the living plague of the Plaguelands with the bog beasts of Azeroth, Loatheb is said to control the power of healing itself.” –Commander Eligor Dawnbringer
This guide will offer a detailed, step-by-step tutorial on how to deal with Loathebs’ necrotic aura and inevitable doom.
Role Summaries
The Fight
- Avoid killing spores out of position!
- Don’t soak spores if you already have Fungal Creep.
- Contribute to healing however you can between Necrotic Auras.
The Fight
- Avoid soaking spores, the DPS will need as much damage as they can get.
During Necrotic Aura
- Keep any absorb spells, such as PW:S on as many targets as possible.
- DPS whenever you have time to spare
Between Necrotic Aura casts
- Heal as many players to full as you can, but prioritize the health of the tank and healers.
- Try to time your first heal so it lands as soon as Necrotic Aura ends.
- Apply heal-over-time spells towards the end of your 3-second window.
The Fight
- Avoid spores. Make sure they are never close to you just in case they die to cleave damage.
Abilities
This fight is fairly simple, with the primary concern being Necrotic Aura preventing healing for the majority of the fight.
Raid Composition & Preparation
The Pull
Loatheb is simple to pull, have your tank run straight through the boss, keeping him on the circle at his feet, facing the exit portal.
Your DPS should ideally place themselves around his left leg, with healers in the back. Some groups will prefer one single stack instead, either method is fine but stacking on one leg allows your raid to manage Fungal Creep given by spores significantly easier.
The Fight
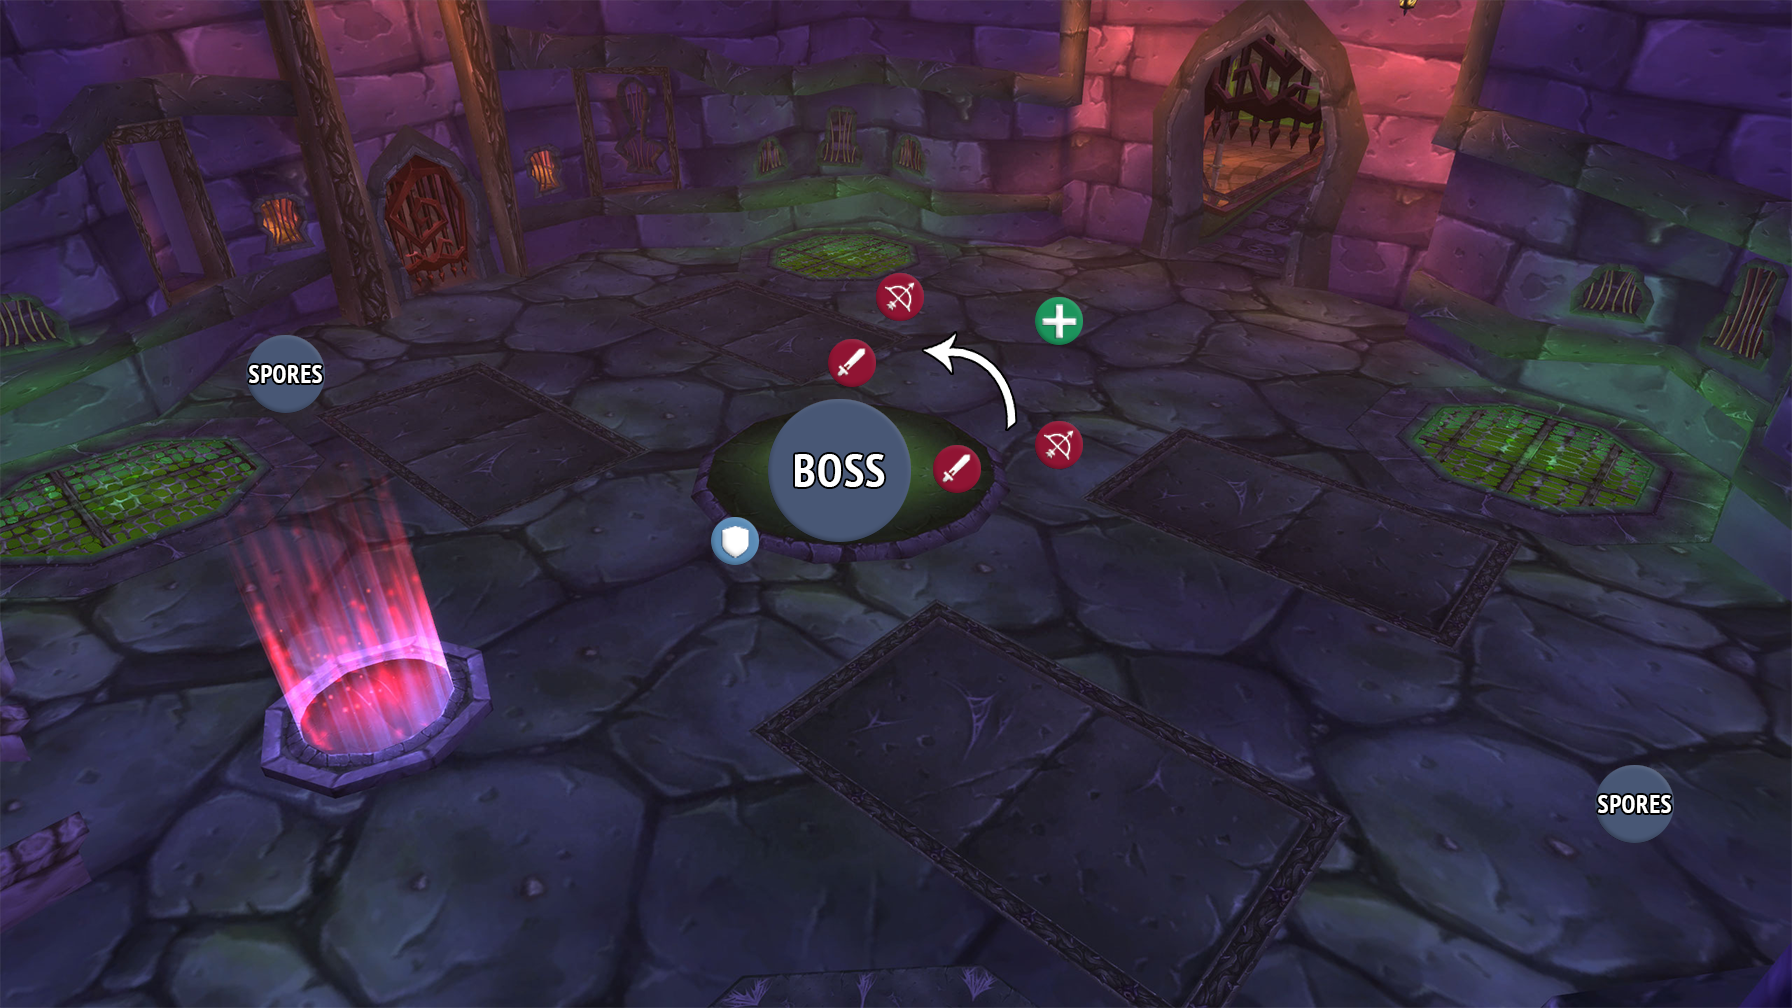
This fight is primarily a DPS race, and to facilitate that, Loatheb will spawn spores roughly every 20-seconds. These spores will spawn in a random edge of the room and slowly float around.
If your raid is stacking around Loathebs left leg, have a Death Knight cast Death Grip on the spore, pulling it into the stack. Once it dies, 5 players will receive Fungal Creep. These players should then rotate over to Loathebs right leg, guaranteeing they won’t soak up Fungal Creep from the next spore.
Fungal Creep increases players Critical Chance by 50% as well as causing them to deal no threat. This is a massive damage boost and you want to make sure this isn’t wasted by killing a spore before they reach the stack!
The main obstacle during this fight is Necrotic Aura, reducing everyone’s healing done by 100% for 17-seconds, and recasting every 20-seconds. This gives the raid a 3-second window to heal. Healers should begin healing before this debuff falls off, just in time for their spell to land when the debuff falls off, giving them as much time as possible to cast heals in the 3-second window.
Using a spell like Renew or Lifebloom just before the debuff is recast can also provide a lot of value, as they will continue healing even if you have the debuff on you. Absorbs like PW:S are also great as they are not technically healing and because of this aren’t reduced by Necrotic Aura.
Loatheb’s melee swings don’t deal much damage, but he makes up for that with spells. Every 30-seconds, Loatheb will cast Deathbloom on everyone in the raid, dealing damage every second for 5 seconds, then blooming, dealing a larger chunk of damage.
After 2 minutes, Loatheb will start casting Inevitable Doom, recasting it every 30 seconds. After another 3 minutes, he will cast Inevitable Doom every 15 seconds instead. This deals a large chunk of Shadow damage to everyone within 100-yards of Loatheb after a short delay.
These two spells together make sure you will always need a lot of healing between Necrotic Auras. DPS players can help take some pressure off the healers by using Healthstones or self-heals like Rune Tap or instant heals like Lay on Hands between Necrotic Aura. If you fall behind on healing, there isn’t a whole lot you can do outside of the 3-second window.
Here are some of the main things that can go wrong in this phase:
- Healers die to Inevitable Doom or Deathbloom, leaving your raid with less healing between Necrotic Auras.
- spores are killed by ranged DPS, giving fewer players the buff.
- spores are killed on top of the tank, removing their ability to generate threat.
- DPS don’t assist the healers between Necrotic Auras, causing the healers to fall behind.
Congratulations on defeating Loatheb! With the Plague Quarter finished, you are one step closer to Kel’Thuzads lair.
About the Author

You can’t grip spores, fix your shit guide