
- Author: DanielD
- Date: September 14, 2022
- Updated: September 26, 2022
- Expansion: WotLK Classic
The daily quests available in the Sholazar Basin allow you to gain Reputation with The Oracles or Frenzyheart Tribe, plus the usual gold and XP. All dailies in this zone are available to both factions, but require a quest chain to be done before accepting them. This guide contains both basic info on the required quest chain before and detailed instructions for completing the daily quests.
A note on flying mounts: If you don’t have a flying mount, some of these quests can be difficult to complete — a few are basically impossible without a flying mount (or a Warlock summoning you to the high ground). However, there is an NPC in the Storm Peaks, “Honest” Max, who will loan you a flying mount. He’s found in K3, in the south of the zone. The only requirement is being Level 77, which you’ll want to be for questing in Sholazar anyway. If you can’t afford Cold Weather Flying or a flying mount, this can be a good alternative, and should speed up questing in Sholazar Basin considerably. Do note that this mount can only be used in Icecrown, Storm Peaks, and Sholazar.
Throughout this guide, you can click on any bar with a ╲╱ symbol to see a detailed walkthrough.
How to Unlock the Sholazar Basin Daily Quests
Before you can do any of the daily quests in the Sholozar Basin, you must complete a very long chain of prerequisites which ends with you choosing a faction to support (much like the Scryers and Aldors in TBC, but way more work). Click the bar below to see a detailed list of all the quests you need to complete, some useful tips and tricks for doing so, and the order in which to complete them.
With all that done, you can finally do the dailies!
Frenzyheart or Oracles – Which Faction to Choose
Some players may be looking to raise both factions’ reputations to exalted (either for achievements or to collect all of the Jewelcrafting recipes.). You can’t work on these at the same time, as being Friendly with one faction sets you to Hated with the other, so which should you choose first?
If you eventually want to gain Exalted status with both factions, it makes the most sense to start with the Frenzyheart Tribe before switching to the Oracles. The reputation rewards for each faction are comparable until Revered, where the rewards become skewed in the Oracle’s‘ favor. At Revered, each faction offers an item that ripens after 7 days: the Disgusting Jar for the Frenzyheart Tribe and the Mysterious Egg from the Oracles.
The Disgusting Jar yields one unique item, the Frenzyheart Brew toy, while the rest of the rewards are alcohol or potions that can be found elsewhere. The toy has a 24% chance to drop so you can get this item pretty quick- even before you reach Exalted if you’re lucky.
The reason why the rep becomes skewed in the Oracle’s‘ favor is the Revered item, the Mysterious Egg, contains 5 items players will want for their collection: four companion pets and one mount, the Reins of the Green Proto-Drake. The pets can be traded, so you can sell any you don’t need. The mount only has a 6% chance of hatching from the egg, so you may need to incubate a lot of eggs before it drops.
So, because there is a greater time investment needed to get all of the Oracles items, you probably want to pursue Oracles rep second, as you can complete the Frenzyheart Tribe quicker.
Switching Factions in Sholozar Basin
You’ll only be able to do dailies with the faction you’re currently sided with, but you can always swap to the other side — it’s actually quite easy to do:
- Return to Artruis the Heartless and fight him again — if you’re very high level and/or well-geared, you’ll need to make sure you swap to something that lets you kill him relatively slowly (so you don’t skip the part where you kill one of the two faction NPCs). Once you have to choose which NPC to kill:
- Kill Jaloot if you want to switch to the Frenzyheart side
- Kill Zeptik if you want to switch to the Oracles.
- Speak with the NPC you didn’t kill and accept/turn in their initial quest to align yourself with their faction.
- Grab the yellow quest from the NPC you didn’t kill and turn it in to unlock the dailies!
Sholozar Basin Daily Quest Walkthroughs
Click a bar to expand a quest and see detailed instructions
The Oracles
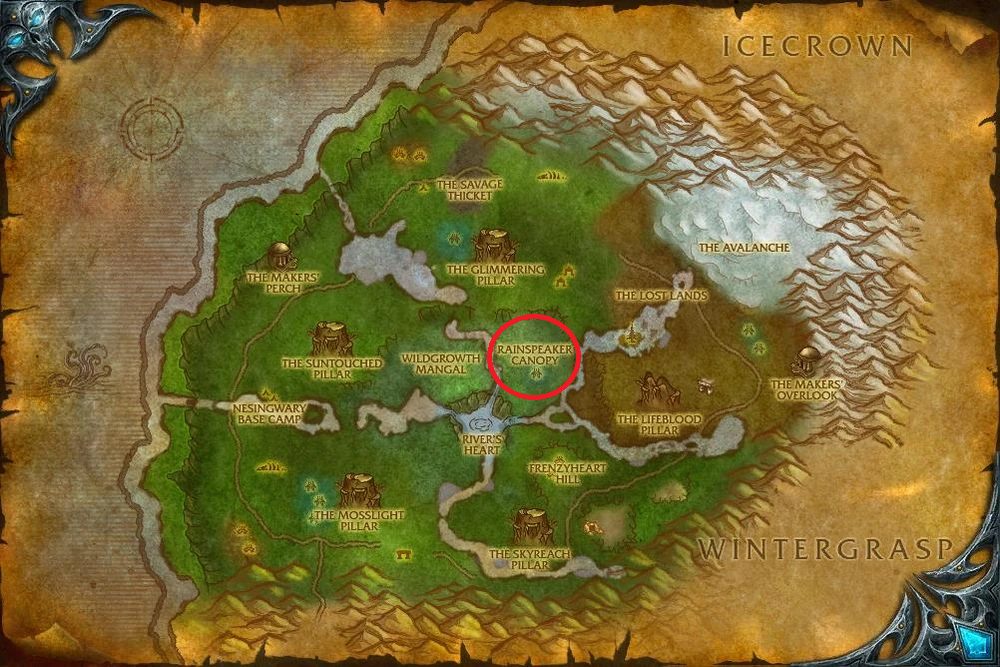
All three quest givers for the dailies are found in Rainspeaker Canopy, in the center of Sholazar Basin (54, 56) (see map). In addition to the XP, gold, and Oracles reputation these dailies give you, you can also earn the Savior of the Oracles achievement by completing each of the 8 daily quests at least once.
High-Oracle Soo-say
- Quest Giver – High-Oracle Soo-say, found in Rainspeaker Canopy (54.6, 56.4)
- Prerequisites – Level 76, Return of the Friendly Dryskin
- Objective – Collect 6 Shiny Treasures
- Rewards
- 21,400 XP
- 250 Reputation with The Oracles
- 6
 50
50 (19 34 at level 80)
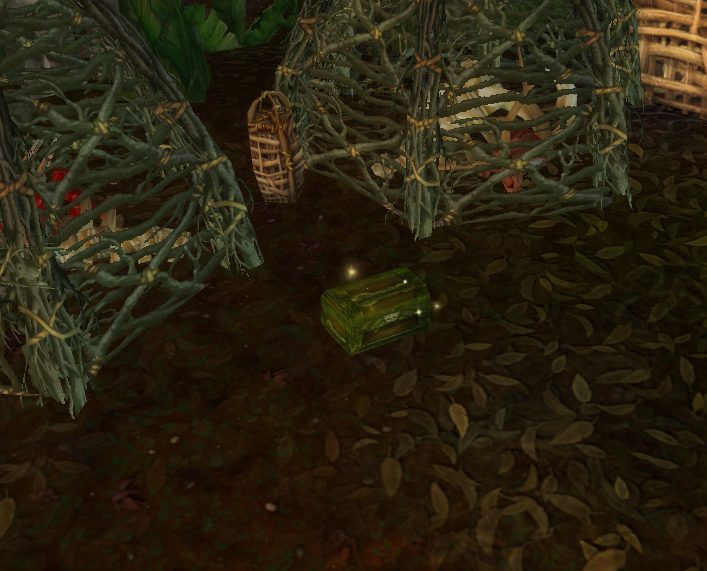
This quest is identical to Gods like Shiny Things, and once again you’ll need a gorloc companion in order to find the Shiny Treasures. If you need any of the gorloc summoning items, just speak with Soo-say and ask for the one you need. Jaloot is unquestionably the best min-max option, since his buff gives you 10% move speed on land and 100%(!) swim speed. (51, 53) is a good place to hunt for treasure — while you can technically find treasure all over the area indicated in the map below, the aforementioned coordinates are relatively open and free of mobs.
It can be tricky to spot the spots that have treasure; your best bet is to stand still and look in one direction for ~5 seconds. Once you find a shiny spot, stand near it and your gorloc will dig something up! If you’re lucky, it will be a container with Shiny Treasures — it can also be a bug or a rabbit. The bugs will put you in combat, but aren’t dangerous, while the rabbit will give you a speed buff if you kill it.


Oracle Soo-nee
This NPC will offer one of the following quests at random each day:
- Quest Giver – Oracle Soo-nee found in Rainspeaker Canopy (53.3, 56.4)
- Prerequisites – Level 77, Return of the Friendly Dryskin
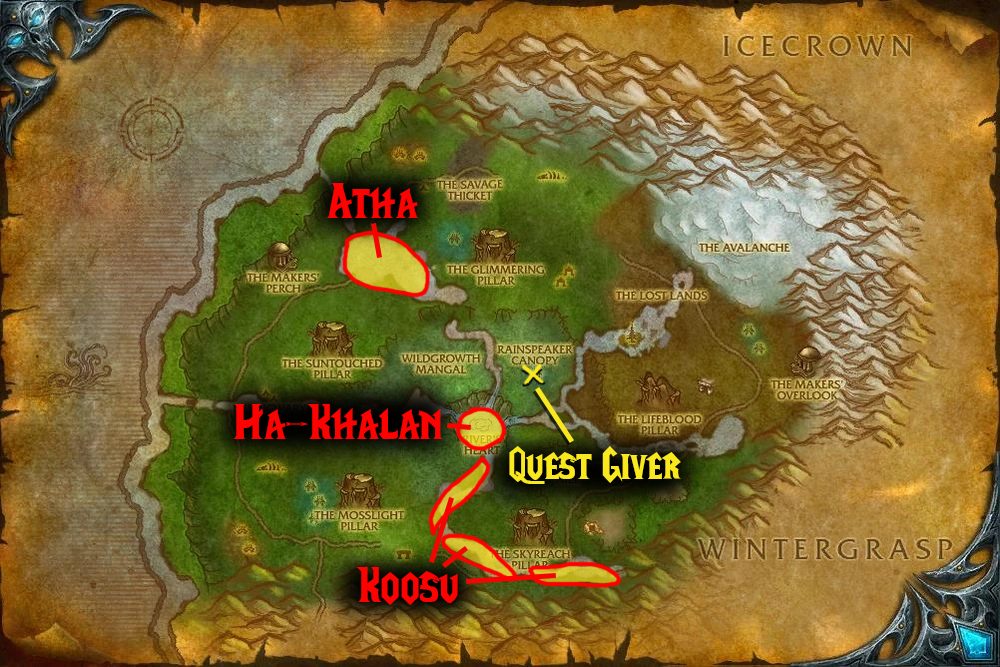
- Objective – Slay Spirit of Atha, Spirit of Ha-Khalan, Spirit of Koosu
- Rewards
- 22,050 XP
- 250 Reputation with The Oracles
- 7 40 (20 63 at level 80)
This straightforward quest requires that you travel to three different locations and use the Cleansing Chime — this will summon one of the evil spirits you need to kill. You can summon each spirit at the following coordinates; note that the coordinates aren’t particularly strict — you just have to be in the correct zone as noted below.
- Atha – (39, 39), Bittertide Lake, west of The Glimmering Pillar
- Ha-Khalan – (48, 63), River’s Heart at the center of the basin
- Koosu – (49, 69), Wintergrasp River, which runs south from the River’s Heart to The Skyreach Pillar
- Quest Giver – Oracle Soo-nee found in Rainspeaker Canopy (53.3, 56.4)
- Prerequisites – Level 77, Return of the Friendly Dryskin
- Objective – Play the Horn of Fecundity near 8 piles Soaked Fertile Dirt
- Rewards
- 22,050 XP
- 250 Reputation with The Oracles
- 7 40 (20 63 at level 80)
Note: without a flying mount, you’ll have to kill yourself in the water and then revive at the spirit healer on the cliffs in order to complete this quest.
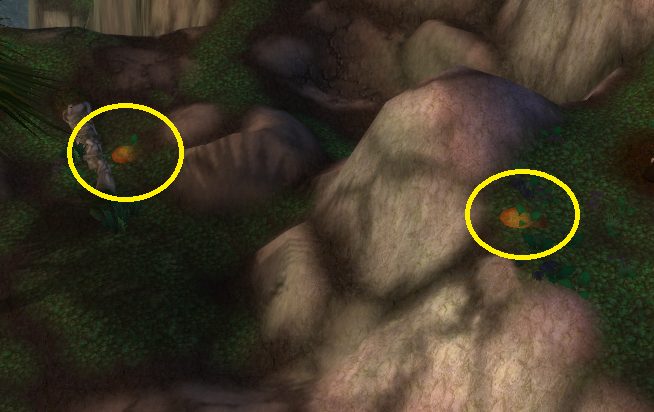
For this quest, you’ll need to travel to the northwest corner of Sholazar Basin, to the cliffs above The Maker’s Perch (26, 34). There, all you have to do is find the lumps of dirt scattered throughout the area and use the provided Horn of Fecundity near them. A tree will grow once you finish channeling — easy! There are mobs around, but there are also enough piles of dirt that you should be able to find plenty that you can play the horn next to without drawing aggro.

- Quest Giver – Oracle Soo-nee found in Rainspeaker Canopy (53.3, 56.4)
- Prerequisites – Level 77, Return of the Friendly Dryskin
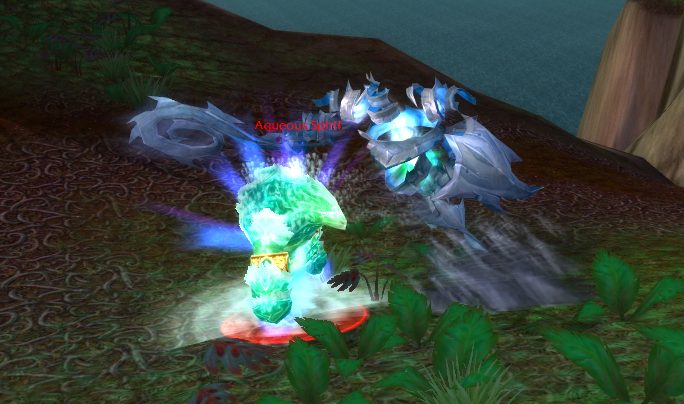
- Objective – Help Haiphoon devour 3 Storm Revenants and 3 Aqueous Spirits
- Rewards
- 22,050 XP
- 250 Reputation with The Oracles
- 7 40 (20 63 at level 80)
This quest requires that you travel to Stormwright’s Shelf, which is what the cliffs above The Maker’s Perch are called. Once there, land near a Storm Revenant — ideally one that isn’t close to any other mobs — and use the provided Drums of the Tempest to transform yourself into Haiphoon. Then engage the Storm Revenant, using your basic attack and your Water Bolt (1) and Frost Nova (2) spells as often as possible. Keep an eye on your third ability, Devour Wind (3) — once the revenant gets low enough, the Devour ability will no longer be greyed out, and you can use it to consume the elemental.
This will transform you into a Wind Elemental, and then you’ll need to find an Aqueous Spirit and do the exact same thing. Once you consume the Aqueous Spirit, you’ll transform back into a water elemental. Repeat until you’ve consumed three of each type of elemental! Make sure you’re always fighting an elemental of a type different than the form you are currently in, or you won’t be able to devour it.
You can’t loot corpses while you’re transformed, so don’t forget to hop out once you’re finished and grab whatever the elementals dropped!


- Quest Giver – Oracle Soo-nee found in Rainspeaker Canopy (53.3, 56.4)
- Prerequisites – Level 77, Return of the Friendly Dryskin
- Objective – Use the Didgeridoo of Contemplation at the top of the four pillars in Sholazar Basin
- Rewards
- 22,050 XP
- 250 Reputation with The Oracles
- 7 40 (20 63 at level 80)
This relaxing quest has you fly to the four pillars in the basin and play the Didger on top of each one. You’ll need to be near the center of the pillar to use the quest item. The first pillar listed, The Glimmering Pillar, has some mobs on top that may aggro when you land, so be ready.
- The Glimmering Pillar – (49.6, 37.4)
- The Suntouched Pillar – (33.5, 52.4)
- The Mosslight Pillar – (36.5, 75.3)
- The Skyreach Pillar – (53.4, 79.4)
There is a fifth pillar in the east, the Lifeblood Pillar — it is not part of this quest, so don’t waste any time flying over there!


Oracle Soo-dow
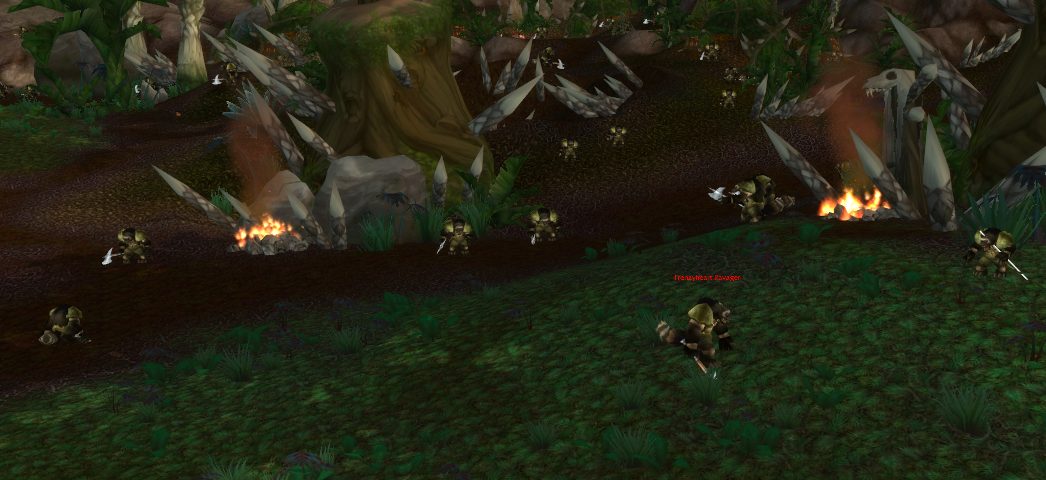
This NPC will offer one of the following quests at random each day. All three quests involve killing the Frenzyhearts that are attacking Sparktouched Haven, and all three quests are turned in not with the quest giver, but instead with NPC.
- Quest Giver – Oracle Soo-dow, found in Rainspeaker Canopy (54.2, 53.8)
- Prerequisites – Level 77, Return of the Friendly Dryskin
- Objective – Retrieve the crystal Defenses at Sparktouched Haven and use them to kill 50 of the Frenzyheart wolvar nearby
- Rewards
- 27,000 XP
- 350 Reputation with The Oracles
- 1360 (2980 at level 80)
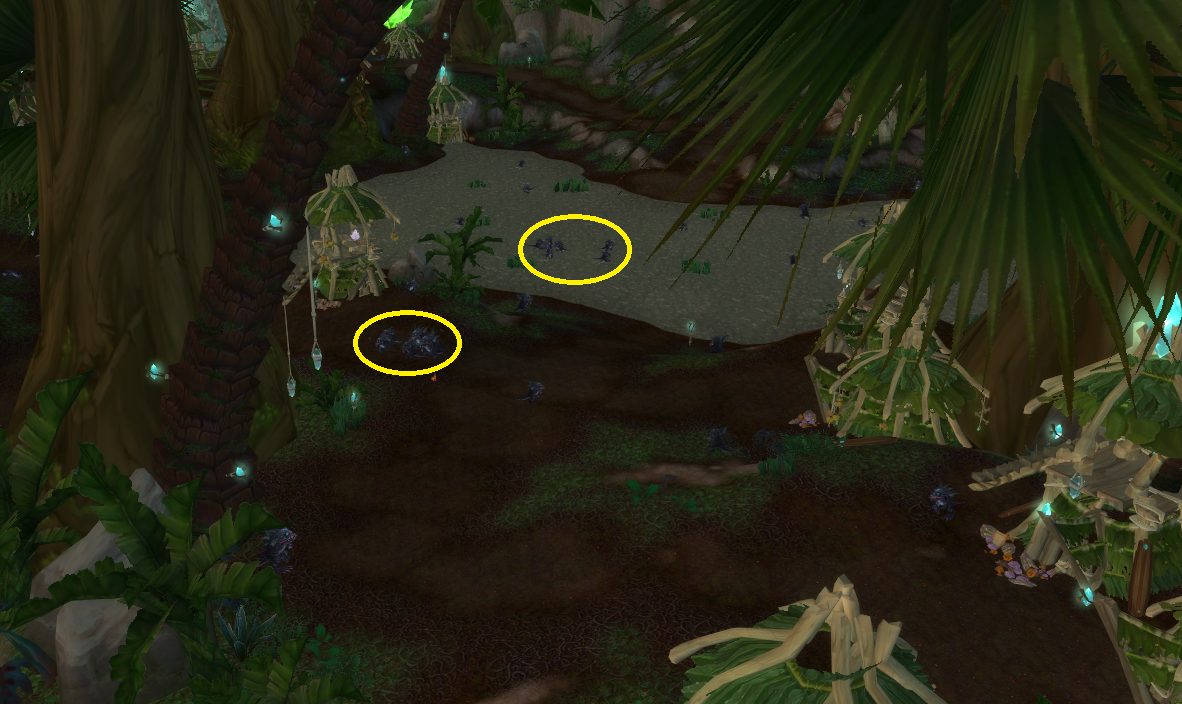
Soo-dow will send you to the southwest, where the Oracles are under attack from the Frenzyhearts. First things first, head to (33.0, 75.7), on the western side of the Mosslight Pillar. There you’ll find the Sparktouched Crystal Defenses chest, which contains three crystals that make this quest a lot easier (and a lot more fun, too). Grab all three crystals and then head even further southwest, to about (22, 79), where you’ll see a huge cluster of wolvar just waiting to get AOEd.
Land in the center of the group and use all three crystals — they’ll absolutely wreck the wolvar. With that done, all you need to do is find a few more stray wolvar and kill them however you like to finish the quest (despite what the map may indicate, they can be any of the wolvar between the large group and the Mosslight Pillar). Note that you turn this quest in to an NPC at the base of the Mosslight Pillar, not the original quest giver.


- Quest Giver – Oracle Soo-dow, found in Rainspeaker Canopy (54.2, 53.8)
- Prerequisites – Level 77, Return of the Friendly Dryskin
- Objective – Go to the Lifeblood Pillar and charge the Dormant Polished, then go to Sparktouched Haven and use the freshly crystal to kill 30 Frenzyheart Attackers
- Rewards
- 27,000 XP
- 350 Reputation with The Oracles
- 1360 (2980 at level 80)
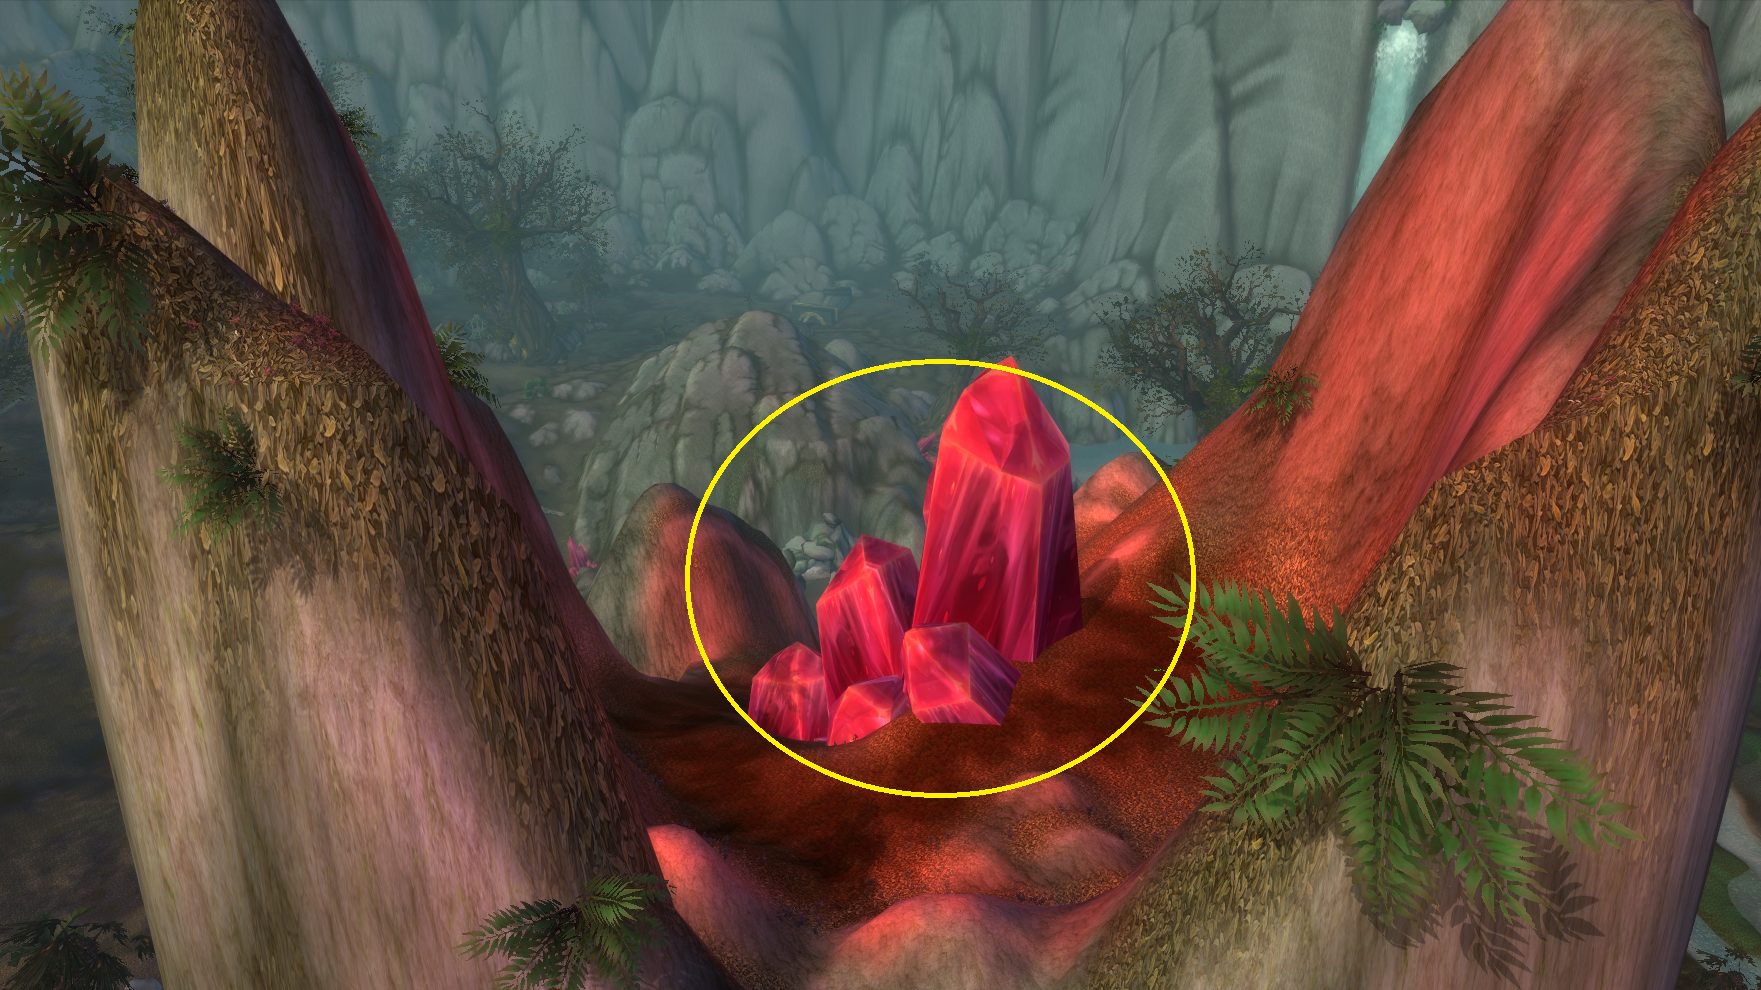
After receiving this quest, your first stop is the Lifeblood Pillar (65, 60), which is found east-southeast of Rainspeaker Canopy. Fly to the top of the pillar and land near the red crystal (if you don’t have a flying mount, you can get to the crystal at the top of the pillar via the path that starts at (69.8, 58.7), to the right of the cave). Next, use the Dormant Crystal while standing next to the large red crystal. After the channeling finishes, you’ll have a better crystal — at this point, you’ll need to fly southwest to Sparktouched Haven, which is under attack from the Frenzyheart.
Head to around (26, 80) and use the crystal — it will give you a very powerful buff that keeps you healthy to boot. Start killing the Frenzyhearts, and once you’ve slain 30, you can go turn this one in. Note that you turn this quest in to Lightningcaller Soo-met (33.4, 74.8), and not the quest giver.

- Quest Giver – Oracle Soo-dow, found in Rainspeaker Canopy (54.2, 53.8)
- Prerequisites – Level 77, Return of the Friendly Dryskin
- Objective – Obtain a Tainted Crystal and bring it to the Great lightning Stone to transform into Soo-holu, then slay 50 Frenzyheart Attackers
- Rewards
- 27,000 XP
- 350 Reputation with The Oracles
- 1360 (2980 at level 80)
Like many quests, with this one you have the option of doing some extra steps (in this case transforming into a Spirit Beast) before killing the 50 Frenzyheart Attackers you need for the quest — or you can just do it the old-fashioned way. Specs with good AOE and level 80 toons may not want to bother with the initial steps.
Fly to Kartak’s Hold (26, 81), southwest of the Mosslight Pillar, and kill Frenzyhearts until one drops the Tainted Crystal; don’t bother killing Frenzyhearts not in Kartak’s Hold, as they don’t seem to drop the quest item (check the text above your minimap if you aren’t sure if you’re in the Hold). Once you find the crystal, take the crystal to the Great Lightning Stone (33.7, 75.0) and use the crystal while near the stone — this will transform you into Soo-holu, granting you new abilities.
Then you can head back towards Kartak’s Hold and start killing Frenzyheart Attackers with your cool new spirit body. Once you’ve slain 50, you can turn this quest in! Note that you turn it in to Lightningcaller Soo-met (33.4, 74.8), and not the quest giver. If you’re having trouble finding enough quest mobs, there is a huge group of them at (22.0, 79.3) that is perfect for specs that have a nice big AOE spell to use.

The Frenzyheart
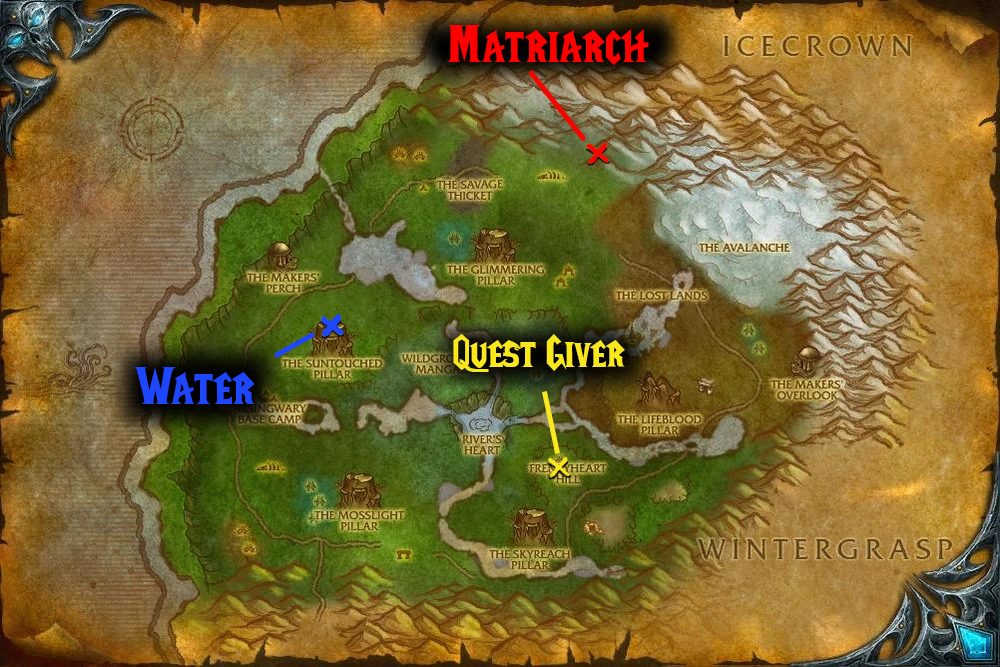
All three quest givers for the dailies are found on Frenzyheart Hill, in the southeast of Sholazar Basin (55, 69) (see map). In addition to the XP, gold, and Frenzyheart reputation these dailies give you, you can also earn the this one achievement by completing each of the 8 daily quests at least once.
Elder Harkek
- Quest Giver – Elder Harkek, found on Frenzyheart Hill (55.5, 69.7)
- Prerequisites – Level 77, Return of the Lich Hunter
- Objective – Capture 12 Chicken Escapees using the Chicken Net
- Rewards
- 21,400 XP
- 250 Reputation with The Frenzyheart
- 650 (1934 at level 80)
This quest is identical to the Flown the Coop quest you did while unlocking the dailies, and it remains an easy one. You have a number of options to catch the chickens: you can be mounted, you can use the net to stop them from moving (which can also be done while mounted), and you can use the /chicken emote to get them to walk towards you. Turning on nameplates will make them easier to spot as well. Catch 12 and you’re all done!


Rejek
This NPC will offer one of the following quest each day:
- Quest Giver – Rejek, found on Frenzyheart Hill (55.7, 69.5)
- Prerequisites – Level 77, Return of the Lich Hunter
- Objective – Blood Rejek’s Blade on a Sapphire Hive Wasp, Hardknuckle Charger, and 3 Mistwhisper Tribe members
- Rewards
- 22,050 XP
- 250 Reputation with The Frenzyheart
- 740 (2063 at level 80)
Trivia: This quest name bears a striking resemblance to the 1982 action film Rambo: First Blood, starring Sylvester Stallone
The first two objectives for this quest are near Frenzyheart Hill. First, go south-soutwhest to the base of The Skyreach Pillar, where on the northeastern side of the pillar you’ll find a couple of lone Sapphire Hive Wasps at (55, 75) and (56, 80). Kill one, and then select its corpse and use Rejek’s Blade to “blood” the blade.
Then proceed northeast to (60, 70), just east of Frenzyheart Hill, where a pair of Hardknuckle Chargers are hanging out. Kill them both, or alternatively head further north to find one that’s alone if you don’t want to fight the pair. Either way, get yourself a dead Hardknuckle Charger and then once again use Rejek’s Blade on the corpse.
Finally, fly northwest to the western side of The Glimmering Pillar, where you’ll find a village of Mistwhisper members. Kill three, blooding the blade on each, and you’re finished with this quest (though the guilt may stay with you).


- Quest Giver – Rejek, found on Frenzyheart Hill (55.7, 69.5)
- Prerequisites – Level 77, Return of the Lich Hunter
- Objective – Get Venture Co Explosives at Swindlegrin’s Dig, then use them on a Stormwatcher’s Corpse to obtain a Stormwatcher’s Head
- Rewards
- 22,050 XP
- 250 Reputation with The Frenzyheart
- 740 (2063 at level 80)
First, you’ll need to head northwest to Swindlegrin’s Dig (35, 48), which is on the northeast side of the Suntouched Pillar. Once there start killing Venture Co. Ruffians and Excavators until one of them drops Venture Co. Explosives. Grab the boom stuff and go further northwest to the cliffs above The Makers’ Perch (25, 34) and kill one of the Stormwatchers there. Use the Venture Co. Explosives on the corpse and you’ll be left with a Stormwatcher’s Head, which you can open and loot to get the quest item you need. Then you can return to Rejek and turn in the quest!


- Quest Giver – Rejek, found on Frenzyheart Hill (55.7, 69.5)
- Prerequisites – Level 77, Return of the Lich Hunter
- Objective – Gather 3 Essences fo the Monsoon and 3 Other essence, then take them to the Shrine of the Tempest to create the True power
- Rewards
- 22,050 XP
- 250 Reputation with The Frenzyheart
- 740 (2063 at level 80)
For this quest, we’re heading once again to The Stormwright’s Shelf in the northwest of Sholazar Basin (25, 38). Once there, you’ll first need to kill the two types of elementals there — Storm Revenants and Aqueous Spirits — until you’ve collected three X (from the Storm Revenants) and three Y (from the Aqueous Spirits). You can sometimes find the elementals fighting one another, which can speed up your collection of the quest items. Once you have three of each, head to the stone pillar on the hill in the northwest corner of the shelf (22.5, 33.9).
You now need to get struck by lightning — this is accomplished by jumping up onto the low platform that surrounds the base of the pillar and then rubbing yourself against the northern side of the pillar. If that doesn’t work, try flying around the pillar on your mount. Despite all the lightning around the area, and the scorch marks on the other side of the pillar, it seems only the northern side of the pillar allows you to complete the quest — very confusing stuff. Once you get struck by lightning, you’ll get a message that you’ve created the True Power of the Tempest, and you can return to Frenzyheart Hill.


- Quest Giver – Rejek, found on Frenzyheart Hill (55.7, 69.5)
- Prerequisites – Level 77, Return of the Lich Hunter
- Objective – Collect a vial of Suntouched Heartblood using Rejek’s Vial
- Rewards
- 22,050 XP
- 250 Reputation with The Frenzyheart
- 740 (2063 at level 80)
You’ll first need to go west-northwest to the top of the Suntouched Pillar (33, 52), where you’ll find water surrounding the crystal in the center. Stand in the water and use vial to fill it, creating Suntouched Water. Then head northeast to the ledge above the bone fields and slay the Goretalon Matriarch (59.6, 23.7). Loot the Matriarch’s Heartblood from the corpse, then right-click the Suntouched Water in your inventory to combine it with the heartblood, creating Suntouched Heartblood. That’s all there is to it! You can now go turn this one in.


Vekgar
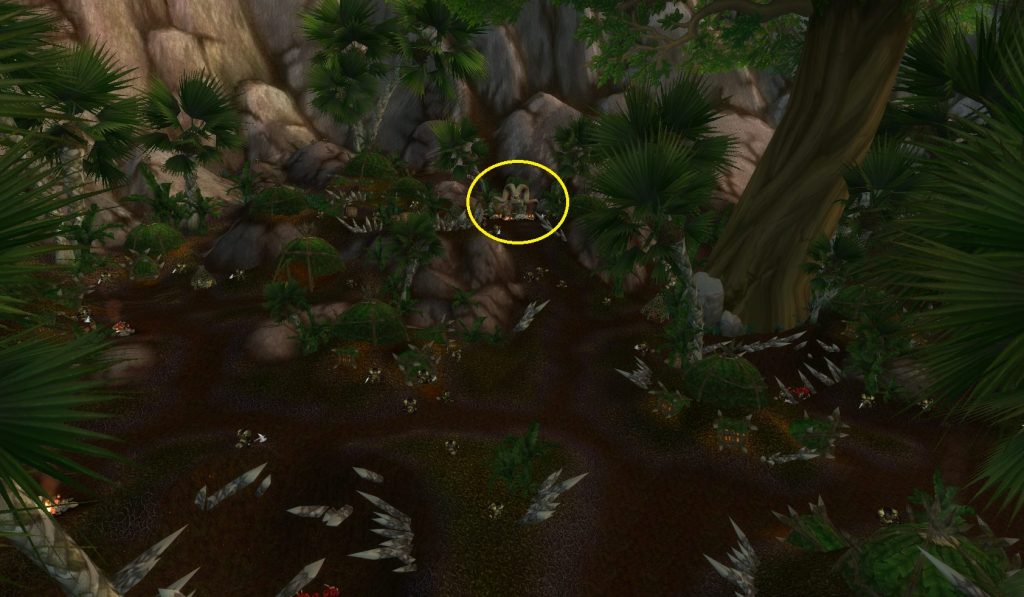
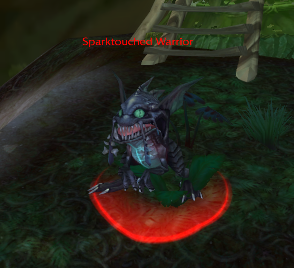
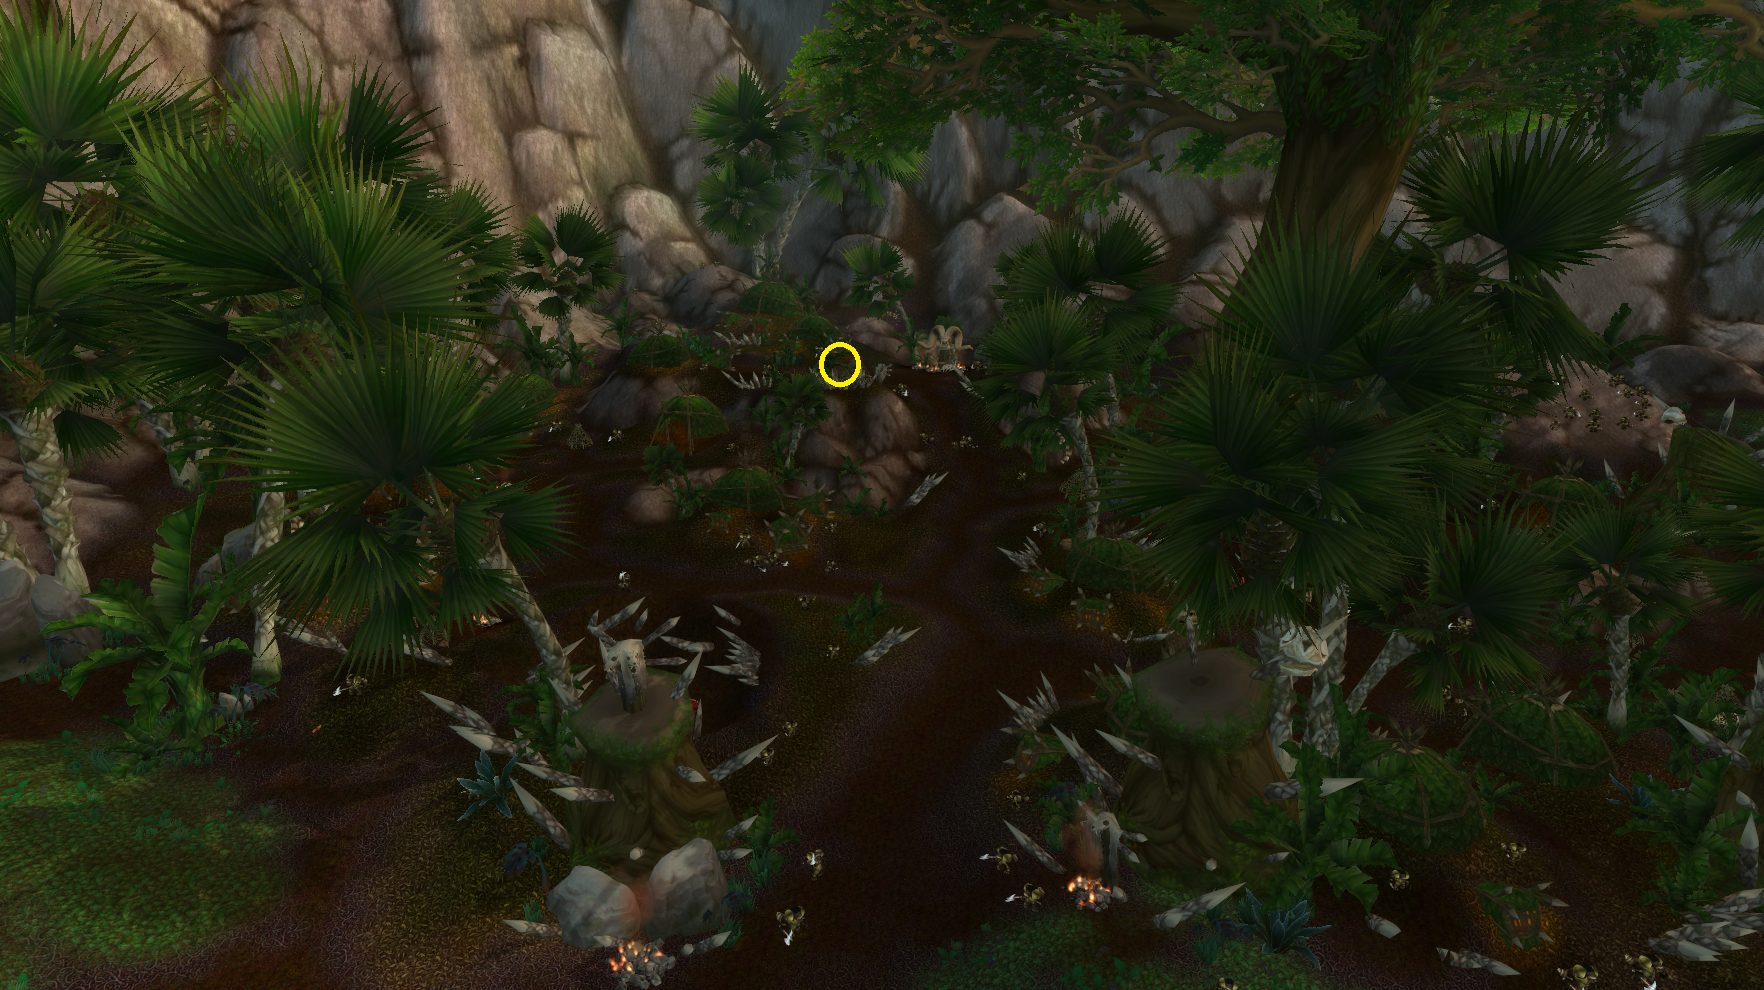
This NPC will offer one of the following quests each day. All three dailies involve killing Sparktouched Gorlocs in Sparktouched Haven (just west of the mosslight Pillar), and all three are turned in to Shaman at Kartak’s Hold, rather than the quest giver.
- Quest Giver – Vekgar, found on Frenzyheart Hill (55.7, 68.7)
- Prerequisites – Level 77, Return of the Lich Hunter
- Objective – Bring Oracle Blood to the Altar of Kartak to summon him, then kill 50 Sparktouched Gorlocs
- Rewards
- 27,000 XP
- 350 Reputation with The Frenzyheart
- 740 (2063 at level 80)
From the quest giver, head west to the Mosslight Pillar — on its eastern side is a village (32, 76) full of Sparktouched Gorlocs. Kill them until one drops Oracle Blood, then go to the Altar of Kartak (23.3, 83.0), which is in the back of Kartak’s Hold southwest of the pillar. Stand near the altar and right-click the blood in your inventory to transform into Kartak; you can then head back northeast to Sparktouched Haven and start slaughtering Gorlocs. Make sure you’re once you’ve completed the quest, you get out of Kartak to loot the gorlocs you kill — they can drop Darkwater Clams, which can contain Siren’s Tears (a very valuable crafting material).
A couple other things to note: you don’t have to be in Kartak to do this quest (but it does make it faster and arguably a lot more fun); you turn this quest in to Shaman Jakkek, who is next to the altar.

- Quest Giver – Vekgar, found on Frenzyheart Hill (55.7, 68.7)
- Prerequisites – Level 77, Return of the Lich Hunter
- Objective – Use the secret Frenzyheart drink to kill 30 Sparktouched Gorlocs.
- Rewards
- 27,000 XP
- 350 Reputation with The Frenzyheart
- 740 (2063 at level 80)
This is a very straightforward quest; once you accept it, you’ll be given a beverage, the Secret Strength of the Frenzyheart. Once consumed, it gives 10 minute buff that reduces damage taken by 50%, deals 2775-3225 bonus damage on attacks, adds knockback to your attacks, and makes the screen all fuzzy. While you don’t have to drink the potion to complete the quest, it sure makes it easier. Once you’ve got a buzz going, head to Sparktouched Haven (just west of the Mosslight Pillar) and kill gorlocs there until you’ve slain the 30 you need to complete the quest. Then head southwest to Kartak’s hold and turn the quest in to shaman.
The buff given by the Secret Strength of the Frenzyheart is pretty massive, so you may want to do other quests in Sholazar Basin before turning this quest in (as you have to turn the drink in when turning in the quest).

- Quest Giver – Vekgar, found on Frenzyheart Hill (55.7, 68.7)
- Prerequisites – Level 77, Return of the Lich Hunter
- Objective – Retrieve Zepik’s traps from his stash in Kartak’s Hold, then use them to kill 50 Sparktouched Gorlocs
- Rewards
- 27,000 XP
- 350 Reputation with The Frenzyheart
- 740 (2063 at level 80)
Like the other two dailies, you can skip getting the tools offered for this quest, but they will make the quest easier (unless you can already one-shot the Sparktouche Gorlocs). The “Tools of War” are, in this case, a set of traps found at (24.0, 83.1), near Kartak’s Altar and Shaman Jakjek. After grabbing them from the chest, you can head northeast to where the gorlocs are hanging around and use the traps on them. The Volatile Trap and the Spike Bomb both one-shot the gorlocs, so you don’t need to bother with pulling a bunch and using all three traps on them or anything like that.
The gorlocs are all over the area indicated in the map below, but you can find a couple of clumped-up groups at (30.5, 74.8) and (31.7, 74.5), near and in the water west of the Mosslight Pillar.

About the Author
