WotLK Classic Warrior Leveling Guide
Welcome to our WotLK Classic leveling guide for Warriors! Battle-hardened champions, Warriors are known for using their berserker strength to beat enemies with pure brute force and unmatched martial prowess. They are sought after in a lot of groups as a tank and are equally valuable as a fantastic, no-downtime DPS class.
Warriors in WotLK Classic are great as both tanks and DPS, but they can be frustrating to level due to their limited toolkit and rage mechanic. Later levels will have you carving through enemies like a hot knife through butter, but early levels can feel like chopping wood with a hammer. Warriors also struggle with soloing a lot of elite quests, often making it easier to skip them if you can’t find a partner.
Most Warriors will choose to level as Arms, offering a lot of tools and a decent mix of survivability and damage. If you have gear ready ahead of time, playing a Fury Warrior can be a great choice, but without decent gear and game knowledge, you will find yourself struggling a lot. In WotLK, even Protection is a fantastic choice, offering unmatched survival, as well as some of the best area-of-effect damage Warriors can offer. With all this in mind, this guide will be focused on Arms Warriors, but a lot of the tips can be applied to Fury or Protection equally.
In this guide, we’ll go over helpful tips, where to spend your talent points, what to look for when gearing, effective use of your abilities, and other general advice to make the leveling process as smooth and easy as possible!
Pros
- Almost no downtime
- Fantastic for chaining enemies constantly
- Great for groups of 2-3 enemies
- Passively very tanky
- Very strong in groups or duos
Cons
- Very limited toolkit
- Not many situational abilities, making a lot of situations hard to deal with
- Gear dependent
- Struggles with larger groups of enemies
- Limited crowd control
General Leveling Tips
Make sure you have a one-handed weapon and a shield with you, so you can quickly swap to them if you ever need to use abilities like Swall or Sblock.
Try to plan ahead, don’t get caught in a corner, and don’t accidentally pull too many mobs at one time, it is easy to get overwhelmed if you aren’t careful.
Warriors have some of the most valuable class quests, so make sure you do them as soon as you can, even if it involves a lot of traveling.
You won’t have a lot of ranks to train, meaning you don’t have to return to your class trainer very often, but there are a lot of abilities worth learning so make sure you keep an eye out for key abilities becoming available!
As an Arms Warrior, most of your damage is based on your weapon, not your spell ranks. This means that upgrading your weapon will be the best increase in your leveling speed and a lot of the time a detour into a dungeon or a different zone to get a better weapon early can be worth it. Spells like Mortal Strike deal damage based on “weapon damage”. Because of this, you want a slower weapon that deals higher damage. Something like Rockslicer is going to be better than Taskmaster’s Axe even though it has lower DPS, simply because every individual hit will deal more damage.
Warriors are able to use Cloth, Leather, Mail, and after level 40, Plate Armor. This is a key part of survivability as a leveling Paladin and you will often need to choose between higher damage Leather options and higher survivability Mail or Plate options. This is always going to end up being a personal choice, only you know how your leveling feels, so only you can decide if you need more survivability or if you’re comfortable enough to get damage instead. In general, you will always want to avoid wearing Cloth gear, as it does not provide the stats you need.
Because Warrior’s lack self-healing, you always want to carry level-appropriate food with you. You never want to be stuck waiting around for your health to regenerate, time spent waiting around is time wasted! You won’t need to carry a ton, but at least a stack or two should always fit into your bags.
Stat Priority
- Strength – This is always going to be your favorite stat. Each point of Strength gives you 2 attack power, increasing all of your damage.
- Attack Power – Increases your damage dealt with most of your abilities.
- Critical Strike Rating – Increases your chance to deal critical damage. This is a fantastic boost because every crit with a slow weapon will do massive damage and enable a few of your talents like Deep Wounds and Wrecking Crew.
- Haste Rating – Increases the speed of all your attacks, allowing you to do more damage faster!
- Hit Rating – Increases your chance to hit with all attacks. This is a great extra stat, but while leveling you will rarely find enough of it to make it worthwhile.
- Agility – Increases your critical strike chance by a small amount.
- Stamina – Increases your maximum health! This is a fantastic stat that is already on most gear, so it is usually not something you aim at, but instead something that comes naturally.
Rotation
Your rotation as an Arms Warrior will often rely heavily on keeping Rend ticking while waiting for Taste for Blood procs and rage to build.
- Use Charge (Unlocked at level 4) to initiate a fight
- Keep Rend (Unlocked at level 4) ticking at all times
- Use Mortal Strike (Unlocked at level 40)
- Use Overpower (Unlocked at level 12) with Taste for Blood
- Use Execute (Unlocked at level 24) with Sudden Death or if the target is below 20% health
- Use Cleave (Unlocked at level 20) if you have extra rage and are fighting 2 or more targets
- Use Slam (Unlocked at level 30) if you have extra rage
If you are fighting multiple targets, you want to use Sweeping Strikes and Bladestorm whenever available
Talent Path
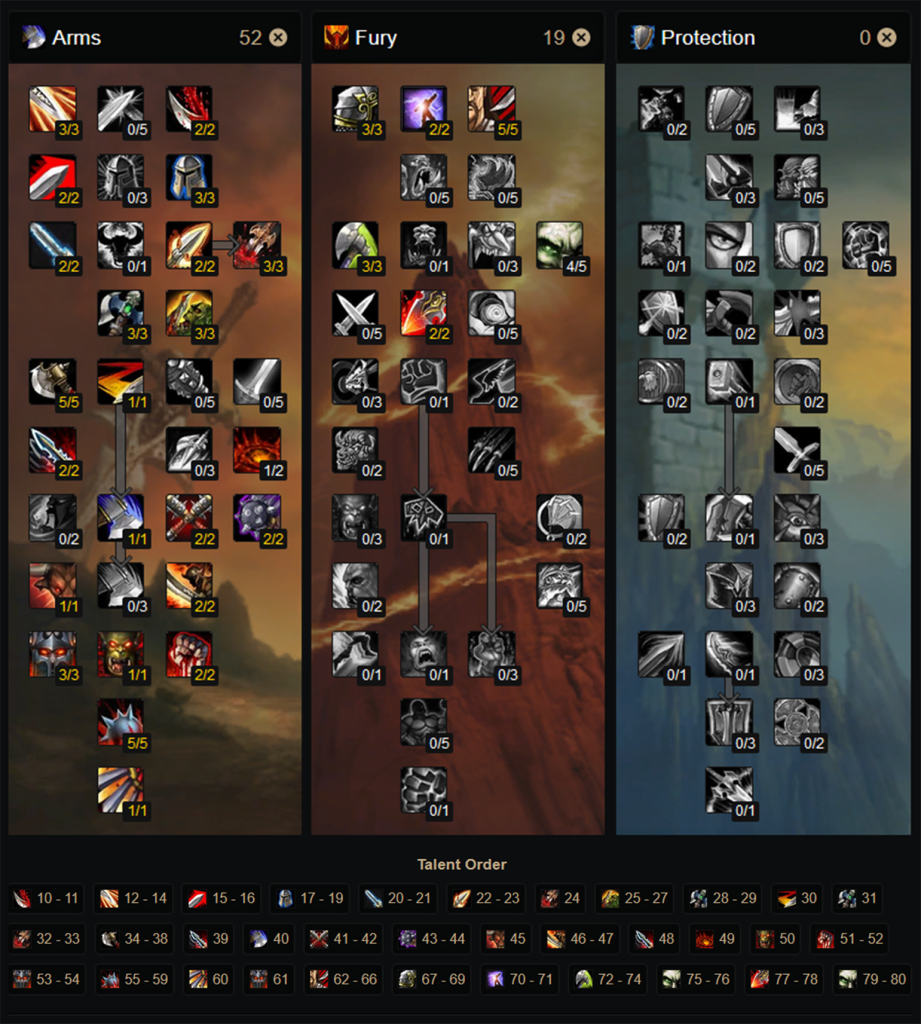
The Arms tree has a lot of incredible talents, but most of them come later into the tree. This leads to the early levels being a little underwhelming and the later levels risking being overwhelming. On the flip side, this also means towards the latter half of the Arms tree you will feel every level up, which is very motivating.
These are the key points in the talent tree:
- Improved Overpower at level 20, increasing the critical strike chance of one of your best abilities by 50%.
- Deep Wounds at level 24, making every critical hit apply a bleed.
- Taste for Blood at level 25, allowing you to use Overpower every time Rend deals damage.
- Sweeping Strikes at level 30, giving you a lot more multi-target potential.
- Mortal Strike at level 40, your new main melee attack!
- Improved Slam at level 43, reducing the cast time of Slam by 1-second, making it an extra swing on a 0.5-second cast.
- Juggernaut at level 45, allowing you to use Charge in combat.
- Endless Rage at level 50, generating more rage from your damage dealt.
- Sudden Death at level 53, giving your melee hits a chance to allow you to use Execute, even on high health targets.
- Blood Frenzy at level 51, your bleeds increase the Physical damage your target takes.
- Wrecking Crew at level 55, critical hits Enrage you for 12-seconds.
- Bladestorm at level 60, spin to win! This one is self-explanatory, enjoy it.
When we are done in the Arms tree, most players will move into the Fury tree. This supplements our damage with talents like Cruelty and Armored to the Teeth.
Glyphs
Glyphs aren’t always going to be the easiest to get a hold of while leveling, but if you happen to swing by an auction house you might find some cheap and useful glyphs to use.
Here are some of the Major Glyphs worth considering:
- Glyph of Bladestorm – Reduces the cooldown of Bladestorm by 15-seconds, more spin more good!
- Glyph of Mortal Strike – Increases the damage of Mortal Strike by 10%. More damage on your best skill, simple and fantastic.
- Glyph of Rending – Increases the duration of Rend by 6-seconds. This won’t be all too useful while leveling, but it can be useful for some fights.
- Glyph of Overpower – Allows the use of Overpower after the enemy parries one of your attacks. More overpowering is never a bad thing.
- Glyph of Cleaving – Allows your Cleave to hit 3-targets instead of only 2. This is worth looking into if you pull 3 enemies often.
- Glyph of Execution – Execute deals damage as if you had 10 more rage. More damage on Execute without costing more is great.
- Glyph of Hamstring – Your Hamstring has a 10% chance to root the target. This is great for creating distance and giving yourself a breather or second to use a bandage, but it only happens 1/10 casts.
- Glyph of Rapid Charge – Reduces the cooldown of Charge by 7%. This isn’t a lot, but you will find yourself wanting to use Charge when it’s on cooldown very often and this can help with that.
- Glyph of Sweeping Strikes – Reduces the rage cost of Sweeping Strikes by 100%, making it free to cast. This is fantastic and makes pulling 2-mobs significantly quicker and easier.
Here are some of the Minor Glyphs worth considering:
- Glyph of Charge – Increases the range of Charge by 5-yards. A small boost but it’s a Minor Glyph after all.
- Glyph of Thunder Clap – Increases the radius of Thunder Clap by 2-yards. Another small boost, but it’s always something.
- Glyph of Battle – Increases the duration of Battle Shout by 2-minutes, meaning you have to refresh it half as often. This is worth having just for convenience.
- Glyph of Enduring Victory – Gives you 5-seconds extra to use Victory Rush, useful if there’s a long distance between enemies.
Noteable Abilities To Train
- Battle Shout at level 1, 12, 22, 32, 42, 52, 60, 69, 78
- Heroic Strike at level 1, 8, 16, 24, 32, 40, 48, 56, 60, 66, 70, 72, 76
- Charge at level 4, 26, 46
- Rend at level 4, 10, 20, 30, 40, 50, 60, 68, 71, 76
- Thunder Clap at level 6, 18, 28, 38, 48, 58, 67, 73, 78
- Victory Rush at level 6
- Hamstring at level 8
- Bloodrage at level 10
- Overpower at level 12
- Demoralizing Shout at level 14, 24, 34, 44, 54, 62, 70, 79
- Disarm at level 18
- Cleave at level 20, 30, 40, 50, 60, 68, 72, 77
- Retaliation at level 20
- Intimidating Shout at level 22
- Execute at level 24, 32, 40, 48, 56, 65, 70, 73, 80
- Shield Wall at level 28
- Intercept at level 30
- Slam at level 30, 38, 46, 54, 61, 69, 74, 79
- Berserker Rage at level 32
- Whirlwind at level 36
- Pummel at level 38
- Mortal Strike at level 40, 48, 54, 60, 66, 70, 75, 80
- Recklessness at level 50
- Spell Reflection at level 64
- Shattering Throw at level 71
- Enraged Regeneration at level 75
Class Quests
- Defensive Stance – At level 10 you will receive a quest from your local Warrior trainer, sending you around the zone running errands until eventually you are taught the way of Defense, learning Defensive Stance, Taunt, and Sunder Armor.
- Berserker Stance – At level 30 you will receive a quest from the Warrior trainer in your racial capital, sending you to Klannoc off the coast of The Barrens. This will lead to a fight on the island, rewarding you with Bstance and Intercept if you can make it out alive.
- Whirlwind Weapon – At level 30, Warriors are given a long quest chain culminating in slaying Cyclonian for his Whirlwind Heart to turn into one of the Whirlwind weapons, Axe, Hammer or Sword. Which one you go for will depend highly on your specialization, matching your choice of Aspec, Mspec or Sspec. While you can finish this quest at level 30, you will not be able to do it alone at level 30, and if you intend on doing this quest solo, you may have to wait until you are closer to level 40.
- At level 50 all classes receive a quest taking them to the Sunken Temple. For Warriors this offers a choice of Diamond Flask, Razorsteel Shoulders, or Fury Visor. I recommend Diamond Flask as it will last you the longest and there aren’t many Trinket alternatives before Outlands.
Equipment
Warriors are able to use all weapons except for Wands. Until level 30 you will simply want to use whichever weapon is best for you, but after level 30 you will have to choose a specialization between Aspec, Mspec, or Sspec. After this, while you can equip whatever you want, you will most often be best using your specialized weapon and should try to find that weapon type for upgrades.
You should always prioritize the damage of your weapon, not the DPS. Slower weapons at the same level will almost always have higher damage to make up for their slow speed and attacks. Abilities like Mortal Strike are instant and deal damage based on weapon damage. Something like Corpsemaker is perfect for a leveling Warrior, being incredibly slow and having a lot of Strength. Something like Angerforge’s Battle Axe may seem great at a glance, but the 2.60 attack speed massively reduces the damage per swing, especially compared to something like Flame Wrath from the same dungeon.
Weapon upgrades will be the biggest damage increase while leveling. Most of your damaging abilities only have a single rank and scale with gear instead of ranks.
Warriors are able to use all armor types and ideally will always want to wear Plate after level 40 and Mail before level 40, but sometimes Leather items will provide better stats at the cost of survivability. While leveling you won’t always be able to wear optimal gear, so make do with what you have.
Professions
Professions can be hard to keep up while you level, but in Wrath of the Lich King, they give a lot of benefits. Something like Blacksmithing is very difficult to keep up while you level, but gathering Professions like Mining and Herbalism are incredibly easy to keep up as you go, and even if you don’t want to craft things yourself, you can sell the materials on the auction house to supplement other aspects of leveling.
While every profession gives some kind of stat boost, most of them give them towards max skill. Gathering professions instead give skills early that constantly scale as you level.
- Mining gives Toughness, a passive boost to your Stamina, starting with 3 Stamina at 75 Mining, and ending at 60 Stamina at 450 Mining.
- Skinning gives Master of Anatomy, a passive boost to your Critical Strike Rating, starting with 3 Critical Strike Rating at 75 Skinning, and ending at 40 Critical Strike Rating at 450 Skinning.
- Herbalism gives Lifeblood, an instant cast heal-over-time on a 3-minute cooldown. This scales with both Herbalism and your maximum health.
If you instead want to craft things while you level, Alchemy and Engineering are fantastic alternatives.
- Engineering allows you to craft grenades and bombs alongside a bunch of fun or niche utility items such as target dummies and fireworks.
- Alchemy allows you to craft your own potions, flasks, and elixirs which can all be invaluable for improving your leveling experience and speed.
Useful Macros
Warriors can make great use of macros, reducing the number of buttons you need drastically and simplifying things like stance swapping.
Startattack macros are invaluable, making your attacks also start your auto attack so that you never forget to swing your weapon. In the macro below, you can swap Mortal Strike for any ability you want to use this with.
#showtooltip
/startattack
/cast Mortal Strike
This allows you to instantly swap between one-handed or two-handed weapons with a single shared button. Make sure you add the name of your weapons and shield!
/equipslot [noworn:shields] 16 NAMEOF1HANDWEAPON
/equipslot [noworn:shields] 17 NAMEOFSHIELD
/equipslot [worn:shields] 16 NAMEOF2HANDWEAPON
Pressing this macro twice will equip your one-hander and shield, swap to Defensive Stance, and cast Shield Wall. This is a fantastic panic button, just make sure to add the name of your one-hander and shield!
#showtooltip Shield Wall
/equipslot [noworn:shields] 16 NAMEOF1HANDWEAPON
/equipslot [noworn:shields] 17 NAMEOFSHIELD
/cast [nostance:2] Defensive Stance
/cast Shield Wall
Pressing this macro twice will equip your one-hander and shield, swap to Defensive Stance, and cast Spell Reflection. This is great for a quick swap to reflect a spell, just make sure to add the name of your one-hander and shield!
#showtooltip Spell Reflection
/equipslot [noworn:shields] 16 NAMEOF1HANDWEAPON
/equipslot [noworn:shields] 17 NAMEOFSHIELD
/cast [stance:3] Battle Stance
/cast Spell Reflection
Pressing this macro twice will equip your one-hander and shield, swap to Defensive Stance, and cast Shield Bash. This is great for a quick swap to interrupt a spell, just make sure to add the name of your one-hander and shield!
#showtooltip Shield Bash
/cast [nostance:2] Defensive Stance
/equipslot [noworn:shields] 16 NAMEOF1HANDWEAPON
/equipslot [noworn:shields] 17 NAMEOFSHIELD
/cast Shield Bash
This macro will swap you to Battle Stance and cast Charge with one button, allowing you better control of your gap closers.
#showtooltip Charge
/cast [nostance:1] Battle Stance
/cast Charge
This macro will swap you to Defensive Stance and cast Intervene with one button, allowing you better control of your gap closers.
#showtooltip Intervene
/cast [nostance:2] Defensive Stance
/cast Intervene
This macro will swap you to Berserker Stance and cast Intercept with one button, allowing you better control of your gap closers.
#showtooltip Intercept
/cast [nostance:3] Berserker Stance
/cast Intercept
This macro will swap you to Berserker Stance and cast Pummel with one button, allowing you to quickly interrupt a spell.
#showtooltip Pummel
/cast [nostance:3] Berserker Stance
/cast Pummel
Author

I love MMOs of all shades, especially the nitty gritty numbers parts of them. You might recognize me from the Shadow Priest discord, otherwise I play a little bit of everything, especially games with support roles available.
There’s a grammar mistake. You call out paladin but should say, warrior.
This is a key part of survivability as a leveling Paladin and you will often need to choose between higher damage Leather options and higher survivability Mail or Plate options.
But did you swap plate for higher dps leather/mail tho?
Hello i have problems with the Makro to switch fast from 1hand w shield to 2 hand, if i press the makro with the 2 handed weapon on he switches to 1hand and shield but if i press it again he dont switch back to 2hand
/equipslot [noworn:shields] 16 Marodeursaxt
/equipslot [noworn:shields] 17 Furens Gunst
/equipslot [worn:shields] 16 Brutale Kriegsaxt der Ausdauer
thats what i typed in the makro but didnt work for me
Why do you have to push this macro twice? What about the syntax knows it was pushed a second time?
#showtooltip Shield Wall
/equipslot [noworn:shields] 16 NAMEOF1HANDWEAPON
/equipslot [noworn:shields] 17 NAMEOFSHIELD
/cast [nostance:2] Defensive Stance
/cast Shield Wall
Oh, is it because of these two things?
1 – Only one spell can be cast at a time, and the script is executed entirely at once, therefore the second cast will not be executed.
2 – You will have already equipped the two items and switched stances at the beginning of the script, so the only valid execution will be casting Shield Wall?
I’m not entirely sure what it is, but I believe it is because the check for if you are in Defensive Stance happens before the game registers you in Defensive Stance, so Shield Wall won’t go off if you only press it once.