Kologarn Strategy Guide – Ulduar (25)
Kologarn, created by Ignis the Forgemaster, guards the Shattered Walkway. He stands between your raid and reaching Yogg-Saron. Unfortunately, he isn’t simply guarding the bridge, Kologarn is the bridge. Destroying him is the only way to cross into the center of Ulduar.
This guide will offer a detailed, step-by-step tutorial on how to deal with Kologarn and his titanic arms.
Role Summaries
- Stay out of melee range with Rubble
- Move out of the way for focused-eyebeam
- Focus on Rubble when possible
- Keep on top of shockwave damage. Falling behind can easily lead to a raid wipe
- The window of time between a tank having 2 stacks of crush-armor and the taunt swap happening can be very high damage, so make sure to keep an extra eye on the tanks
- Taunt swap at 2 stacks of crush-armor
- Make sure you are in melee range of the torso when swapping!
- Pick up Rubble ASAP whenever it spawns
- Call out focused-eyebeam targets
- If a Healer or Tank is grabbed with stone-grip, call out to make sure everyone adjusts accordingly
- Call tank swaps at 2 stacks of crush-armor if the tanks are not doing this themselves
- Call to swap back to the arm whenever it respawns
Abilities
Kologarn is separated into three chunks, his torso, and each of his arms. Each chunk has its own abilities, and killing an individual piece will disable their abilities temporarily. The fight is over once Kologarns torso is dead.
Kologarn
right-arm
When an arm dies, it deals damage to Kologarn.
left-arm
rubble
Whenever an arm is destroyed, 5 Rubble will spawn.
Raid Composition & Preparation
The Pull
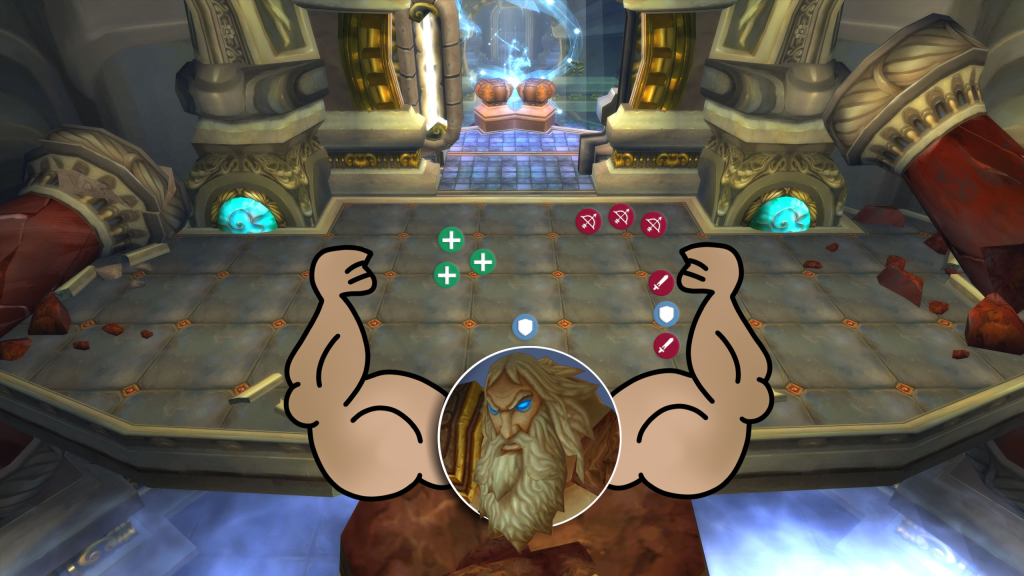
There is nothing special to consider when pulling Kologarn. Simply have your main-tank run into melee range with the boss’s body.
The Fight
Kologarn’s body must be tanked at all times to make sure he doesn’t petrify the raid. Your tanks will need to rotate who is currently tanking the torso, taunting after 2 stacks of crunch-armor. Crunch-armor can be dodged and parried, making avoidance sets worth considering, leading to fewer tank swaps and less general risk.
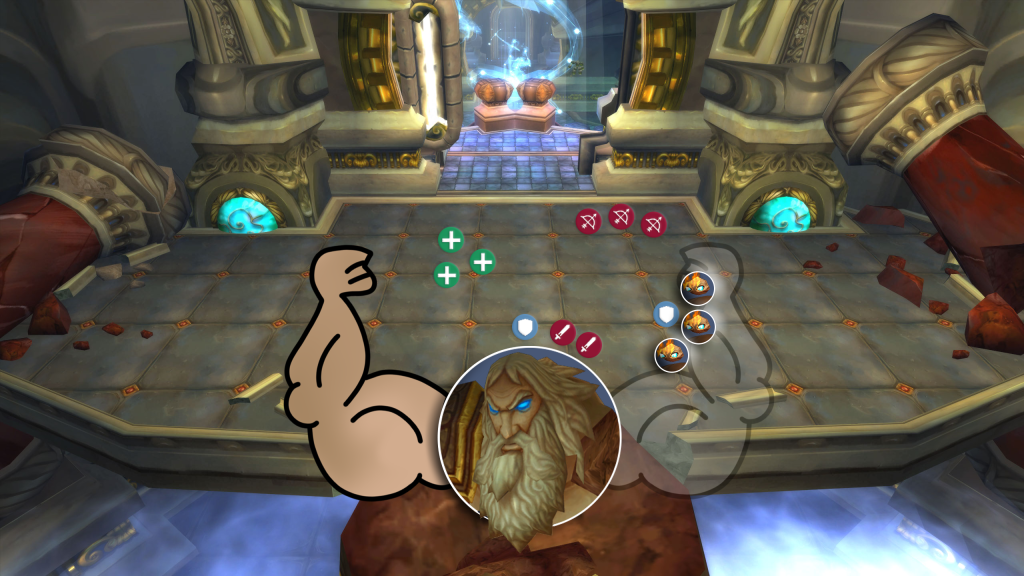
The DPS should focus on Kologarn’s right arm to minimize how many stone-grips go out during the fight. Once the arm dies, Rubble will spawn from it. The current off-tank will want to pick these up as fast as possible and keep them out of melee range for the raid while your ranged DPS focuses them down. The right arm will respawn after 60 seconds, and your group will most likely want to swap back to it each time it comes back.
As soon as the right arm is dead, your group will want to focus on Kologarn’s body, burning it down until the right arm respawns, then rinse and repeat. The left arm will likely die to cleave damage every so often, but it will generally not be worth focusing.
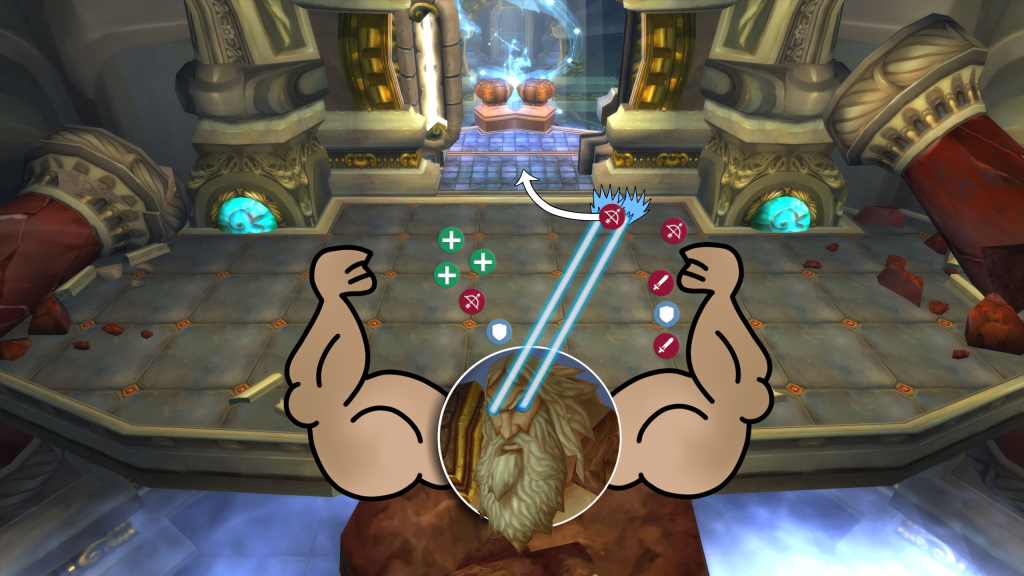
Occasionally Kologarn will cast focused-eyebeam at a random player, firing lasers that follow the target and deal AoE damage around their impact. The player targeted will need to run away from the point of impact, and they should completely ignore everyone in their way. Everyone not targeted will need to take their own responsibility for avoiding focused-eyebeam, while the target simply makes sure they get out of there.
Running towards the entrance can be a good direction, as long as your raid is aware of this and keeps the entrance clear for focused-eyebeam targets.
Here are some of the main things that can typically go wrong in this fight:
- Tanks fail to taunt swap and get too many stacks of crunch-armor
- The off-tank fails to pick up Rubble, leading them to target healers
- Someone other than the main-tank uses an AoE taunt to aggro Rubble, taunting Kologarn and causing petrifying-breath to hit the raid
- focused-eyebeam is pulled through the raid
- stone-grip grabs an unlucky combination of players, for example, 3 healers
- Healers fall behind on shockwave‘s constant damage
Achievements
- disarmed-25
- Kill Kologarn and both of his arms within 12 seconds. Killing an arm deals damage to Kologarn, so this is done by killing both arms while the boss is at low health and then quickly killing what is left of the boss.
- if-looks-could-kill-25
- Kill Kologarn without any raid member being hit by focused-eyebeams. This requires everyone to pay constant attention to their surroundings and the focused player to not accidentally bring the beams onto any raid members.
- rubble-and-roll-25
- Kill Kologarn after spawning at least 25 Rubble. This requires your raid to kill a total of at least 5 arms. Each arm respawns after a short time, but to get this your raid will have to avoid dealing too much damage to the boss directly, as each arm killed deals significant damage to the boss.
- with-open-arms-25
- Kill Kologarn without destroying any arms. This requires a fairly high performance group, effectively ignoring the main premise of the fight and instead focusing directly on the boss. Anyone grabbed by an arm will be stuck there until the boss dies!
Congratulations on defeating Kologarn! Assert dominance by using his corpse as a bridge and make your way into the Observation Ring.
Author
I love MMOs of all shades, especially the nitty gritty numbers parts of them. You might recognize me from the Shadow Priest discord, otherwise I play a little bit of everything, especially games with support roles available.


love ur guides, keep up great work :)
Thanks!
I like Kologarn. He is not complicated for the first look.