- Author: Passion
- Date: September 23, 2022
- Updated: September 23, 2022
- Expansion: WotLK Classic


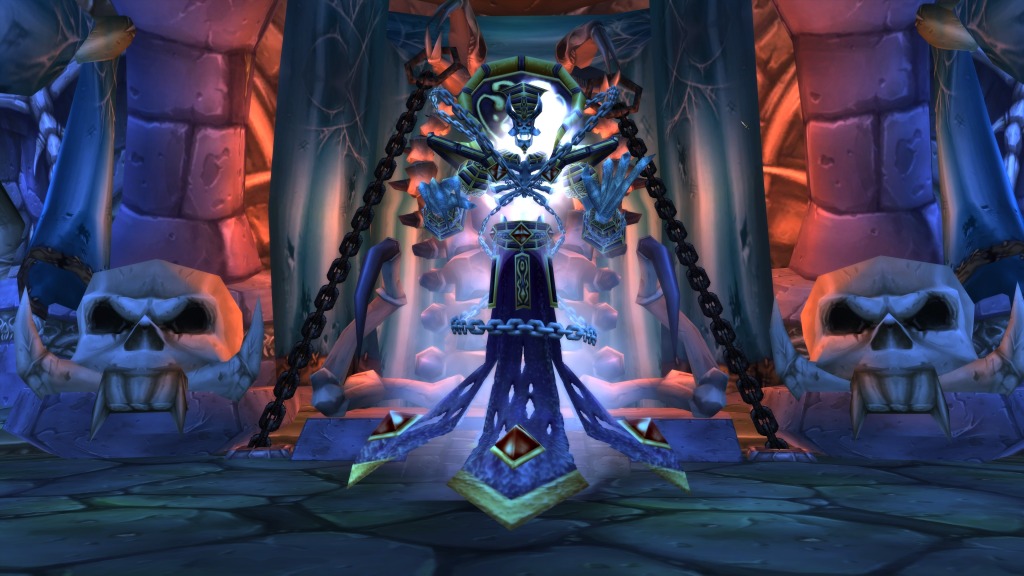
Kel’Thuzad is the final boss of the dread citadel, Naxxramas. An incredibly powerful Lich, most of his fight consists of fighting waves of the undead. After beating his legion of abominations and banshees, Kel’Thuzad himself will awaken, casting powerful spells, and dealing massive damage.
“He serves the Lich King without question, a necromancer of great prowess in life, turned to a master of necromancy after his death. It is said he is the most loyal of the Lich King’s subjects.” –Commander Eligor Dawnbringer
This guide will offer a detailed, step-by-step tutorial on how to deal with Kel’Thuzads undead swarm and dominant magic.
Role Summaries
Phase 1
- Avoid getting close to Banshee and Soldier, deal with them exclusively at range.
- Try to stay close to the center of the room to not accidentally pull enemies into melee range.
Phase 2
- Make sure you are always 10-yards away from other players.
- If you are closer to the melee stacks, make sure they have room to get away from their stack.
- Always be ready to interrupt Frostbolt, even if you are not assigned to interrupting.
- Save your cooldowns for 45% Health, including Bloodlust/Heroism.
Phase 1
- Don’t worry about DPSing Soldier and Banshees, but make sure you are never close to them.
- Focus DPS on Abomination.
- Remember, this Phase will always last for 3 minutes and 48 seconds, giving you time to use your cooldowns before Phase 2.
Phase 2
- Stay at max melee range.
- Stack on your assigned area, marked by the points of Kel’Thuzads robe.
- Rotate to another point if yours gets targeted by Shadow Fissure.
- Make sure you don’t stack on ranged players if you have to leave melee range.
Phase 1
- Prioritize DPSing Soldier and Banshees, but make sure you are never close to them.
- DPS the Abomination only when there is nothing else.
- Remember, this Phase will always last for 3 minutes and 48 seconds, giving you time to use your cooldowns before Phase 2.
Phase 1
- When there are no Abominations there is very little healing needed. Help out by DPSing when possible.
Phase 2
- Make sure you are ready for Frost Blast and can quickly heal the target, you have 4-seconds before they die.
- Your tank will likely need a lot of healing against Guardian of Icecrown, so make sure you keep an eye on them.
Phase 1
- Don’t worry about tanking Soldier and Banshees, but make sure you are never close to them.
- Tank the Abominations.
- If you have too many stacks of Mortal Wound, let another tank grab the next Abomination.
- Remember, this Phase will always last for 3 minutes and 48 seconds, giving you leeway to use your defensive cooldowns before Phase 2.
Phase 2
- Stay at max melee range.
- Stack on your assigned area, with the main-tank in front of the boss and the off-tank stacked with melee, marked by the points of Kel’Thuzads robe.
- Rotate to another point if yours gets targeted by Shadow Fissure.
- Make sure you don’t stack on ranged players if you have to leave melee range.
Abilities
Phase 1
The first Phase is a constant stream of enemies for 3 minutes and 48 seconds. This cannot be sped up and you will always have to fight a minimum of 71 Soldier, 8 Abominations and 8 Banshees.
Assorted Undeads
Phase 2
This Phase consists primarily of various mechanics that require the raid to spread at least 10-yards from each other.
Kel’Thuzad
Guardian of Icecrown
Raid Composition & Preparation
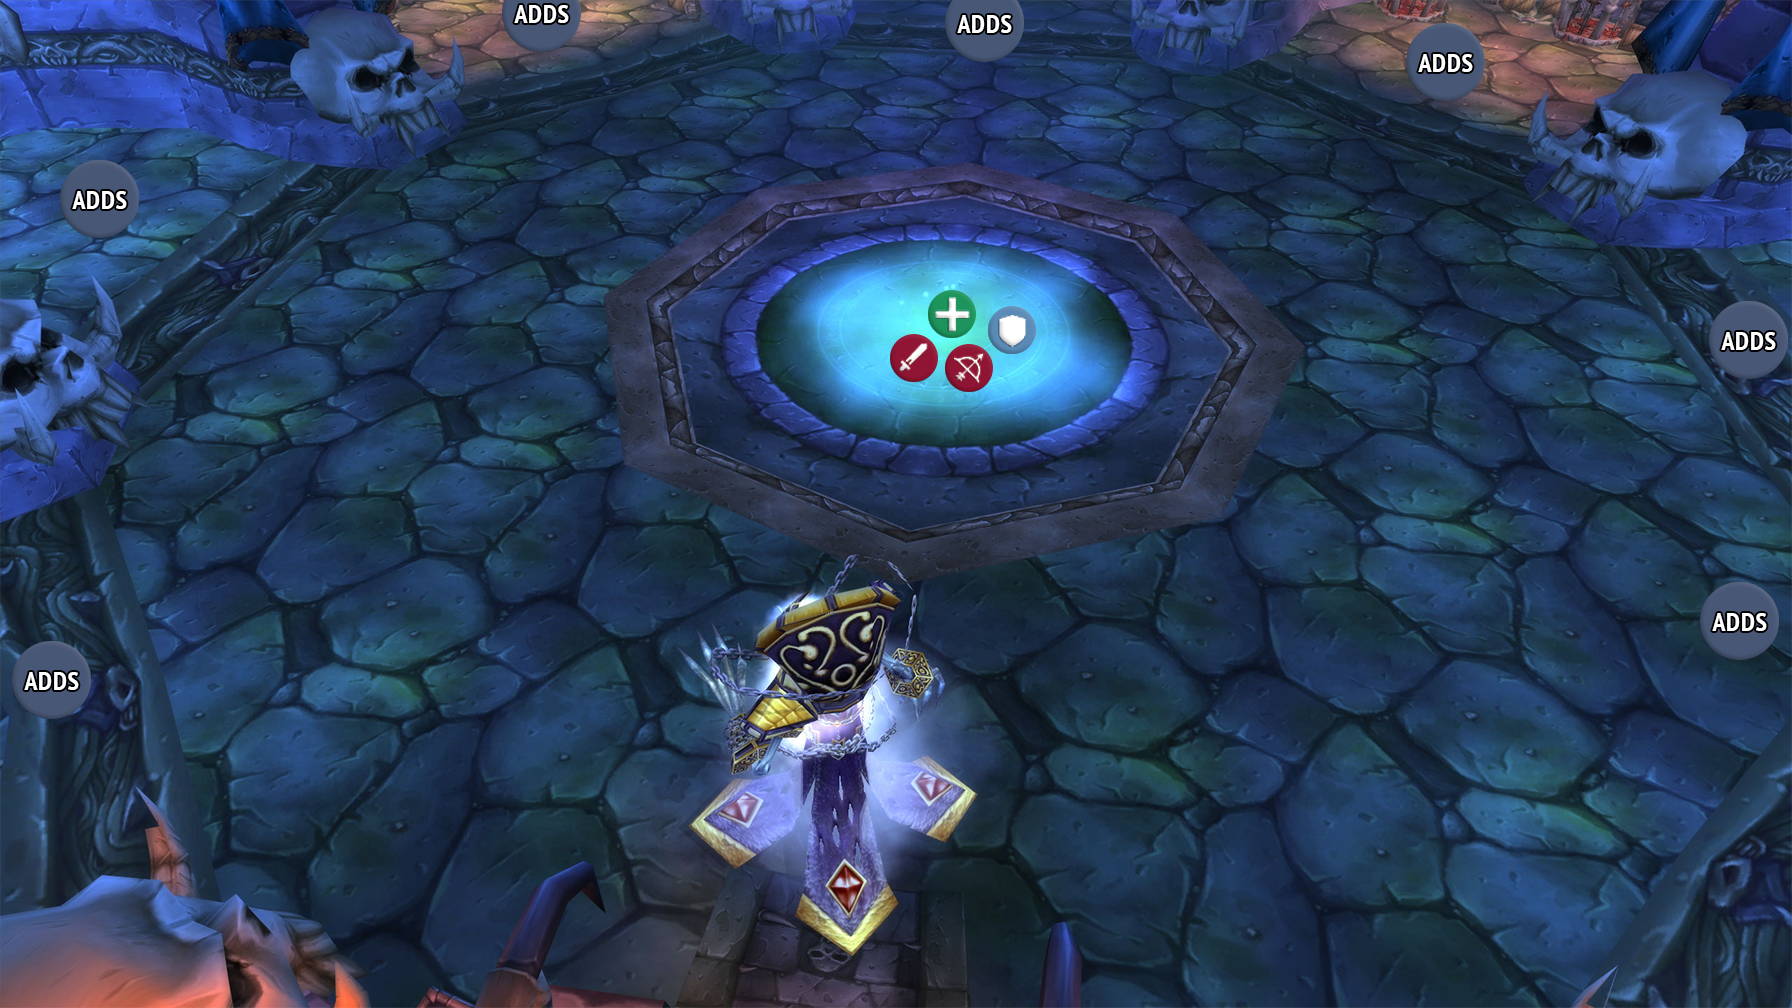
The Pull
The encounter begins when a player comes close to the center of the room. Kel’Thuzad will spawn Soldier, Abomination, and Banshee in the seven alcoves spread around the room. Enemies from these areas will slowly walk towards the raid group and need to be handled as they do. The easiest way to do this is to stack in the center of the room, in the green circle, and fight from there.
As appealing as it may seem, there is no point in trying to pull more enemies here, Phase 1 is on a timer and will not end any quicker no matter what you do.
The Fight
Phase 1
Phase 1 will last for 3 minutes and 48 seconds, with Kel’Thuzad sending 71 Soldier, 8 Abominations and 8 Banshees. If you pull more from the alcoves, they will simply respawn.
These enemies will slowly walk towards the raid, typically getting initial aggro on healers. Soldier will cast Dark Blast if they get close to anyone, dealing area-of-effect damage around them and killing the Soldier. Because of this you typically want your ranged DPS to handle them, which shouldn’t be an issue as they have very low health.
Banshees will knock back anyone in melee range, potentially sending a player into one of the alcoves and quickly swarming them. These move very slowly and should also be handled by ranged DPS as much as possible.
Abominations are the most difficult enemy in Phase 1. Unlike the other adds, Abominations run instead of walking. These hit very hard in melee range and apply Mortal Wound to a tank in melee combat with them. These will spawn faster as the fight goes on, making it very important that they always die before the next one runs in. If a tank gets too many stacks of Mortal Wound it is very important for another tank to take over while Mortal Wound falls off.
After 3 minutes and 48 seconds, Phase 2 will begin — Even if you are still fighting!
Here are some of the main things that can go wrong in this phase:
- Someone doesn’t notice a Banshee getting close and gets knocked back into an entire corner worth of enemies, likely killing themselves and wiping the raid.
- Soldier aren’t prioritized by ranged DPS, allowing them to run into the raid stack and blow up the entire raid.
- Abominations don’t die fast enough, leading to multiple up that quickly overwhelm the raid.
Phase 2
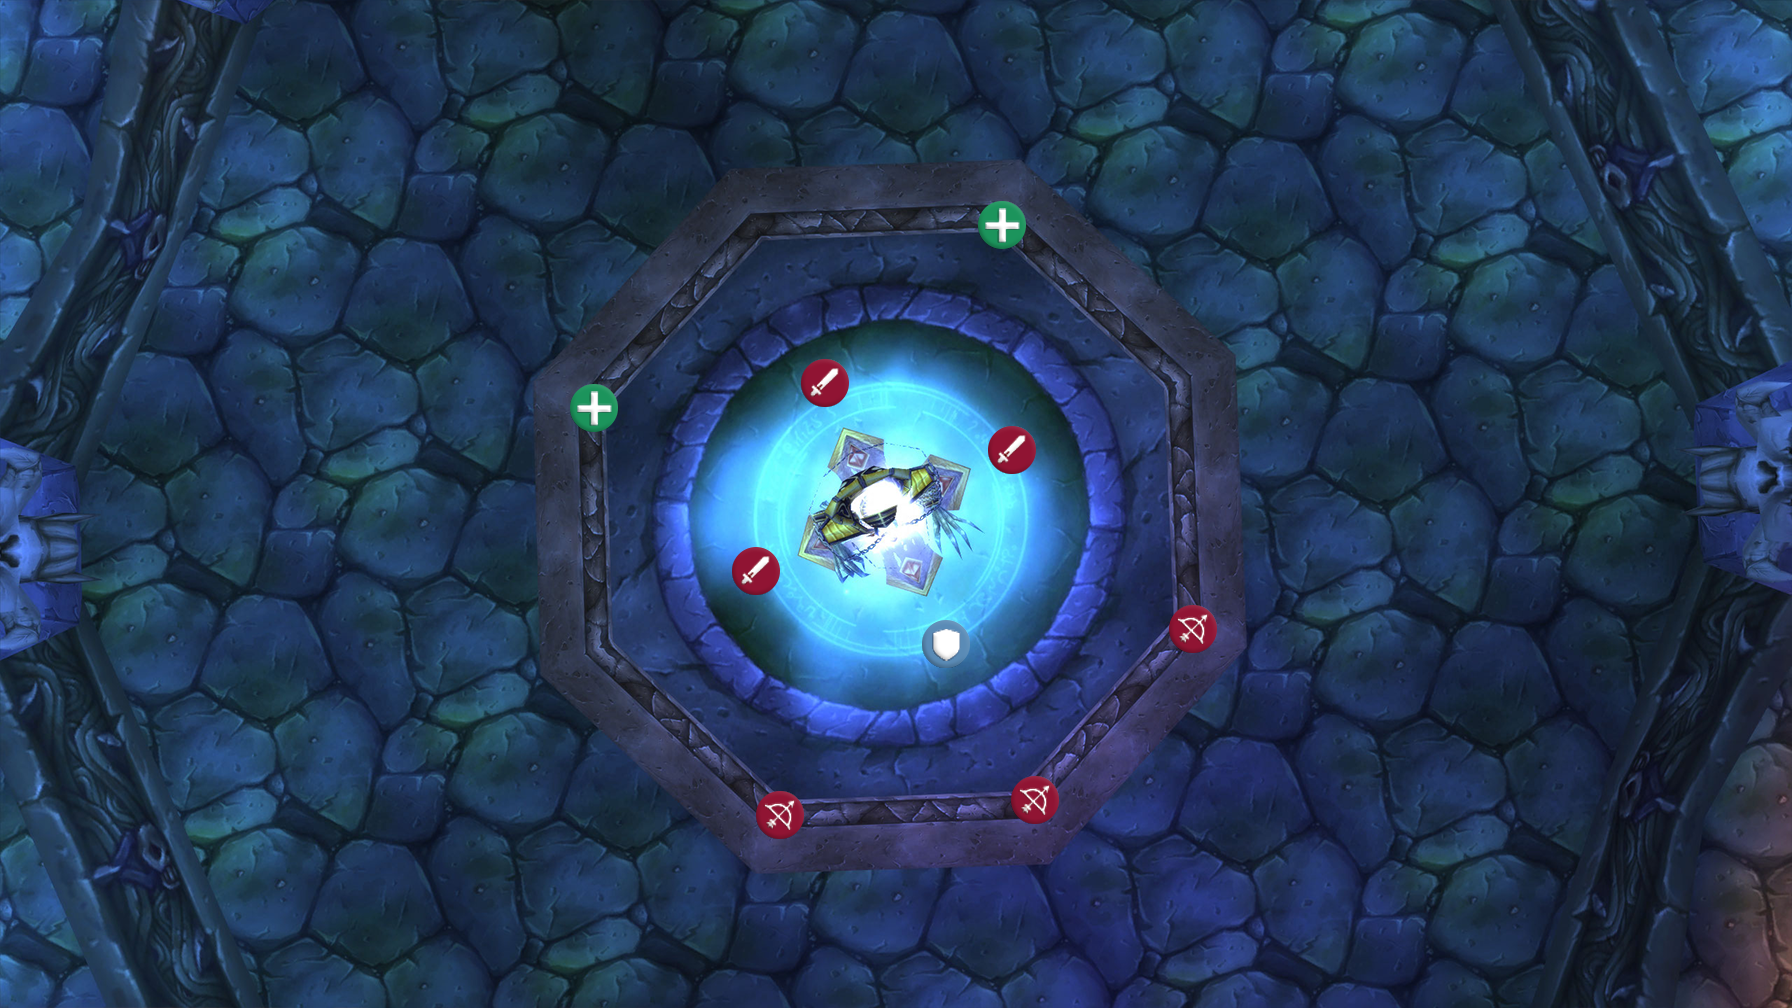
Kel’Thuzad will become targetable and needs to be immediately picked up by a tank and brought into the center of the room, ideally dead center of the green circle on the floor. Melee players will need to stack in 3 groups around Kel’Thuzad, at his back and at each of his sides, with the tank at his front.
Kel’Thuzad will cast Frost Blast on a 45-second cooldown, hitting a player and everyone within 10-yards of them, freezing them and dealing massive damage, as well as continuing to chain to everyone within 10-yards of them. This will also deal 104% of their maximum HP as damage over 4-seconds, meaning that without healing they are guaranteed to die.
To handle this, all ranged players will need to be spread at all times, but there is a lot of space so this shouldn’t be an issue. But remember, melee players may have to run away from the boss to avoid Shadow Fissure, so keep an eye out for them to make sure you give them space if needed.
Melee DPS have a harder time staying spread though! They will need to be at max range of Kel’Thuzad at all times. To aid in melee positioning, you can try to align yourself with the points of Kel’Thuzads robe. He has four points, one in each direction. As long as melee DPS are aligned with these points and at max range, they should be good to go!
Kel’Thuzad will cast Detonate Mana on a 30-second cooldown, applying a debuff to a player that uses mana. After 5-seconds, this player will explode, dealing damage to all other players within 10-yards of them based on their maximum mana, meaning melee DPS will deal significantly less damage than healers for example.
As a ranged player, if you are correctly spread with 10-yards separating you from everyone else, this is not an issue at all and won’t hit anyone, but as melee, it is significantly more difficult. Ideally, the player with the debuff will run straight away from their stack, getting 10-yards from the melee stack as well as 10-yards from any ranged DPS. This can be tricky if ranged DPS are too clumped behind the melee stacks, so some people may have to adjust.
Occasionally, a red Shadow Fissure will appear at someone’s feet, one-shotting them after 5-seconds. This is easy enough to simply walk out of, but make sure you don’t end up within 10-yards of other players! For melee DPS you should swap to one of the other stacks around Kel’Thuzad, and return to your stack after the Shadow Fissure has exploded.
Kel’Thuzad will also cast Frostbolt without a cooldown. Sometimes he will decide to cast this repeatedly, sometimes he will only cast it once before doing something else. This needs to be interrupted as it deals high damage to the tank and can easily kill them. Most classes have some method of interrupting, but generally, this will be left to melee players. Rogues can interrupt with Kick and Shamans have one of the best interrupts in the game with Wind Shear on a 6-second cooldown. If Kel’Thuzad decides to chain cast Frostbolt, more players will need to jump in and start interrupting, so even if you are not assigned as an interrupter, always be ready!
Occasionally he will also cast Frostbolt Volley, hitting everyone in the raid for a chunk of Frost damage. This cannot be interrupted and has to be handled by healers quickly making everyone healthy again.
At 45% health, 2 Guardian of Icecrown will be called in to attack the raid. These will appear one by one and need to be quickly grabbed by a tank. These enemies will build stacks of Blood Tap, increasing their damage dealt by 15% every time. They have too much health to kill quickly, so have your tank pick them up quickly while the DPS continues focusing on Kel’Thuzad. You want to use all cooldowns now and try to end the fight as quickly as possible.
Here are some of the main things that can go wrong in this phase:
- Players don’t pay attention to their positioning, stacking within 10-yards and hitting more raid members than necessary.
- Interrupts are either late, ignored, or out of sync, causing Kel’Thuzad to kill the tank with Frostbolts.
- Healers don’t react to Frost Blast and don’t heal the target within 4-seconds, causing them to die.
- Melee stacks too close to the tank and chain Frost Blast or Detonate Mana into them.
- Melee with Detonate Mana have nowhere to go and hit multiple raid members.
Congratulations on defeating Kel’Thuzad! With the ruler of Naxxramas slain yet again, you have released Dragonblight from the grip of the dread citadel and dealt a powerful blow to the Lich King’s armies.
About the Author
