- Author: DanielD
- Date: July 5, 2022
- Updated: September 26, 2022
- Expansion: WotLK Classic
The daily quests in Icecrown are mainly PvE, and are unlocked over a long series of quest chains. In addition to the usual gold and XP, the neutral quests allow you to gain reputation with Knights of the Ebon Blade, while some of the faction-specific quests offer rep with the Valiance Expedition (Alliance), Warsong Offensive (Horde), or the Argent Crusade.
While you won’t be able to do all of the dailies at the same time when you first arrive In Icecrown (because you will unlock them over the course of questing in the zone), you should always try to pick up and complete multiple dailies in the same area whenever possible. Even if you can’t complete the objectives at the same time, you will at least save travel time.
Note: We are still confirming which quests are required to unlock the dailies. Full quest tree unlock paths are coming soon!
Walkthroughs – Neutral Daily Quests
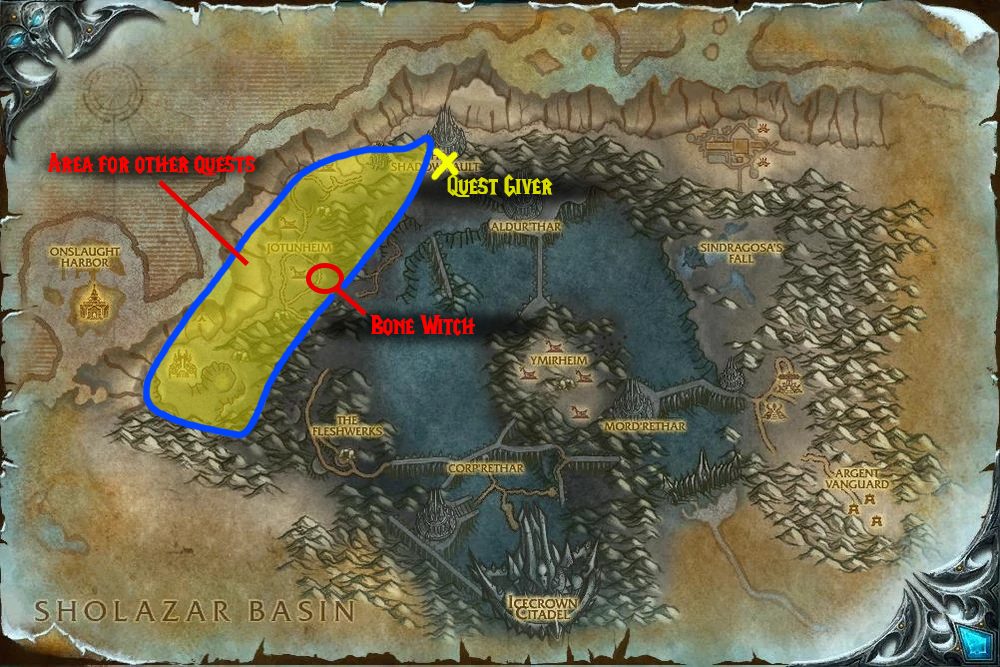
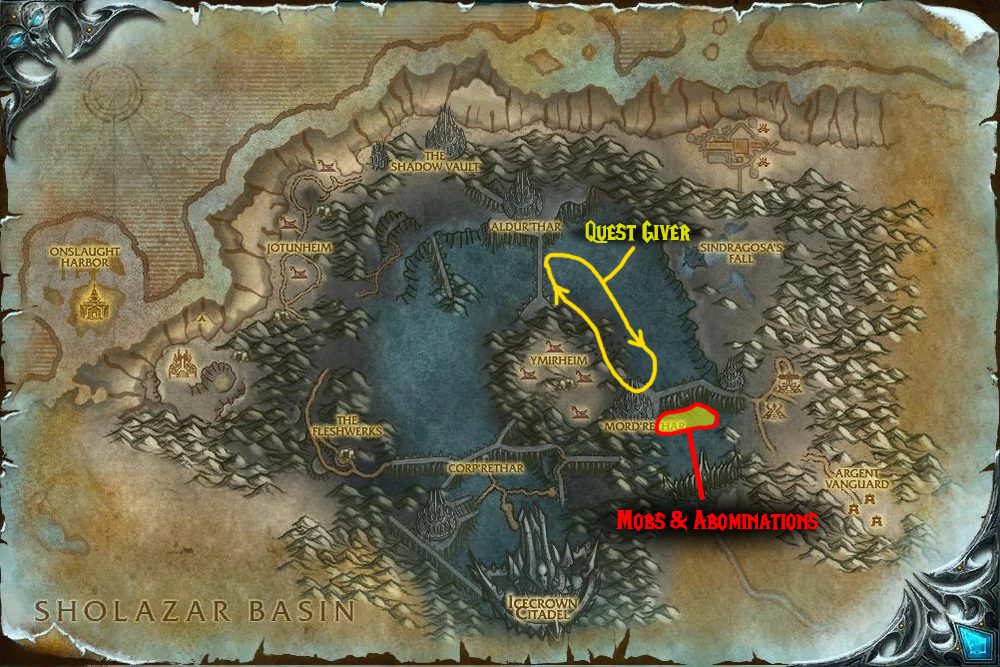
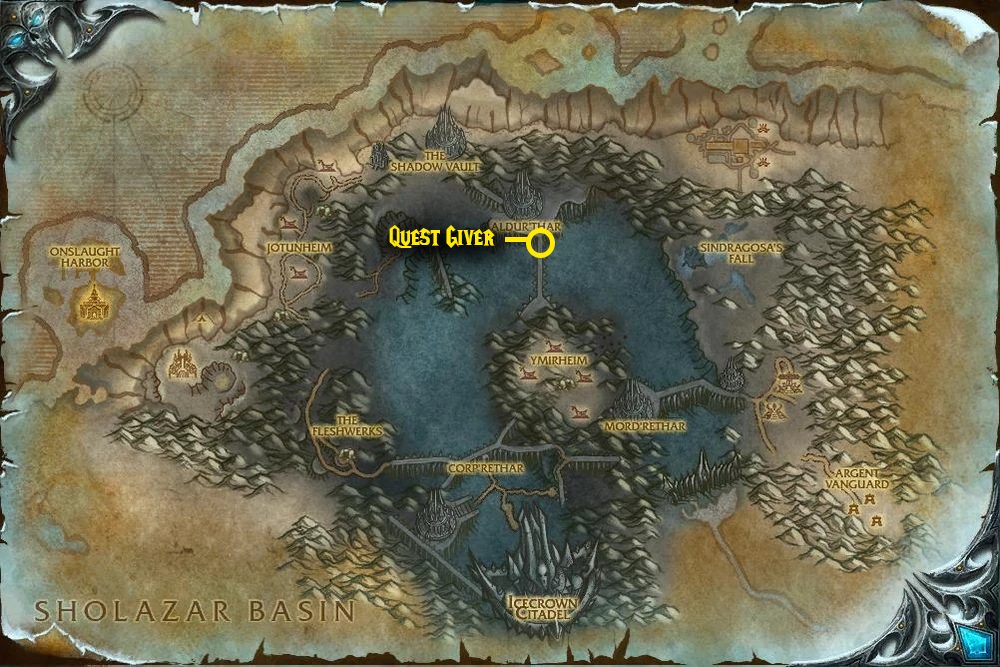
The Shadow Vault
Click the bar to expand a quest and see detailed info and instructions
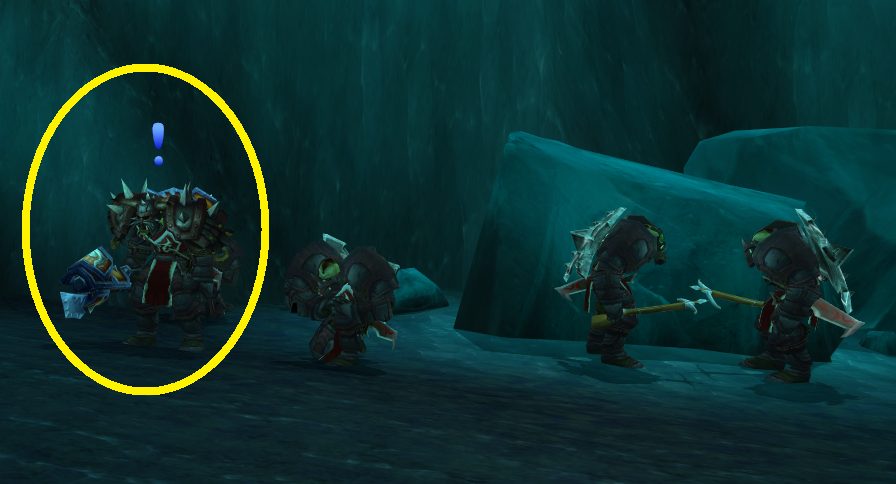
- Quest Giver – Baron Silver (42.8, 24.9), found in the courtyard in front of The Shadow Vault
- Prerequisites – Level 77, Let the Baron Know, Shadow Vault Decree
- Objective – Plant the Ebon Blade Banner near 15 Vrykul corpses
- Rewards
- 22,050 XP
- 250 Reputation with Knights of the Ebon Blade
- 7
 40
40 (20 63 at level 80)
If you haven’t yet completed Crush Dem Vrykuls!, Ebon Blade Prisoners, and Vandalizing Jotunheim, you can work on these (and turn in The Bone Witch) while completing this daily. All four of these quests can be picked up in The Shadow Vault. Once they’re available, try to do this alongside Vile Like Fire! and Shoot ‘Em Up.
You’re already going to be killing Vrykul for other quests, so you might as well plant some banners on them and earn yourself some extra gold and rep! For this quest, you just need to use the Ebon Blade Banner near the corpse of any Vrykul — it can even be mobs other players have killed. Kill your way southwest through Jotunheim to Njorndar Village, where you can turn in The Bone Witch.
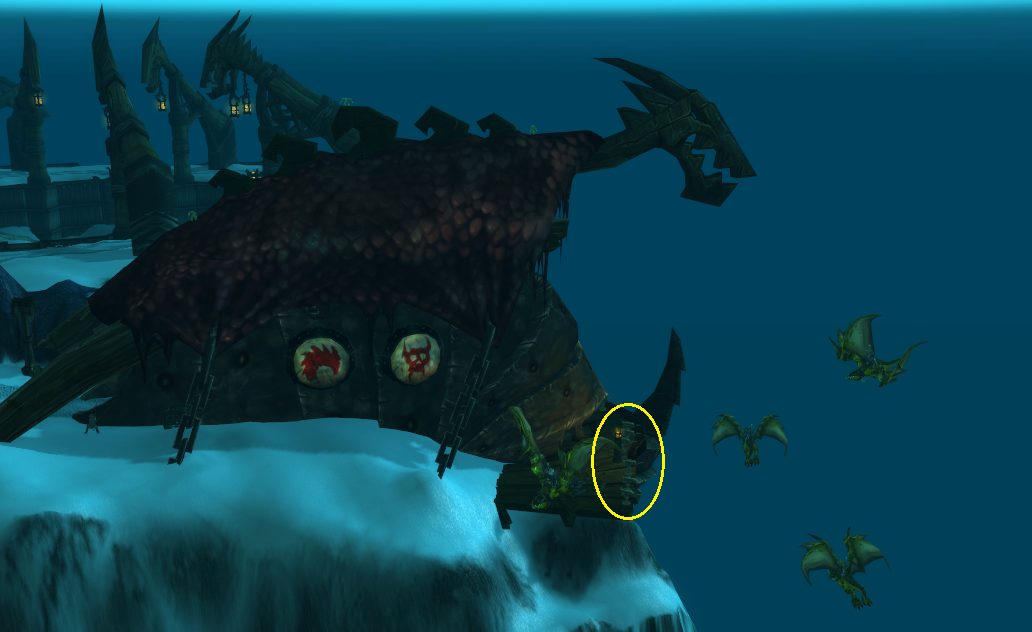
- Quest Giver – The Leaper (43.5, 25.0), found near the entrance to the Shadow Vault, by the tent with the crystal ball
- Prerequisites – Level 77, Ebon Blade Prisoners
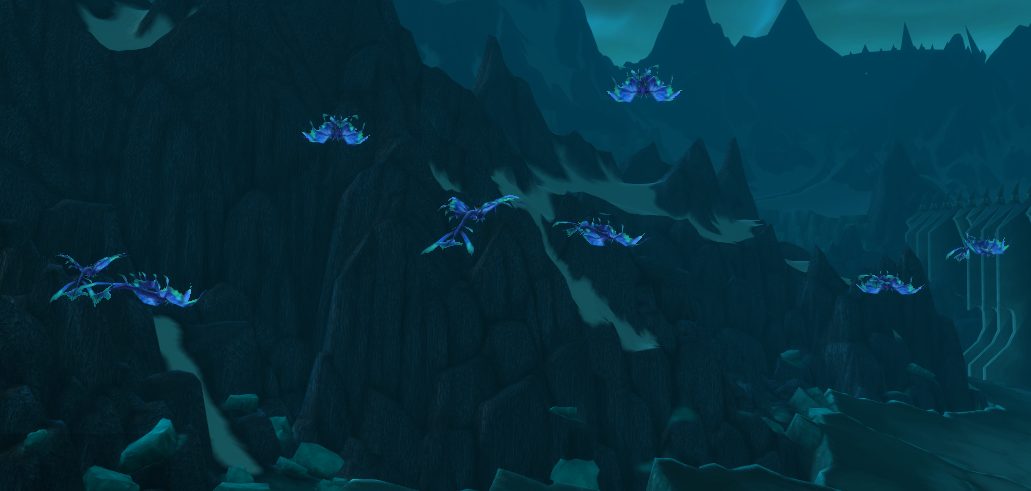
- Objective – Kill 15 Jotunheim Proto-Drakes using the Jotunheim Rapid-Fire Harpoon
- Rewards
- 22,050 XP
- 250 Reputation with Knights of the Ebon Blade
- 7 40 (20 63 at level 80)
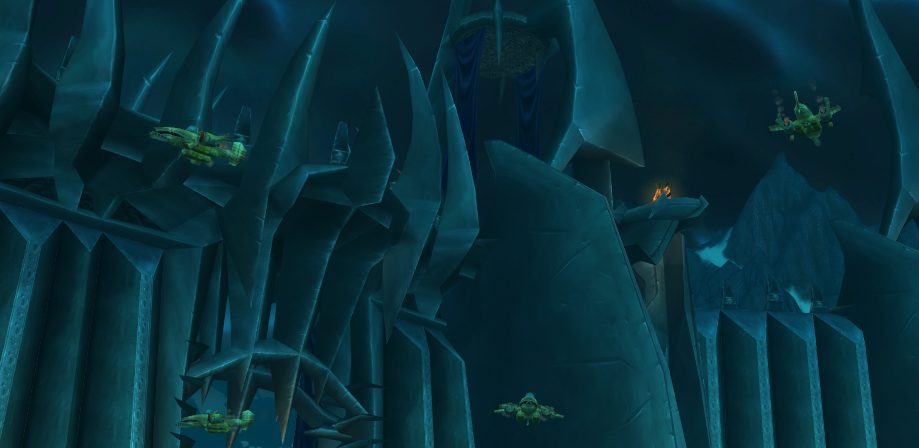
This is a fun quest if you like Duck Hunt, or if you have an irrational hatred of drakes. From The Shadow Vault, fly west over the mountains and you’ll see a wooden balcony with a viking longboat sort of a shape. On the balcony are a series of harpoons, which you’ll use to shoot the drakes flying around in front of the balcony.
After you’ve spammed the Rapid-Fire Harpoon ability (the ‘3’ key) and the turret is out of energy, press ‘1’ to refill the harpoon’s energy and spam the rest of your shots. Try to target close enemies whenever possible. Once the harpoon is out of energy a second time, you can move to the next harpoon and repeat the process (assuming it isn’t occupied by another player).
Once another player damages one of the drakes, they’ll get credit for it, so you may want to fly southwest to the next harpoon balcony if the one you are on already has players.

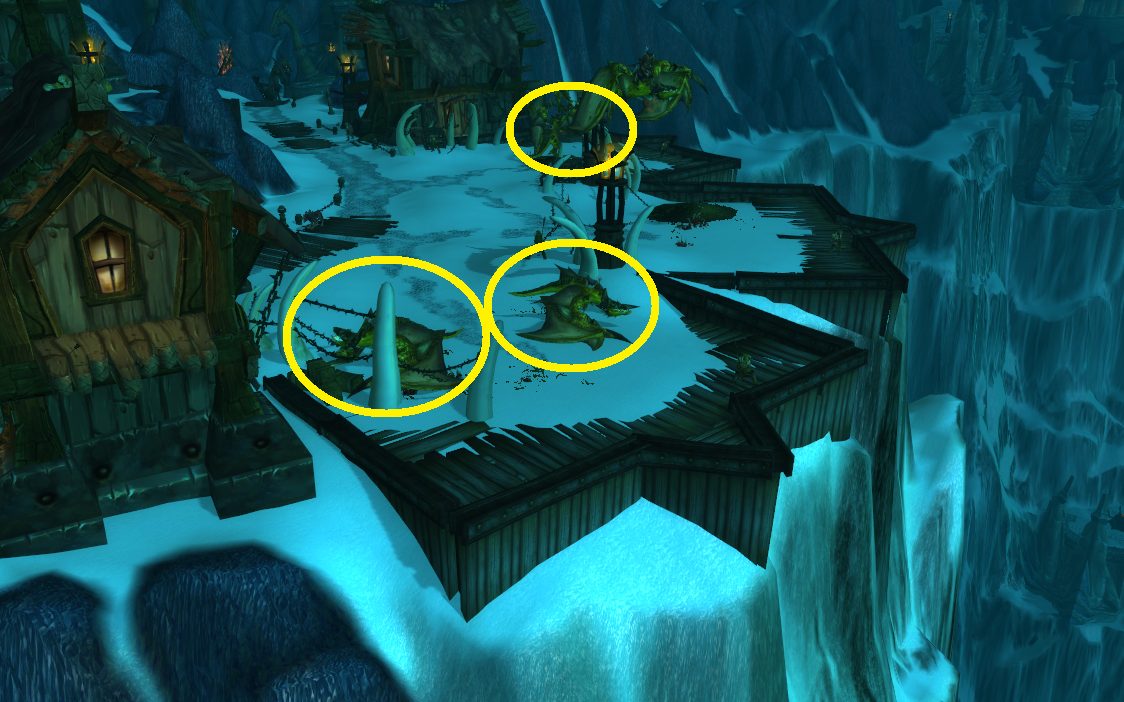
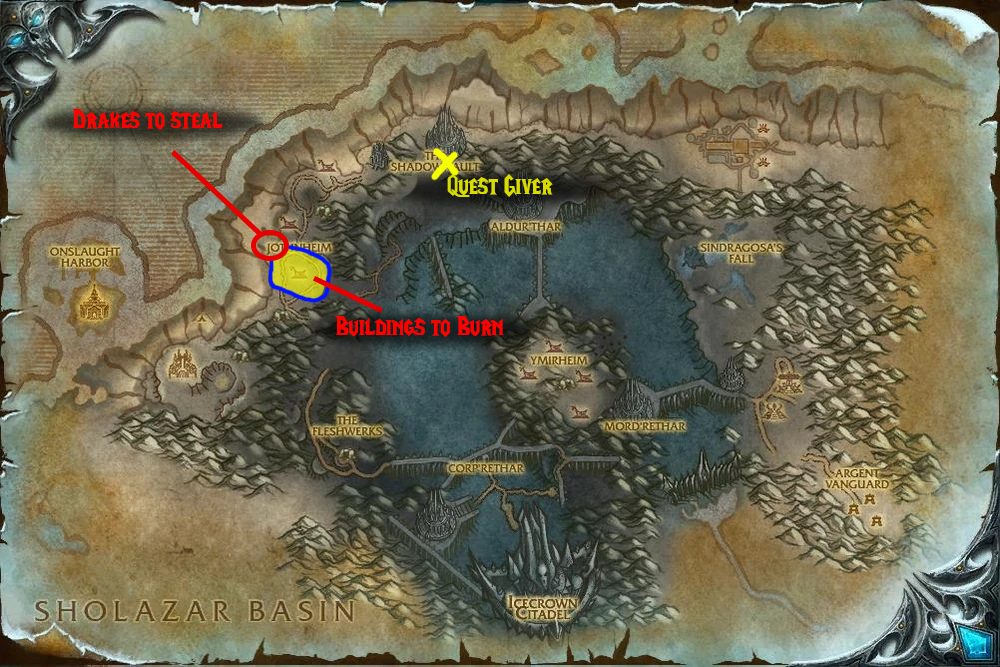
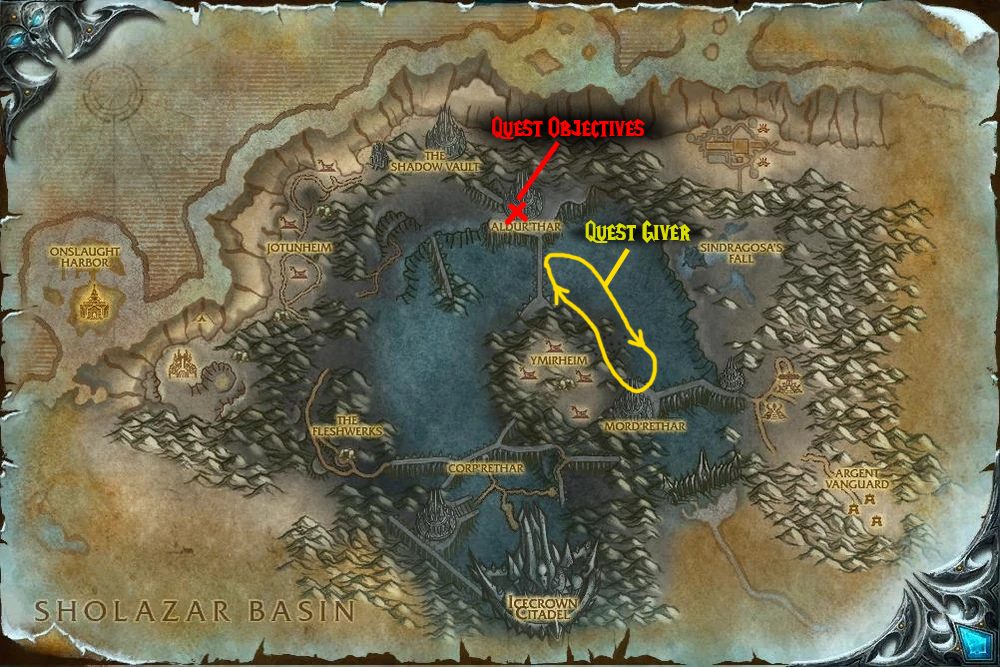
- Quest Giver – Vile (43, 25), the abomination found patrolling on the road in front of The Shadow Vault
- Prerequisites – Level 77, Let the Baron Know, Shadow Vault Decree, Crush Dem Vrykuls!
- Objective – Set 8 Vrykul buildings on fire
- Rewards
- 22,050 XP
- 250 Reputation with Knights of the Ebon Blade
- 3 70 (16 93 at level 80)
A bit further southwest on the edge of the cliff where you did Shoot ‘Em Up, you’ll find the prototype drakes you need to steal to do this quest. Once you’re on one, the speed boost on ‘1’ will help you get around quicker, and you’ll need to use the ‘3’ key to set the various buildings in the town on fire.
Death’s Rise
Once you’ve done the dailies based in The Shadow Vault, you should grab the breadcrumb quest To the Rise with all Due Haste! if you haven’t yet, as it will send you to Death’s Rise and is part of a chain that unlocks one of the dailies.
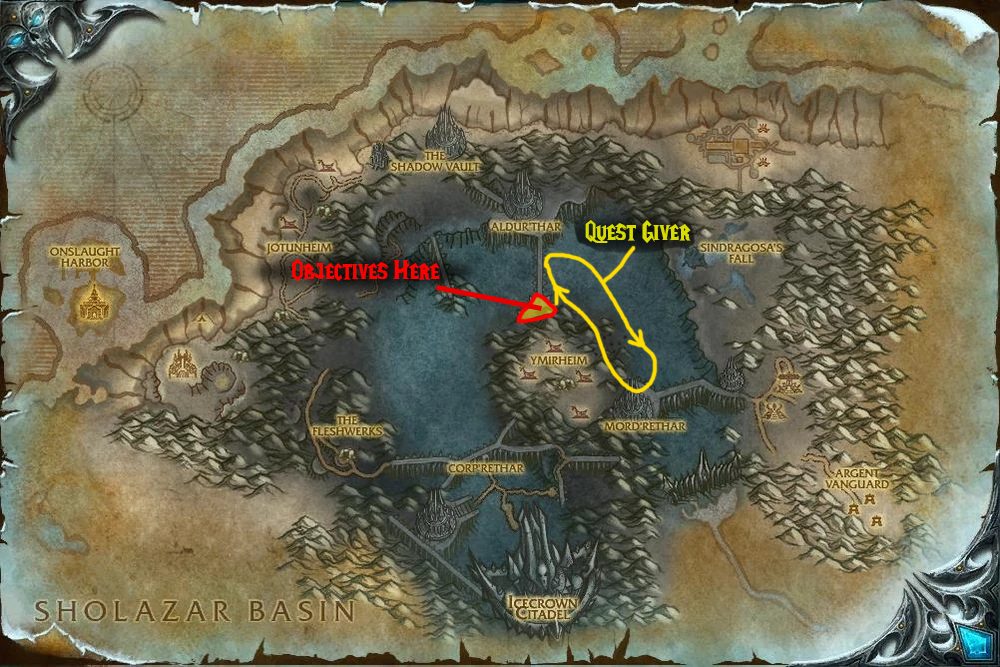
It can be tricky to find Death’s Rise if it’s your first time heading there, since it’s literally hanging off the side of a cliff. Fortunately, it’s pretty easy to identify on the map, and we’ve circled it to make it even easier. Again, pick up as many of the dailies as are available to you before you start completing them.


Click the bar to expand a quest and see detailed info and instructions
- Quest Giver – Setaal Darkmender (19.7, 48.4), found in Death’s Rise, on a box up against the cliff
- Prerequisites – Level 77, The Story Thus Far…
- Objective –Transform 10 Scarlet Onslaught corpses with the Darkmender’s Tincture
- Rewards
- 22,050 XP
- 250 Reputation with Knights of the Ebon Blade
- 7 40 (20 63 at level 80)
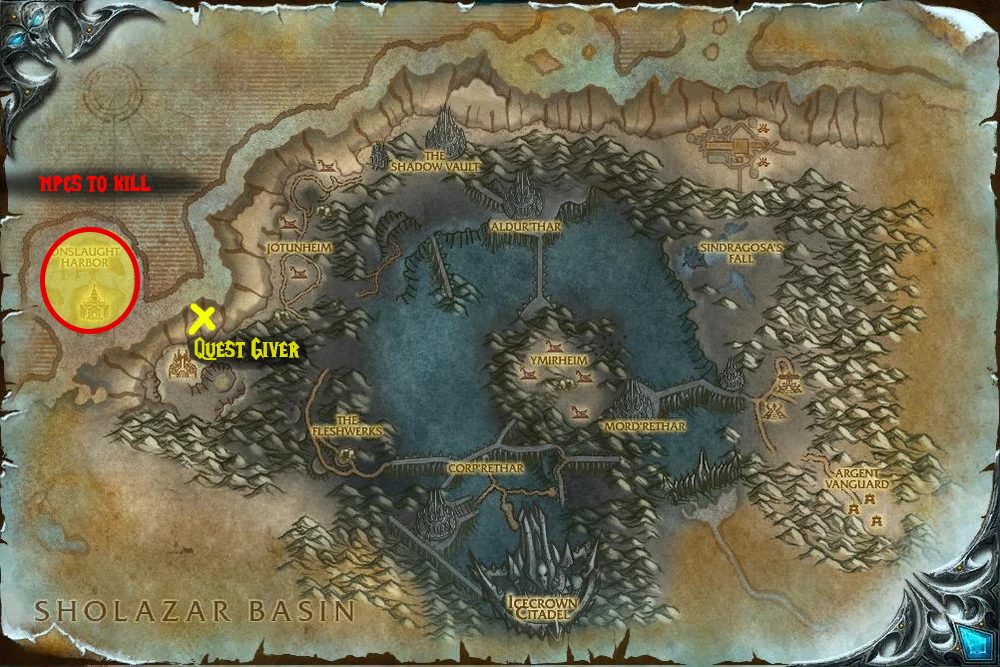
To complete this quest you’ll have to go to the island west of Death’s Rise. Once there, kill any of the mobs on the island and then use the Darkmender’s Tincture on their corpse. While this works on any of the mobs on the island, they are a little more sparse on the northern part, and that can make it easier to avoid pulling multiple foes by accident. If you picked up No Fly Zone, you’ll naturally want to focus on killing gryphon riderss while doing this quest.
Be careful not to use the tincture while you’re in combat — this will waste a charge of the tincture, and you’ll have to abandon the quest and start over.
- Quest Giver – Aurochs Grimbane (19.7, 48.4), found in Death’s Rise — he’s the Tauren on the horse circling the bonfire
- Prerequisites – Level 77, The Story Thus Far…
- Objective – Collect 5 Onslaught Intel Documents
- Rewards
- 22,050 XP
- 250 Reputation with Knights of the Ebon Blade
- 7 40 (20 63 at level 80)
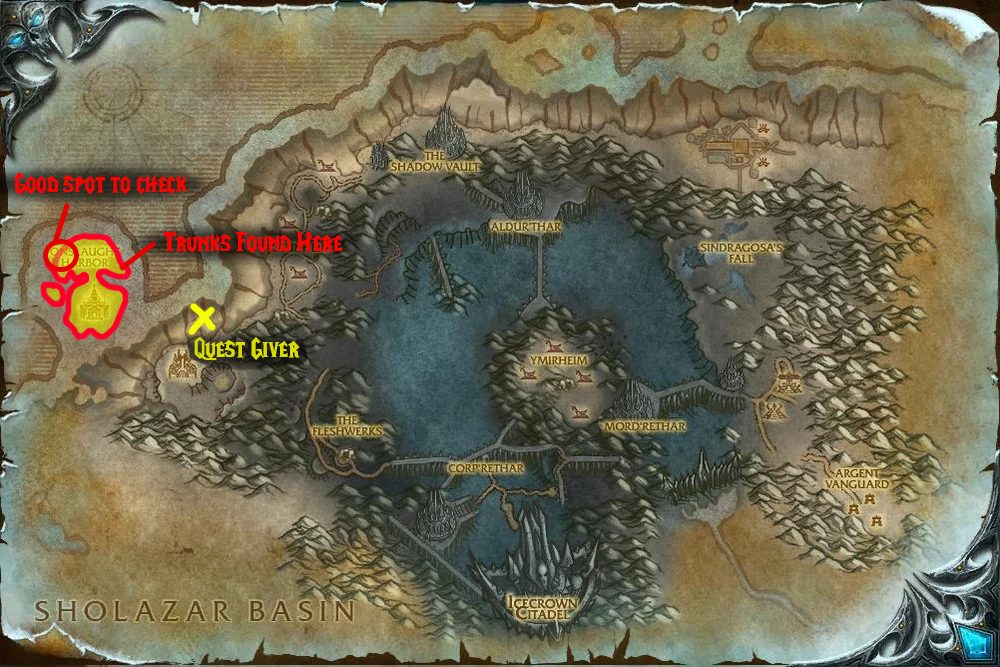
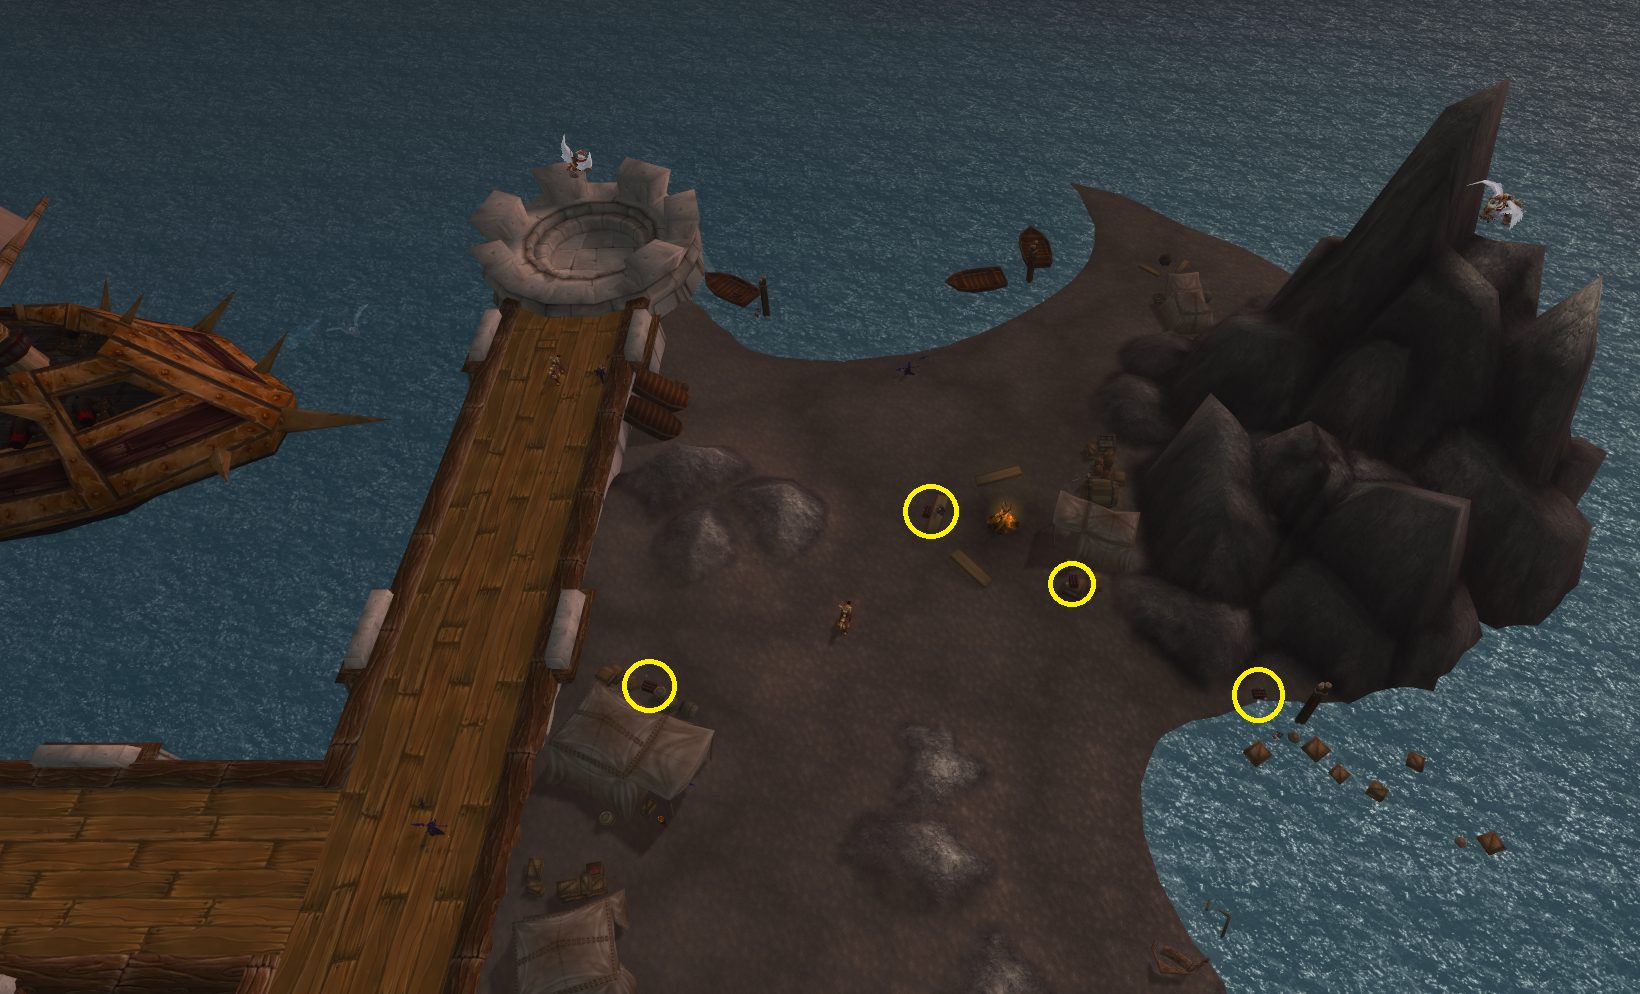
This quest is completed on the same island as From Their Corpses, Rise!, which you should have picked up at the same time. The NPCs on the island all have a 33% chance to drop a Scarlet Onslaught Trunk Key, which can be used to open — you guessed it — a Scarlet Onslaught Trunk. These in turn will yield the Onslaught Intel Documents you need for this quest.
The trunks are found all over the island, including on top of some towers, and on the archways above the bridges that connect the islands. One of the best places to find them is on the western side of the northern island, near where the large ships are docked.
- Quest Giver – Uzo Deathcaller (19.7, 48.4), found in Death’s Rise — he’s the troll near the Flight Master
- Prerequisites – Level 77, You’ll Need a Gryphon
- Objective – Kill 10 Onslaught Grypon Riders
- Rewards
- 22,050 XP
- 250 Reputation with Knights of the Ebon Blade
- 7 40 (20 63 at level 80)
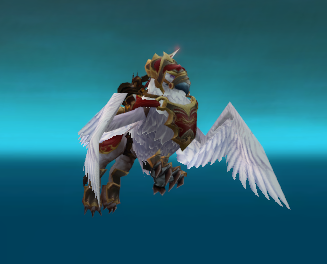
This quest is a straightforward find-‘n-kill — you’ll be taking down the Gryphon Riders across the water to the west. You’ll be given a Bone Gryphon for this quest, but it’s optional, and you can always just find gryphon riders that are accessible from land if you prefer. If you’re doing the other two dailies here, it’s best to kill gryphon riders that are hanging out over land anyway (so you can loot them/turn them into monsters, and so you can also open the chests for Intelligence Gathering).
If you are going to use the gryphon, note that it only works while near Onslaught Harbor, so if you try to fly back to Death’s rise on it, you’ll end up falling into the sea. Use Bone Armor (3) once you mount it, and keep using it when it’s off cooldown. Also note that you can use melee attacks while on the gryphon — since you’ll want to be using Plague Strike (2) off cooldown, you might as well stay in melee range. Otherwise, just spam Frost Breath (1) until the targets die. If the Bone Gryphone’s health gets low you can land, dismount, and remount to return it to full health.
If you are going to use the gryphon, note that it only works while near Onslaught Harbor, so if you try to fly back to Death’s rise on it, you’ll end up falling into the sea.
Walkthroughs – Alliance Daily Quests
The Alliance-exclusive quests are almost all started on the Skybreaker airship — where each quest is obtained is noted in parenthesis after the quest’s name.
Quests are listed in approximate order of when they can be unlocked. Click the bar to expand a quest and see detailed info and instructions
- Quest Giver – Knight-Captain Drosche, found on the Skybreaker (the Alliance airship that patrols north/east of the central mountain)
- Prerequisites – Level 77, The Skybreaker
- Objective – Kill 20 Ymirheim Vrykul
- Rewards
- 22,050 XP
- 250 Reputation with Valiance Expedition
- 7 40 (20 63 at level 80)
Do this quest at the same time as Assault by Ground, if able.
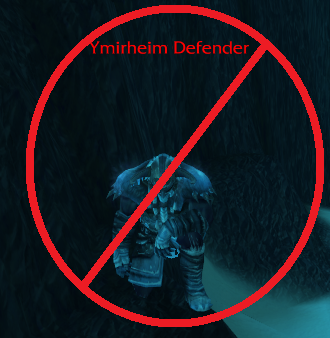
Knight-Captain Drosche is easy to find, as he’s on the topmost rear deck of the Skybreaker airship. The daily he gives you is a simple “kill the bad guys” quest; any enemy on the mountain in the middle of the map will do. If you aren’t doing Assault by Ground at the same time, avoid attacking the Ymirheim Defenders, as they’ll spawn multiple mobs to help them.
- Quest Giver – Skybreaker Squad Leader (62.8, 51.6), in a ravine between the central mountain and the eastern glacier
- Prerequisites – Level 77, Joining the Assault
- Objective – Escort at least 4 Skybreaker Troops to the gates of Ymirheim
- Rewards
- 22,050 XP
- 250 Reputation with Valiance Expedition
- 7 40 (20 63 at level 80)
Pick up Blood of the Chosen on the Skybreaker before starting this quest, as you can do both objectives at the same time (unless you’re a healing class, in which case it can be hard to get kill credit — the NPCs you’re “escorting” do surprisingly good damage).
An escort quest with refreshingly useful NPCs, who also don’t take forever to go from point A to point B. You may have to wait a bit after the quest giver says they need to “make preparations”. Keep talking to him until you get a conversation option — once you can pick it, do so and he’ll charge up the hill with his men. Try to stay out in front of them if you’re tank/DPS, since you can only lose a couple of friendly troops and still complete the mission.
Watch out when you engage the Ymirheim Defenders — once they’re aggroed, 4 of their friends will spawn, so don’t think you’re going to get to team up on a lone defender! If you’re far ahead of the quest NPCs, you may want to wait for them (and/or cooldowns) before engaging.
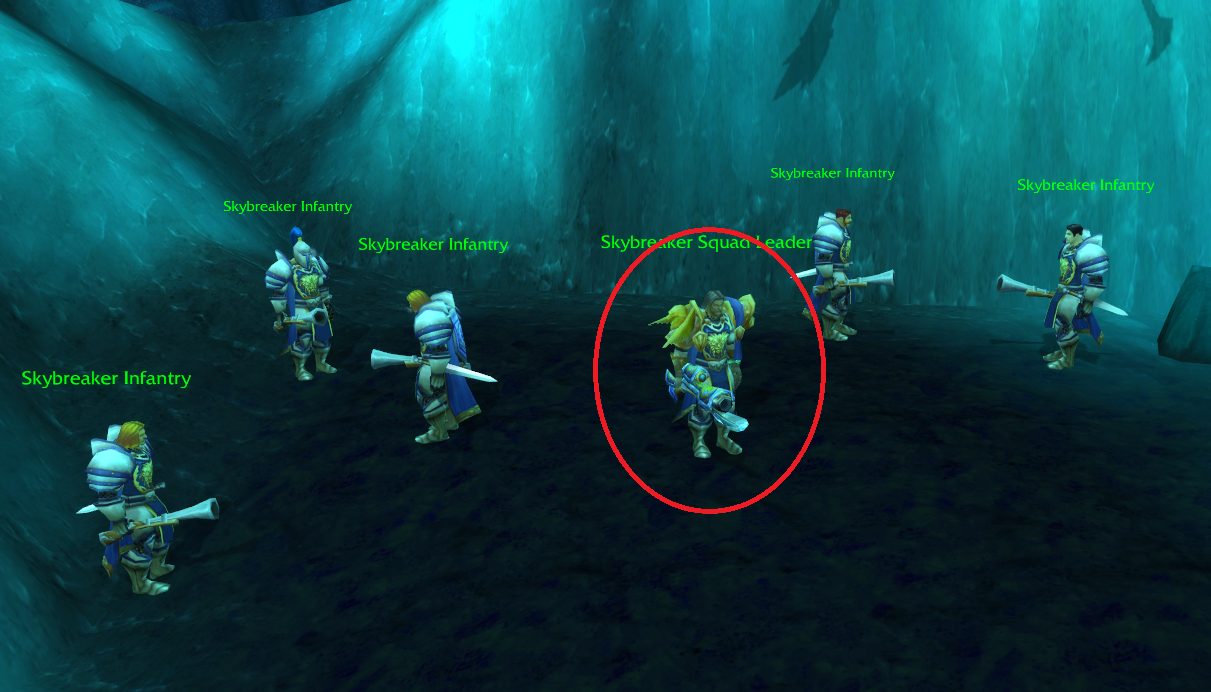
- Quest Giver – Ground Commander Koup (62.6, 51.3), in a ravine between the central mountain and the eastern glacier
- Prerequisites – Level 77, Joining the Assault
- Objective – Provide covering fire until 4 Skybreaker Infiltrators have landed safely
- Rewards
- 22,050 XP
- 250 Reputation with Valiance Expedition
- 7 40 (20 63 at level 80)
Ground Commander Kou is somewhat hard to find, as he’s nestled between the glacier and the mountain. He’s near a Skybreaker Transport, so you’re better off searching for that instead of for the NPC itself.
This on-the-rails shooter quest requires that you defend the Skybreaker Transport from enemy surface fire (in this case, harpoon turrets) while they drop troops. Once four troops have dropped safely, you’ll have completed the mission. What trips up most people on this quest is figuring out how to start it! After accepting the quest, turn around (face north) and look at the Skybreaker Troop Transport — you need to right-click the turret to hop into it, and then the quest will start.
The other mistake many players make is in thinking that their goal is to destroy the enemy harpoons, but what you’re actually firing from your turret is smoke grenades. All you need to do is land a single grenade near each harpoon, and they should no longer be able to fire. You may want to shoot a couple at each turret just to be sure, however.
Once you’ve completed the quest objectives, you don’t have to enjoy the leisurely ride back if you don’t want to — feel free to jump out of the turret and return to the quest giver under your own mount’s power.
- Quest Giver – Absalan the Pious, onboard the Skybreaker (the Alliance airship that patrols north/east of the central mountain)
- Prerequisites – Level 77, The Skybreaker
- Objective – Rescue 10 Saronite Mine Slaves
- Rewards
- 22,050 XP
- 250 Reputation with Argent Crusade
- 7 40 (20 63 at level 80)
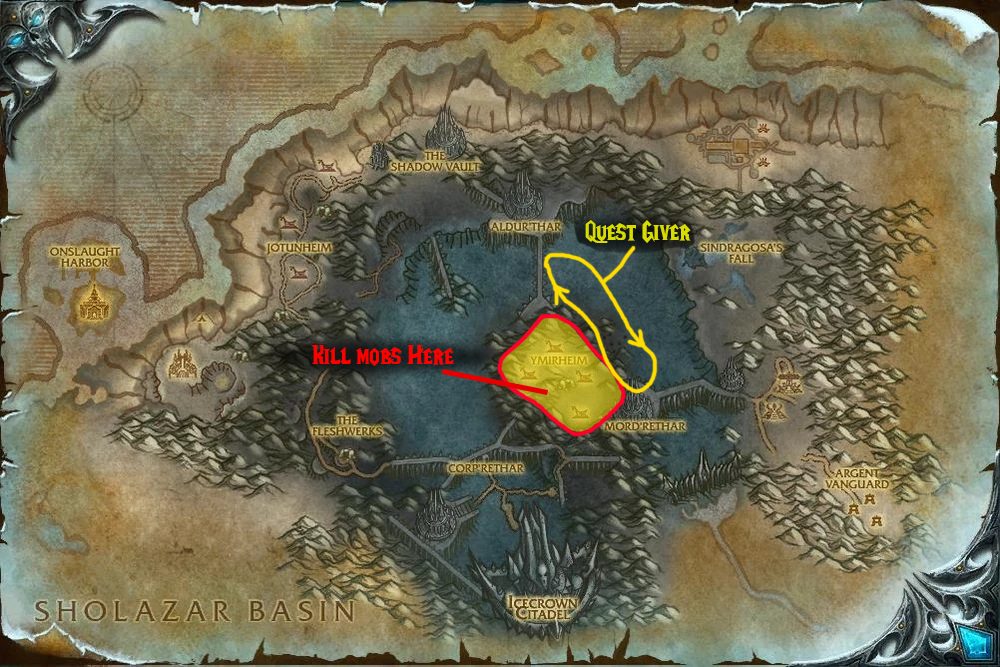
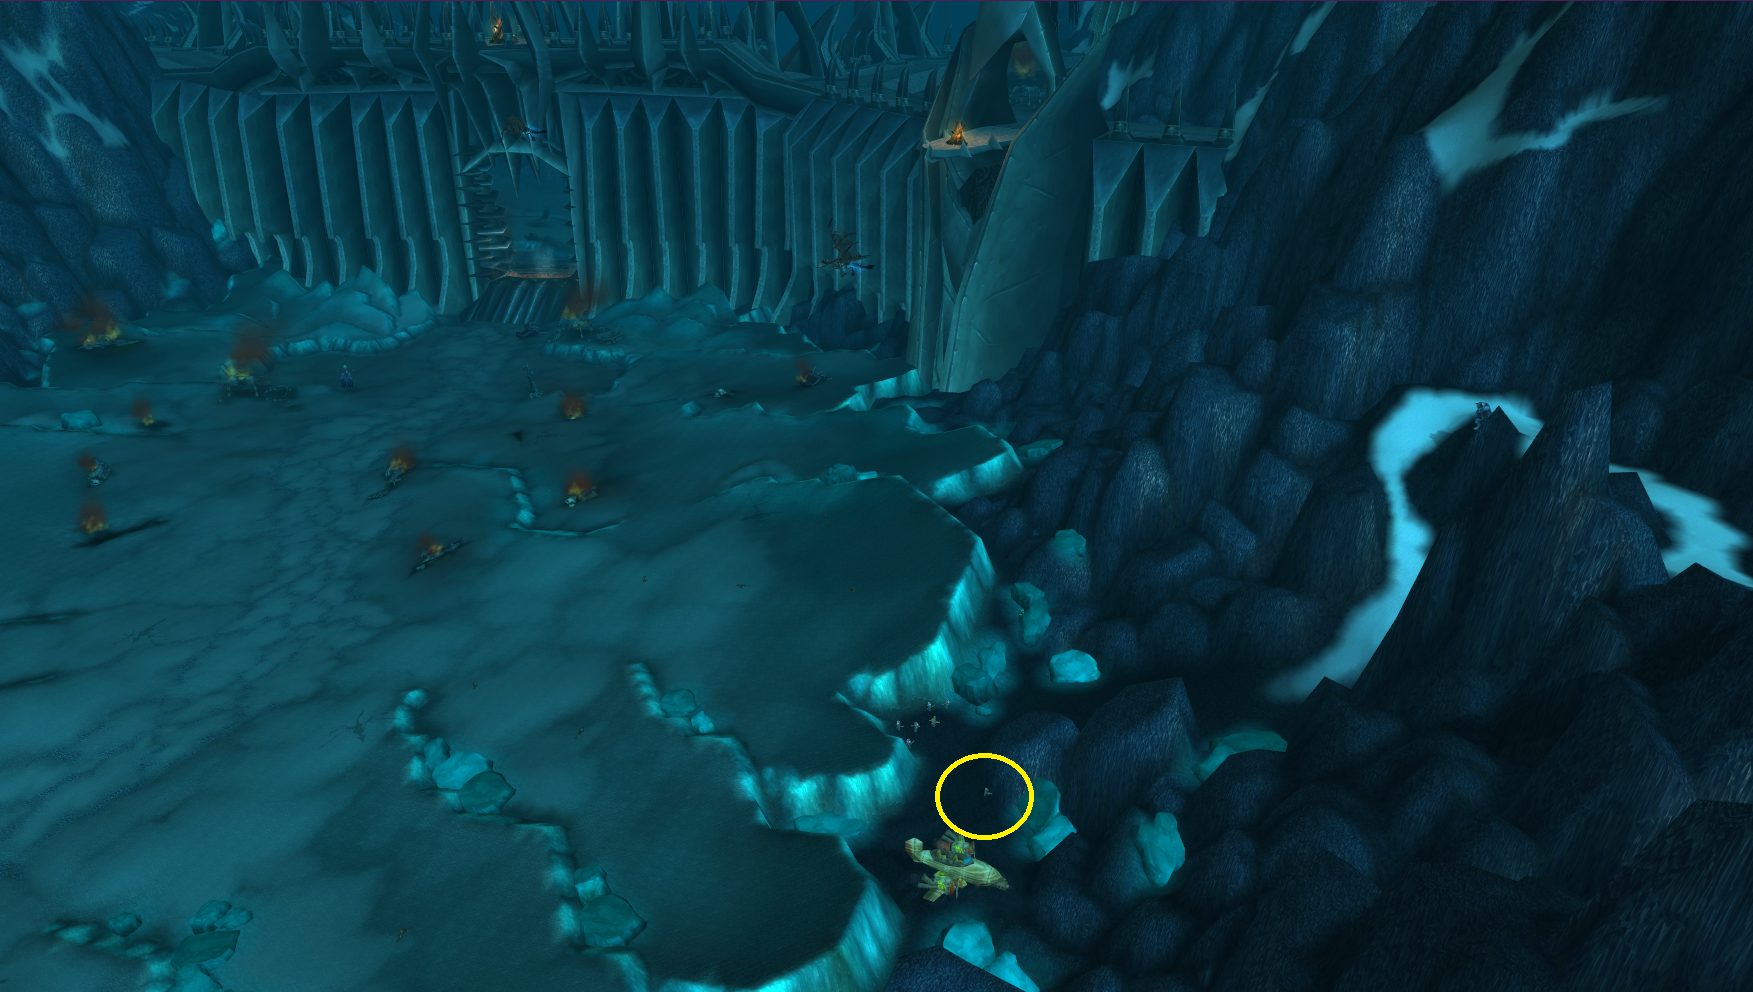
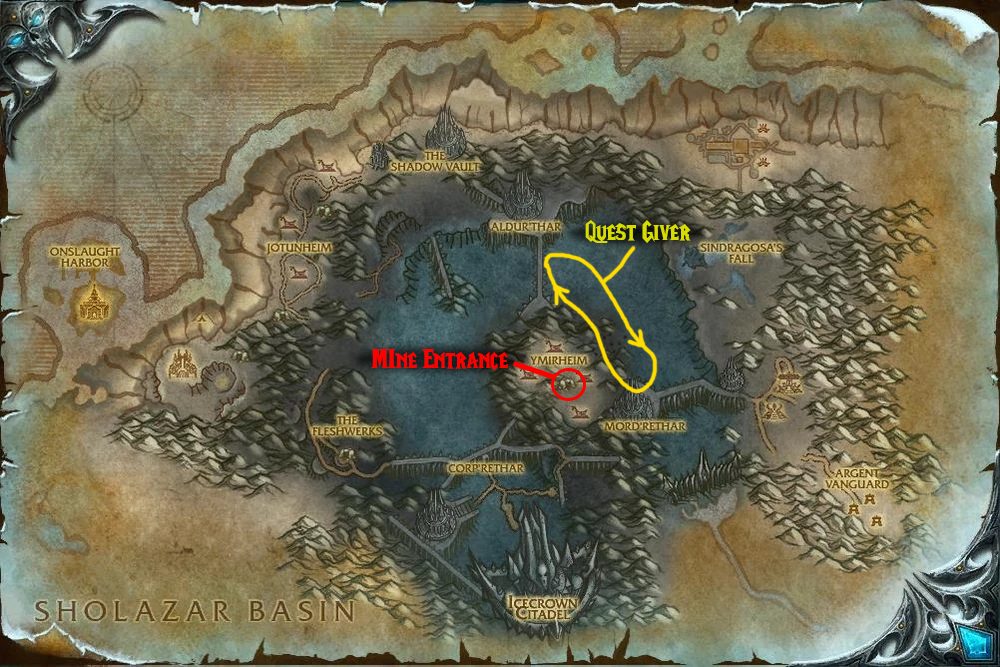
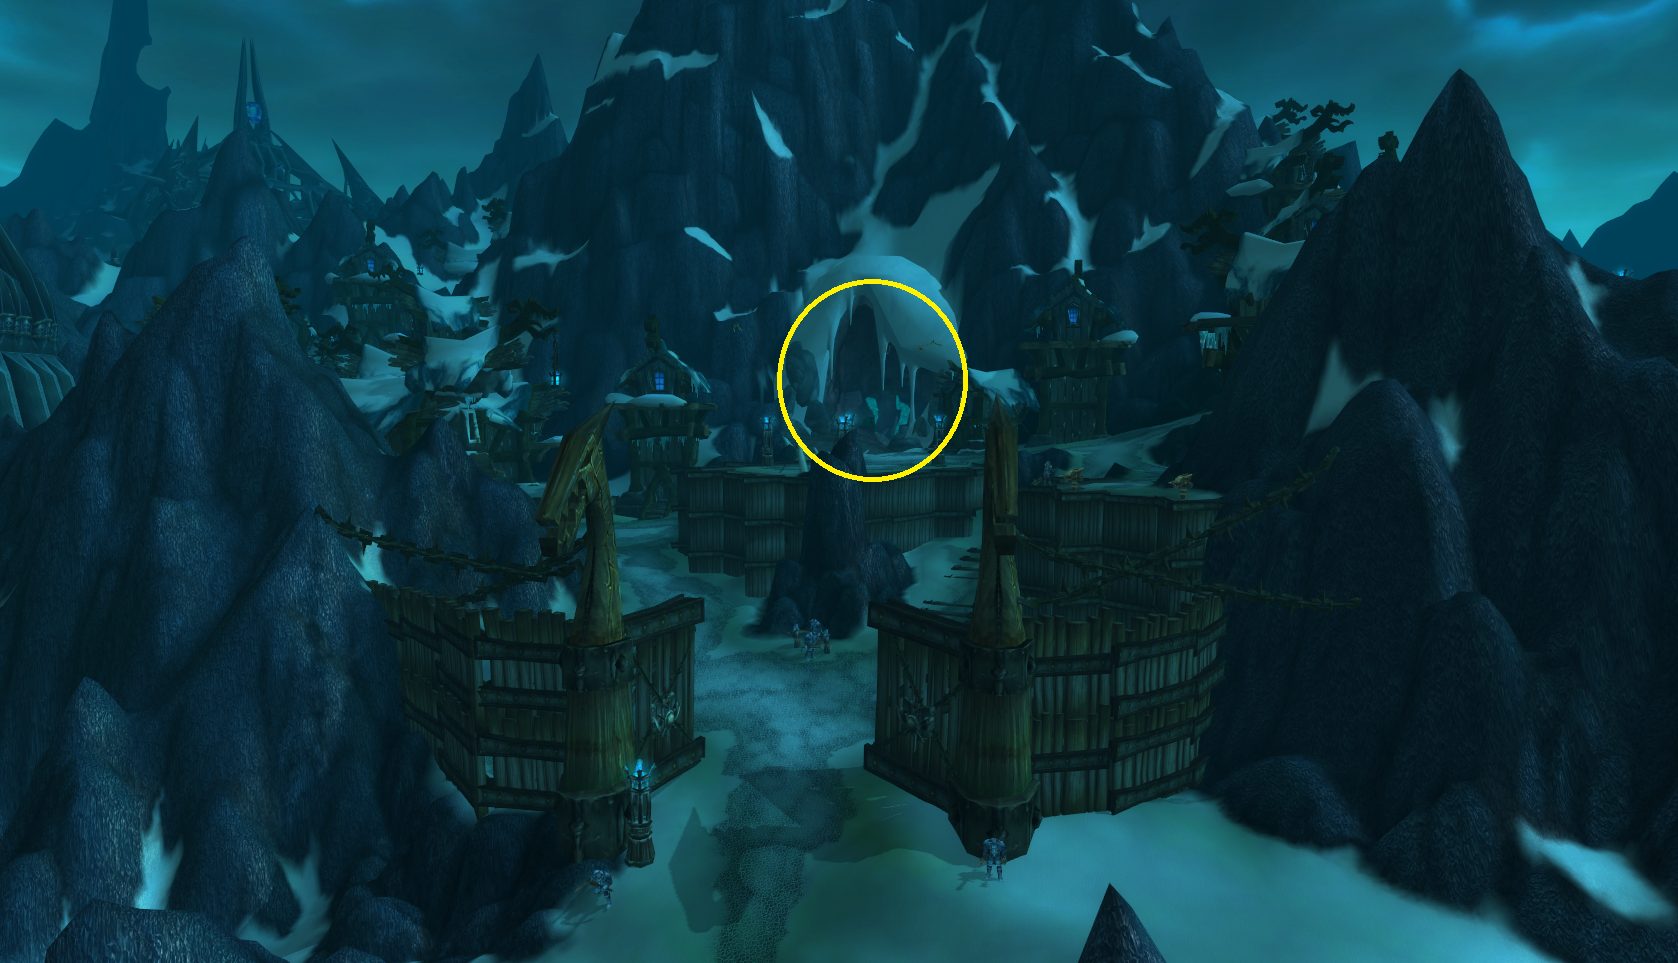
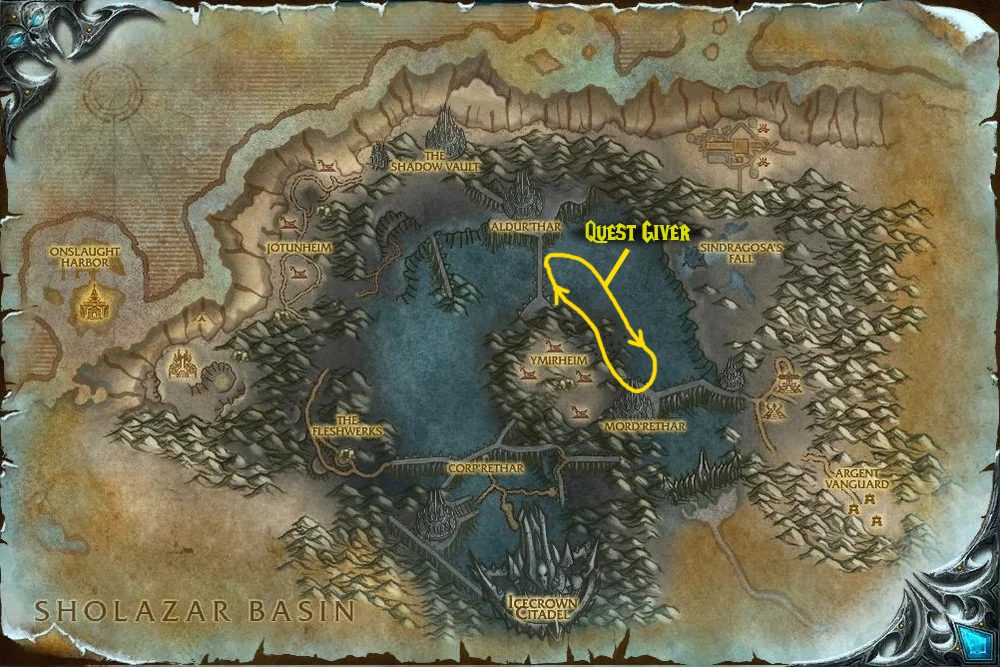
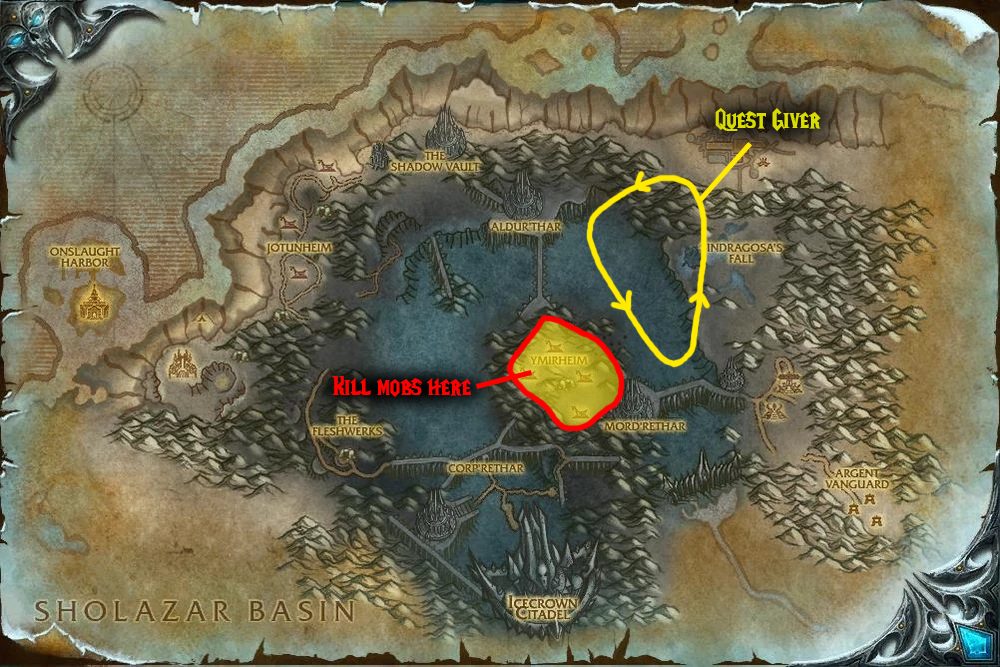
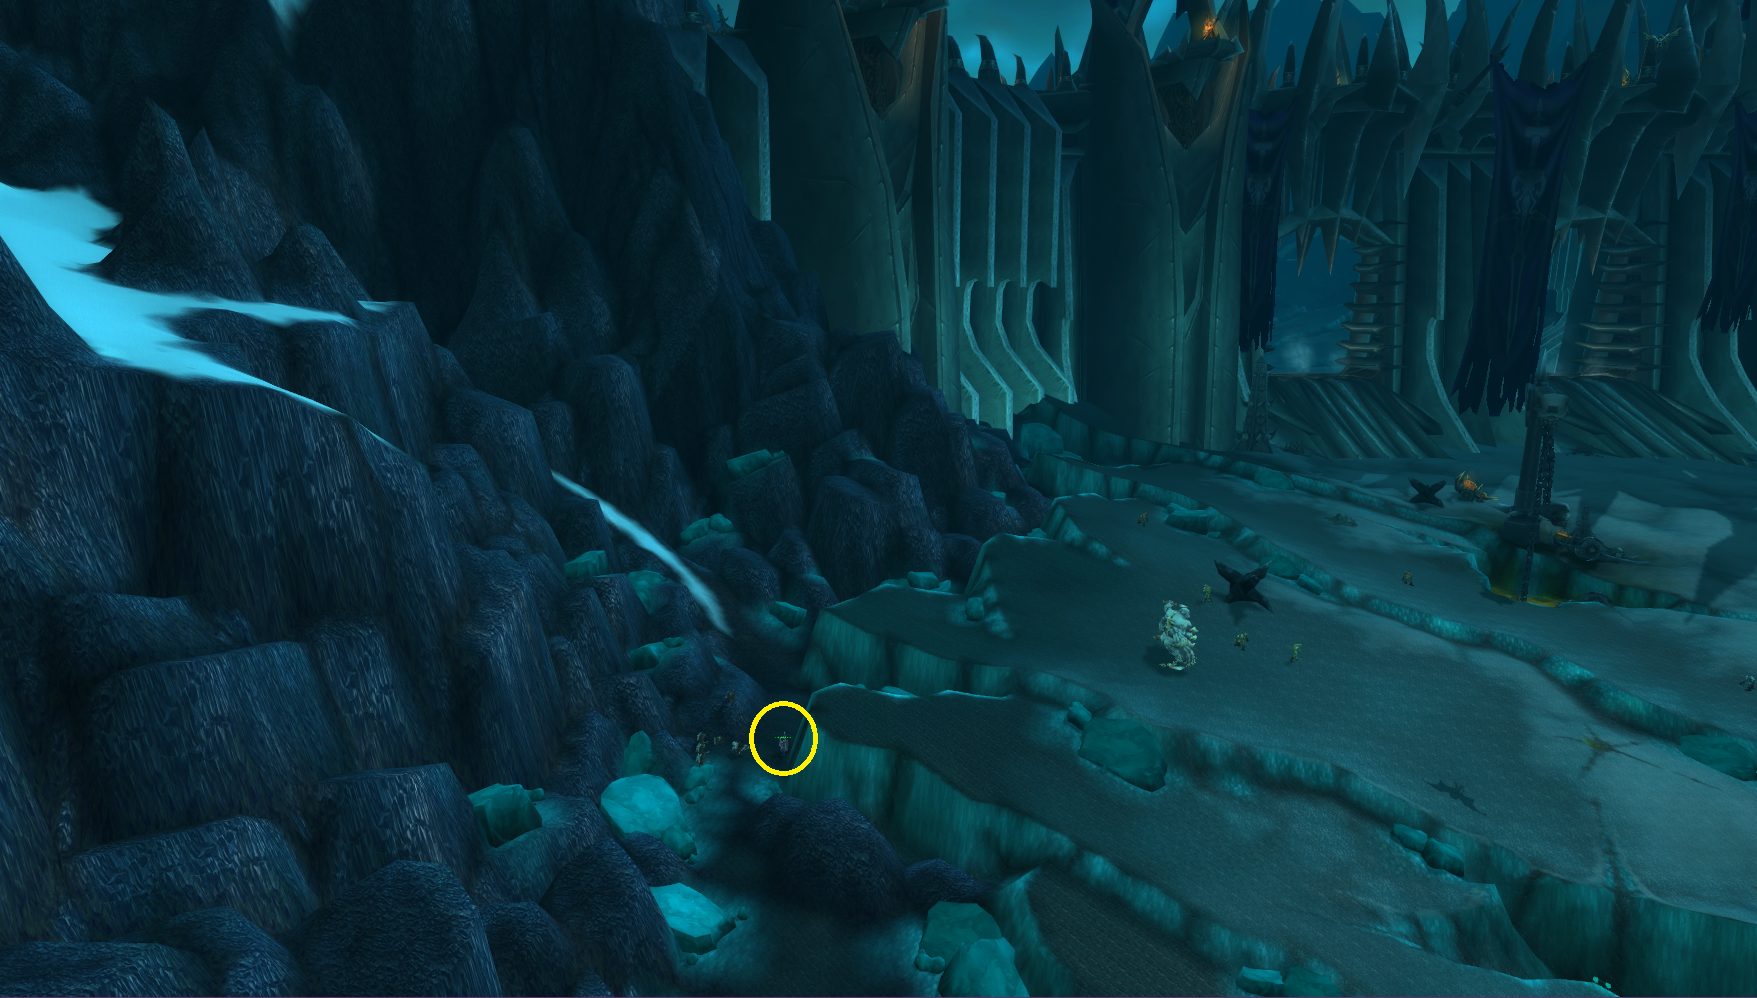
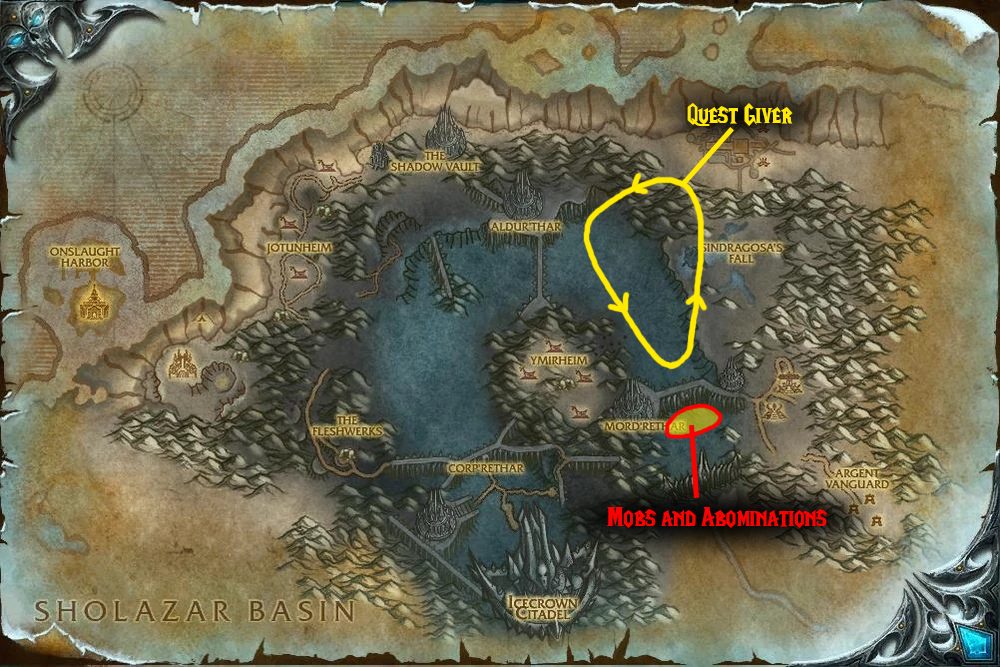
To find the quest giver, land on the deck of the Skybreaker, then look towards the huge main cabin with the yellow windows — Absalan is found at the foot of the staircase to the right of the main cabin. Once you accept the quest, you’ll need to fly to the mine in the center of Ymirheim, which is visible on the zone map (and we’ve circled it for you in the gallery below).
Once in the mine, you just need to talk to the Saronite Mine Slavess there — there’s only one dialog option, and when you pick it, they’ll either become freed (the quest objective), attack you, or freak out and run away. If they run away, you can try to follow them and speak with them again. You can prepare this script to make it easier to select the dialog option while running: /script SelectGossipOption(1); — once you’ve rescued 10, you’ll be able to go and turn in the quest.
Some players claim that killing the Val’Kyr Taskmistresses near the slaves before speaking with them will guarantee that the slaves become free (instead of freaking out), but we were unable to reproduce this.
- Quest Giver – Chief Engineer Boltwrench, onboard the Skybreaker (the Alliance airship that patrols north/east of the central mountain)
- Prerequisites – Level 77, Borrowed Technology
- Objective – Destroy three Frostbrood Skytalons using the Smuggled Solution
- Rewards
- 22,050 XP
- 7 40 (20 63 at level 80)
The quest giver is found on the lowest deck of the Skybreaker, since that’s the engine room — he’s on the prow (front) end of the deck. Once you’ve got the quest, you can fly southeast to the Broken Front. There, you’ll need to collect three each of three different quest items: an Abandoned Helm, some Abandoned Armor, and a Pile of Bones — they’re strewn all over the area indicated below, so you should be able to avoid combat while you collect what you need.
Since you’ll need three sets of three, pick up any quest items you see until you’ve got three of each item type. Then, simply use the Smuggled Solution quest item and watch the magic happen! Repeat twice more to complete the quest.

- Quest Giver – Thassarian, onboard the Skybreaker (the Alliance airship that patrols north/east of the central mountain)
- Prerequisites – Level 77, Poke and Prod, initial non-daily version of non-daily version of That’s Abominable!
- Objective – Use the Abomination Reanimation Kit to create Reanimated Abominations, then use it to kill 15 Icy Ghouls, 15 Vicious Geists, and 15 Risen Alliance Soldiers
- Rewards
- Initial Turn-in:
- 22,050 XP
- Slippers, Giest Leg, Scourgepaul, mantlerean
- 7 40 (20 63 at level 80)
- Daily:
- 22,050 XP
- 7 40 (20 63 at level 80)
- Initial Turn-in:
You’ll do this quest once as a non-daily, and then it will unlock as a daily. To find the quest giver, land on the deck of the Skybreaker, then look towards the huge main cabin with the yellow windows. Go up the stairs on the right side of the cabin, and Thassarian will be on the landing. After you’ve accepted the quest, you can fly southeast to the Broken Front.
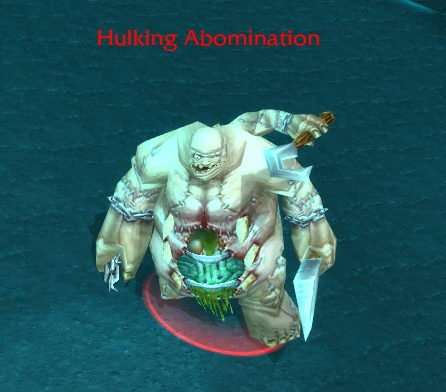
Once you arrive in the quest area, you’ll first need to kill Hulking Abominations until one drops Chilled Guts. You can only hold one at a time in your inventory, so once you’ve got it, head over to where the quest mobs are, and then use the Abomination Reanimation Kit.
Now your strategy will depend on your class and spec a bit, but the end goal is to have as many quest mobs surrounding the Abomination before using its Burst at the Seams ability — this will cause it to explode, and you’ll get quest credit for any mobs caught in the blast. You can just send the Abomination in alone, you can put it on passive and pull a group yourself — it’s whatever works best for you. You’ll want to use the Abomination’s Flatulate while you’re pulling mobs, as it will stun them and make it easier to pull a larger group without you or the Abomination dying.
There are a few possible issues with this quest. First off, if you aren’t getting a pet bar after summoning the Abomination, type the following into the chat (without quotes): “/console reloadui”. Some other things to note are that if you have a pet summoned, dismiss it before using the Abomination Reanimation Kit or you’ll lose the Chilled Guts and still have no Abomination. Additionally, don’t get too close to the Death Gate — if your zone changes from The Broken Front, your Abomination will disappear.
- Quest Giver – Thassarian, onboard the Skybreaker (the Alliance airship that patrols north/east of the central mountain)
- Prerequisites – Level 77, Sneak Preview, initial non-daily version of non-daily version of Drag and Drop
- Objective – “Drag and drop” 3 Dark Subjugators by throwing an Orb of Illusion at them
- Rewards
- 22,050 XP
- 7 40 (20 63 at level 80)
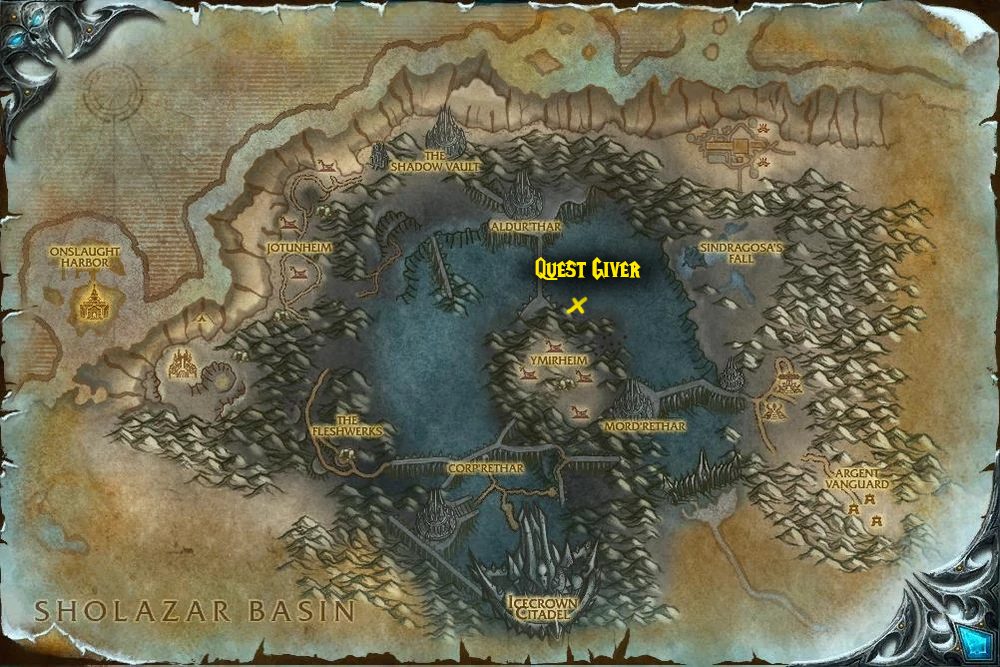
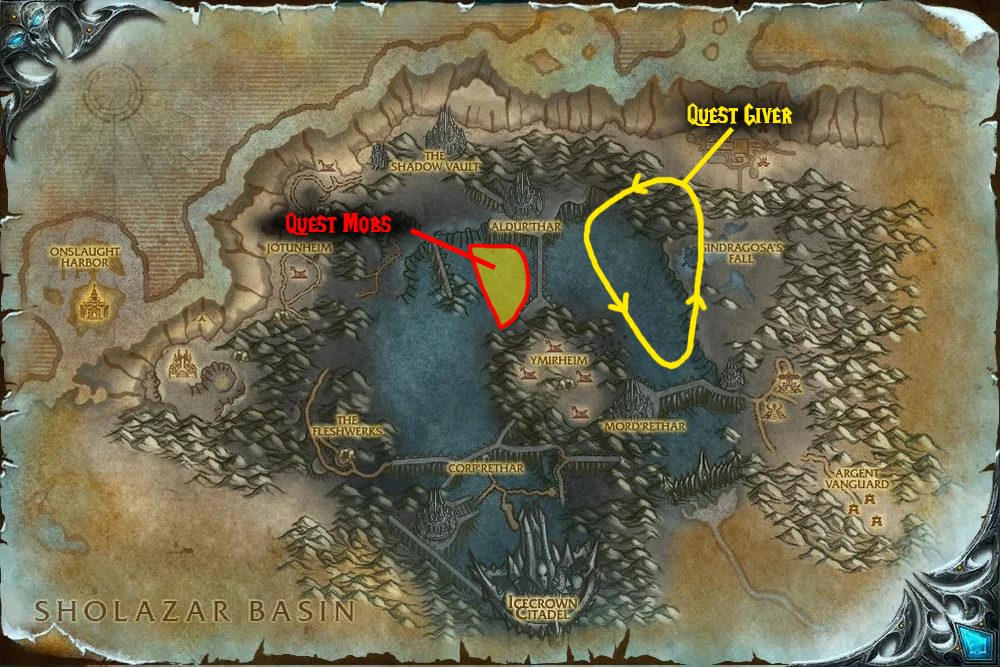
You’ll do this quest once as a non-daily, and then it will unlock as a daily. To find the quest giver, land on the deck of the Skybreaker, then look towards the huge main cabin with the yellow windows. Go up the stairs on the right side of the cabin, and Thassarian will be on the landing. Once you accept the quest, you’ll need to head to the camp at (53, 45), near the southern end of the bridge that connects Aldur’thar and Ymirheim.
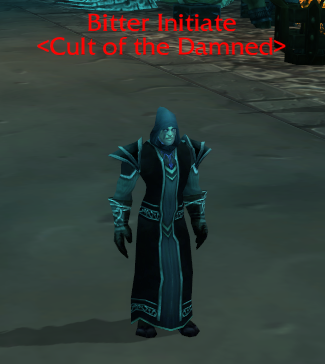
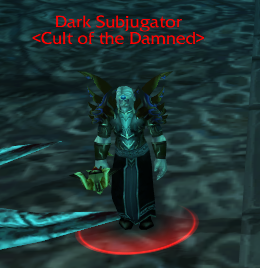
Once there, you’ll first have to kill Bittier Initiatess to collect an Orbs of Illusion; they have about a 50% drop rate. You can then use it (right-click the orb in your inventory) while targeting a Dark Subjugator — note that you’ll need to throw the orb at them without them aggroing, else you won’t be able to use the orb. Don’t wait until you’ve collected all three orbs, but try to immediately use an orb on the closest subjugator. Do this three times to complete the quest.
It can be hard to avoid pulling multiple mobs while doing this quest, so be patient and pay attention to your surroundings. Many of the mobs patrol, so take a look at where everyone roams before you commit to a fight. This is also a quest that can be very difficult to do if there is competition (there are only four Dark Subjugators), so it’s a good idea to fly by and see if the area’s already crowded with other players before you commit to completing it (or even picking it up).
- Quest Giver – Thassarian, onboard the Skybreaker (the Alliance airship that patrols north/east of the central mountain)
- Prerequisites – Level 77, That’s Abominable!, initial non-daily version of non-daily version of Not a Bug.
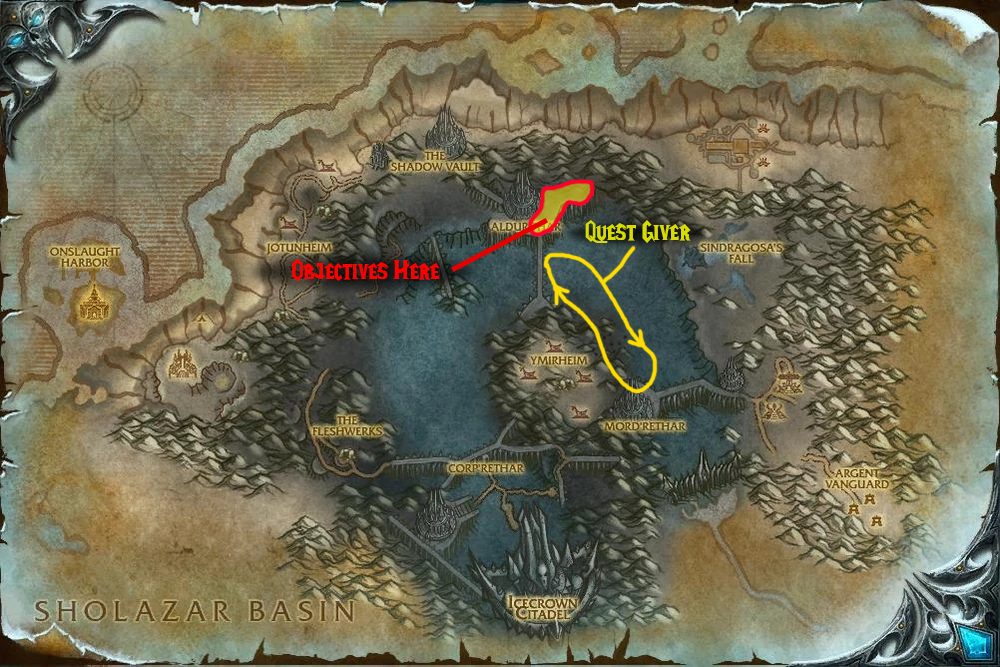
- Objective – Collect 5 Dark Matters using the Rod of Siphoning and then summon a Dark Messenger at Aldur’thar
- Rewards
- Initial Turn-in:
- 22,050 XP
- Choice of: Mantle, Gilly Gaunt, Chain Demon Glove, Legplats of North, Gutbuster
- 7 40 (20 63 at level 80)
- Daily:
- 22,050 XP
- 7 40 (20 63 at level 80)
- Initial Turn-in:
If available, do this at the same time as Retest Now, and No Rest For The Wicked, since you’ll be flying to the same area for all three quests.
You’ll do this quest once as a non-daily, and then it will unlock as a daily. To find the quest giver, land on the deck of the Skybreaker, then look towards the huge main cabin with the yellow windows. Go up the stairs on the right side of the cabin, and Thassarian will be on the landing. Once you’ve got the quest, it’s a short flight north to Aldul’thar.
There, you’ll need to first kill Enslaved Minions and then use the Rod of Siphoning on their corpses. They’re only found in a pair with their Void Summoner, naturally, so you’ll generally have to kill both before using the rod — classes with CC can instead kill the minion, CC the summoner, and then use the rod if they like. Each time you use the rod, you’ll collect a Dark Matter. Once you have five, head to the purple crystal on the lower level by the bridge and right-click it to summon the Dark Messenger and complete the quest.

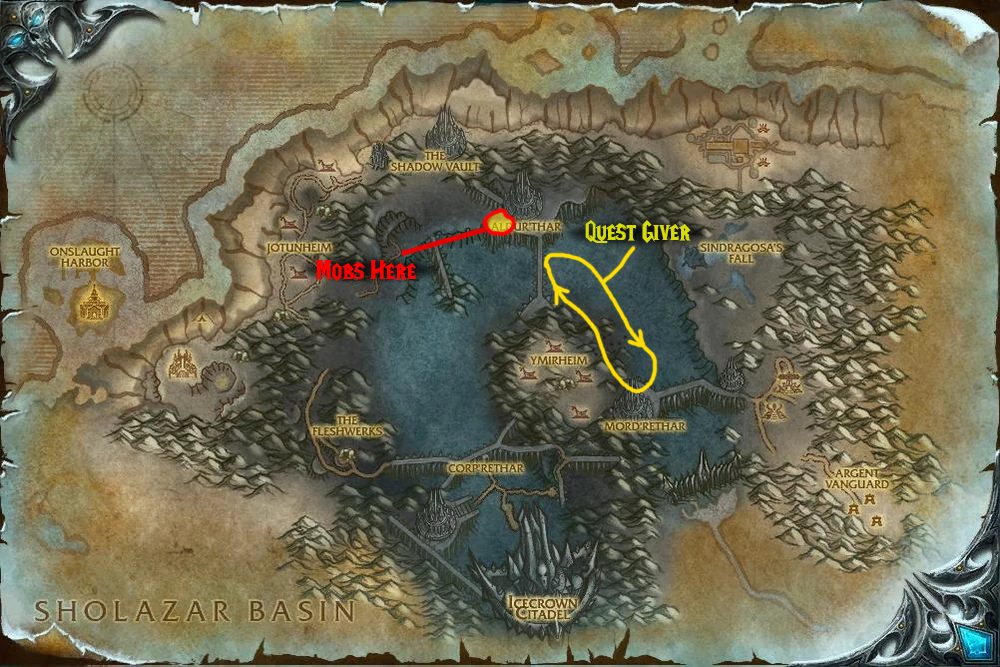
- Quest Giver – Chief Engineer Boltwrench, onboard the Skybreaker (the Alliance airship that patrols north/east of the central mountain)
- Prerequisites – Level 77, Cannot Reproduce, initial non-daily version of Retest Now.
- Objective – Drink the Diluted Cult Tonic and kill cultists to collect 10 Tainted Essences, then create a Writhing Mass and throw it into a cauldron at Aldur’thar
- Rewards
- Initial Turn-in:
- 22,050 XP
- Choice of: cultstir, deadrazor, twisthoolwack, bowregress, writhmace
- 7 40 (20 63 at level 80)
- Daily:
- 22,050 XP
- 7 40 (20 63 at level 80)
- Initial Turn-in:
Pick this up at the same time as Not a Bug, and do that quest first — the summoners you’ll be fighting have a 21% drop rate for the Tainted Essence. Also pick up No Rest For the Wicked if you can, as it’s in the same area.
You’ll do this quest once as a non-daily, and then it will unlock as a daily. The quest giver is found on the lowest deck of the Skybreaker, since that’s the engine room — he’s on the prow (front) end of the deck. Once you’ve got the quest, fly northwest to the westernmost platform of Aldur’Thar, where you’ll find the mobs with the highest droprate of the Tainted Essence you need. Once there, use the Diluted Cult Tonic — it will give you a 10 minute buff, during which time you’ll be able to farm the essence.
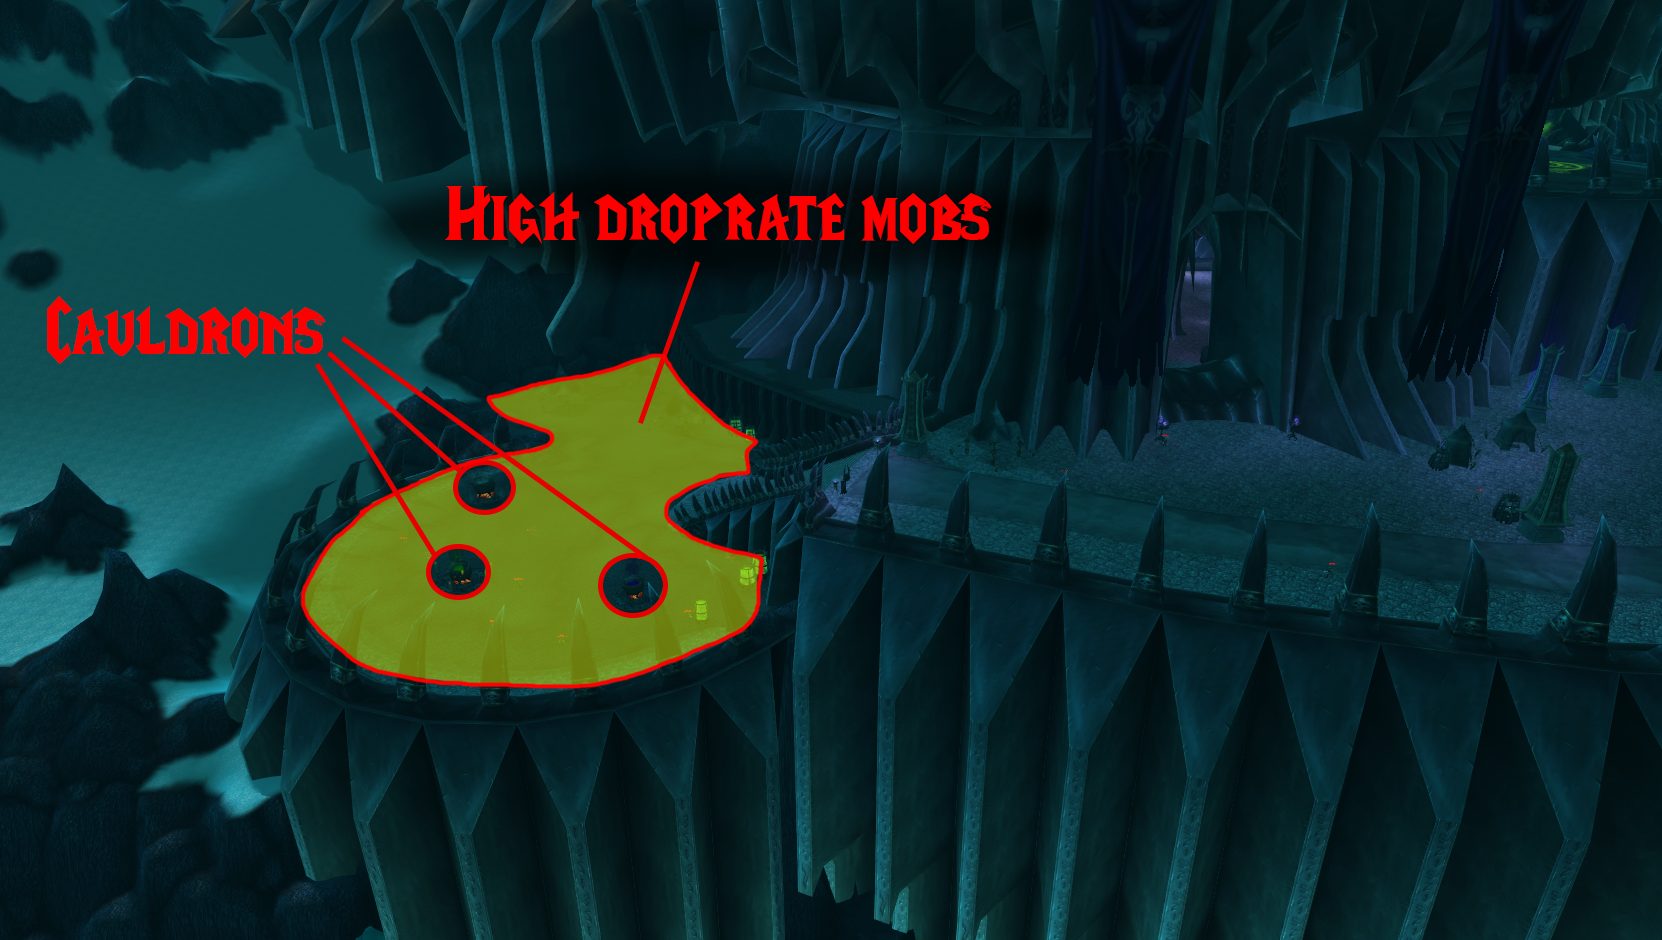
If there’s too much competition for the mobs, you can go east and kill the other cultists, but it’s not ideal. The Cult Alchemists have the best drop rate (51%), followed by the Apothecary (49%) — the next closest are the Cult Blackguard and Torturer (36%), so don’t waste time killing anything but alchemists and apothecaries unless you have to (all the other cultists can also drop the essence, but at a very low drop rate).
Once you’ve collected 10 Tainted Essence, right-click the stack in your inventory to create a Writhing Mass, and then you can throw it into one of the cauldrons (by right-clicking it in your inventory while near a cauldron). Before you do so, decide which two-hour buff you want:
- Grey: +60 Spell Power
- Dark Blue: +100 Attack Power
- Green: +75 Stamina
- Quest Giver – High Captain Justin Bartlett, onboard the Skybreaker (the Alliance airship that patrols north/east of the central mountain)
- Prerequisites – Level 77, Raise the Barricades, Get the Message (identical to the daily)
- Objective – Capture 6 Orgrim’s Hammer Dispatch
- Rewards
- 22,050 XP
- 250 Reputation with the Valiance Expedition
- 7 40 (20 63 at level 80)
To find the quest giver, land on the deck of the Skybreaker, then look towards the huge main cabin with the yellow windows — High Captain Bartlett is found inside straight ahead. Once you accept the quest, you’ll need to fly southwest over Ymirheim to the Icecrown Glacier. Once there, use the following macro to target and down the Orgrim’s Hammer Scouts:
#showtooltip Dart Gun
/tar Orgrim
/use Dart Gun
/cleartarget
There are a few large packs of them, and you should be able to use the Dart Gun on your mount, so just keep well out of aggro range while downing the scouts. That being said, you can use the Dart Gun in combat, so if you do pull one, go ahead and dart it anyway.
One thing to consider is that you’ll need to loot the corpse of the scout you hit with the Dart Gun, so whenever possible, find spots where the ground below isn’t full of mobs, and down the scouts over them. Also make sure you’re paying attention to where your dart goes, since you’ll need to visually track the scout as it falls from the sky.

- Quest Giver – Thassarian, onboard the Skybreaker (the Alliance airship that patrols north/east of the central mountain)
- Prerequisites – Level 77, Basic Chemistry (identical to the daily)
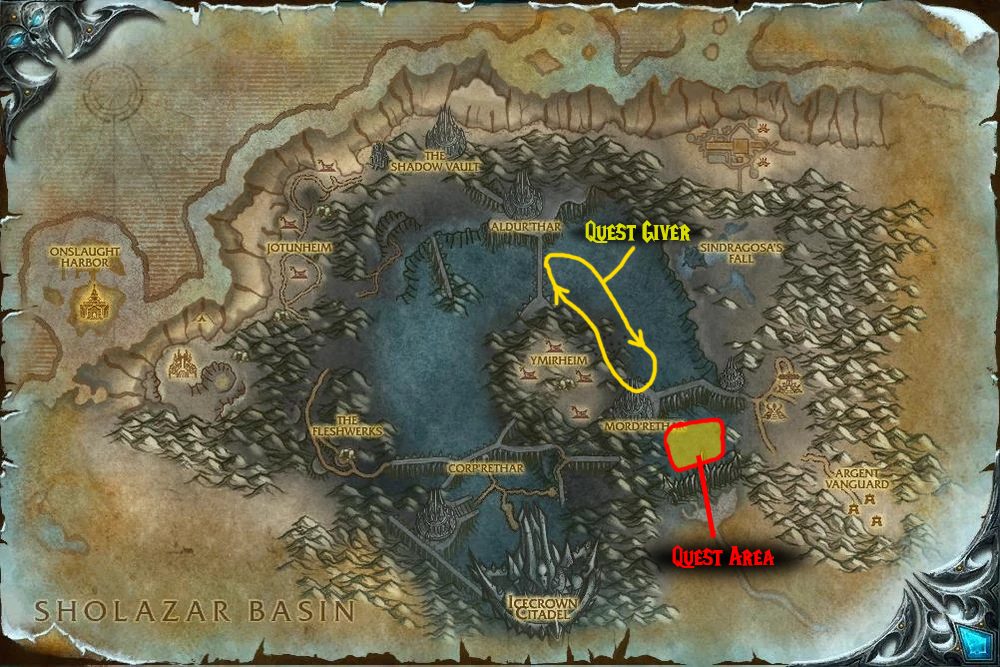
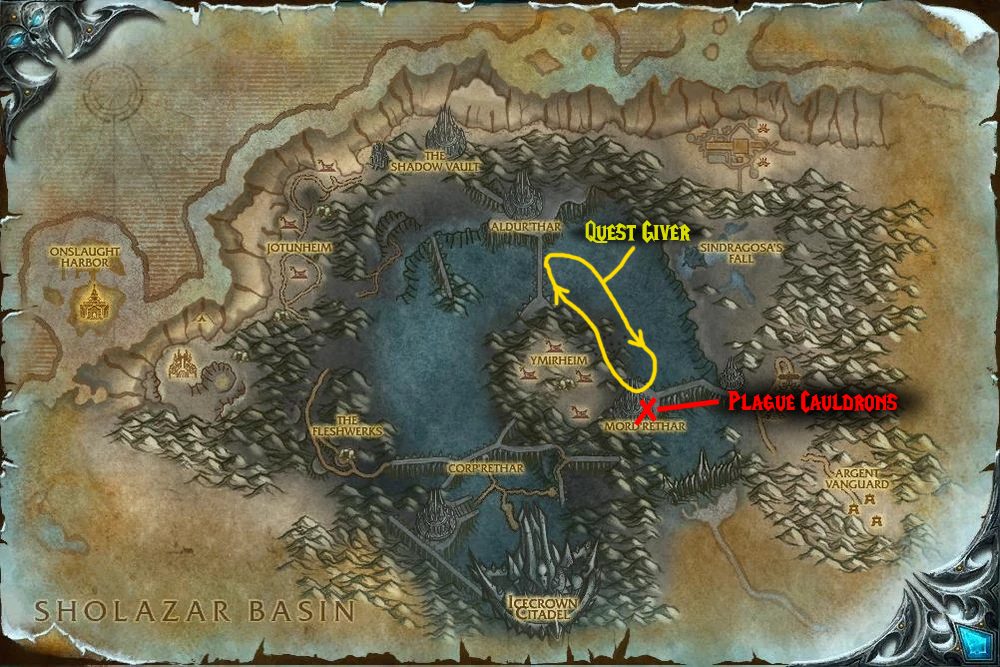
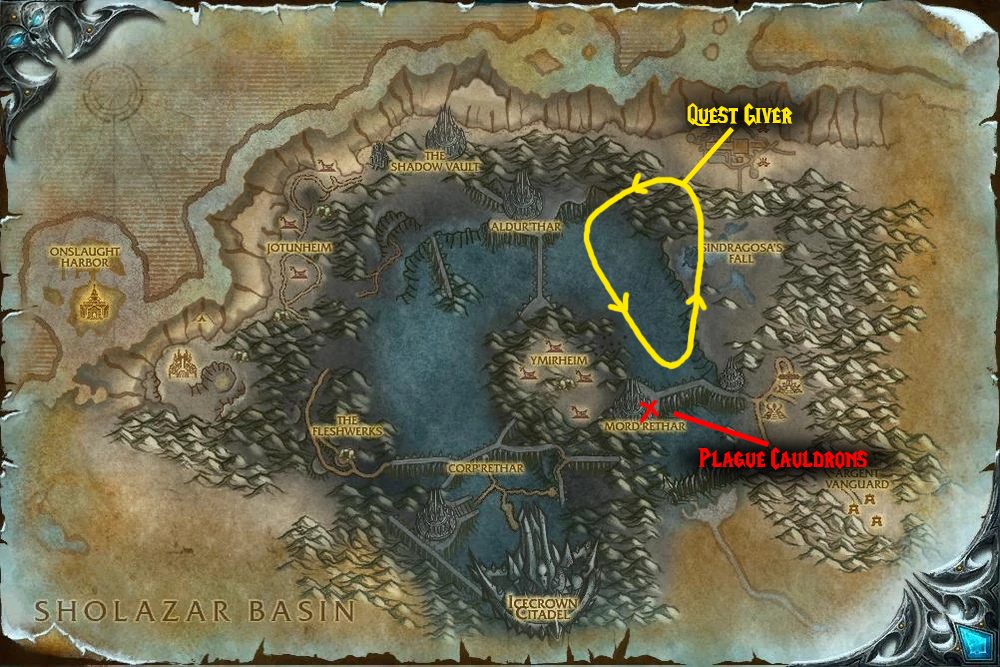
- Objective – Use the Pustulant Spinal Fluid to neutralize a batch of plague in a cauldron at Mord’rethar.
- Rewards
- 33,100 XP
- 22 20 (42 6 at level 80)
To find the quest giver, land on the deck of the Skybreaker, then look towards the huge main cabin with the yellow windows. Go up the stairs on the right side of the cabin, and Thassarian will be on the landing. Once you pick up the quest, fly south or southeast (depending on the airship’s location) to the side of the bridge closer to Mord’rethar.
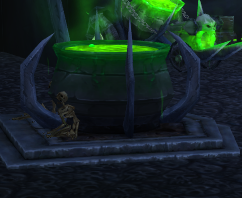
Head into the structure via the doorway at (63.5, 62.0), and go left to the nearest plague cauldron once inside. Now you’ll need to use the Pustulant Spinal Fluid repeatedly (usually 6 or 7 times) until you get the message that the plague batch has been neutralized. This is made significantly more challenging by the fact that mobs will spawn out of the cauldron every so often — stay near the cauldron and kill the mobs as they emerge, and keep using the quest item off cooldown.
While it’s possible to solo this quest, it’s much easier to do it with a partner, as the mobs that emerge from the cauldron are not pushovers. . In addition to the extra HP and firepower a partner brings, you’ll be able to neutralize the plague cauldron faster with two quest items. Don’t forget that you can team up with anyone doing either the daily or the initial, Basic Chemistry version.
- Quest Giver – Thassarian, onboard the Skybreaker (the Alliance airship that patrols north/east of the central mountain
- Prerequisites – Level 77, Need More Info, initial non-daily version of No Rest For The Wicked
- Objective – Kill Alumeth the Ascended at Aldur’thar
- Rewards
If available, also pick up Not a Bug and Restest Now, as all three quests have objectives in the same general area.
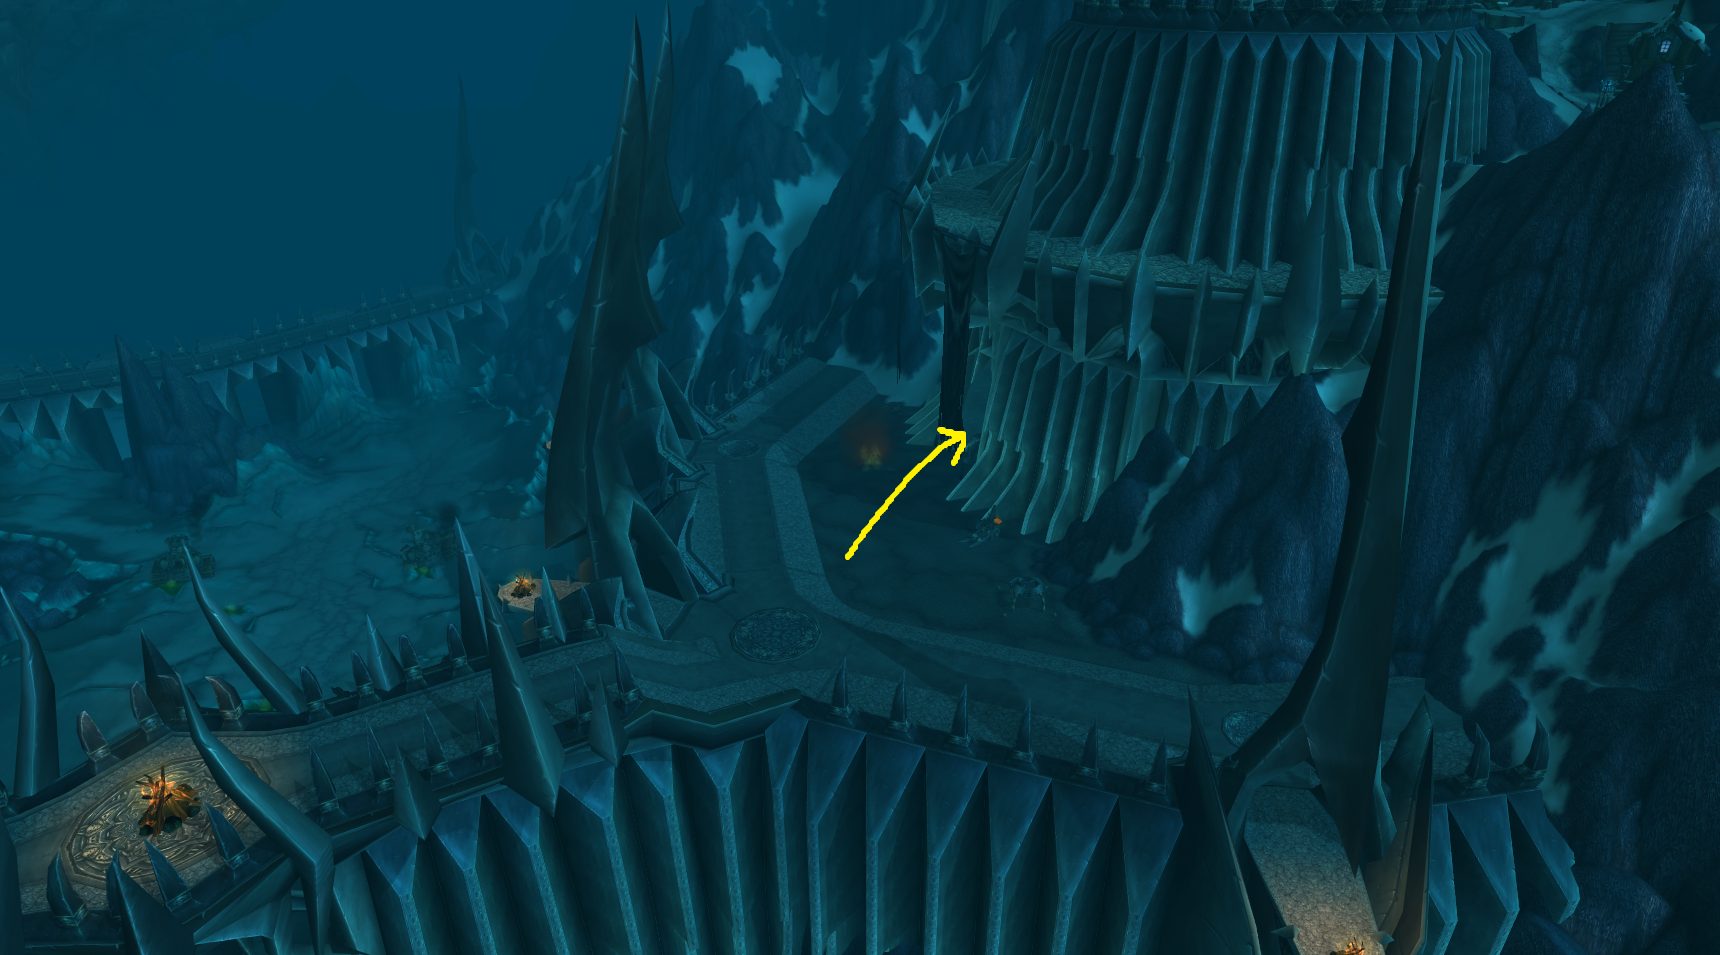
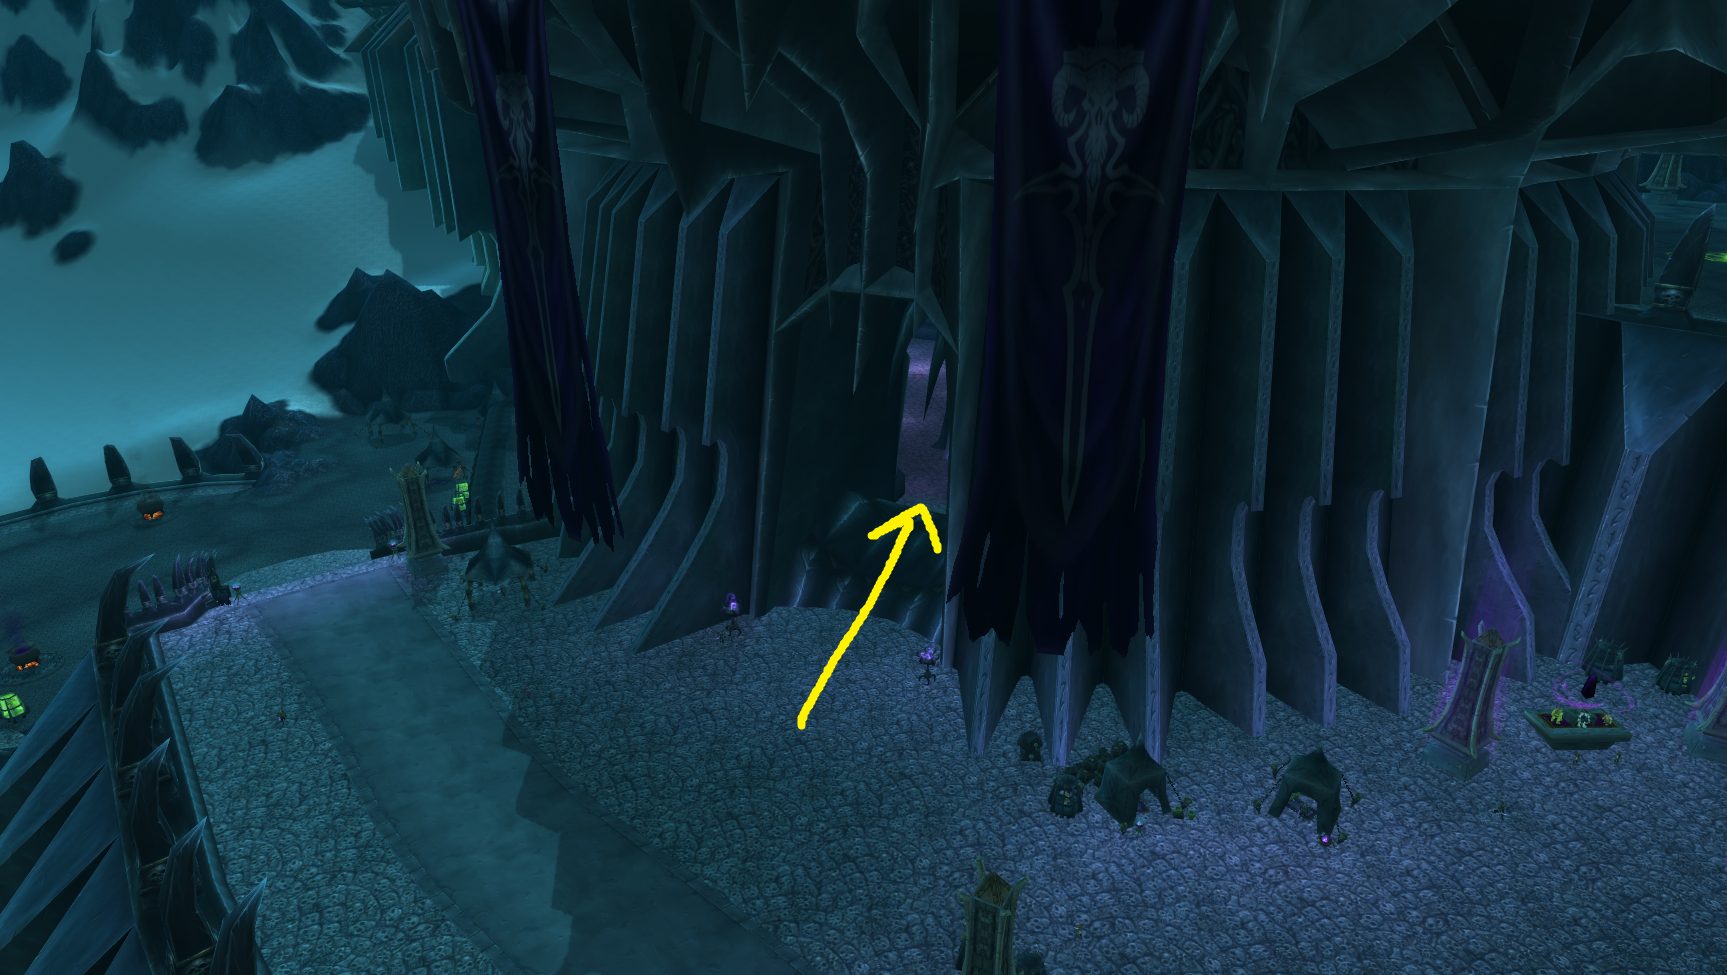
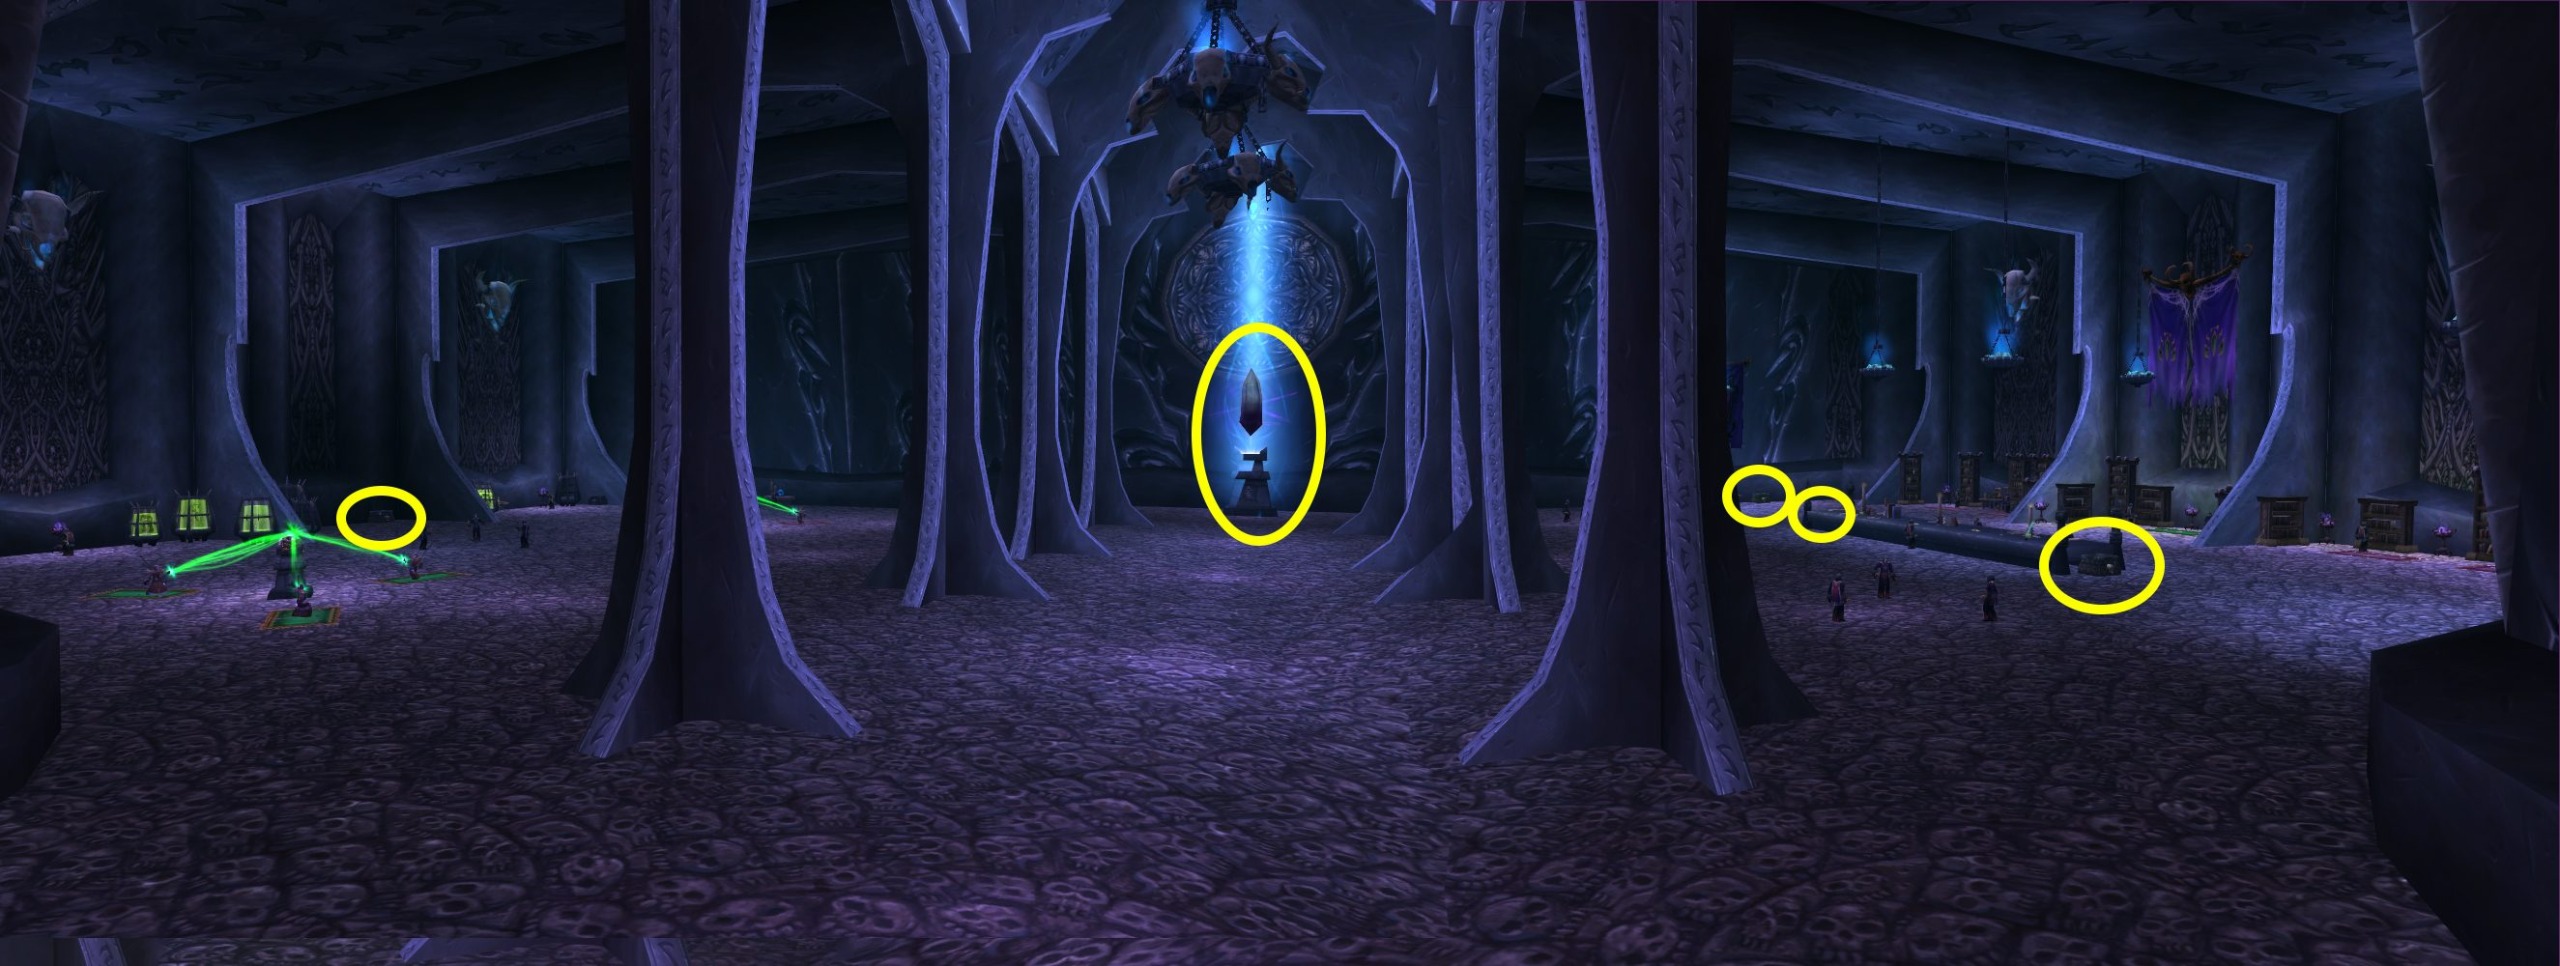
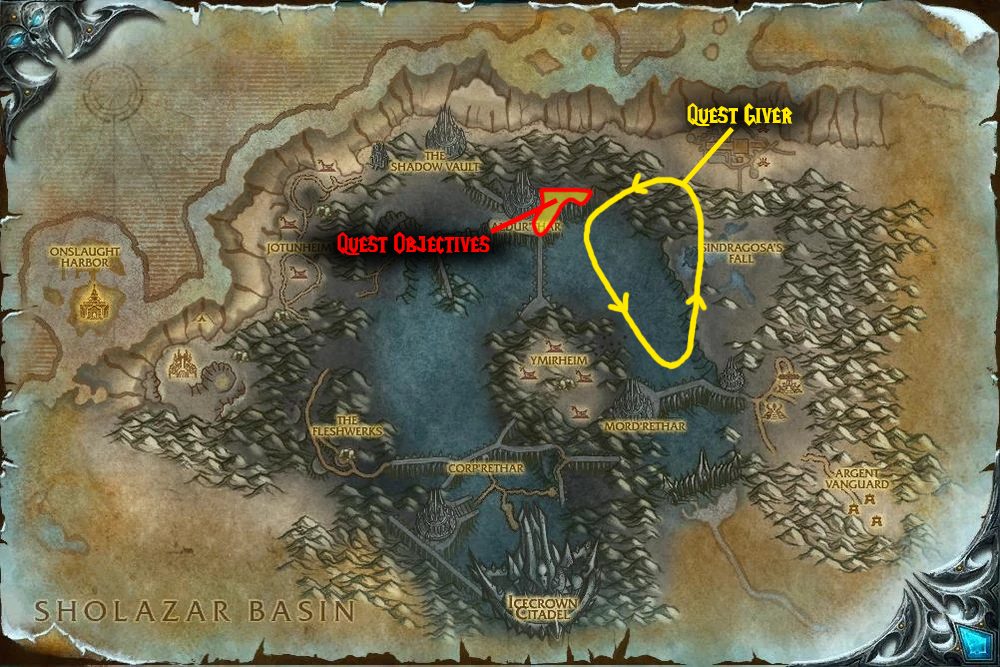
To find the quest giver, land on the deck of the Skybreaker, then look towards the huge main cabin with the yellow windows. Go up the stairs on the right side of the cabin, and Thassarian will be on the landing. After accepting the quest, fly northwest to Aldur’thar, and enter the structure via the large doorway at (52, 33).
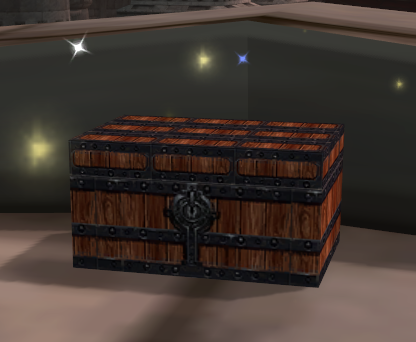
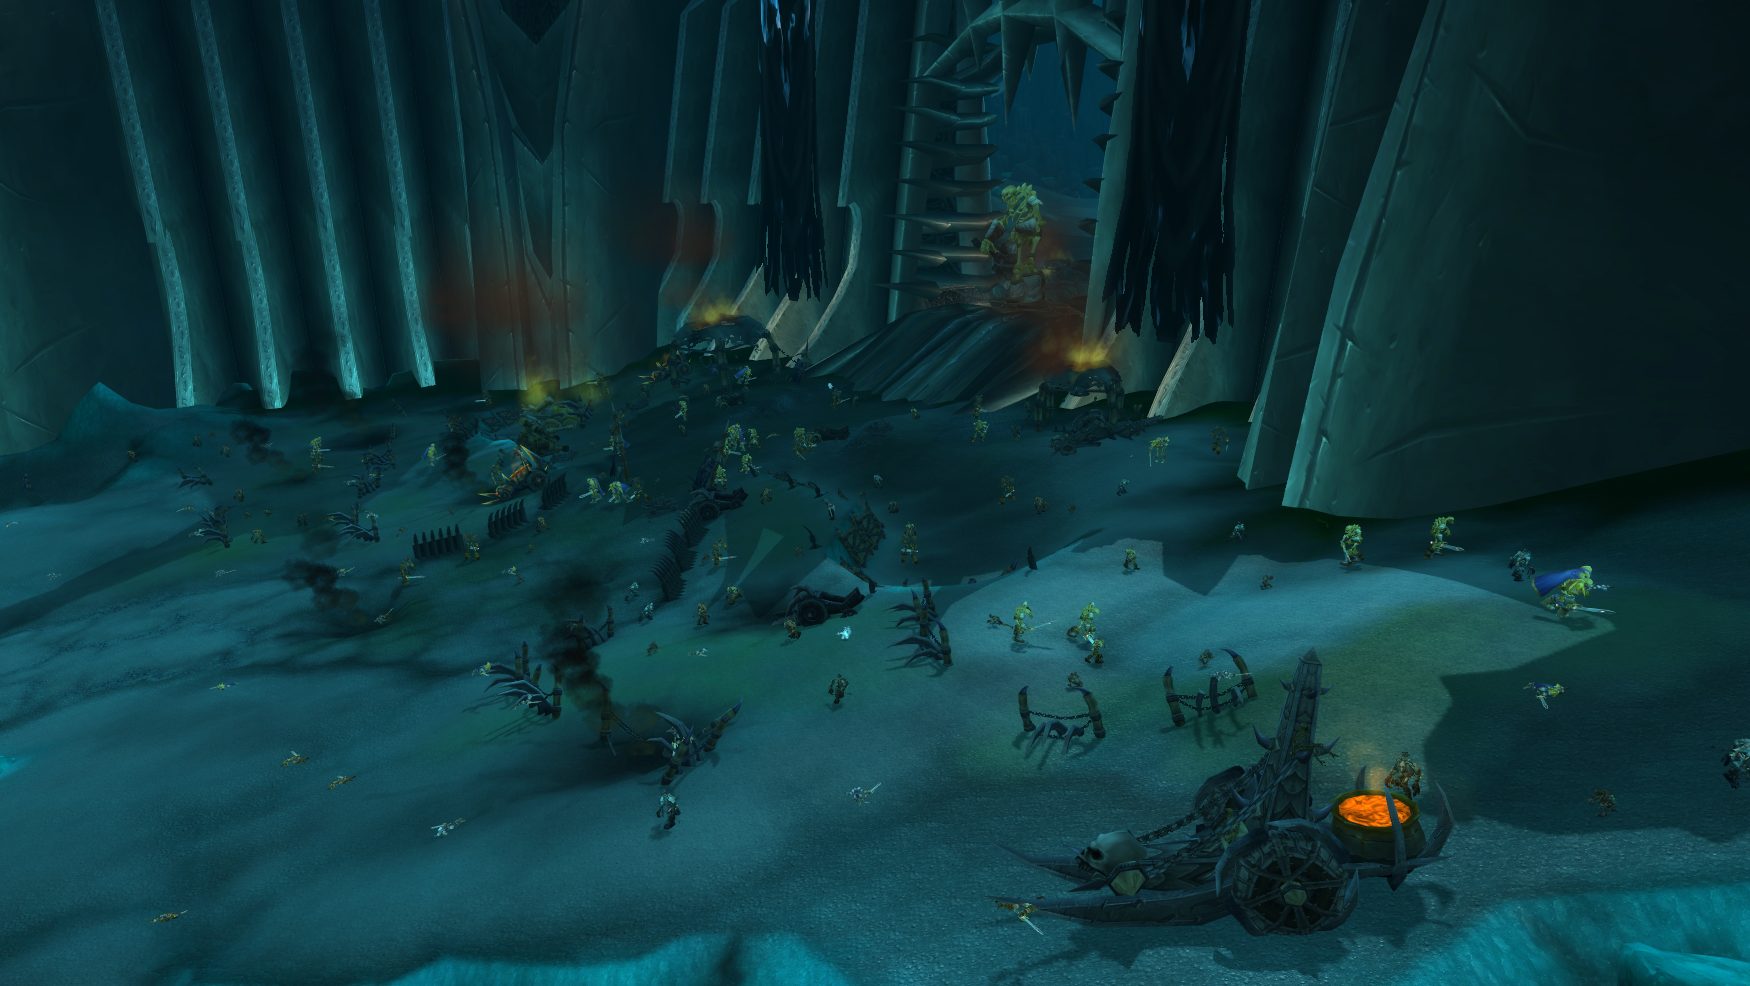
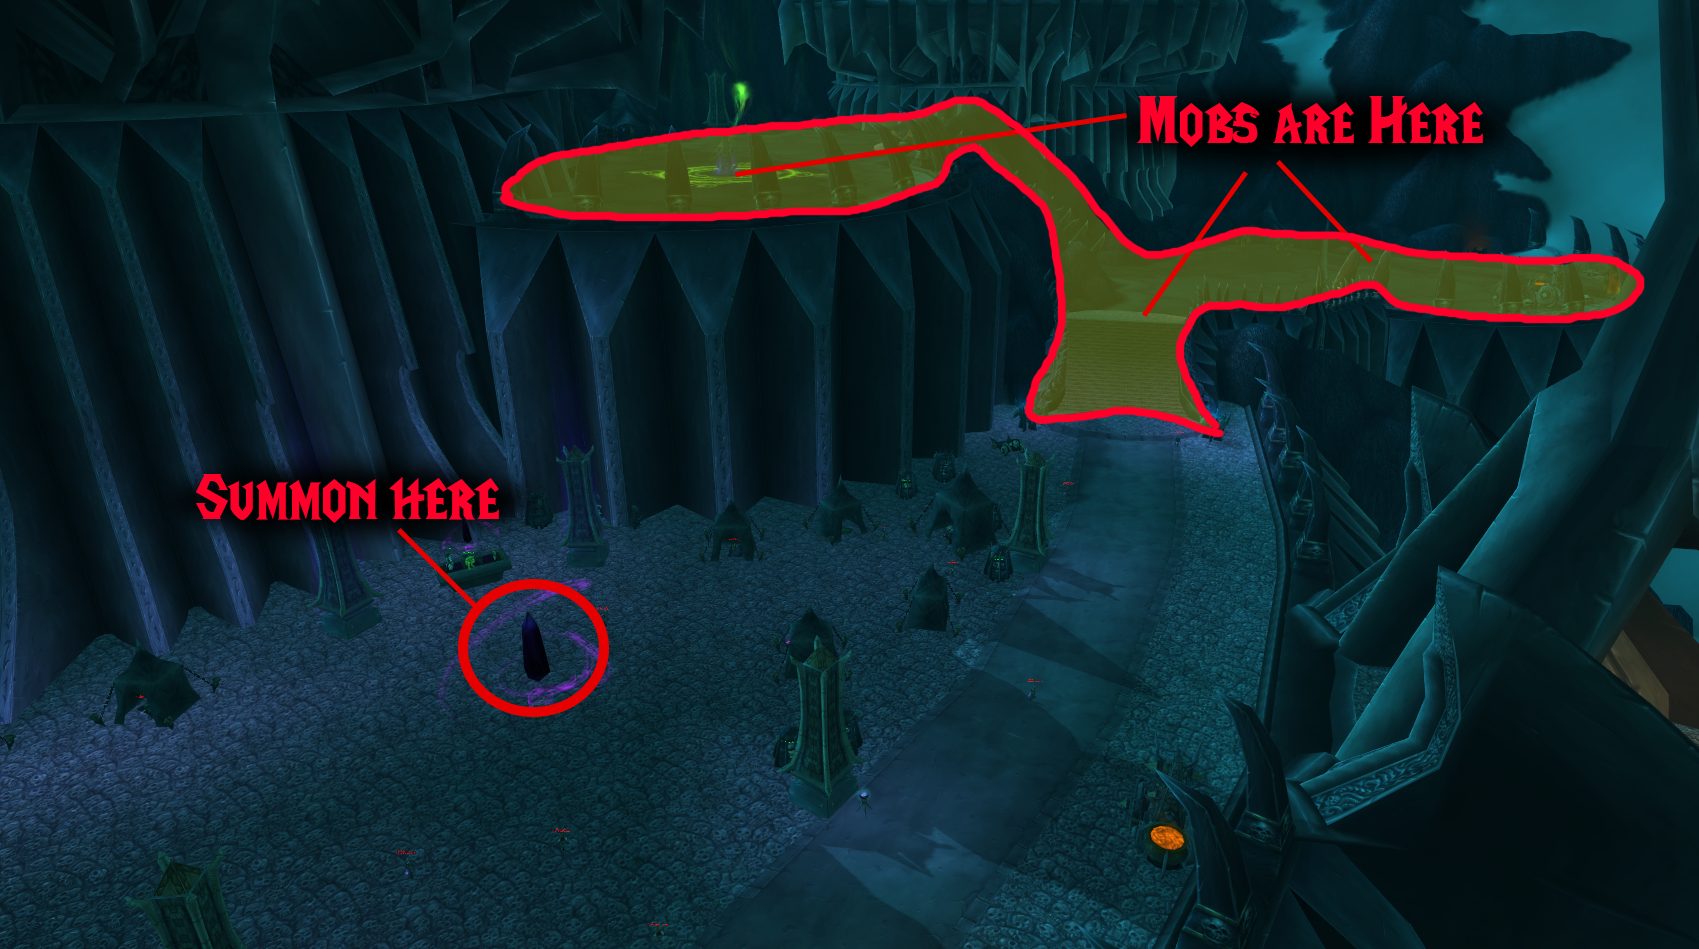
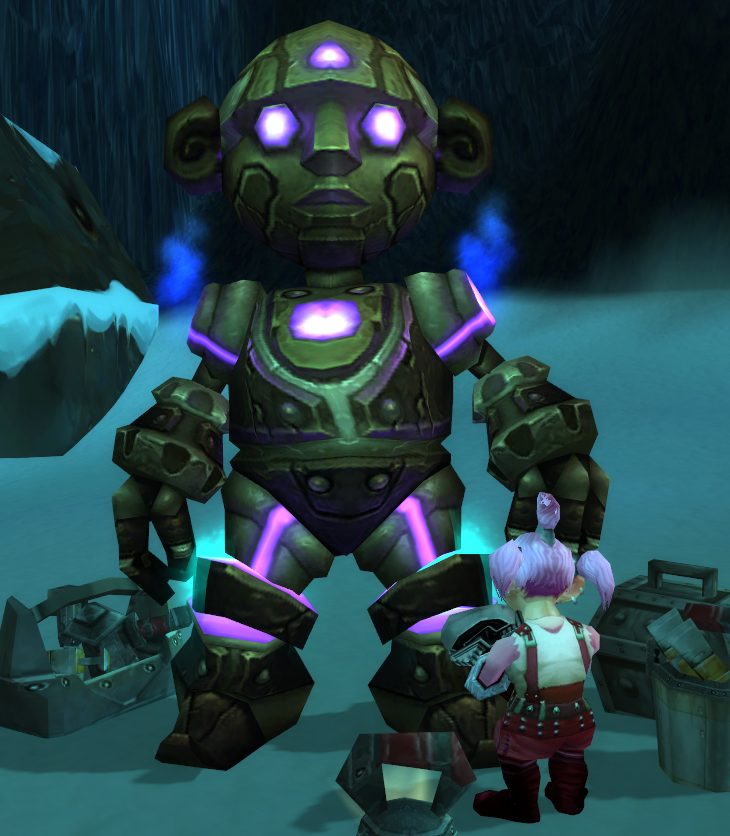
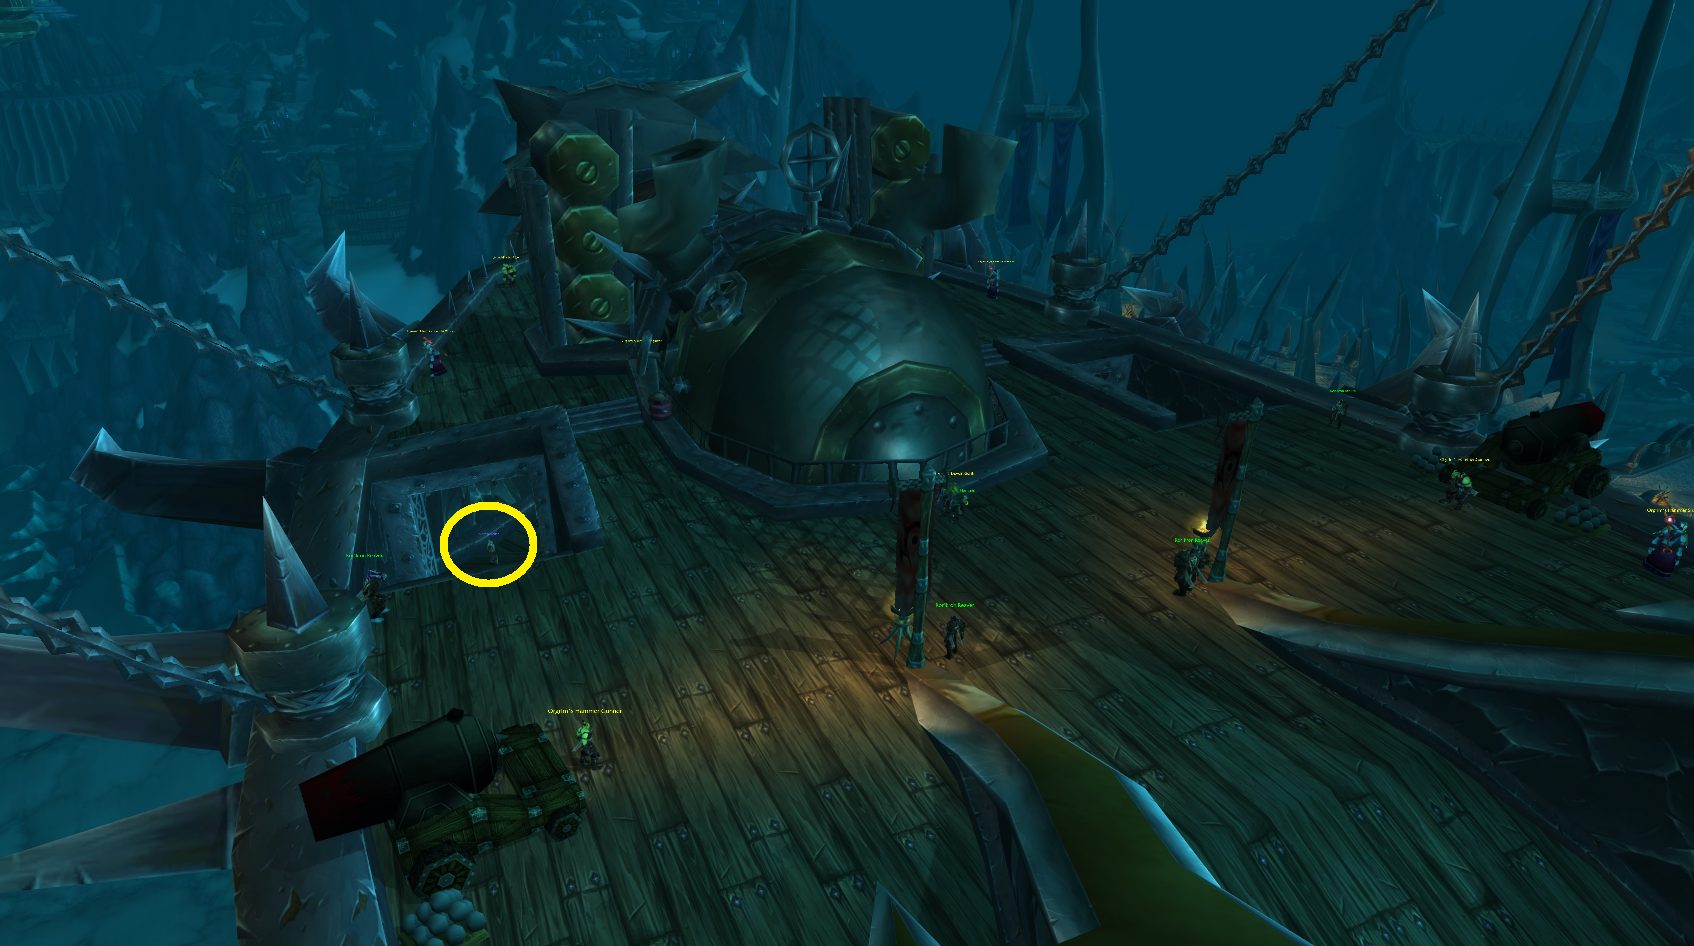
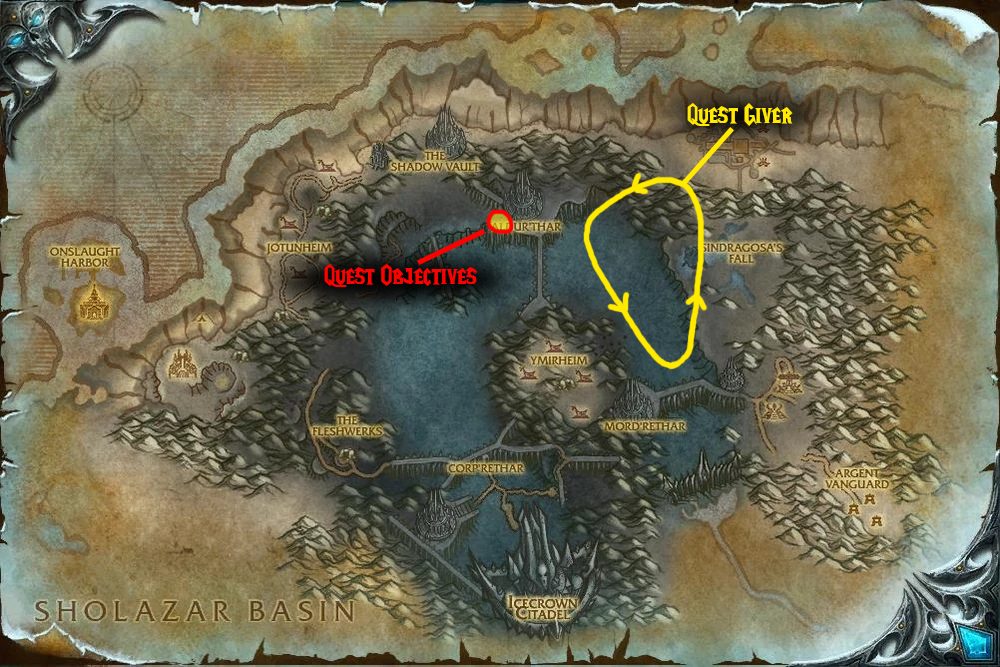
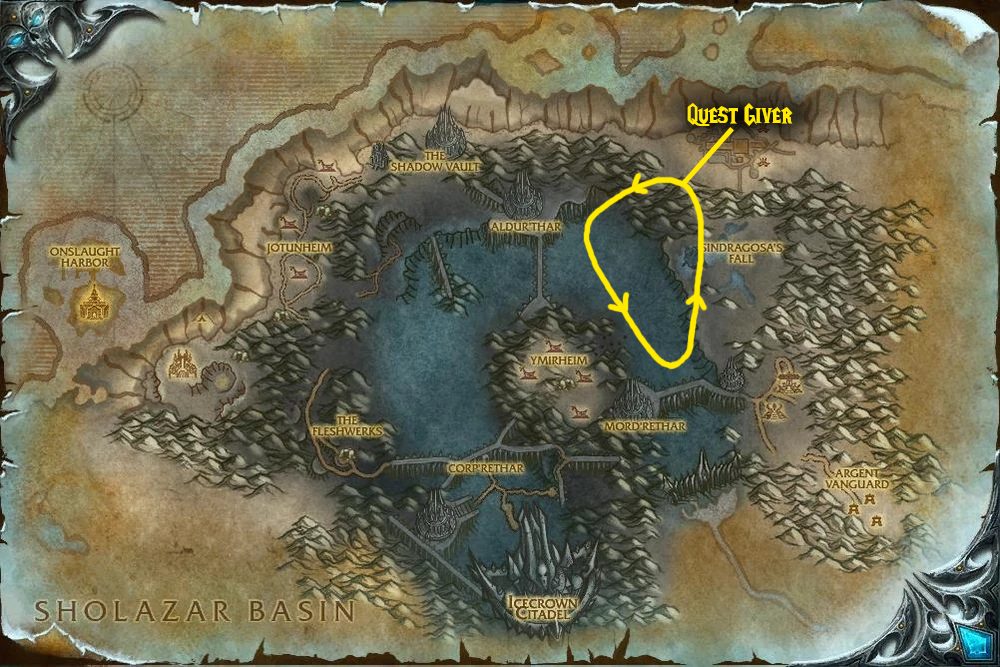
Before you can summon Alumeth, you’ll need to collect Heart, Skull, Robes, and Scepter. These are found in chests around the room — three on the right, one on the left (see image below). Once you have all four quest items, you can right-click one in your inventory to create Alumeth’s Remains. Once that’s done, head over to the big crystal on the northern side of the room and use the remains to summon him so you can kill him.
Alumeth is soloable if you are well-geared (although he’s got 104K HP so it may take a while), or if you’re a class good at soloing tough foes (Warlock/Hunter/DK). Otherwise, you’ll want to get some help before starting this one.
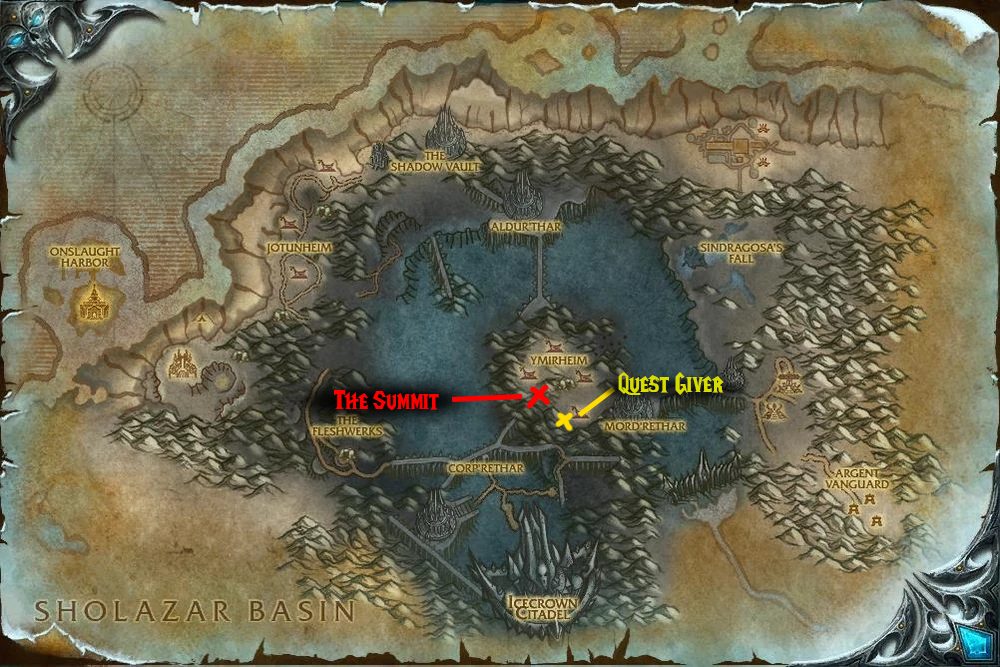
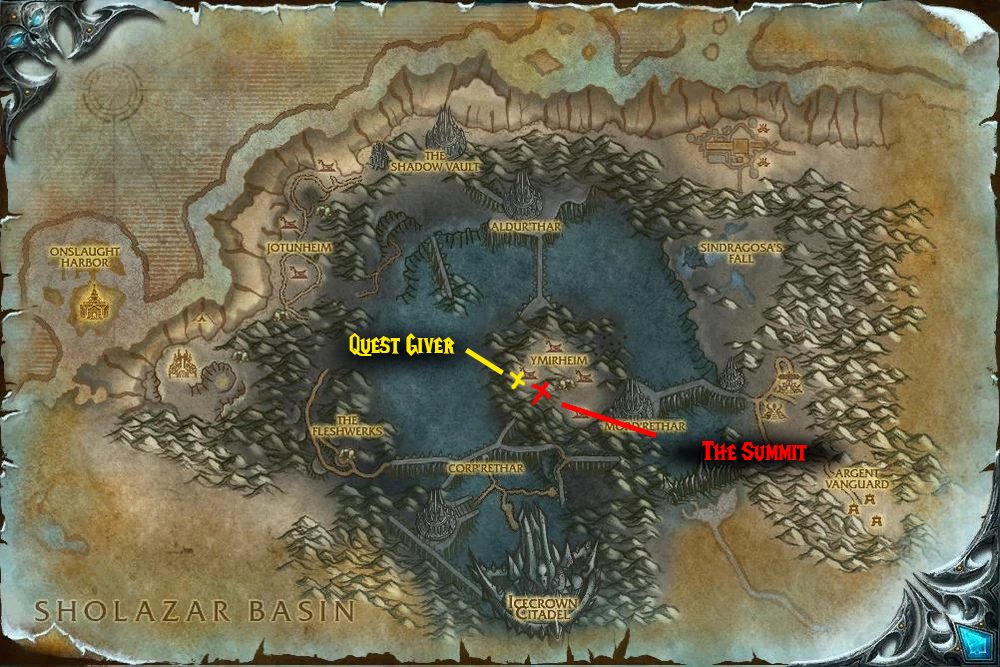
- Quest Giver – Frazzle Geargrinder (57.0, 62.6), found around the side of a building in the southeasternmost section of Ymirheim
- Prerequisites – Level 77, Get to Ymirheim!
- Objective – Use the Jumpbot to plant the Alliance Battle Standard in the skulls at the top of the mountain
- Rewards
- 22,050 XP
- 250 Reputation with Valiance Expedition
- 7 40 (20 63 at level 80)
This quest flags you for PvP when you accept it.
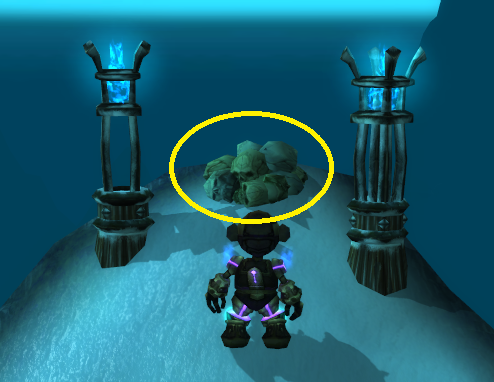
The quest giver is found in Ymirheim, in the southeastern section of the town. Once you accept the quest, you’ll be able to right-click Frazzle’s jumpbot to enter it. You can then use the ‘3’ key to jump, and since you don’t have to land to jump again, you can keep pressing 3 to stay airborne and essentially fly up the side of the mountain to the summit (which is northwest of Frazzle at (54.9, 60.1)). Once there, press ‘1’ near the pile of skulls to plant the standard and complete the quest — you can then return to Frazzle for your reward!
Optionally, you can target any player from the other faction you see also climbing the mountain and press ‘2’ to fire rockets at them; they don’t do a lot of damage, but can knock the other player back down the mountain.
- Quest Giver – High Captain Justin Bartlett, onboard the Skybreaker (the Alliance airship that patrols north/east of the central mountain)
- Prerequisites – Level 77, The Broken Front
- Objective – Kill 15 Horde players
- Rewards
- 22,050 XP
- 7 40 (20 63 at level 80)
This quest flags you for PvP when you accept it.
To find the quest giver, land on the deck of the Skybreaker, then look towards the huge main cabin with the yellow windows — High Captain Bartlett is found inside straight ahead.
This quest can be very difficult to complete, as you have to actively seek out PvP to complete it, and only PvP kills in Icecrown count (Battlegrounds will not work). Your best bet is to accept it and try to complete it over the course of doing other quests/activities, but if you’re on a PvE server, it’s possible you’ll never find enough PvP-flagged players.
This quest was removed in patch 4.1.0, likely because it was buggy — we have yet to confirm if it will be present in Wrath Classic.
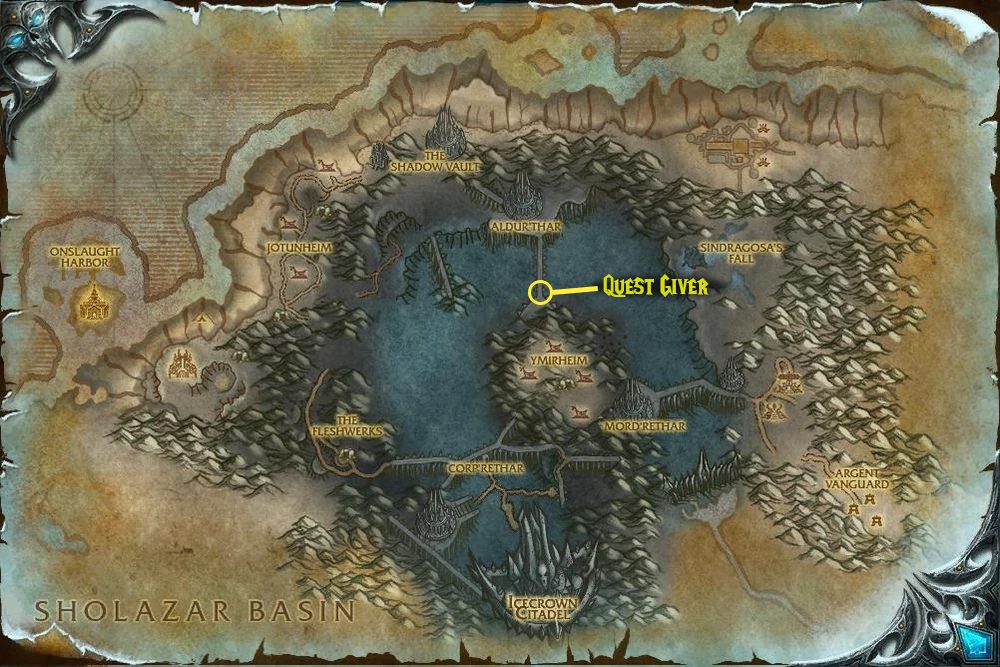
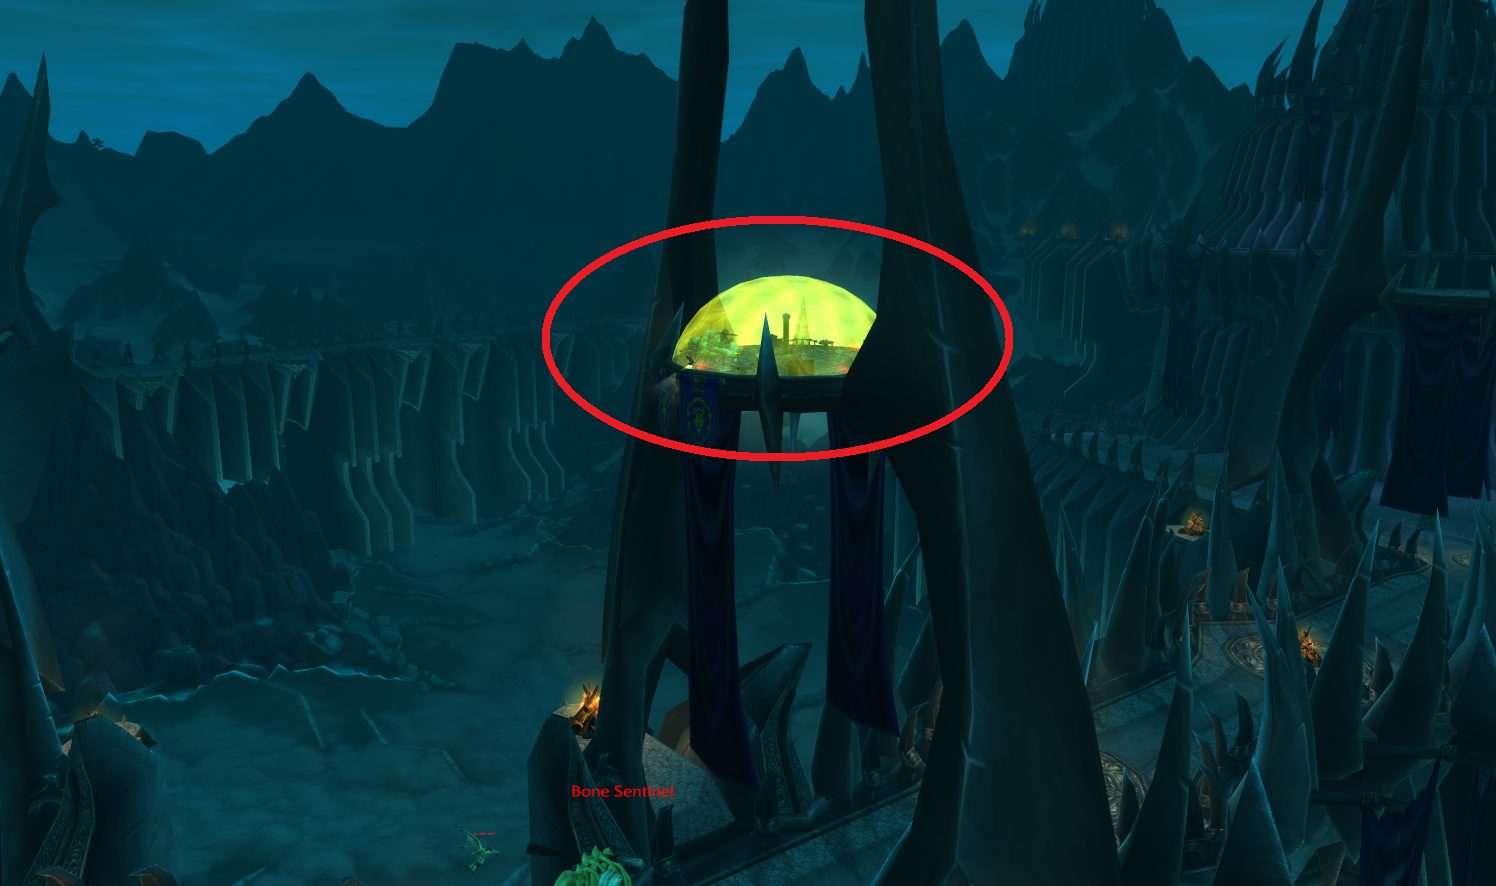
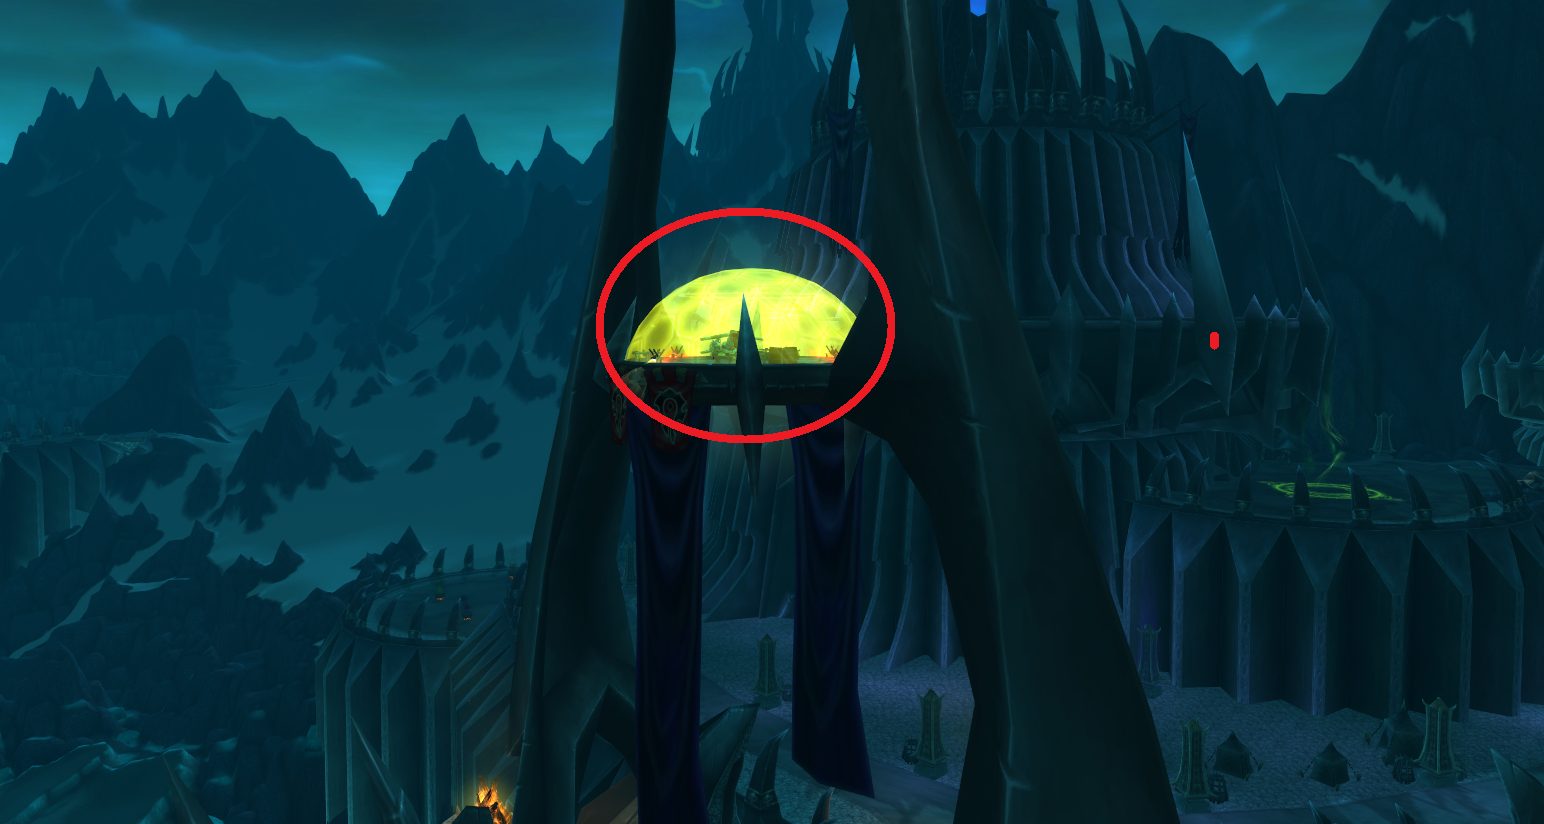
- Quest Giver – Kibli Killohertz (54, 43), found in the dome above the southern end of the bridge to Aldur’thar
- Prerequisites – Level 77, Leading the Charge
- Objective – Kill 50 Bombardment Infantry, 10 Bombardment Captains, and 20 Gargoyle Ambushers
- Rewards
- 22,050 XP
- 7 40 (20 63 at level 80)
This quest giver is located in the yellow dome that sits above the southern end of the bridge between Ymirheim and Aldur’thar. After speaking with him and accepting the quest, you’ll need to speak with Karen No (who is nearby, under the same dome) and tell her to give you a bomber — the quest will then begin.
Despite not having to steer, this is one of the more involved bombing missions. You’ll need to swap between three positions: ‘4’ is air-to-air, ‘5’ is bombing, and ‘6’ is engineering. Start by switching to engineering and getting your shield to 100 stacks, then swap to bombing and start taking out targets on the ground. Every few bombs, swap to the air-to-air position and make sure there aren’t any gargoyles attacking you — take ’em out if there arunlike the. If you get the message that your vehicle is burning (or notice the Burning debuff in the upper right of your UI), you’ll need to swap to the engineering position and use the ‘2’ key to Fight the Fire and put it out.
If you wait a long time to swap to air-to-air and end up having to use all your missiles, the ‘2’ key will refresh the cooldown on them. Otherwise, it’s just a matter of rotating between the three positions as necessary. Don’t stress if you get shot down — you’ll keep the progress on the quest and be able to go back for another bomber.
Walkthroughs – Horde Daily Quests
The Horde-exclusive quests are almost all started on the airship Orgrim’s Hammer — where each quest is obtained is noted in parenthesis after the quest’s name.
Quests are listed in approximate order of when they can be unlocked. Click the bar to expand a quest and see detailed info and instructions
- Quest Giver – Warbringer Davos Rioht, found on Orgim’s Hammer (the Horde airship that patrols north/east of the central mountain)
- Prerequisites – Level 77, Orgim’s Hammer
- Objective – Kill 20 Ymirheim Vrykul
- Rewards
- 22,050 XP
- 250 Reputation with Warsong Offensive
- 7 40 (20 63 at level 80)
Do this quest at the same time as Assault by Ground, if able.
Knight-Captain Drosche is easy to find, as he’s on the main deck of the airship, directly beneath the platform that connects the two balloons. The daily he gives you is a simple “kill the bad guys” quest; any enemy on the mountain in the middle of the map will do. If you aren’t doing Assault by Ground at the same time, avoid attacking the Ymirheim Defenders, as they’ll spawn multiple mobs to help them.
- Quest Giver – Kor’kon Squad Leader (58, 46), in a ravine between the central mountain and the eastern glacier
- Prerequisites – Level 77, Joining the Assault
- Objective – Escort at least 4 Horde Troops to the gates of Ymirheim
- Rewards
- 22,050 XP
- 250 Reputation with Warsong Offensive
- 7 40 (20 63 at level 80)
Pick up Blood of the Chosen on Orgrim’s Hammer before starting this quest, as you can do both objectives at the same time (unless you’re a healing class, in which case it can be hard to get kill credit — the NPCs you’re “escorting” do surprisingly good damage).
An escort quest with refreshingly useful NPCs, who also don’t take forever to go from point A to point B. Once you accept the quest, the squad leader and its troops will start running up the path that leads to Ymirheim’s main gate. Try to stay out in front of them if you’re tank/DPS, since you can only lose a couple of friendly troops and still complete the mission.
Watch out when you engage the Ymirheim Defenders — once they’re aggroed, 4 of their friends will spawn, so don’t think you’re going to get to team up on a lone defender! If you’re far ahead of the quest NPCs, you may want to wait for them (and/or cooldowns) before engaging.
- Quest Giver – Ground Commander Xutjja (58.3, 46.0), in a ravine between the central mountain and the eastern glacier
- Prerequisites – Level 77, Joining the Assault
- Objective – Provide covering fire until 4 Kor’kron Infiltrators have landed safely
- Rewards
- 22,050 XP
- 250 Reputation with Warsong Offensive
- 7 40 (20 63 at level 80)
Ground Commander Xutjja is somewhat hard to find, as he’s nestled between the glacier and the mountain.
This on-the-rails shooter quest requires that you defend the Kor’kon Troop Transport from enemy surface fire (in this case, harpoon turrets) while they drop troops. Once four troops have dropped safely, you’ll have completed the mission. What trips up most people on this quest is figuring out how to start it! After accepting the quest, go east through the ravine and walk up to the Kor’kon Troop Transport — you need to right-click the turret to hop into it, and then the quest will start.
The other mistake many players make is in thinking that their goal is to destroy the enemy harpoons, but what you’re actually firing from your turret is smoke grenades. All you need to do is land a single grenade near each harpoon, and they should no longer be able to fire. You may want to shoot a couple at each turret just to be sure, however.
Once you’ve completed the quest objectives, you don’t have to enjoy the leisurely ride back if you don’t want to — feel free to jump out of the turret and return to the quest giver under your own mount’s power.
- Quest Giver – Brother Keltan, found on Orgim’s Hammer (the Horde airship that patrols north/east of the central mountain)
- Prerequisites – Level 77, Orgrim’s Hammer
- Objective – Rescue 10 Saronite Mine Slaves
- Rewards
- 22,050 XP
- 250 Reputation with Argent Crusade
- 7 40 (20 63 at level 80)
To find the quest giver, land on the deck of the Orgrim’s Hammer, then face the bomb-dispenser and go down the left-hand ramp — Brother Keltan is standing in the middle of the ramp (kind of in the way, honestly).
After you accept the quest, you’ll need to fly to the mine in the center of Ymirheim, which is visible on the zone map (and we’ve circled it for you in the gallery below).
Once in the mine, you just need to talk to the Saronite Mine Slavess there — there’s only one dialog option, and when you pick it, they’ll either become freed (the quest objective), attack you, or freak out and run away. If they run away, you can try to follow them and speak with them again. You can prepare this script to make it easier to select the dialog option while running: /script SelectGossipOption(1); — once you’ve rescued 10, you’ll be able to go and turn in the quest.
Some players claim that killing the Val’Kyr Taskmistresses near the slaves before speaking with them will guarantee that the slaves become free (instead of freaking out), but we have been unable to reproduce this.

- Quest Giver – Koltira Deathweaver, found on Orgim’s Hammer (the Horde airship that patrols north/east of the central mountain)
- Prerequisites – Level 77, Poke and Prod, initial non-daily version of That’s Abominable!
- Objective – Use the Abomination Reanimation Kit to create Reanimated Abominations, then use it to kill 15 Icy Ghouls, 15 Vicious Geists, and 15 Risen Alliance Soldiers
- Rewards
- Initial Turn-in:
- 22,050 XP
- Slippers, Giest Leg, Scourgepaul, mantlerean
- 7 40 (20 63 at level 80)
- Daily:
- 22,050 XP
- 7 40 (20 63 at level 80)
- Initial Turn-in:
You’ll do this quest once as a non-daily, and then it will unlock as a daily. To find the quest giver, land on the deck Orgrim’s Hammer, then walk down the large ramp with the Horde banner hung over it — Koltira is on the left at the bottom of the ramp. Once you’ve accepted the quest, you can fly southeast to the Broken Front. Once you arrive in the quest area, you’ll first need to kill Hulking Abominations until one drops Chilled Guts. You can only hold one at a time in your inventory, so once you’ve got it, head over to where the quest mobs are, and then use the Abomination Reanimation Kit.
Now your strategy will depend on your class and spec a bit, but the end goal is to have as many quest mobs surrounding the Abomination before using its Burst at the Seams ability — this will cause it to explode, and you’ll get quest credit for any mobs caught in the blast. You can just send the Abomination in alone, you can put it on passive and pull a group yourself — it’s whatever works best for you. You’ll want to use the Abomination’s Flatulate while you’re pulling mobs, as it will stun them and make it easier to pull a larger group without you or the Abomination dying.
There are a few possible issues with this quest. First off, if you aren’t getting a pet bar after summoning the Abomination, type the following into the chat (without quotes): “/console reloadui”. Some other things to note are that if you have a pet summoned, dismiss it before using the Abomination Reanimation Kit or you’ll lose the Chilled Guts and still have no Abomination. Additionally, don’t get too close to the Death Gate — if your zone changes from The Broken Front, your Abomination will disappear.
- Quest Giver – Koltira Deathweaver, found on Orgim’s Hammer (the Horde airship that patrols north/east of the central mountain)
- Prerequisites – Level 77, Sneak Preview, initial non-daily version of Drag and Drop
- Objective – “Drag and drop” 3 Dark Subjugators by throwing an Orb of Illusion at them
- Rewards
- 22,050 XP
- 7 40 (20 63 at level 80)
You’ll do this quest once as a non-daily, and then it will unlock as a daily. To find the quest giver, land on the deck Orgrim’s Hammer, then walk down the large ramp with the Horde banner hung over it — Koltira is on the left at the bottom of the ramp. Once you accept the quest, you’ll need to head to the camp at 53, 45, on the northern slop of the central mountain.
Once there, you’ll first have to kill Bittier Initiatess to collect an Orbs of Illusion; they have about a 50% drop rate. You can then use it (right-click the orb in your inventory) while targeting a Dark Subjugator — note that you’ll need to throw the orb at them without them aggroing, else you won’t be able to use the orb. Don’t wait until you’ve collected all three orbs, but try to immediately use an orb on the closest subjugator. Do this three times to complete the quest.
It can be hard to avoid pulling multiple mobs while doing this quest, so be patient and pay attention to your surroundings. Many of the mobs patrol, so take a look at where everyone roams before you commit to a fight. This is also a quest that can be very difficult to do if there is competition (there are only four Dark Subjugators), so it’s a good idea to fly by and see if the area’s already crowded with other players before you commit to completing it (or even picking it up).

- Quest Giver – Koltira Deathweaver, found on Orgim’s Hammer (the Horde airship that patrols north/east of the central mountain)
- Prerequisites – Level 77, That’s Abominable!, initial non-daily version of Not a Bug.
- Objective – Collect 5 Dark Matters using the Rod of Siphoning and then summon a Dark Messenger at Aldur’thar
- Rewards
- Initial Turn-in:
- 22,050 XP
- Choice of: Mantle, Gilly Gaunt, Chain Demon Glove, Legplats of North, Gutbuster
- 7 40 (20 63 at level 80)
- Daily:
- 22,050 XP
- 7 40 (20 63 at level 80)
- Initial Turn-in:
If available, do this at the same time as Retest Now and No rest For the Wicked, since you’ll be flying to the same area for all three quests.
You’ll do this quest once as a non-daily, and then it will unlock as a daily. To find the quest giver, land on the deck Orgrim’s Hammer, then walk down the large ramp with the Horde banner hung over it — Koltira is on the left at the bottom of the ramp. Once you’ve got the quest, it’s a short flight north or northwest to Aldul’thar.
There, you’ll need to first kill Enslaved Minions and then use the Rod of Siphoning on their corpses. They’re only found in a pair with their Void Summoner, naturally, so you’ll generally have to kill both before using the rod — classes with CC can instead kill the minion, CC the summoner, and then use the rod if they like. Each time you use the rod, you’ll collect a Dark Matter. Once you have five, head to the purple crystal on the lower level by the bridge and right-click it to summon the Dark Messenger and complete the quest.
- Quest Giver – Chief Engineer Copperclaw, found on Orgim’s Hammer (the Horde airship that patrols north/east of the central mountain)
- Prerequisites – Level 77, Cannot Reproduce, initial non-daily version of Retest Now.
- Objective – Drink the Diluted Cult Tonic and kill cultists to collect 10 Tainted Essences, then create a Writhing Mass and throw it into a cauldron at Aldur’thar
- Rewards
- Initial Turn-in:
- 22,050 XP
- Choice of: cultstir, deadrazor, twisthoolwack, bowregress, writhmace
- 7 40 (20 63 at level 80)
- Daily:
- 22,050 XP
- 7 40 (20 63 at level 80)
- Initial Turn-in:
Pick this up at the same time as Not a Bug, and do that quest first — the summoners you’ll be fighting have a 21% drop rate for the Tainted Essence. You can also do No Rest for the Wicked in the same general area.
You’ll do this quest once as a non-daily, and then it will unlock as a daily. The quest giver is found on the lowest deck of Orgrim’s Hammer, since that’s the engine room — he’s in the room with the fiery glow. Once you’ve got the quest, fly northwest to the westernmost platform of Aldur’Thar, where you’ll find the mobs with the highest droprate of the Tainted Essence you need. Once there, use the Diluted Cult Tonic — it will give you a 10 minute buff, during which time you’ll be able to farm the essence.
If there’s too much competition for the mobs, you can go east and kill the other cultists, but it’s not ideal. The Cult Alchemists have the best drop rate (51%), followed by the Apothecary (49%) — the next closest are the Cult Blackguard and Torturer (36%), so don’t waste time killing anything but alchemists and apothecaries unless you have to.
Once you’ve collected 10 Tainted Essence, right-click the stack in your inventory to create a Writhing Mass, and then you can throw it into one of the cauldrons (by right-clicking it in your inventory while near a cauldron). Before you do so, decide which two-hour buff you want:
- Grey: +60 Spell Power
- Dark Blue: +100 Attack Power
- Green: +75 Stamina
- Quest Giver – Sky-Reaver Korm Blackscar, found on Orgim’s Hammer (the Horde airship that patrols north/east of the central mountain)
- Prerequisites – Level 77, Raise the Barricades, Blinding the Eyes in the Sky (identical to the daily)
- Objective – Shoot down 6 Skybreaker Recon Fighterss with the SGM-3
- Rewards
- 22,050 XP
- 250 Reputation with the Warsong Offensive
- 7 40 (20 63 at level 80)
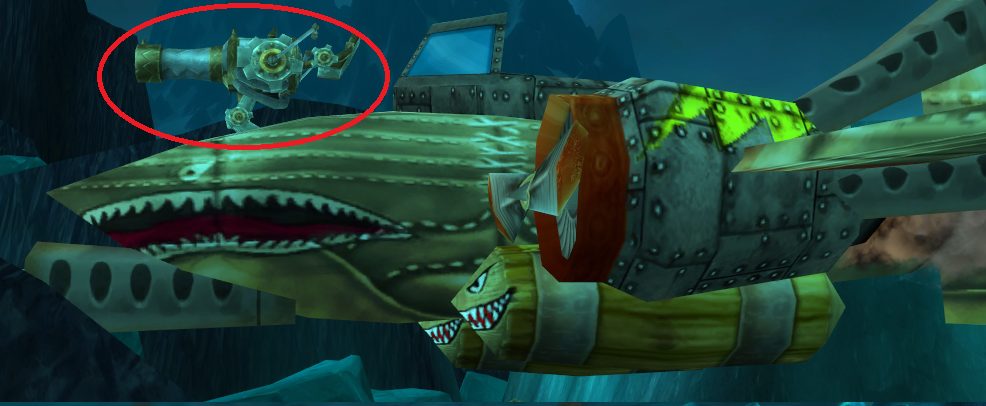
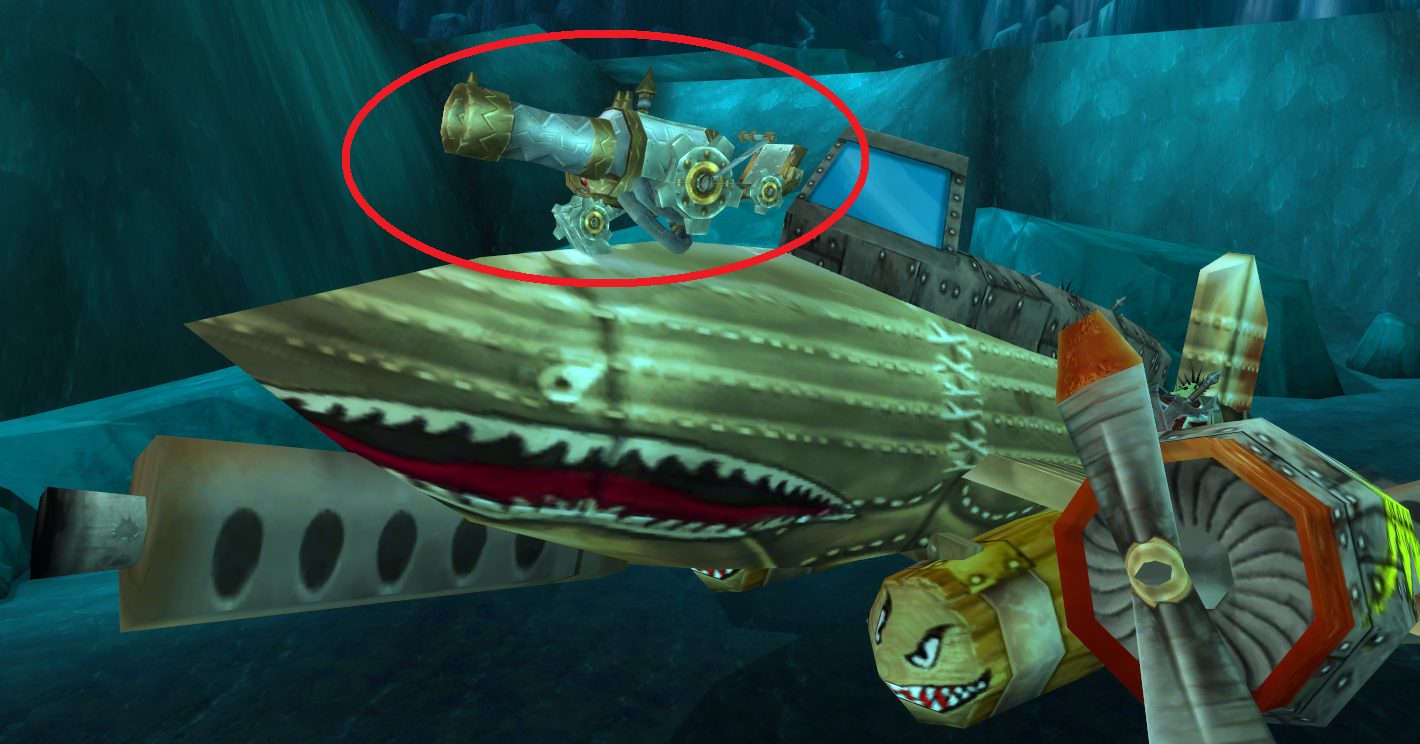
To find the quest giver, land on the main deck of Orgrim’s Hammer, then walk down the ramp with the Horde flag hanging over it — Korm is standing in front of the throne just ahead. Once you accept the quest, you’ll need to fly west over the Aldur’thar bridge to the Valley of Fallen Heroes. Once there, use the following macro to target and down the Skybreaker Recon Fighters:
#showtooltip SGM-3
/tar Skybreak
/use SGM-3
/cleartarget
You can’t use the SGM-3 while mounted, so land in the indicated area, ideally near a large group of the recon fighters (see image below). Kill any nearby mobs, then start spamming the macro, and you should be able to complete the quest relatively quickly. If you can’t target anything look around and try to reposition under some of the fighters.
- Quest Giver – Koltira Deathweaver, found on Orgim’s Hammer (the Horde airship that patrols north/east of the central mountain)
- Prerequisites – Level 77, Basic Chemistry (identical to the daily)
- Objective – Use the Pustulant Spinal Fluid to neutralize a batch of plague in a cauldron at Mord’rethar.
- Rewards
- 33,100 XP
- 22 20 (42 6 at level 80)
To find the quest giver, land on the deck Orgrim’s Hammer, then walk down the large ramp with the Horde banner hung over it — Koltira is on the left at the bottom of the ramp. Once you pick up the quest, fly south or south-southwest (depending on the airship’s location) to the side of the bridge closer to Mord’rethar.
Head into the structure via the doorway at (63.5, 62.0), and go left to the nearest plague cauldron once inside. Now you’ll need to use the Pustulant Spinal Fluid repeatedly (usually 6 or 7 times) until you get the message that the plague batch has been neutralized. This is made significantly more challenging by the fact that mobs will spawn out of the cauldron every so often — stay near the cauldron and kill the mobs as they emerge, and keep using the quest item off cooldown.
While it’s possible to solo this quest, it’s much easier to do it with a partner, as the mobs that emerge from the cauldron are not pushovers. . In addition to the extra HP and firepower a partner brings, you’ll be able to neutralize the plague cauldron faster with two quest items. Don’t forget that you can team up with anyone doing either the daily or the initial, Basic Chemistry version.
- Quest Giver – Koltira Deathweaver, found on Orgim’s Hammer (the Horde airship that patrols north/east of the central mountain)
- Prerequisites – Level 77, Need More Info, initial non-daily version of No Rest For The Wicked
- Objective – Kill Alumeth the Ascended at Aldur’thar
- Rewards
If available, do this quest at the same time as Not a Bug and Retest Now, as they’re all in the same general area.
To find the quest giver, land on the deck Orgrim’s Hammer, then walk down the large ramp with the Horde banner hung over it — Koltira is on the left at the bottom of the ramp. After accepting the quest, fly to Aldur’thar and enter the structure via the large doorway at (52, 33).
Before you can summon Alumeth, you’ll need to collect Heart, Skull, Robes, and Scepter. These are found in chests around the room — three on the right, one on the left (see image below). Once you have all four quest items, you can right-click one in your inventory to create Alumeth’s Remains. Once that’s done, head over to the big crystal on the northern side of the room and use the remains to summon him so you can kill him.
Alumeth is soloable if you are well-geared (although he’s got 104K HP so it may take a while), or if you’re a class good at soloing tough foes (Warlock/Hunter/DK). Otherwise, you’ll want to get some help before starting this one.
- Quest Giver – Blast Thunderbomb (51.9, 57.6), found around the side of a building in the southwesternmost section of Ymirheim
- Prerequisites – Level 77, Get to Ymirheim!
- Objective – Use the Jumpbot to plant the Horde Battle Standard in the skulls at the top of the mountain
- Rewards
- 22,050 XP
- 250 Reputation with Valiance Expedition
- 7 40 (20 63 at level 80)
This quest flags you for PvP when you accept it.
The quest giver is found in Ymirheim, in the southeastern section of the town. Once you accept the quest, you’ll be able to right-click Frazzle’s jumpbot to enter it. You can then use the ‘3’ key to jump, and since you don’t have to land to jump again, you can keep pressing 3 to stay airborne and essentially fly up the side of the mountain to the summit (which is southeast of Blast Thunderbomb at 54.9, 60.1). Once there, press ‘1’ near the pile of skulls to plant the standard and complete the quest — you can then return to Frazzle for your reward!
Optionally, you can target any player from the other faction you see also climbing the mountain and press ‘2’ to fire rockets at them; they don’t do a lot of damage, but can knock the other player back down the mountain.

- Quest Giver – Sky-Reaver Korm Blackscar, found on Orgim’s Hammer (the Horde airship that patrols north/east of the central mountain)
- Prerequisites – Level 77, The Broken Front
- Objective – Kill 15 Horde players
- Rewards
- 22,050 XP
- 7 40 (20 63 at level 80)
This quest flags you for PvP when you accept it.
To find the quest giver, land on the main deck of Orgrim’s Hammer, then walk down the ramp with the Horde flag hanging over it — Korm is standing in front of the throne just ahead.
This quest can be very difficult to complete, as you have to actively seek out PvP to complete it, and only PvP kills in Icecrown count (Battlegrounds will not work). Your best bet is to accept it and try to complete it over the course of doing other quests/activities, but if you’re on a PvE server, you may find it impossible to complete.
This quest was removed in patch 4.1.0, likely because it was buggy — we have yet to confirm if it will be present in Wrath Classic.
- Quest Giver – Fringe Engineer Tezzla (54.0, 36.8), found in the dome above the northern end of the bridge to Aldur’thar
- Prerequisites – Level 77, Fringe Science Benefits
- Objective – Kill 50 Bombardment Infantry, 10 Bombardment Captains, and 20 Gargoyle Ambushers
- Rewards
- 22,050 XP
- 7 40 (20 63 at level 80)
This quest giver is located in the yellow dome that sits above the northern end of the bridge between Ymirheim and Aldur’thar. After speaking with her and accepting the quest, you’ll need to speak with Rizzy Ratchwiggle the Bombadier (who is nearby, under the same dome) and tell her to give you a bomber — the quest will then begin.
Despite not having to steer, this is one of the more involved bombing missions. You’ll need to swap between three positions: ‘4’ is air-to-air, ‘5’ is bombing, and ‘6’ is engineering. Start by switching to engineering and getting your shield to 100 stacks, then swap to bombing and start taking out targets on the ground. Every few bombs, swap to the air-to-air position and make sure there aren’t any gargoyles attacking you — take ’em out if there are. If you get the message that your vehicle is burning (or notice the “Burning” debuff in the upper right), you’ll need to swap to the engineering position and use the ‘2’ key to Fight the Fire and put it out.
If you wait a long time to swap to air-to-air and end up having to use all your missiles, the ‘2’ key will refresh the cooldown on them. Otherwise, it’s just a matter of rotating between the three positions as necessary. Don’t stress if you get shot down — you’ll keep the progress on the quest and be able to go back for another bomber.
We hope this guide on Icecrown Daily Quests was helpful! If you have suggestions for improvements or strategies you’d like to share, please do so in the comments below.
About the Author
