- Author: Nevermore
- Date: July 14, 2024
- Updated: July 14, 2024
- Expansion: WoW Classic
Welcome to the SoD Phase 4 Fury Warrior DPS Guide!
This guide focuses exclusively on the Fury specialization, exploring key components such as Runes, Talent Trees, Stat Priorities, Rotations & Abilities, Best Professions, BiS (Best in Slot) items, and Race Choices. The new Rune System introduced in the Season of Discovery has enhanced the overall performance of Fury Warriors beyond their already amazing reputation, granting them new passive effects, direct damage abilities, and utility tools that elevate their play style by a considerable amount! Just like Arms Warrior, Fury Warriors experienced a massive overhaul to their runes in Phase 4 of Season of Discovery, having to change their gameplay as well.
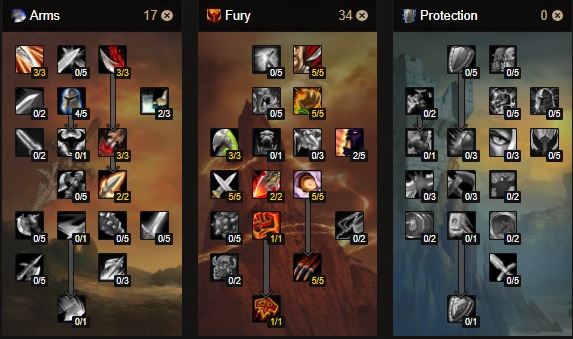
Talents
Runes
- Helm: Endless Rage
- Cloak: Fresh Meat
- Chest: Raging Blow
- Wrist: Rampage
- Hands: Single-Minded Fury
- Waist: Blood Surge
- Legs: Consumed by Rage
- Feet: Rallying Cry
- Ring: Sword Specialization
- Ring: Mace Specialization
Stat Priority
- Hit Chance
- Critical Strike Chance
- Strength
- Attack Power
- Agility
- Stamina
Rotations & Abilities
Single-Target Rotation
- Initiate with Charge in Battle Stance
- Swap to Berserker Stance and maintain it
- Proc Fresh Meat as soon as possible
- Prioritize casting Rampage for Burst Phases
- Use either Fresh Meat, Consumed by Rage, Berserker Rage or Bloodrage to trigger Rampage
- Attempt to upkeep Consumed by Rage if Fresh Meat is slow to trigger after the initial proc
- Cast Thunder Clap once at the beginning to debuff the target if nobody brings a similar effect
- Refresh Thunder Clap once its duration expires if nobody else brings a similar effect
- Cast Sunder Armor
- Stack Sunder Armor up to 5 stacks if nobody else brings a similar effect
- Maintain Sunder Armor at 5 stacks throughout the entirety of the fight
- Cast Raging Blow on cooldown whenever you are “Enraged”
- Spam Execute when the target reaches the HP threshold
- Cast Bloodthirst on cooldown
- Cast Bloodthirst to trigger the initial proc of Fresh Meat
- Spam Heroic Strike as a Rage spender as long as you don’t Rage Starve yourself
AoE Rotation
- Cast Thunder Clap to debuff enemies and deal damage
- Cast Cleave as a main Rage spender
- Use the Single-Target rotation beside Cleave and Thunder Clap
Best Professions
Blacksmithing
Blacksmithing has long been one of the most iconic professions for Plate-wearing classes and Warriors can fully benefit from this profession. This is by far the best profession that a Warrior can pick, not only for the strong items that can be acquired during the leveling process but also thanks to the new end-game items and special epic items available with the release of the Season of Discovery.
Engineering
Being known as one of the top professions in both PvE and PvP in the Classic Era, Engineering’s reputation also remains true in the Season of Discovery. It grants access to powerful bombs, various gadgets, and even specially crafted equipment that can be used to enhance your overall performance.
Best Races
Warrior is the only Class that can be picked by any race available to both factions, offering a wide variety of race/class combinations. For the Alliance, the best option for Fury Warrior is a choice between Human and Dwarf due to Sword Specialization, Mace Specialization, and Stoneform. Overall, Human is the better option since the weapon skill racials directly impact the PvE performance. For the Horde, the best option is a choice between Orc and Troll due to Blood Fury and Berserking. Orc is slightly stronger since Blood Fury can be used more easier than Berserking, with the latter effect requiring you to be injured to reach its full potential.
Human
Dwarf
Night Elf
Gnome
Orc
Undead
Tauren
Troll
About the Author

peniz