
- Author: Nevermore
- Date: July 12, 2024
- Updated: July 12, 2024
- Expansion: WoW Classic
Welcome to the SoD Phase 4 Restoration Shaman Healer Guide!
This guide focuses exclusively on the Restoration specialization, exploring key components such as Runes, Talent Trees, Stat Priorities, Rotations & Abilities, Best Professions, BiS (Best in Slot) items, and Race Choices. The new Rune System introduced in the Season of Discovery has elevated the status of Restoration Shamans, making them even stronger. They now have access to multiple new utility/healing spells while also being granted multiple mana regeneration tools. Thanks to those changes, Restoration Shamans are now among the most powerful healers in the WoW Classic Era.
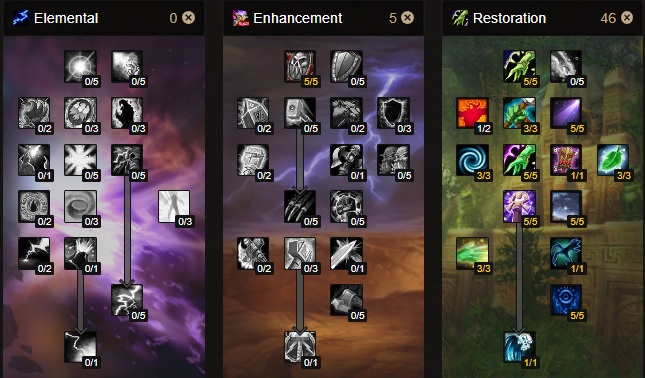
Talents

Runes
- Helm: Tidal Waves
- Cloak: Coherence
- Chest: Overload/Healing Rain
- Wrist: Riptide
- Hands: Water Shield
- Waist: Power Surge
- Legs: Earth Shield
- Feet: Spirit of the Alpha
- Ring: Nature Specialization
- Ring: Fire Specialization
Stat Priority
- Spell Healing
- Intellect
- Spell Critical Strike Chance
- Mp5
- Spirit
- Stamina
- Spell Damage
- Hit Chance
Rotations & Spell Priorities
Healers typically don’t have a “rotation” like Tanks or DPS specializations, rather having a Spell Priority List, and that applies to Restoration Shaman Healers as well. The only situation in which a healer has a “rotation” is if they decide to provide Off-DPS, and that situation applies only if no ally requires immediate healing.
Spell Priority List
- Maintain Water Shield
- Place Totems and prioritize Searing Totem/Flametongue Totem, Strength of Earth Totem, Mana Spring Totem, and Grace of Air Totem/Windfury Totem
- Reposition totems when needed with Totemic Projection
- Prioritize Mana Tide Totem for moments where your entire group requires Mana Regeneration
- Prioritize casting Earth Shield on tanks
- Prioritize using Nature’s Swiftness + Healing Wave to heal targets in critical moments
- Cast Riptide on single targets that require instant healing
- Cast Riptide to trigger Tidal Waves
- If you choose the Healing Rain rune
- Cast Healing Rain on stacked groups to heal multiple people
- Cast Chain Heal to heal multiple injured allies
- Cast Chain Heal to trigger Tidal Waves
- Cast Chain Heal on a target that has Riptide active to empower Chain Heal and trigger Ancestral Healing
- Cast Lesser Healing Wave to heal minor single-target injuries
- Cast Lesser Healing Wave after triggering Tidal Waves
- Cast Healing Wave to heal major injuries on single targets
- Prioritize casting Healing Wave while Tidal Waves is active to reduce its cast time
- Avoid casting Healing Wave if your target is in immediate danger of dying and Nature’s Swiftness is on cooldown
- Cast Shamanistic Rage on cooldown to regenerate mana and provide replenishment for your allies
Off-DPS Rotation
- Cast Flame Shock on cooldown
- Cast Earth Shock if Flame Shock is still active on the target
- Cast Chain Lightning against multiple targets
- Cast Cast Lightning Bol against single targets
Best Professions
Leatherworking
Leatherworking is among the top professions for a class such as Shaman, providing the ability to craft Leather Armor and Mail Armor. Moreover, Leatherworking provides access to special epic recipes in the Season of Discovery, granting Restoration Shaman Healer powerful equipment that will increase its overall healing capabilities.
Engineering
Being known as one of the top professions in both PvE and PvP in the Classic Era, Engineering’s reputation remains true in the Season of Discovery as well. It grants access to powerful bombs, various gadgets, and even specially crafted equipment that can be used to enhance your overall performance.
Enchanting
Enchanting allows you to imbue equipment with special effects while also allowing you to disenchant any item into magical essences. In the Season of Discovery, Enchanting grants access to powerful sigils which can be used to gain a large amount of Spell Power.
Skinning
Skinning is a viable alternative for gold and material generation in case you pick Leatherworking. This profession is one of the easiest to grind as all you have to do is kill mobs in the world and skin their pelts.
Best Races
The Shaman Class can only be picked by the Horde faction, being available for 3 specific races. The best possible option for Restoration Shaman Healer is Berserking thanks to the Casting Speed buff that it offers. Sadly, both Tauren and Orc are more of an aesthetic choice when compared to Troll for the Restoration specialization.
Orc
Undead
Troll
About the Author

how about dual wielding some arbitratry onehanders using rockbiter ? Since AP will be your highest stat, you will almost completely refresh you mana every minute with shamanistic rage.
Having 2 +9 healing hammers with rockbiter does restore my mana to nearly 100%