
- Author: Nevermore
- Date: July 11, 2024
- Updated: July 20, 2024
- Expansion: WoW Classic
Welcome to the SoD Phase 4 Holy Paladin Healer Guide!
This guide focuses exclusively on the Holy specialization, exploring key components such as Runes, Talent Trees, Stat Priorities, Rotations & Abilities, Best Professions, BiS (Best in Slot) items, and Race Choices. The new Rune System introduced in the Season of Discovery has overall boosted the performance of Holy Paladin Healer, making it stronger than before, and granting it several new abilities and passive effects that vastly increase its performance.
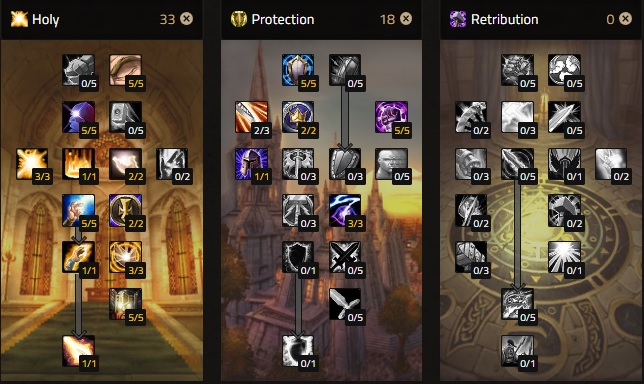
Talents
Runes
- Helm: Fanaticism
- Cloak: Divine Light
- Chest: Hallowed Ground/Divine Storm
- Wrist: Light’s Grace
- Hands: Beacon of Light
- Waist: Infusion of Light
- Legs: Hand of Sacrifice/Aura Mastery/Inspiration Exemplar
- Feet: Sacred Shield
- Ring: Defense Specialization
- Ring: Holy Specialization
Stat Priority
- Spell Healing Power
- Intellect
- Critical Strike Chance
- Mp5
- Spirit
- Stamina
- Armor
- Strength
Rotations & Spell Priorities
The rotations and abilities of Holy Paladin Healer will be split into two different categories. The first one is for Healing and Utility spells while the second is for offensive abilities that can be used to provide Off-DPS while nobody requires healing or dispeling.
Healing/Utility Spells Priority List
- Cast Beacon of Light on a priority target
- Cast Sacred Shield on a priority target
- Prioritize Lay on Hands as a last resort saving tool
- Use Blessing of Protection on targets that require Physical Damage Mitigation in critical moments
- If you select the Hand of Sacrifice rune, use Hand of Sacrifice as a mitigation tool for tanks
- If you select the Aura Mastery rune, use it together with Concentration Aura or Devotion Aura if no other Paladin uses any of those at that specific moment
- Prioritize Divine Favor for critical situations
- Cast Divine Favor + Holy Shock if you don’t have time to cast Holy Light
- Cast Divine Favor + Holy Light if your target is not in danger of dying immediately
- Cast Divine Light to generate absorption effects on the tank as long as you don’t run OoM
- Prioritize Divine Light over Holy Light as long as your mana pool allows it
- Cast Holy Shock on cooldown for targets that require instant healing
- Cast Holy Light on targets that require heavy healing
- Prioritize Holy Light over Divine Light if you’re close to running OoM
- Cast Flash of Light (Main Spell)
Offensive Spells DPS Rotation
- Cast Holy Shock on an enemy if no ally requires instant healing
- Cast Exorcism on cooldown
- Cast Seal of Wisdom/Seal of Light
- Cast Judgement while Seal of Wisdom or Seal of Light is active
- Cast Consecration on cooldown
Best Professions
Blacksmithing
Blacksmithing has always been one of the iconic professions for any plate-wearing Class, and that remains true in the Season of Discovery as well. Additionally, Blacksmithing provides access to the new epic items available in SoD besides the usual items.
Tailoring
Tailoring functions as a viable alternative to Blacksmithing if you choose to utilize Cloth Armor and make use of the new Season of Discovery epics. However, Holy Paladin Healer is stronger while wearing Plate Armor, making Tailoring situational at best depending on the epic items themselves.
Engineering
Engineering has long been seen as one of the best professions for PvE, bringing many gadgets, bombs, and specialized items. Furthermore, Engineering grants new special recipes in the Season of Discovery which can significantly enhance your overall performance.
Best Races
The Paladin Class can only be picked by the Alliance, with only Humans and Dwarves being able to select it. Before Phase 4, the best possible race for Holy Paladin Healer is Human thanks to The Human Spirit. Dwarves are also a very solid pick thanks to Stoneform, however, the defensive cooldown won’t be as useful for the Holy Paladin Healer. Besides their specific racial effects, aesthetics and overall feel also play an important role, so pick whichever you think works best for you!
Human
Dwarf
About the Author

Hi Nevermore, thanks for the guide. I think you covered most of what matters, and I learned something :).
I wanted to comment on one rune that I have found unreliable but which you extoll for preventing raid one-shots. The Divine Sacrifice rune has killed me a couple of times to those kinds of effects, possibly because I misinterpreted the way it functions. If the damage is dealt at once, it appears to punch through the 20% cut-off and simply one-shots me. This happened twice in BFD on the turtle boss, where the shell explosion hits my party and kills me (even if I’m not near the boss).
Any thoughts on that, or have you had a different experience than me?
Cheers