Retribution Paladin DPS Guide & Best Runes – Phase 4 Season of Discovery (SoD)
Welcome to the SoD Phase 4 Retribution Paladin DPS Guide!
This guide focuses exclusively on the Retribution specialization, exploring key components such as Runes, Talent Trees, Stat Priorities, Rotations & Abilities, Best Professions, BiS (Best in Slot) items, and Race Choices. The new Rune System introduced in the Season of Discovery has changed the way Retribution Paladin DPS plays, adding many much-needed direct damage abilities and cool interactions that give a new flavor to its play style.
Talents
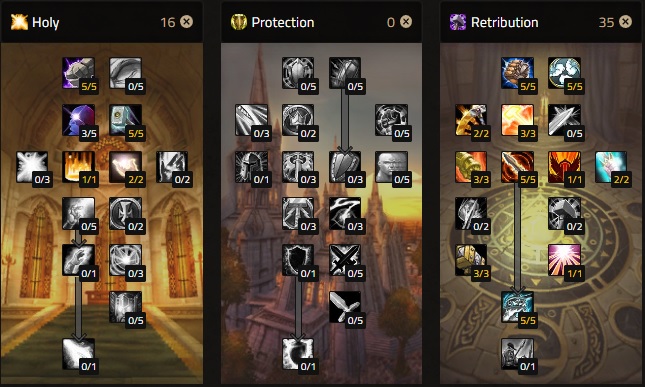
Phase 4 of the Season of Discovery brings some interesting changes to the Retribution Talent Tree. Since Vindicator has been launched and overhauled, the Vindication talent has been revamped to include its effect, making it a mandatory pick. The rest of the build looks similar to what we are used to, with the last 3 points being placed into either Spiritual Focus or Divine Intellect. Furthermore, since the T1 set bonuses bring back “Seal Twisting”, the Seal of Command talent will now be mandatory as well.
Runes
- Helm: Wrath
- Cloak: Righteous Vengeance
- Chest: Divine Storm
- Wrist: Improved Hammer of Wrath/Purifying Power
- Hands: Crusader Strike
- Waist: Sheath of Light
- Legs: Aura Mastery/Rebuke/Hand of Sacrifice
- Feet: The Art of War
- Ring: Holy Specialization
- Ring: Sword Specialization
Stat Priority
- Hit Chance
- Weapon Speed
- Weapon Damage
- Strength
- Attack Power
- Critical Strike Chance
- Agility
- Spell Power
- Intellect
Rotations & Abilities
Retribution Paladin DPS has two distinct rotations in Phase 4 of Season of Discovery. The rotations are based on whether or not the T1 6-item set bonus is active or not, as the play style is split into a standard rotation and a very specific rotation that involves “Seal Twisting” that depends entirely on the T1 set.
Standard Rotation
- Cast Seal of the Crusader
- Cast Judgement while the Seal of the Crusader is active
- Prioritize Avenging Wrath for Burst Phases
- Cast Seal of Martyrdom and upkeep it
- Cast Judgement on cooldown while the Seal of Martyrdom is active
- Cast Hammer of Wrath on cooldown
- If you choose the Improved Hammer of Wrath rune, spam Hammer of Wrath while the target is under 10% HP as long as you don’t go OoM
- Cast Exorcism on cooldown
- Cast Divine Storm on cooldown
- Cast Crusader Strike on cooldown
- Cast Consecration on cooldown as long as you don’t run OoM
T1 Seal Twisting Rotation
Note: Unleashing 3 seals at the same time might be possible, however, we won’t be certain until the Tier Sets become available
- Cast Seal of Wisdom or Seal of Light
- Cast Judgement while either Seal of Wisdom or Seal of Light
- Prioritize Avenging Wrath for Burst Phases
- Seal Twist with Seal of Martyrdom/Seal of Command/Seal of Righteousness
- Cast Seal of Martyrdom and quickly follow up with Seal of Command
- Cast Judgement after 5 seconds of activating the second seal to unleash both seals at the same time
- Cast Hammer of Wrath on cooldown
- If you choose the Improved Hammer of Wrath rune, spam Hammer of Wrath while the target is under 10% HP as long as you don’t go OoM
- Cast Exorcism on cooldown
- Cast Divine Storm on cooldown
- Cast Crusader Strike on cooldown
- Cast Consecration on cooldown as long as you don’t run OoM
Best Professions
Blacksmithing
Blacksmithing has always been one of the iconic professions for any plate-wearing Class, and that remains true in the Season of Discovery as well. Additionally, Blacksmithing provides access to the new epic items available in SoD besides the usual items.
Engineering
Engineering has long been seen as one of the best professions for PvE, bringing many gadgets, bombs, and specialized items. Furthermore, Engineering grants new special recipes in the Season of Discovery which can significantly enhance your overall performance.
Best Races
The Paladin Class can only be picked by the Alliance, with only Humans and Dwarves being able to select it. Before Phase 4, the best possible race was considered Human thanks to its weapon versatility, however, Phase 4 also makes Dwarf a very viable choice since they can benefit from the same bonuses through the Sword Specialization and Mace Specialization runes. In terms of performance, Dwarf is now slightly better thanks to Stoneform, however, it comes down to the aesthetic preference of the player with both races being great in PvE.
Human
Dwarf
Author

Hey there folks, I am Nevermore and have been deeply passionate about WoW for more than a decade. Whether we talk about the hidden mysteries of Azeroth or the otherworldly Outland, my journey brought me here to share the things that I have experienced with you all.
Who the fk though it was better to have 10% str over 5% crit when we have liek 100 strength at level 25? 20 attack power is no where near better than 5% crit… Nevermore at it again
My initial thought was that raw AP would be better but you are actually right, the 5% crit chance is a lot better if RNG is on our side. My blunder there folks.
Definitely Conviction>Divine Strength with our current stat values at 25. The crit will have a much higher impact. Rest of the guide looks fantastic!