WoW Classic Feral Druid PvE DPS Guide
Welcome to our feral druid DPS guide for WoW Classic! If you want to play as a kitty and use your claws to slash your foes apart, a feral DPS druid is the choice for you! Feral druids play most like a rogue, using energy to build combo points, then spending them with a powerful finishing ability. While cats don’t do as much damage as a pure DPS class, their excellent utility and powerful buffs make them a solid choice for any raid group.
Feral DPS druids are quite rare, but that doesn’t mean they’re a bad class! It is very important to understand how a feral druid plays in a raid setting, considering their role is different from a traditional damage dealer. This guide will help you learn how to play one, including your rotation and helpful tips! We’ll also cover everything you need to know about optimizing, like your stat priorities, enchants, consumables, and professions!
Races
Some classes have a lot of options when picking a race, but the druid isn’t one of those. Both the alliance and horde have just one race to play as, making your decision fairly simple! Alliance can be a night elf, while horde can play as a tauren. Neither race has particularly appealing racial abilities, but night elves have great agility base values and tauren have superior strength base values. If you want to see what each race has to offer, check out all of their abilities here!
- Alliance – Night Elf
- Horde – Tauren
Talents
There’s no question that druids are the most versatile class in the game. With the use of shapeshifting, druids can harness an animal form to use different abilities. What separates one druid from another is how they pick their talents. While you can build your feral DPS druid a few ways for different purposes, there’s only one build that maximizes your damage.
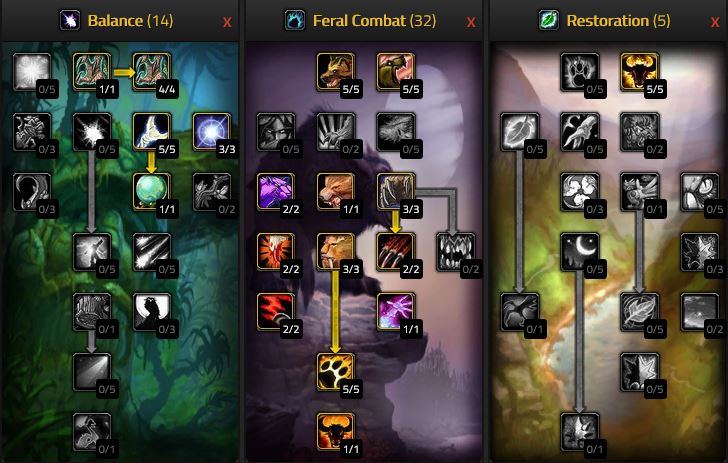
This 14/32/5 build is definitely your best option. It is known as the powershifting build, utilizing the combination of the talents Natural Shapeshifter and Furor to add extra depth to your rotation. This build selects every relevant feral combat talent, while also using the balance tree to acquire Natural Weapons and Omen of Clarity. If you’re not interested in powershifting, you can swap 3 points out of Natural Shapeshifter for 3 points in Improved Thorns.
Optimization
After reaching level 60, you’ll spend several hours optimizing your feral druid. Considering that the class is already at a DPS disadvantage, you’ll need to put in extra work to compensate. Without optimizing, you won’t do much damage and your utility won’t be enough to justify a raid spot. If you’re dedicated to dealing the most damage, optimization is where the difference happens.
Stat Priority
The first thing to understand is what stats are relevant for a feral druid. Kitties do play like a rogue, using energy and combo points, but they don’t benefit from stats in the same way. Feral druids want stats that increase their physical damage, which makes agility and strength particularly useful.
Prioritize these stats for a feral druid:
- Hit Rating (to 9%) – Even though you’re fighting in Cat Form, you still need to achieve the hit cap. This is 9% for feral druids, which may take some time as you don’t have any talents that offer you any hit rating. Other stats are still relevant, but capping your hit is your top priority.
- Critical Strike Rating – Once you’ve reached the hit cap, you’ll want to be focusing heavily on increasing your crit rating to maximize damage. Increasing this stat directly works best, but there are also other ways to increase how often you get a crit.
- Agility – While strength does increase your AP more, Agility increases your critical strike rating as well, so it’s kind of the best of both worlds. This is actually your most important common stat to build up, because it gives you that balance.
- Strength – Not at all to be forgotten about, but also not at the top of your stat priority list, Strength increases your attack power by 2 points for every single point of strength you have. It’s for this reason that you’ll, more often than not, want to prioritize Strength over direct AP. If you notice that you’re getting a lot of crits, but still not doing as much damage as you think you should be, you might want to pad out your strength a bit.
Weapon Skill
Feral druids do use a weapon and fight in melee range. They also have individual weapon skills for each type of weapon they can equip. However, your weapon skill level doesn’t actually matter. Regardless of the weapon type you’re using, when you switch to Cat Form, you’re assumed to be using claws, which automatically raises your weapon skill level to 300. This means that feral druids always have maximum weapon skill.
Professions
The use of professions are important for any class and role. Professions are great for adding extra depth and capabilities, allowing you to make equipment, tools, and consumables that all make your character stronger. They’re also great for making gold, which can then be used to purchase gear, materials, mounts, and anything else you could possibly desire!
Here are the professions you’ll benefit from as a feral druid:
- Leatherworking – Leatherworking is a great choice for any feral druid, but especially if you’re lacking gear. This will allow you to make great armor, namely the Devilsaur Armor to give you 2% hit rating. Without any helpful talents, any source of hit rating is fantastic.
- Skinning – If you’re going to be a leatherworker, then you’ll want to take skinning too. With skinning, you can effectively collect all the materials necessary to craft leather gear.
- Engineering – Another great choice is engineering. Engineering is a great option for any class in the game due to useful explosives and gadgets. Strictly from a damage standpoint, no other profession benefits you more
- Mining – If you’re going to be an engineer, then you should definitely have mining. You need to be a miner in order to gather from mineral nodes around the world. Without mining, you’ll have to purchase all your materials to craft engineering goods.
Enchants
Enchants for a feral DPS druid are less impactful than other specializations, but you can still receive a significant benefit. There is also less variety available to you since Animist’s Caress is designed for restoration. Your weapon enchant will give you the greatest power by far, but collectively the rest of these enchants are also nice.
Here are the most optimal enchants to have as a feral druid:
- Helm – Lesser Arcanum of Voracity, +8 Strength
- Shoulder – Zandalar Signet of Might, +30 Attack Power
- Cloak – Enchant Cloak – Lesser Agility +3 Agility / Enchant Cloak – Stealth Increased Stealth
- Chest – Greater Stats, +4 All Stats
- Bracers – Superior Strength, +9 Strength
- Gloves – Superior Agility, +15 Agility
- Pants – Lesser Arcanum of Voracity, +8 Strength
- Boots – Minor Speed, + Movement Speed or Greater Agility, +7 Agility
- Weapons: Enchant Weapon – Agility / Enchant 2H Weapon – Agility
Consumables
Consumables are where things start to get tricky for a feral druid. Your talent build is technically the powershifting build, which means you’ll consume a lot of mana if you decide to powershift. This does make your rotation a little clunkier, but it does result in a damage increase. Because of that, you’ll actually want some consumables that increase your mana regeneration. You’ll want anything that boosts strength, agility, and attack power, but potions and weapon oil can help supplement your mana.
These consumables are fantastic for a feral druid:
- Elixir – Elixir of the Mongoose, +25 Agility and +2% Critical Strike Chance for 1 hour
- Food – Smoked Desert Dumplings, +20 Strength or Blessed Sunfruit, +10 Strength
- Juju – Juju Power, +30 Strength for 30 minutes and Juju Might, +40 Attack Power
- Potions (if powershifting) – Mageblood Potion, +12 MP5 for 1 hour and Major Mana Potion, ~1800 mana every 2 minutes
- Weapon Oil (if powershifting) – Brilliant Mana Oil, +25 Healing Power and +12 MP5 for 30 minutes
- Others – Winterfall Firewater, +35 Attack Power for 20 minutes, Scroll of Strength, +17 Strength for 30 minutes
Rotation & Gameplay Tips
For advanced information view our Feral Druid DPS Powershifting Rotation Guide.
A feral DPS druid certainly offers one of the most unique playstyles. The combo-finisher fighting style of the rogue is certainly at play for a cat, but things get different when you consider human form. Some raid groups will bring along a feral druid for decursing with Remove Curse, while others view a druid as a solid backup healer. It is important to understand your role within the raid and how you can benefit the most. If you aren’t required to fulfill a support role, you can use powershifting to boost your damage.
Here are some gameplay tips for a feral druid:
- The druid class has two important cooldowns that can affect any member of your raid. These are Rebirth and Innervate. Rebirth has a 30 minute cooldown, but is an in-combat resurrection, which can be fantastic for preventing a wipe when a tank dies. Innervate has a 6 minute cooldown and drastically increases mana regeneration, making it great for empowering a mana-hungry caster or a healer working overtime.
- As a feral druid, you technically have two useful buffs available to you. Mark of the Wild is your class buff, giving armor, boosting resistances, and raising all attributes. Unique to the feral specialization is Leader of the Pack, the end talent in the feral combat tree. This gives all party members +3% crit chance, making you excellent when paired with a group of warriors and rogues.
- Feral druids also have access to Faerie Fire while in Cat Form thanks to Faerie Fire (Feral). You should keep this applied at all times, as it increases not only your damage, but it benefits all of your raid’s melee damage attackers too.
- When you feel comfortable, you should implement powershifting into your rotation whenever possible. This refers to shifting out of Cat Form when out of energy, then immediately shifting back to Cat Form on your next global cooldown. This is useful because the Furor talent gives you 40 energy on each shift, but this is feasible because the Natural Shapeshifter talent also reduces the mana cost of all shifting by 30%. If you know you won’t be required to cast any spells or heal, feel free to powershift to your heart’s content.
- Always fight your target from behind. This will allow you to use Shred, your highest-damage combo-point generator. Your other combo-point generators, Claw and Rake do such poor damage that they aren’t worth their energy cost. When opening a fight from Stealth, start with Ravage.
- Only use your combo point finisher with 5 combo points. This allows for the maximum damage. You should always use Ferocious Bite as your finisher. Your other option is Rip, but this unfortunately consumes one of the 16 crucial raid debuff slots. Furthermore, Rip cannot crit, whereas Ferocious Bite can. Despite Rip doing more on paper, Ferocious Bite has more potential and doesn’t inconvenience your raid group.
- Before using a finishing ability, make sure to cast Tiger’s Fury. This does cost energy, but it increases your damage done for 6 seconds.
A feral druid’s rotation isn’t overly complex, but there are multiple things you will need to pay attention to. You’ll need to keep Faerie Fire (Feral) applied for extra damage, but you do have 40 seconds in between applications. This can make it easy to forget, but it does give you flexibility.
When your debuff is applied, you’ll want to fight behind your target and use Shred until you have 5 combo points. Wait until you have around 50 energy, then use Tiger’s Fury for a short damage boost. When your global cooldown comes back up, you’ll immediately cast Ferocious Bite to consume your combo points.
At this point, you’ll simply resume using Shred to build combo points and Ferocious Bite to spend them, while keeping Faerie Fire (Feral) up at all times. Whenever you run out of energy, powershift to get 40 extra energy, good for another Shred.
To simplify:
Single Target: Faerie Fire (Feral) (keep applied) > Shred to 5 combo points > Tiger’s Fury > Ferocious Bite > Powershift (when out of energy)
Author

If I'm not working or spending time with the family I'm probably gaming. Some of my favorite recent games I've played are Far Cry 5, World of Warcraft Classic, and 7 Days to Die.
You say “Crits are always fantastic for dealing more damage, but they generate high threat and feral druids don’t have access to threat-reducing abilities”. But he have Cower – https://classicdb.ch/db/?spell=9892.
Hey drus, good catch, we’ll get that corrected!
I found the spell https://vanillawowdb.com/?spell=22570 in the database, but I didn’t see it in the game. Does it exist? How can I get it?
Looks like an error in the database, as Mangle wasn’t added until the TBC pre-patch.
In the enchant-section, “Enchant Weapon – Crusader” is listed as the best weapon enchant, but I am pretty sure procc effects of weapons do NOT work in shapeshift form, therefore +Intellect should be the best weapon enchant until the +Agility weapon enchant is added to the game.
Also crusader wont proc in cat form…
Apologies the enchants have been updated!
I would make a precisation: Ferocious bite is generally the best option but DEPENDS pretty much by the contest and expecially the target!
If you are hitting heavy armored targets RIP is far more better, coupled with Rake dot aswell. The same happens in PvP vs a warrior for example.
Another common situation where you want use RIP over Ferocious bite is on fights where you can’t stick on target all time, because maybe you get feared, or you have to move out of AoE, or other issues. So you can always keep a 5 points RIP on the target, possibly coupled by Rake dot, to keep a sustained damage even when you can’t touch him for some seconds. Make a 5 point RIP, in those cases, anyway doesn’t exclude ur next 5 points to be spent on Ferocious bite, while dots are still running.
Sorry mate but your guide is totally wrong. The stat priority must be: Hit > Crit > Agi > AP > Str
Strength never been the top priority for feral druids since critical strikes gives you additional combo points and more combo points means more ferocious bite. May be you have to play a feral druid first before writing something. Thanks.
We can’t enchant cloak with boot enchants
Hey Maurim, thanks for catching that for us. That was a simple copy paste error and it’s been fixed. Thanks again for helping us to improve the guide and have a wonderful day.
Hey Aeternatus, thanks a lot for your thoughts here. The author, as stated, thought that the threat generated by crits would have been an issue here and it’s a valid point to make in a group, but the amount of damage that a Druid can actually get out there doesn’t really give them any issues with threat. We’ve changed the guide to reflect your suggestions, as they are accurate, with one caveat though: Strength should be prioritized over AP, because a single point of Str means 2 points of AP for a Druid. Thanks again for your input and for helping us to improve the guide. Have a wonderful day!
You guy’s have to note Manual Crowd Pummelers as a must on boss fights.