- Author: Kurathis
- Date: August 17, 2021
- Updated: August 17, 2021
- Expansion: TBC Classic


Currently, the way to trigger this encounter is to fish The Lurker Below from the water with 300+ Fishing skill.
This particular encounter alternates between two different phases. During Phase 1, you will be fighting The Lurker, while in Phase 2, he submerges and has adds spawned. After Phase 2, he will reemerge and the encounter will be in Phase 1 again. The timing of each phase is as follows:
Phase 1: 60 Seconds
Phase 2: 60 Seconds
Abilities
- Melee Damage – Hits tanks for roughly 4,000 physical damage
- Water Bolt – Plenty of damage caused to random targets. It is only used if no targets are within melee range
- Spout – This ability acts a slow-moving AoE water gun that will damage every target in a 360 degree rotation. It can be either clockwise or counter-clockwise.
- To avoid this damage, ranged DPS are able to enter the water (you don’t have to be underneath the water) so you can still attack the boss
- To avoid this damage, melee DPS and tanks are able to rotate themselves, following the Spout
- Whirl – Damages all targets in melee range and knocks them back
- Geyser – A knockback ability that causes damage and knocks players back
Positioning
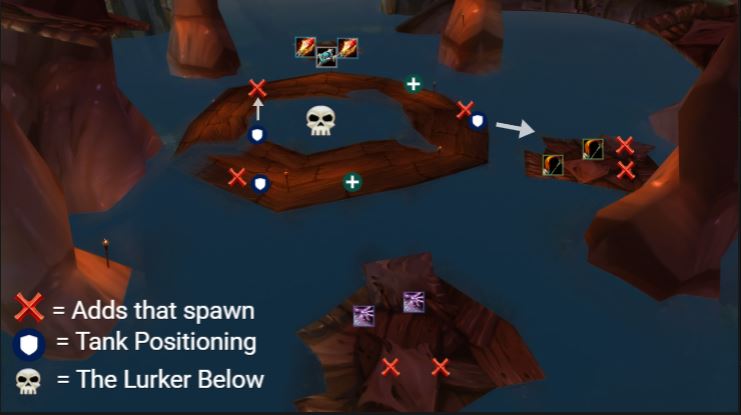
Platform #1: Two Mages and One Shadow Priest
Platform #2: Two Hunters
Platform #3: Two Warlocks
Main Platform: Heals spread out slightly, Melee DPS and Tanks
Tank: An important note is where you decide to tank the boss, since if you are affected by Whirl, and do not get back to the boss in time he will deal substantial damage to your raid group. (To avoid this, please refer to the positioning diagram above)
Phase 1
Note: This phase lasts for 60 seconds each time.
Note: This fight only requires 3 tanks.
Note: Ranged DPS do NOT need to worry about their threat generation in this encounter, so they can DPS as hard and as fast as they’d like to since the boss doesn’t have their threat.
Strategy
During Phase 1, The Lurker Below will use Spout, an ability that rotates 360 degrees before ending. Ranged DPS that are on the platforms can drop into the water to avoid this damage while Melee DPS can simply around the boss to avoid it and still be able to deal damage.
If the proposed positioning was followed, the players should be spread out enough to avoid being affected by other players targeted with Geyser.
Melee DPS should stand as close to the boss as they possibly can to avoid getting knocked back into the water by Whirl.
Phase 2
Note: This phase lasts for 60 seconds each time.
The Lurker Below will submerge itself to begin this phase. Once submerged, he will spawn nine (9) total adds. Each platform will see a total of two adds while the middle platform will see three adds spawned.
For positioning, it’s generally desired to have Crowd-Control classes on the outer platforms to help control the adds while downing the melee mobs in the middle (The adds on the outer platforms will disappear when he submerges again)
Depending on how you position your Crowd-Control classes, this strategy may be slightly different. Keep in mind, Mind Control will not work for crowd control.
Platform #1: We generally have the Shadow Priest immediately use their AoE fear, Psychic Scream, to have an immediate fear present. During that time, the Mages will both use Polymorph to control the adds further. Once the adds are under control, the Mages and Shadow Priest will begin attacking the melee add nearest to them (as pictured)
Platform #2: Both Hunters can use Freezing Trap while focusing down their nearest melee add on the middle platform. If a trap breaks, the tank that was tanking the melee add nearest to this platform can begin tanking that add before returning to the middle. Platform #3 players should be able to reach this add to assist in killing it efficiently.
Platform #3: Having at least two Warlocks on this platform allows for use of Death Coil, instantly fearing each add, and then using Fear to control them further. The idea is to get an immediate fear off so that the mobs can be instantly controlled.
Note: If you have more than three Warlocks on the same platform, just make sure to designate which Warlocks will be covering the Fear to avoid confusion.
After Phase 2’s 60-second timer ends, Phase 1 will begin again, and will carry on until you have defeated The Lurker Below.
About the Author