- Author: Pride
- Date: November 15, 2021
- Updated: November 18, 2021
- Expansion: TBC Classic
After defeating all of his minions in Tempest Keep: The Eye, your raid will finally gain access to the big bad boss of the raid. Kael’thas Sunstrider, the lord of the blood elves himself, will be your final enemy in this raid.
A large amount of guilds have found themselves unable to progress beyond 8/10 bosses killed in phase 2, and it is easy to see why — Kael’thas is one tough elf. He has 6mil HP, though you will commonly need to deal about ~7-8mil to kill him due to his Shock Barrier, and your raid will have to deal about 15-17mil damage overall during this fight because of the adds.
As a result, this fight is very long and requires good strategies & precise execution, particularly during phase 3. Make sure that tactics and assignments are clearly explained to everyone before the pull, because a wipe caused by a simple mistake after 10 minutes of fighting can be very demoralizing.
This guide will offer your guild a step-by-step analysis of how to beat this arrogant elf and get his very precious loot.
Role Summaries
Phase 1
- When fighting Thaladred, kite him towards the room’s entrance — see the Phase 1 section
- Do not go within 30 yards of Capernian
Phase 2
- Stack up with the raid on Kael’thas’ platform unless you have a special assignment
- Engineers, this is your time to shine – use Super Sapper Charges on the weapons
- When your designated weapon dies, loot it, equip it, and right click it if it has a use effect
Phase 3
- Do not leave the bottom of the steps that lead to Kael’thas’ platform until all the adds are alive again
- After the adds are resurrected, quickly move to your designated spot — see the Phase 3 section
- Use Heroism / Bloodlust along with personal cooldowns in this phase
- If Thaladred uses Gaze on you, do not kite him through the raid — kite him around them
- Do not go within 30 yards of Capernian
Phase 4
- Go to your designated spot ASAP
- Move out of Flame Strike — indicated by a massive orange marker on the ground
Phase 5
- Everyone, healers included, kill Phoenix Eggs off while Kael’thas is invulnerable at the start of phase 5
- After Kael’thas uses Gravity Lapse, fly towards the ground but do not touch it
- Spread out as much as possible — Nether Beam chains to nearby players
- Do not fly close to the Nether Vapors (black clouds) as they will kill you
- Use your Healthstone if you drop low, specially if you have the Nether Vapor debuff
Phase 1
- You can only DPS Thaladred for ~5 seconds at a time, move out afterwards or you might die
- You cannot DPS Capernian at all
- Do not stand near the tank when fighting Telonicus — his Bombs hurt
- Stop DPS on Telonicus if the raid leader calls for it
Phase 2
- Interrupt the Cosmic Infuser‘s Heal cast
- Focus down the weapons in this order: Staff > Mace > Daggers > Sword > Shield > Bow > Axe
- Rogues: Equip the Warp Slicer in your main hand and the Infinity Blade in your offhand
- Warriors, Enhancement Shamans: Equip the Infinity Blade in your main hand if you are assigned to it
- Retribution Paladins: Equip Devastation
- Feral Druids: Equip the Staff of Disintegration and right click it in your character screen to enable its aura
Phase 3
- Your kill order will be Sanguinar > Telonicus
- Do not stand near the tank when fighting Telonicus — his Bombs hurt
- If Thaladred uses Gaze on you and is nearby, quickly move away from the melee stack
- Rogues: Use Shiv to apply 5 stacks of Magic Disruption on Sanguinar and then Telonicus when Sanguinar is dead. Also apply it on Thaladred at the start of phase 3 if you are assigned to it
Phase 4
- Your priorities will be: Dispel Mind Control > Destroy Shock Barrier > Kill Phoenix Eggs
- Switch to Phoenix Eggs when the Phoenix adds die if your raid does not ignore them
- Rogues, Warriors: Use your Kick / Pummel after Shock Barrier is broken to interrupt Pyroblast
- Rogues: Use Shiv to dispel Mind Controlled players. Always keep 5 stacks of Magic Disruption on the boss
- Infinity Blade users: Use spammable abilities (Hamstring) to dispel Mind Control if you are assigned to it
Phase 5
- If you’re going in to DPS during Gravity Lapse, be extra careful of Nether Vapor (black clouds)
Phase 1
- Make sure you are never close to Thaladred, as you might get Silenced or die
- Hunters: Use your Misdirection on the warlock tanking Capernian as soon as Sanguinar dies
- Warlock tanking Capernian: Be just outside your curse range (~31 yards) to avoid her Conflagration. Don’t move further than 35 yards (her Fireball range), you don’t want her to move. Spam Searing Pain for threat
- Always be at your maximum range while DPSing Capernian
- Stop DPS on Telonicus if the raid leader calls for it
Phase 2
- Mages, Elemental Shamans: Interrupt the Staff of Disintegration‘s 1st cast so it moves to your raid
- Hunter tanking Netherstrand Longbow: Make sure it is facing away from your raid, don’t be near allies
- Give your protection paladin a few seconds before you start using your AoE spells
- Focus down the weapons in this order: Staff > Mace > Daggers > Sword > Shield > Bow > Axe
- Casters: Equip the Staff of Disintegration and right click it in your character screen to enable its aura
- Hunters: Equip Infinity Blade in your main hand. Equip the Netherstrand Longbow and right click it in your character screen to generate Nether Spikes and then equip it in your ammo slot
Phase 3
- Hunters: Using your Misdirection correctly during this phase will be vital
- Your kill order will be Thaladred > Capernian > Sanguinar > Telonicus
- Hunters: Use special attacks to apply Armor Disruption on Sanguinar right away if you are assigned to it
- If Thaladred uses Gaze on you, try to kite him away from the melee stack, never through the raid
- Shadow Priests: If you go in to DPS Capernian, make sure you are never near other players
Phase 4
- Mages: Counterspell Kael’thas’ first Fireball cast so he doesn’t kill a random raid member
- Your priority will be: Dispel Mind Control > Destroy Shock Barrier > Kill Phoenix Eggs
- Switch to Phoenix Eggs when the Phoenix adds die if your raid does not ignore them
- Hunters: Use Wing Clip to dispel Mind Control on ranged players & healers
- Casters: Make sure your main tank always has the Mental Protection Field aura. If your raid does not have any feral druids, 1 caster DPS will have to always stay within 30 yards of the main tank for the aura
Phase 5
- During Gravity Lapse, move as far away from the boss as possible to avoid chaining Nether Beam
Phase 1
- Make sure you are never close to Thaladred, as you might get Silenced or die
- Priests / Shamans: Use Fear Ward / Tremor Totem on the MT to counter Sanguinar’s Bellowing Roar
- Do not use any healing spells after Capernian attacks until your warlock tank has threat on her
- Be nowhere near Capernian
- Be ready to heal anyone afflicted by Capernian’s Conflagration
Phase 2
- Pay very close attention to which tank you are assigned to in this phase
- If your assignment is the prot paladin tanking all the weapons, spam heal them like crazy
- If your assignment is raid healing, top people off quickly, an unfortunate Multi-Shot can kill people
- Loot and equip the Cosmic Infuser as soon as it dies — its buff is invaluable
Phase 3
- Pay very close attention to which tank you are assigned to in this phase
- Keep up the Infernal Protection buff on all of your tanks at all times
- Priests / Shamans: Use Fear Ward / Tremor Totem on the MT to counter Sanguinar’s Bellowing Roar
- If Thaladred uses Gaze on you, try to kite him away from the melee stack, never through the raid
- Be ready to heal anyone afflicted by Capernian’s Conflagration
Phase 4
- If you are assigned to the Phoenix tank, stay focused, if they die your raid will likely wipe
- Quickly top people off after their Mind Control gets dispelled
- Try to keep up the Infernal Protection buff on as many people as possible
Phase 5
- During Gravity Lapse, move as far away from the boss as possible to avoid chaining Nether Beam
- You will have to heal like a madman during Gravity Lapse as this will be where most deaths happen
- Pay extra attention to those blind raid members that get the Nether Vapor debuff
Phase 1
- Warriors: Use Berserker Rage just before Sanguinar attacks to counter his Bellowing Roar
- Stay within Capernian’s Conflagration range in order to prevent shadow priests from being the only target
- Be extremely careful when moving Telonicus to his designated spot — you might get melee killed
Phase 2
- Pay very close attention to which weapon you are assigned to in this phase
- Devastation tank: Quickly move the axe away from the raid to avoid accidental Whirlwind deaths
- If you have no specific assignments, help interrupt the Cosmic Infuser‘s Heal cast
- Warriors, Paladins: Loot & equip the Phaseshift Bulwark as soon as it dies
- Warriors: You can also loot & equip the Warp Slicer & Infinity Blade if you’re not tanking later on
- Feral Druids: Equip the Staff of Disintegration and right click it in your character screen to enable its aura
Phase 3
- Quickly moved to your designated advisor before they are resurrected
- Warriors, Paladins: Use the Phaseshift Bulwark‘s ability to counter Sanguinar’s Bellowing Roar
- Telonicus tank: Stand as far away from the melee DPS as you can be without Telonicus moving with you
- If Thaladred uses Gaze on you, do not move from your position — use a defensive cooldown if necessary
Phase 4
- Main Tank: Quickly move to Kael’thas as soon as you can, before phase 4 even starts
- Interrupt Kael’thas’ first Fireball cast so he doesn’t kill a random raid member
- Main Tank: If a Phoenix add spawns close to you, move the boss away to avoid accidental deaths
- Warriors, Paladins: Use the Phaseshift Bulwark‘s ability to survive the 1st Pyroblast after Shock Barrier
- Feral Druids: Make sure your main tank has the Mental Protection Field aura at all times
- Warrior Off-tanks: Use Hamstring with the Infinity Blade in your main hand to help dispel Mind Control
Phase 5
- During Gravity Lapse, move as far away from the boss as possible to avoid chaining Nether Beam
- Main Tank: If you get the Nether Vapor debuff, call it out on voice and use defensive cooldowns to survive
Abilities
Advisors
Weapons
Kael’thas Sunstrider – Phase 4
Kael’thas Sunstrider – Phase 5
When Kael’thas reaches 50% HP, phase 5 begins. He will no longer use Mind Control and Flame Strike during phase 5, gaining Gravity Lapse, Nether Beam and Nether Vapor instead.
Raid Composition & Preparation
The Pull
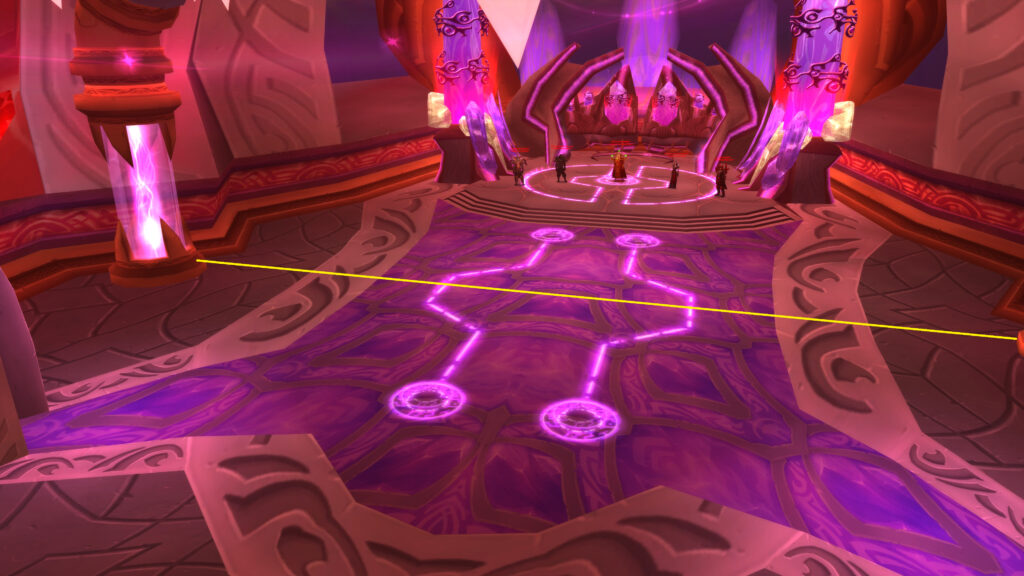
Your raid can safely buff anywhere inside Kael’thas’ room, provided you do not go past the yellow line in the picture above.
Kael’thas will give a 10-15 second monologue before Thaladred engages you alone. Your ranged DPS players can get in position at max range from him during this time, while melee stand by until he uses Gaze for the first time.
Phase 1
After Thaladred has used his Gaze ability, he’ll start going after his targe — very slowly. Your melee DPS can go in and hit him for 5-6 seconds at this point, then go back out in anticipation of the next Gaze.
Your general aim while fighting Thaladred in phase 1 will be to take him towards the entrance of the room and have him die roughly at the spot show in the picture below, or anywhere on that side of the room, far from the other advisors.
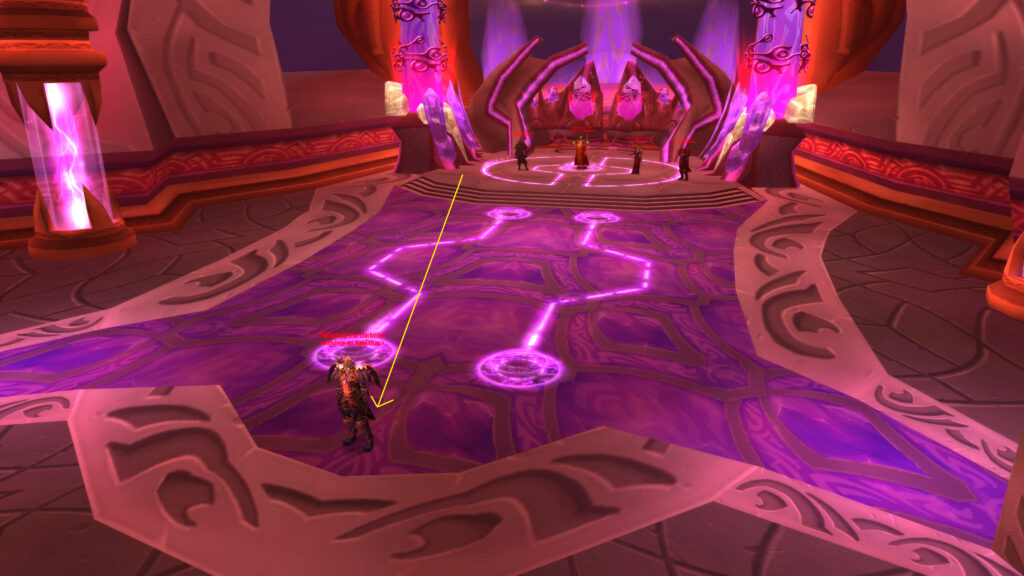
Your raid will have to be extra careful while he’s low on HP. He can switch Gaze targets unpredictably, and you really don’t want him to move back towards his original position. If he dies anywhere else, phase 3 will be significantly harder, so it will be very important that your raid gets a clean kill at the correct spot here.
After Thaladred is dead, you have about ~8 seconds of emoting from Kael’thas before Sanguinar enters the fray. He will cast Bellowing Roar right away, so make sure your main tank has a Fear Ward or Tremor Totem if they are not a warrior with access to Berserker Rage. It will also help if you have a hunter use Misdirection on the MT here, to prevent the boss from running loose or killing a DPS player while the tank repositions him to the spot shown below.
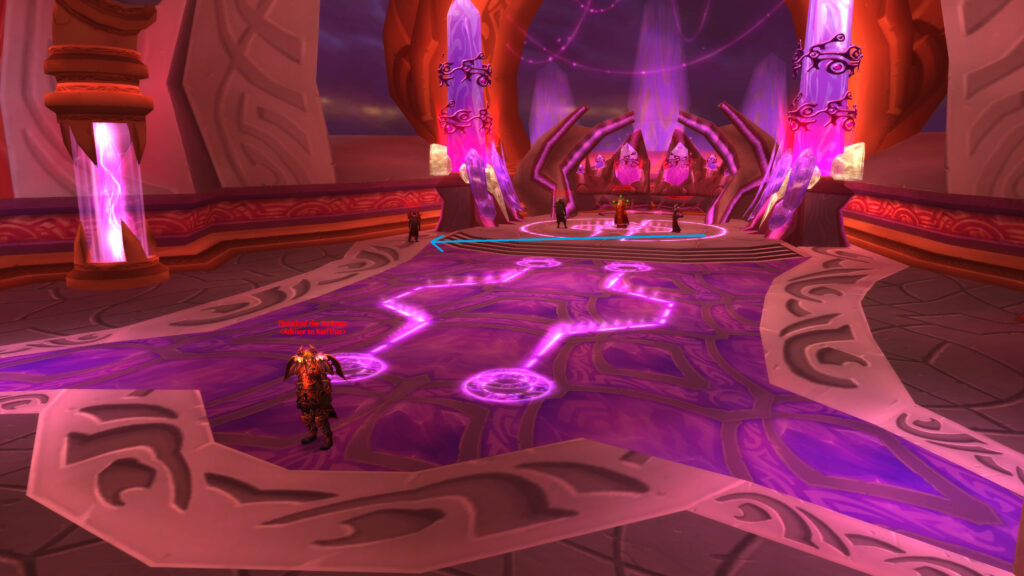
Besides Bellowing Roar, Sanguinar is a tank and spank so just keep damaging him until he’s dead.
Following another 8-10 seconds of Kael’thas emoting, Capernian will join the fight. This will be one of the deciding moments for how the rest of the encounter goes — a mistake here can cause things to snowball out of control big time.
Simply put, you want her to stay exactly where she starts off at. To achieve that, your DPS players should avoid attacking her for a few seconds, and instead just move around trying to find their max range. Do not use ANY spells that generate threat, like Power Word: Shield or healing spells, until the warlock tanking her has established some threat using Searing Pain.
Having a hunter use Misdirection on your warlock tank right as she becomes attackable can help here, but this should be the last time you use Misdirection for a while — you will need all of them in phase 3.
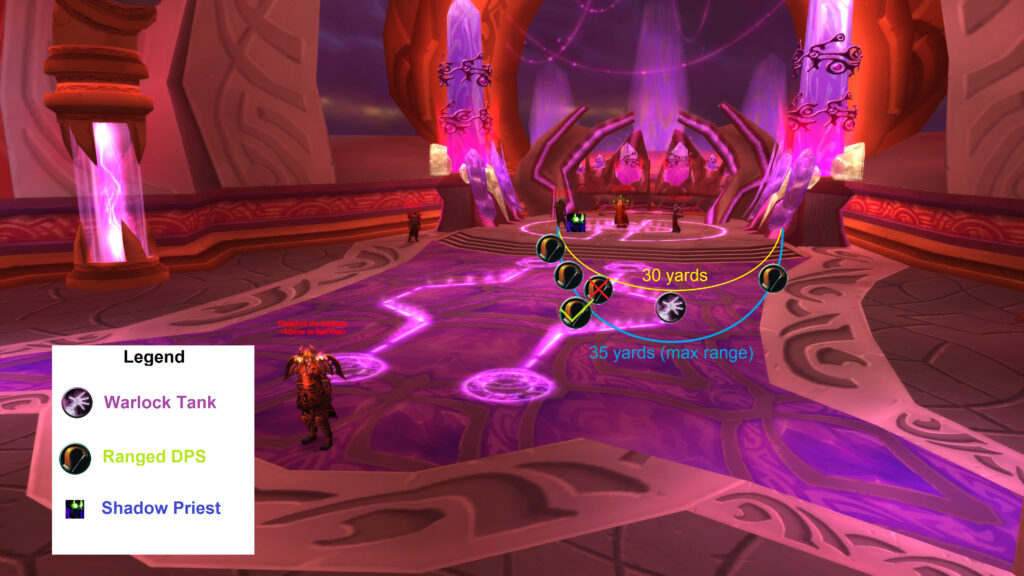
As shown in the picture above, your warlock tank will want to stand between 31 (Conflagration range) and 34 yards (Fireball range) away from Capernian. Warlock curses without the Grim Reach Affliction talent have exactly 30 yards range, so the correct range is easy to tell — just barely outside the range he can use curses at.
The rest of your DPS should be standing at their maximum range as much as possible. Shadow priests have a slightly smaller range with Mind Flay (24 yards), so it is a good idea to have a healer pay attention to them so they do not die if they get hit by Conflagration — there will not be any other raid damage going out at this point.
Beast Mastery hunters should know that Capernian will most likely kill their pets with Arcane Burst. They have a lot of time to resurrect them during phase 1, so they can send them in anyway, but that will be harder in later phases.
If you managed to kill Capernian where she stood and Thaladred is dead at the correct spot, things are looking pretty good for your raid. The toughest part of phase 1 is now over — only Telonicus is left — and you are set for later phases.
You will want to move Telonicus right next to Sanguinar, as shown in the picture below.
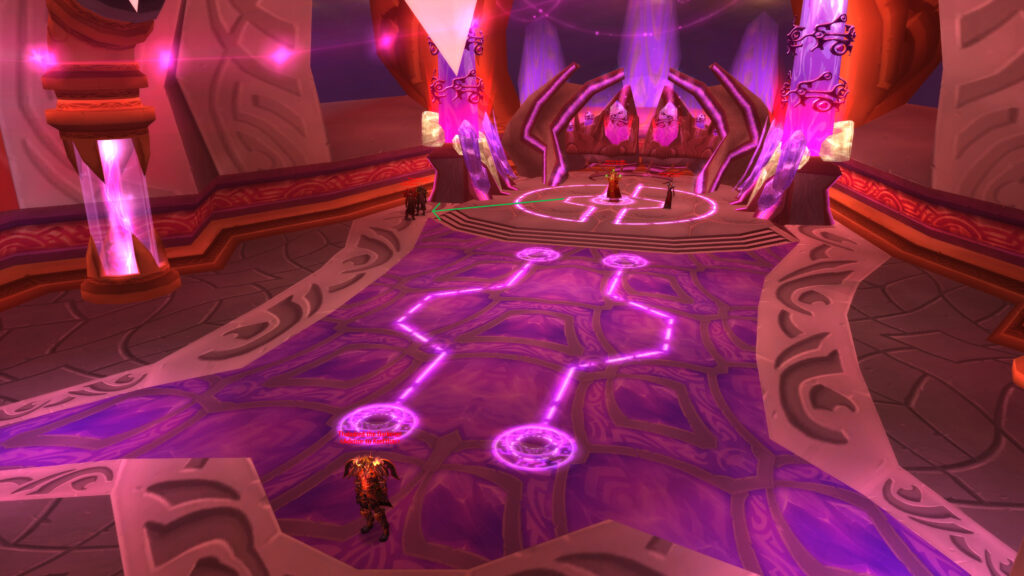
This fight will also be mostly a tank and spank, similar to Sanguinar. He will spam Bombs on the tank targeting him, so melee will have to be careful while he’s being repositioned, as 2 bombs in a row will get them killed.
The only thing to consider while fighting Telonicus is that you do not want any of your phase 2 tanks to get the Remote Toy debuff. If any of them do, it will generally be a good idea to stop DPS until the debuff fades, so you go into phase 2 without any of your tanks randomly getting stunned, likely dying or losing threat as a result.
Phase 2
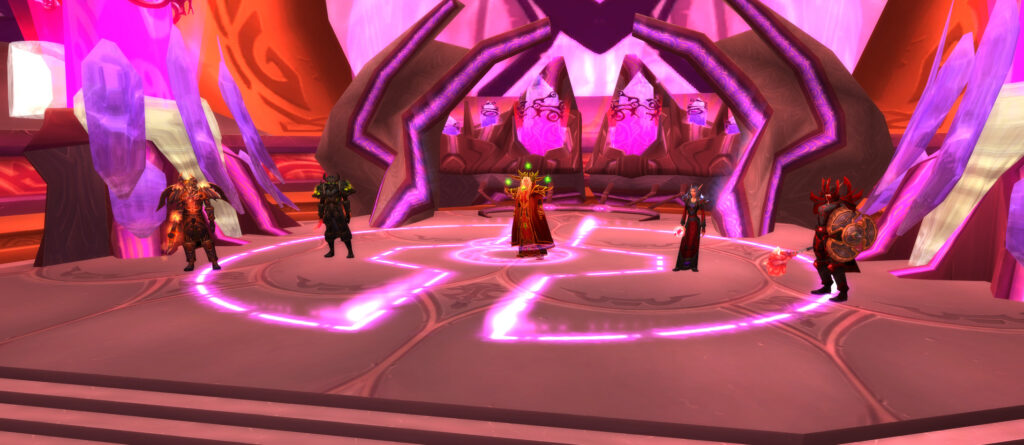
Kael’thas will emote for 10-15 seconds before phase 2 begins. While he’s emoting, your entire raid (minus the bow tank) will want to move to the platform he’s standing on, directly in front of him, as shown in the picture below.
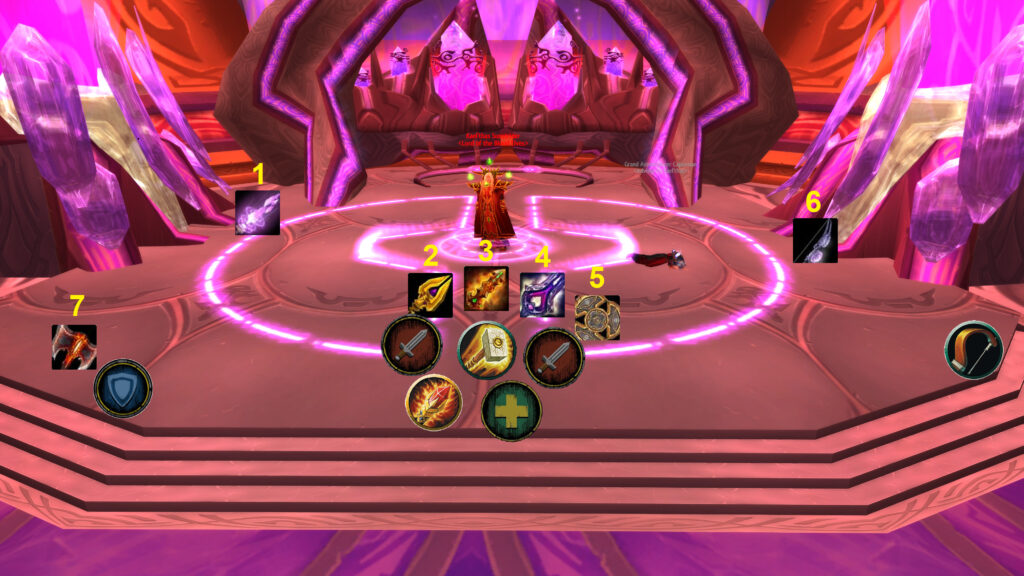
The staff spawns slightly further away from the other weapons, so you will want to have your mages and shamans use Counterspell and Earth Shock respectively to interrupt its casts first thing during phase 2, forcing it to move to the raid.
While the staff is moving towards the raid, your axe tank will want to quickly pick it up and move it away from your stack, as an early Whirlwind will very likely wipe you if it hits a bunch of cloth users.
When the staff reaches the raid, your casters can go to town with their AoE spells. Melee players will instead want to focus individual weapons down, with this being the recommended focus order:
- Staff of Disintegration
- Cosmic Infuser
- Infinity Blades
- Warp Slicer
- Phaseshift Bulwark
- Netherstrand Longbow
- Devastation
Note that the weapons have different HP values, so they will likely die at different timings, which is mostly fine. As each weapon dies, your players will want to loot then equip it as your raid leader advises.
A rogue or warrior in your raid will have to Kick / Pummel the Cosmic Infuser‘s Heal spell. Other than that, provided your casters don’t pull aggro off your protection paladin and die, the only thing you really have to look out for are that the axe and bow are at their correct positions & their tanks are getting healed.
Staff of Disintegration users will need to right click it in their equipment screen in order to activate its aura. Hunters should do the same with their Netherstrand Longbow in order to get its overpowered Nether Spike ammo.
Infinity Blades users (warriors, hunters, etc) should equip it in their main hand, while rogues equip it in the offhand instead.
Phase 3
2 minutes after phase 2 started or after the last weapon has died, Kael’thas will emote again, signifying the start of phase 3. All of the advisors will come back to life, fighting you all at once. If any weapons are still alive at this point, you will want to finish them off quickly, as the advisors will require your undivided attention — this phase is the toughest one.
The beginning of phase 3 is arguably the most important part of it so you’ll want everyone to focus at this point. Hunters can make it a lot easier with their Misdirection — it is advised that you use one for each tank (Sanguinar, Telonicus, and the warlock tanking Capernian) and everyone holds off on doing damage until they are in position.
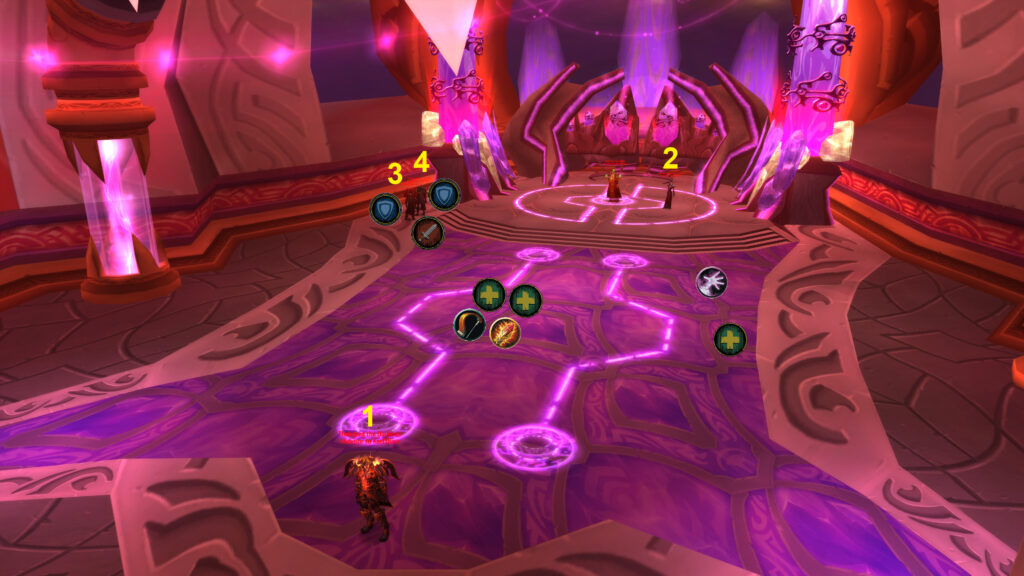
These will be your positions for phase 3.
NOTE: Do not move to these spots right away! Stay at just below the steps leading to Kael’thas’ platform until all of the adds are resurrected. If you move too far before the adds are resurrected, you will be out of range of the threat reset that happens, meaning the adds will ignore the tanks and go straight for you, very likely causing a wipe.
After everyone is at the correct position, you will want to use Heroism / Bloodlust along with each player’s personal DPS cooldowns, and nuke down Thaladred ASAP. Melee players are not good at dealing damage to him, nor Capernian for the matter, so they should damage Sanguinar instead.
Your want to kill the advisors in the following order:
- Thaladred (Ranged only)
- Capernian (Ranged only)
- Sanguinar (Melee start here)
- Telonicus
If you get targeted by Thaladred’s Gaze, do NOT run through the raid! You will get everyone Silenced or potentially killed. Instead, you want to run in a circular motion around the map, allowing ranged DPS players to DPS him without having to move.
The advisor most likely to cause wipes in this phase will be Capernian. Your warlock tank will need to do some serious threat on her, as she will be killed second. Your raid will have to be very careful not to enter her Conflagration range when moving away from Thaladred, as that is an almost guaranteed way to die and take others with you.
Note that the Staff of Disintegration‘s Mental Protection Field aura will make you immune to the disorient component of Conflagration, but not the damage. If you accidentally step too close and get hit by it, you need to call out that you need healing ASAP, else there is a decent chance that you die, particularly if you’re dealing splash damage to others around you.
Sanguinar and Telonicus will be pieces of cake after Thaladred and Capernian are down, specially if you have a feral druid providing the Mental Protection Field aura to your tanks and melee DPS players, protecting them from stuns and disorients.
Sanguinar’s Bellowing Roar can be partially mitigated by using Fear Ward, Tremor Totem, Berserker Rage and the Phaseshift Bulwark‘s Arcane Barrier, which grants immunity to fear for 4 seconds. None of these options really work great for protecting your melee DPS however, who run the risk of being feared into Telonicus’ Bombs. 1 Bomb will generally not kill them if they’re at full HP, but 2 might be lethal, so your healers will need to be alert.
A small trick that can help make Phase 3 a little bit easier is having 1-2 melee DPS players using Infinity Blade quickly spam a low-cost damage ability like Hamstring to apply 5 stacks of its Magic Disruption debuff on Thaladred. Most of the damage he’s going to take will be magical, and 25% extra damage will make a huge difference in kill speed.
In the same vein, having a hunter (ideally survival with the Expose Weakness talent) stay on Sanguinar in order to apply 5 stacks of the Netherstrand Longbow‘s Armor Disruption debuff will help your melee DPS kill him much faster. But unlike with Thaladred, the hunter needs to stay on Sanguinar full-time, as the bow’s proc chance is low and the debuff will fall off.
Phase 4
3 minutes after phase 3 started or after the last advisor has died, Kael’thas will emote one more time and then finally join the fight himself. For most guilds, it is extremely likely that 1 advisor (most likely Telonicus) will still be alive at this point, so your raid will want to quickly finish him off while your main tank and a few healers move over to deal with Kael’thas.
If you’ve gotten this far, there’s a good chance that you’re leaving with some fancy loot, as phases 4 & 5 are pretty easy compared to phase 3. Regardless, don’t lose focus – wipes are by no mean impossible and there’s still a LOT of time left.
This phase will start with Kael’thas casting Fireball on his high threat target, who is likely to be a healer or shadow priest with leftover threat from phase 3. A mage should be ready to use Counterspell, else you’re looking at one dead raid member.
You will want to position as follows:
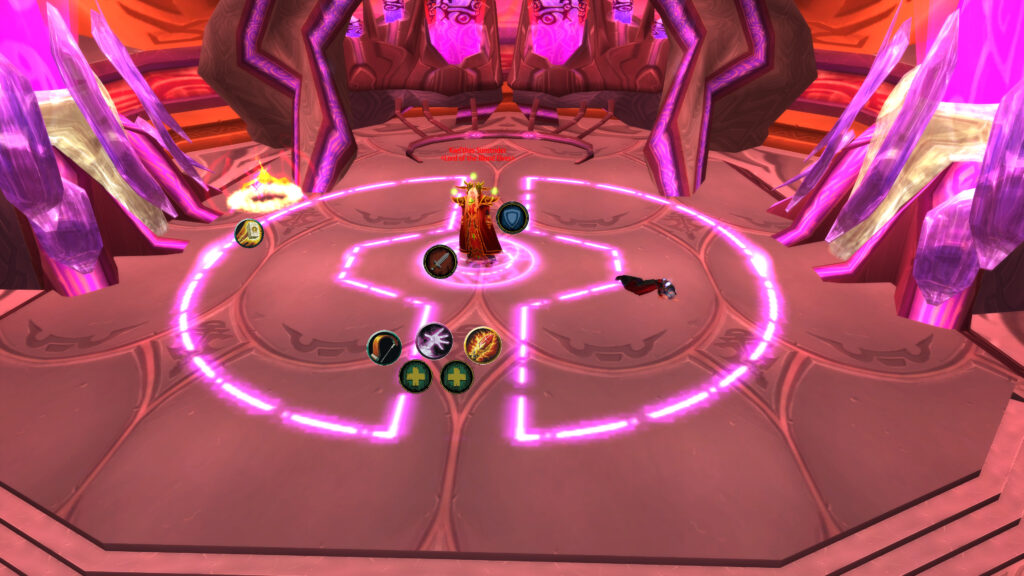
There are 3 main mechanics to look out for during this phase: Mind Control, Phoenix and Shock Barrier.
Mind Control will mind control (duh) 1 to 3 random raid members, increasing their damage and healing done by 100%. Your Infinity Blade users (hunters, rogues, warriors) need to free them by using their special attacks.
The Infinity Blade section of this guide has a macro you can use to make this process easier, as you do not need to switch targets in order to free them, and you deal minimal damage to them, minimizing deaths after they are free.
Phoenix is fairly easy to deal with. A dedicated tank (ideally a prot paladin) or a ranged player with a slow (hunter, elemental shaman) need to damage them so they are targeted, and then kite them away from your raid. The phoenixes deal damage to themselves, so you can just let them die on their own over time while you nuke Kael’thas.
When they’re about to die, your tank / kiter should move them back towards the raid — bring them close, but not too close, as they will explode on death. Your need to kill the Phoenix Eggs within 15 seconds, else they will come back to life and explode, dealing massive fire damage and knocking back players within ~8 yards.
If your raid’s DPS and healing are good enough, you can also afford to completely ignore the phoenixes during phase 4. Kael’thas becomes invulnerable for 50-60 seconds during the transition to phase 5, giving you ample time to go egg-busting while there’s nothing else to do — you will likely be able to kill 2 to 3 eggs in that time.
Shock Barrier is likely to be the biggest obstacle for groups with low total DPS. Your raid leader MUST be ready to call it out, and your raid needs to react to the call quickly, swapping to Kael’thas ASAP. If you’re too late with interrupting the first Pyroblast, your tank will need to react with his Phaseshift Bulwark‘s Arcane Barrier, but after that it is vital that you do not mess up with interrupting the 2nd one, or you will most likely wipe.
The biggest challenge of this phase comes when Shock Barrier and Mind Control are used at the same time, straining your raid’s focus, particularly with a Phoenix or Flame Strike added to the mix for some extra nastiness.
You will need to deal with these mechanics in the following order:
- Infinity Blade users free mind controlled players
- Break the Shock Barrier and interrupt Pyroblast
- Kill Phoenix Eggs if your raid is not ignoring them
Besides those 3 abilities, you’re only dealing with Arcane Disruption and Flame Strike, which are child’s play compared to what you’ve dealt with so far. Just make sure that you have a caster or feral druid giving your tank the staff’s Mental Protection Field aura at all times, and you’re most likely headed off to an easy-breezy phase 5.
Phase 5
After you get Kael’thas down to 50% HP, he will run back to the middle of his platform in panic and become untargetable for a good ~50-60 seconds while he powers up. The dude has watched too much Dragon Ball, to be frank.
Unlike Goku, Kael’thas is arguably weaker after “powering up”. He will no longer use Mind Control and Flame Strike, instead gaining access to Gravity Lapse, Nether Beam an Nether Vapor — not the greatest trade. With Mind Control out of the way, all but 1 of your Infinity Blade users can switch to different weapons, boosting your raid DPS.
Positioning for phase 5 will be the same the exact same as in phase 4. You will definitely want to ignore Phoenix adds and Phoenix Eggs in phase 5 if your raid DPS is good, focusing all of your damage on Kael’thas instead.
Roughly 10-15 seconds after phase 5 starts, Kael’thas will cast the first Gravity Lapse of the fight. He teleports every player to him, and then launches them into the air, giving them the ability to fly at the cost of taking 150 damage per second.
Your ranged DPS, tanks and healers need to quickly move away from the center of his platform. Melee DPS can stay in and damage him, but it will be very risky due to Nether Beam and the Nether Vapor clouds, while the reward is low due to Kael’thas absorbing a large part of all incoming damage thanks to repeated uses of Shock Barrier.
Regardless, everyone will want to slowly move towards the ground but avoid touching it, as that will lead to them taking damage and being launched up in the air again. Avoid the Nether Vapor clouds like they’re the plague, and make sure you’re close to the ground when Gravity Lapse ends to avoid dying to fall damage.
This part of the fight will largely depend on how many AoE healers like resto shamans and holy priests you have, and how good they are at raid healing under pressure. If you play carefully, everyone uses their Healthstones if they get low and you don’t end up losing your tank to Nether Vapor stacks, Gravity Lapse is completely manageable.
Kael’thas only casts Gravity Lapse roughly every 90 to 100 seconds, so with high enough DPS that might just be the only time you see Gravity Lapse before the arrogant prince of the elves finally goes down. Most guilds will likely see a 2nd one, but that’s it as far as big obstacles go — it is not uncommon for half the raid to die here and still get a kill.
Congratulations! With Kael’thas finally dead, your guild has fully cleared Tempest Keep: The Eye and earned a shot at his incredible loot pool. Only Lady Vashj inside the Serpentshrine Cavern stands between you and the Betrayer.



Your phase 4 information leaves alot to be desired. Not gonna mention how much damage you need to do to that shield to break it and then have a melee interupt it. Or since his shock barrier shield lasts 10 seoncds you can survive both pyroblasts and just kick the shield as it comes off naturally.
Hi there, illidain,
That’s a great addition! I’ve added the approximate damage required to break down the barrier.
I’m not sure what you mean when you say, “just kick the shield as it comes off naturally.”
Can you enchant the legendary weapons if you want to?
Yep, sure can. We regularly use oils on the staff etc.