- Author: Furious
- Date: July 9, 2020
- Updated: October 10, 2020
- Expansion: TBC Classic
Welcome to our TBC Classic strategy guide for Gruul’s Lair! Found in Blade’s Edge Mountains, Gruul’s Lair is one of the first raids you can experience in TBC. It is a 25 man raid of fairly basic difficulty, but it requires coordination and a decent DPS output. While you can enter at level 65, it is highly recommended to enter at level 70 with gear from dungeons instead.
Gruul’s Lair is home to just two boss encounters; High King Maulgar and the Dragonkiller himself. As a result, it is fairly quick and will serve as a nice chance of receiving loot each week. Neither encounter is overly difficult, but wiping is certainly possible if you ignore mechanics or have a particularly undergeared group. To help you figure out how to effectively clear Gruul’s Lair, our strategy guide below will cover how to access the entrance, how you should prepare for the raid, and detailed guides for both encounters. Good luck and let’s get started!
Attunement
Fortunately, no attunement process is required to enter Gruul’s Lair. It only requires level 65.
Accessing the Entrance
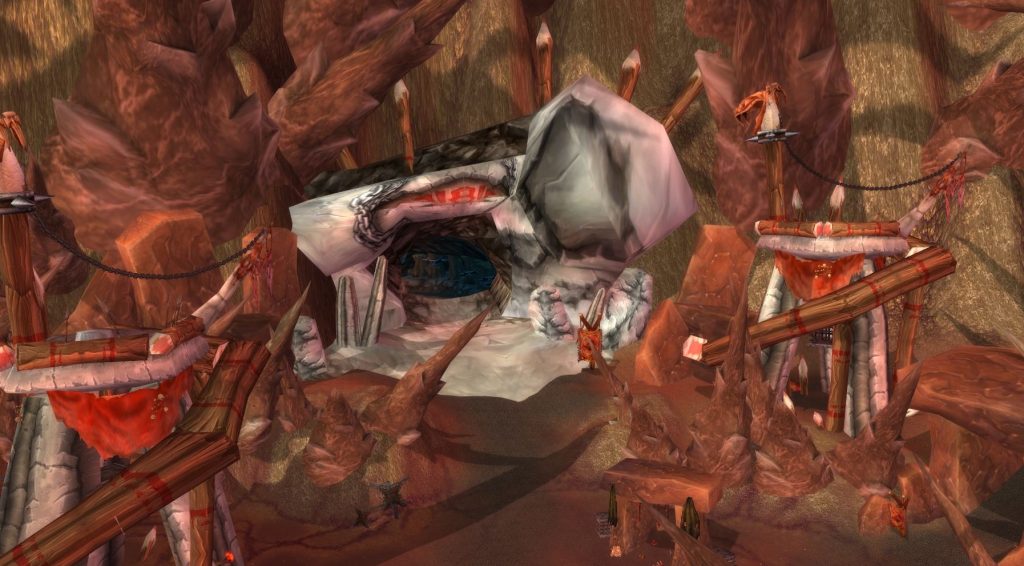
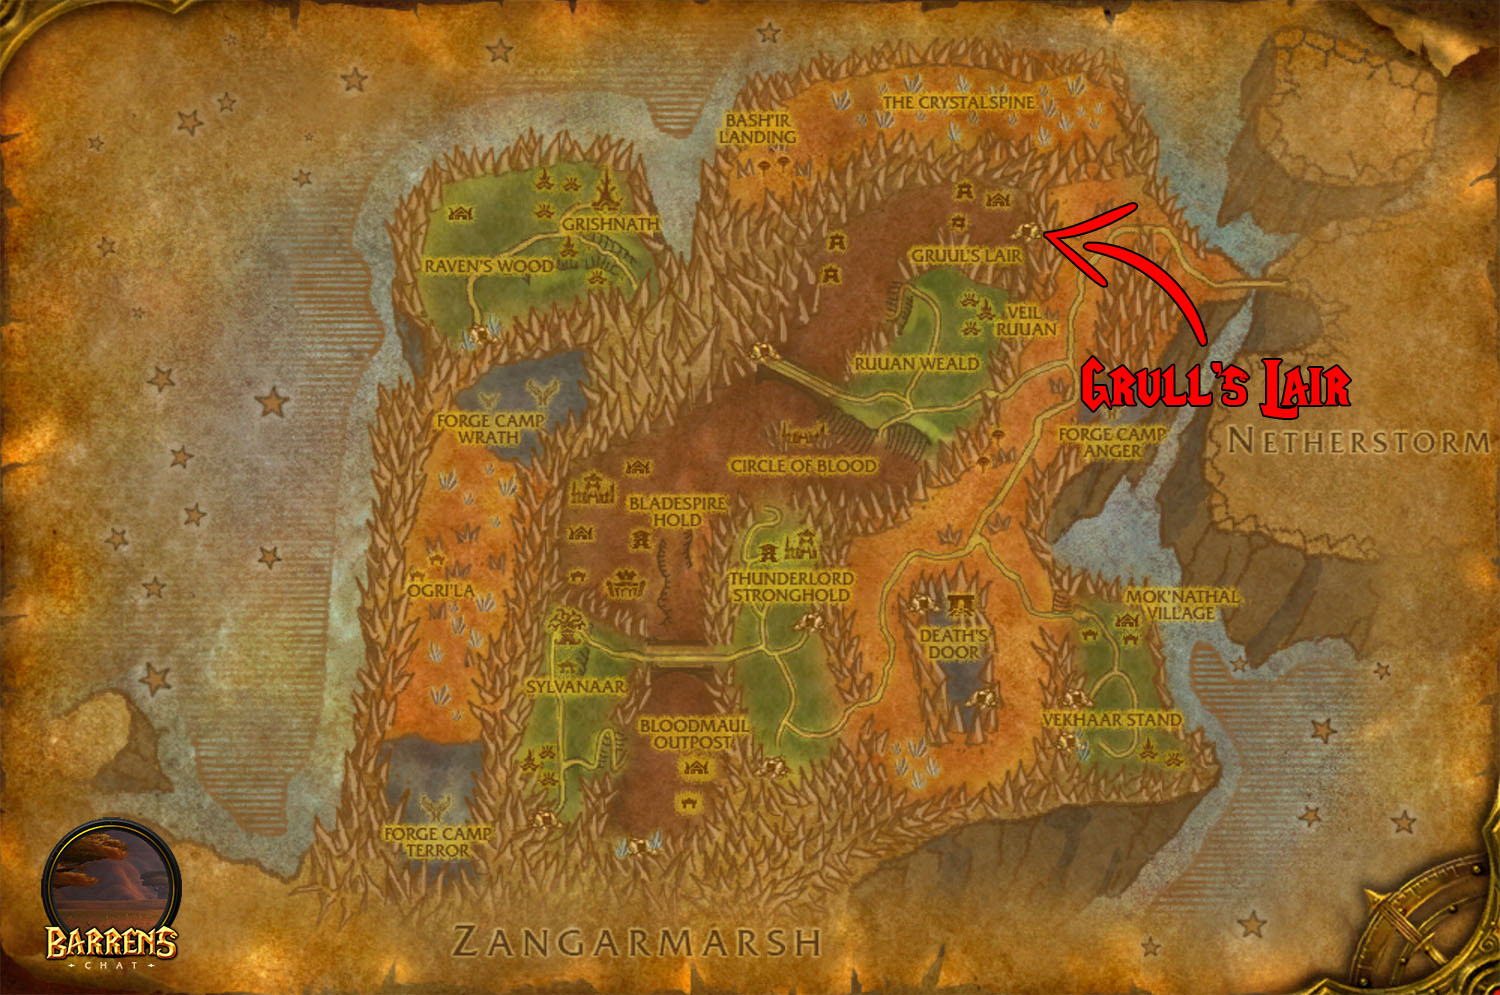
The entrance to Gruul’s Lair can be found in the northern portion of Blade’s Edge Mountains. It is marked on the map as Gruul’s Lair and can be accessed by running or flying north from the flight path at Evergrove (Ruuan Weald). It will be found in an ogre encampment and you should spot the entrance as a cavern in the wall.
Navigating Gruul’s Lair
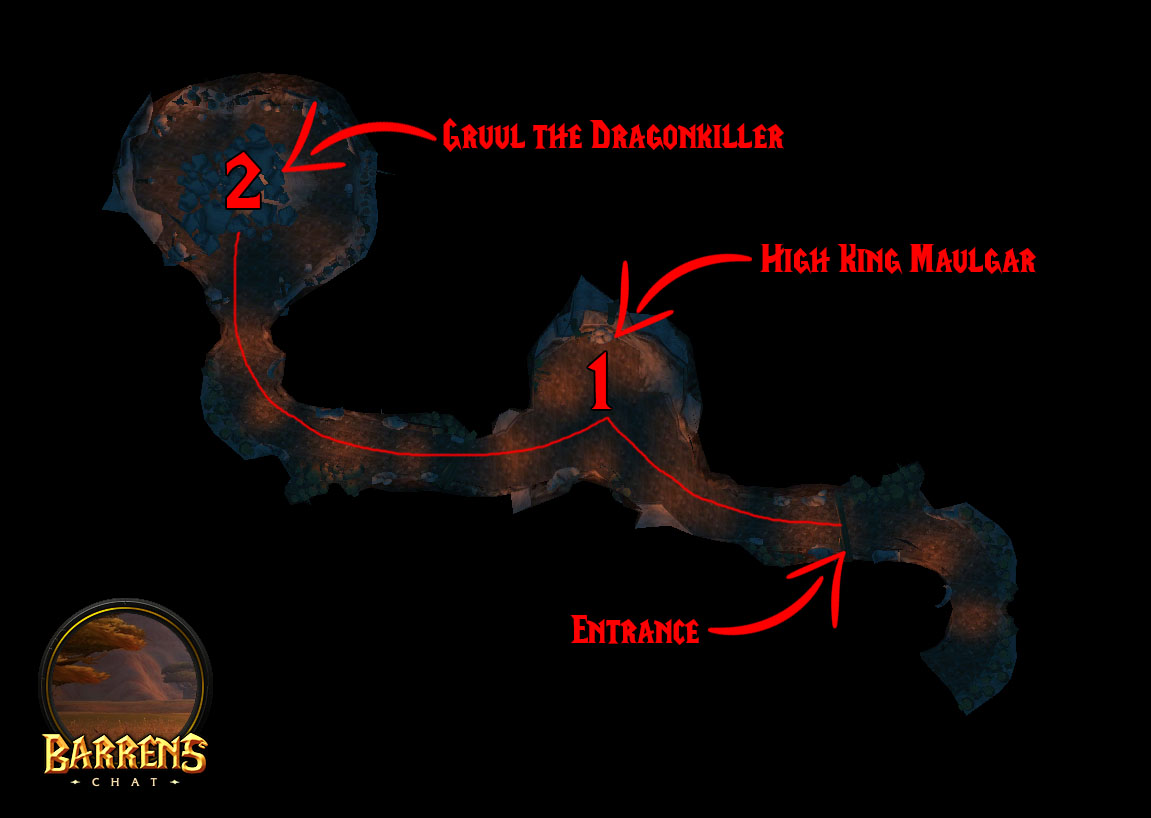
High King Maulgar > Gruul the Dragonkiller
There is only one way through Gruul’s Lair and that’s forward. You need to kill both bosses in the raid and they appear sequentially. First up is High King Maulgar and his council, followed by Gruul the Dragonkiller.
Raid Preparation
Because Gruul’s Lair is technically accessible at level 65 and has no attunement process, the requirements for completion are fairly minimal. Overall, the biggest is your raid composition containing a few specific classes to tackle specific mechanics in the raid. Beyond this, being level 70 and having at least blue gear should make things easier.
In particular, you’ll need 3 tanks and between 6-8 healers. Of the remaining DPS members, you should heavily prioritize ranged and casters. Specifically, you’ll want at least 2 hunters, 1 warlock, and 1 mage. Having paladins/shamans and druids are always helpful. If heavy on ranged, make sure to have at least 2 melee that can interrupt.
As far as gear goes, grab the best you have access to. At this point, it will likely be gear from level 70 dungeons. Try to avoid entering with questing and unenchanted gear. To make things easier, bring any consumables that you have access to. This includes food, potions, and bandages. For Gruul’s Lair specifically, you can also use the various Unstable Flasks for an extra punch. Finally, make sure you understand all the mechanics to avoid taking unnecessary damage!
To summarize:
- Composition: 25 raid members: 3 tanks, 6-8 healers, ranged/caster focused DPS group. At least 2 melee with interrupts, 2 hunters, 1 warlock, and 1 mage. A druid and paladin/shaman heavily recommended.
- Gear: Preferably dungeon gear with enchants and gems if appropriate. Crafted gear is also a bonus.
- Consumables: Basic raid consumables: food, potions, and bandages. Also bring class-appropriate Unstable Flasks for extra power.
Trash Mobs
Along the fairly short raid zone, you will face a few trash mobs that respawn after an hour. They are not particularly difficult, but should be pulled one pack at a time. Your general strategy should be to silence the Gronn-Priests when they try to heal and avoid standing behind the Lair Brutes. Doing this and pulling slowly will easily get you to both boss encounters without any deaths.
Boss Encounters
As mentioned earlier, there are just two boss encounters in Gruul’s Lair. Neither can be steamrolled and the mechanics must be respected. High King Maulgar is first and he is arguably more complicated, but Gruul has a tighter DPS requirement. We’ll separate each boss into an individual explanation below.
High King Maulgar
Preparation
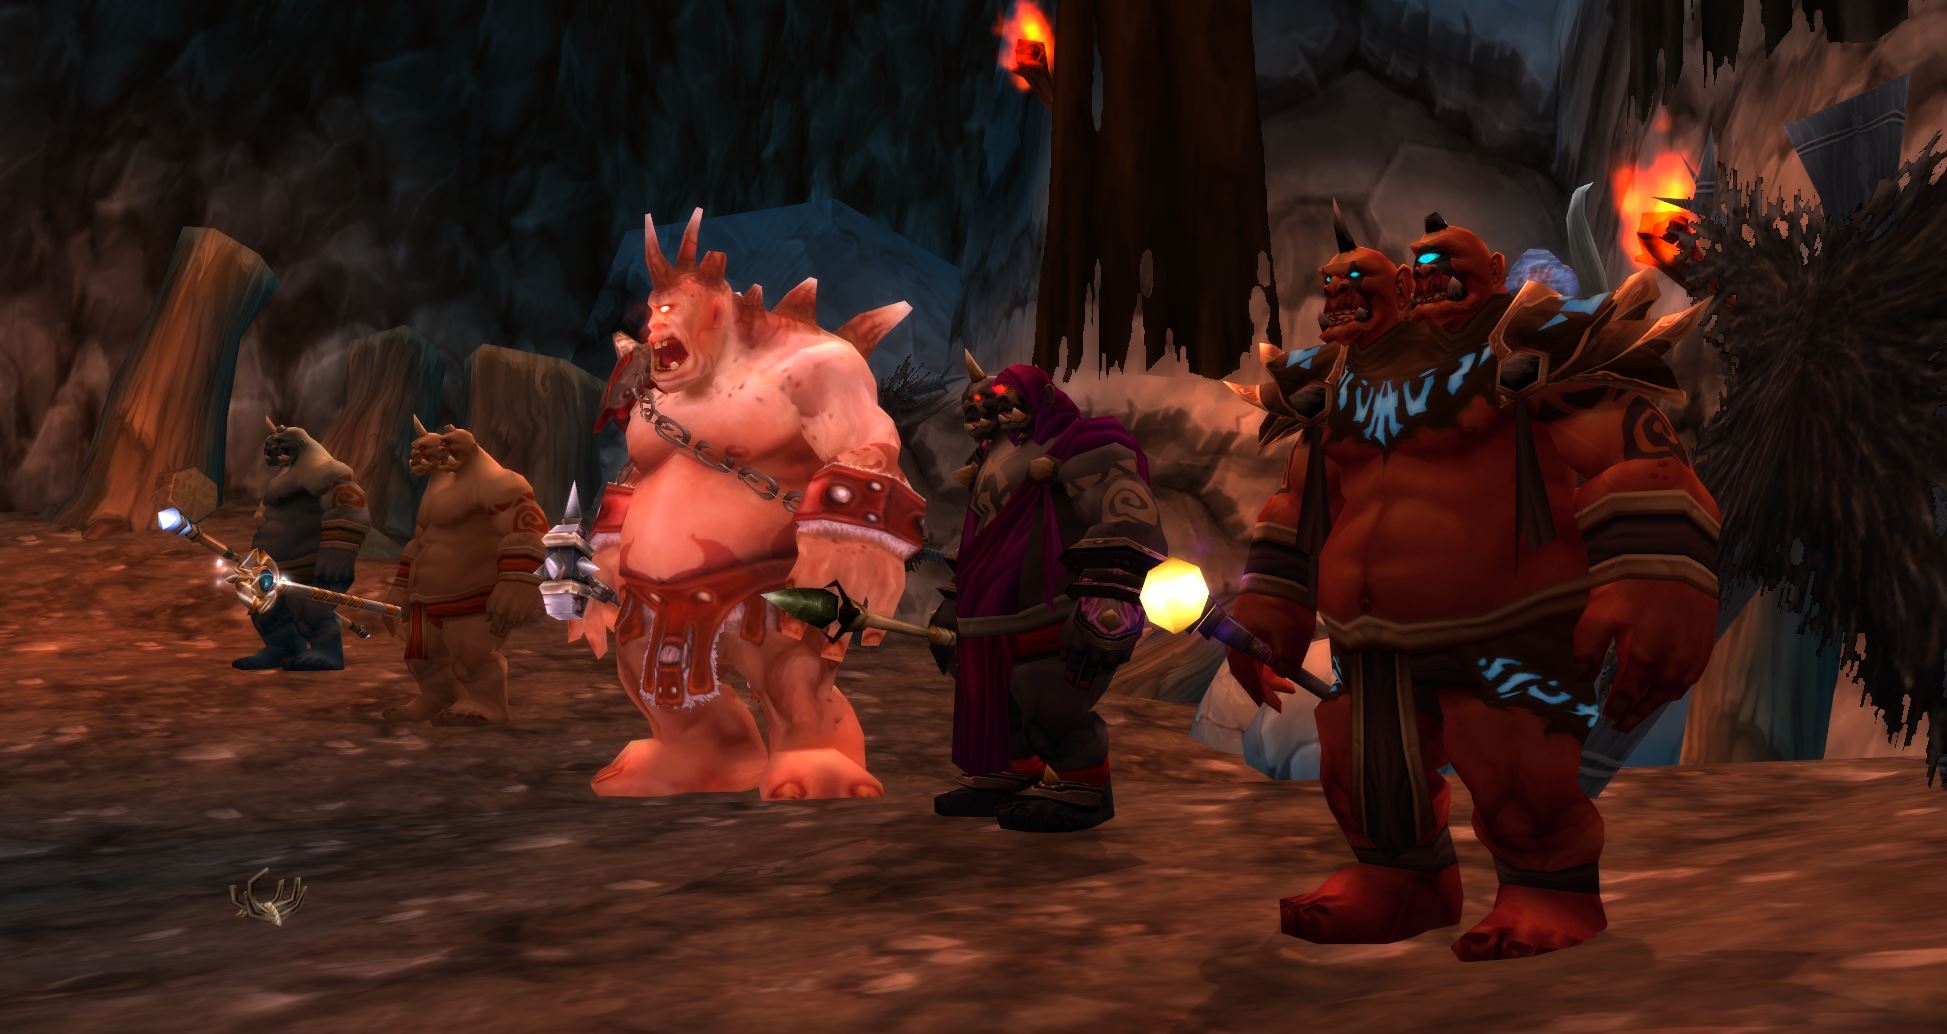
The fight with Maulgar involves himself and four powerful adds. The first part of the fight entails killing the four adds while the second half is killing Maulgar. The encounter becomes significantly easier after finishing off his allies. With that in mind, we’ll start with the four adds in the fight. Each will be tanked differently and use abilities that must properly be accounted for.
Here are each of the four adds in the fight and how they should be managed (this is also the recommended kill order):
- Blindeye the Seer (priest)
- This guy is the healer and should be focused first. He is the only add that will be tanked traditionally and should be picked up by the off tank.
- He uses three spells. The first is Prayer of Healing, which heals himself and nearby allies.
- More importantly, he will cast Power Word: Shield on himself and follow it up with Prayer of Mending. This grants him a shield and begins a 10 second cast heal that will fully restore his health if finished. The cast cannot be interrupted while the shield is active, making bursting through the shield a high priority.
- The cast can also be interrupted by select abilities even with the shield active: Silencing Shot, Intimidation, Improved Counterspell, Silence, Improved Kick, Intercept, and Improved Shield Bash.
- Olm the Summoner (warlock)
- Olm is a caster that should be killed second. He must be tanked by a warlock using Enslave Demon on his Wild Fel Stalker and a tank.
- Wild Fel Stalkers that are not being enslaved must be CCed via another warlock using Banish and Fear.
- He uses two spells. The first is Death Coil, which deals moderate damage to a random raid member.
- The second spell is Dark Decay, which is a stacking dot applied to his current target. It cannot be removed, but Wild Fel Stalkers frequently use an ability that removes it automatically.
- Krosh Firehand (mage)
- Krosh is another caster that deals heavy damage and he should be killed third. He will be tanked by a mage using Spellsteal to steal a Spell Shield preventing damage to Krosh. In return, it will protect the mage and allow them to tank the boss.
- Beyond his shield, he uses two spells. The first is Blast Wave, which hits all targets within 15 yards. This is fully avoidable with proper positioning.
- The second spell is Greater Fireball, which will deal heavy damage to his target. For this, the mage tank will need to have a high health pool to avoid an untimely death.
- Kiggler the Crazed (shaman)
- Technically a shaman, but uses several mage-like abilities and will be the final add you kill. He should be tanked by any pair of ranged DPS/casters; a boomkin can solo it or two hunters is also good.
- He uses four spells, although none are particularly threatening. The first is Greater Polymorph, which is an unremovable polymorph on his current target (boomkins are immune, making them ideal).
- His second spell is Lightning Bolt, which deals minor damage to his current target. This can be absorbed by a shaman’s Grounding Totem.
- The third spell is Arcane Explosion, which deals minor damage but drops threat and knocks back all targets within 30 yards that are hit. The offtank ranged DPS/caster must be ready to grab aggro if the other ranged tank is hit. He must also be positioned away from the raid to avoid unnecessary damage.
- The fourth spell is Arcane Shock, dealing insignificant damage but silencing for 5 seconds and disarming the target.
In addition to these four adds, you’ll face High King Maulgar at the same time. The fight with Maulgar can be separated into two phases based on his health pool. He will behave the same throughout the entire fight until he reaches 50% health, at which point he will enlarge and use two additional spells. Even before his second phase, he hits quite hard and will require constant healing for whoever is tanking him.
Maulgar’s core abilities include three melee-based attacks and a fear. The first is Arcing Smash, which hits his current target and anyone else directly in front of him. For this, he must always be faced away from the raid. His second ability is Mighty Blow, which deals moderate damage and knocks his target back. It’s best to have the tank’s back close to a wall to minimize knockback distance.
His other primary ability is Whirlwind. He will begin spinning for 15 seconds, dealing heavy damage every second to anyone hit by him. The raid must prioritize avoiding Whirlwind to prevent a wipe. Positioning Maulgar away from the raid is key to successfully clearing phase one.
Upon dropping him to 50% health, phase two will begin. He deals less damage during this phase, but he will charge at random raid members. This is not threatening, but he must quickly be taunted and pulled back away from the raid before he uses Whirlwind. His other ability is Intimidating Roar, which stuns the tank and fears nearby targets for 8 seconds. This will be used every 15 seconds and can quickly get hectic.
Execution
With this in mind, finishing the Maulgar encounter is a matter of dispatching his four adds in order and progressing through his two phases. An important step in the fight is the pull and properly positioning all the adds. Maulgar should be tanked by the gate to Gruul while Kiggler can be tanked near the entrance. Olm should be tanked in the back of the room and Krosh should be tanked on the right portion of the room. Blindeye should be held wherever there are few raid members.
Starting the fight in this position will minimize the amount of damage dealt by AoE abilities. From here, start on Blindeye and focus on breaking through his shield and interrupting his heal. Switch to Olm next and take out his minions. After Olm, proceed to Krosh so your mage no longer needs to tank. Finish off Kiggler last to stop Polymorph casts. Now focus on Maulgar and avoiding Whirlwind damage. Make sure the off tank is quickly taunting after charge casts and the fight should be no problem.
Role Summaries
DPS
- Follow the correct kill order (Blindeye > Olm > Krosh > Kiggler).
- Avoid damage from AoE sources (Maulgar’s Whirlwind, Krosh’s Blast Wave, Kiggler’s Arcane Explosion).
- Quickly burst through Blindeye’s Power Word: Shield and interrupt his Prayer of Mending.
Healers
- Have healers assigned to the ranged tanks of Krosh and Kiggler.
- Have at least one healer assigned to the main tank during phase one.
- Avoid damage from AoE sources (Maulgar’s Whirlwind, Krosh’s Blast Wave, Kiggler’s Arcane Explosion).
Tanks
- Main tank should be on Maulgar.
- Primary off tank should pick up Blindeye.
- Warlock and a secondary off tank (or two warlocks) should tank Olm.
- Mage should tank Krosh.
- Boomkin or two ranged DPS should tank Kiggler.
- During phase two, off tank must be ready to taunt the boss during Intimidating Roar.
Gruul the Dragonkiller
Preparation
Compared to the fight with Maulgar, Gruul’s encounter is fairly straightforward considering it is just a single phase and includes no adds. Despite that, there is heavy raid damage throughout the fight and a fairly tight DPS requirement due to how the fight gets progressively harder. As a result, you have no more than 10 minutes before Gruul’s damage overwhelms the raid. With that in mind, the fight is mainly about maximizing damage output.
To begin with, the core mechanic of the fight is Gruul’s Growth ability. This is a stacking buff cast every 30 seconds that increases Gruul’s damage by 15%. While it can stack to 30, 20 is easily enough to wipe the raid (happens at 10 minutes). The other significant mechanic involves Ground Slam. This randomly knocks back the entire raid and applies Gronn Lord’s Grasp, which stacks up to 5 times and reduces movement speed by 20% each stack.
After 5 Ground Slam casts, the entire raid will become Stoned and unable to move. At this point, Gruul will use Shatter, which deals damage based on how close you are to other Stoned raid members. Moderate damage is experienced beyond 15 yards, which means melee are at a disadvantage during this fight. The heavy damage output from Shatter can quickly cause healers to run out of mana, so it’s important to stay spread out as much as possible.
Another complication is his Reverberation ability. This will silence the entire raid for 4 seconds. Unfortunately, the spell cannot be avoided and will cause untimely wipes if not accounted for. This gives a good reason to keep the raid topped off at all times. Gruul will also use Cave In, which causes moderate damage per second to anyone standing in the affected area. The ground will give a brief warning before appearing, so the damage is mostly avoidable.
His only other ability includes Hurtful Strike, which does heavy damage to whoever is second highest on his threat list. This should be the off tank. With this in mind, the bulk of the fight is dealing with Ground Slam/Shatter and racing against Growth. Mitigating damage with proper positioning is key to avoiding deaths and losing crucial DPS uptime.
Execution
After setting up the initial pull, the fight is quite straightforward. Pull Gruul and tank him in the center of the room. Have all raid members spread out. Give a few seconds for the main and off tank to generate aggro on the boss. Watch for Ground Slam casts and run near a wall to avoid long knockbacks. Quickly reposition afterward and drag the boss back to the center of the room.
Rinse and repeat this until he casts Shatter. When 4 stacks of Gronn Lord’s Grasp are on the raid, stay spread out at all times to avoid unnecessary deaths. Afterward, resume killing the boss and avoiding Cave In. While 20 is surely enough stacks of Growth to wipe the raid, a smaller number like 16 is also high enough as well. Try to kill Gruul before 14 stacks of Growth to ensure a smooth kill.
Role Summaries
DPS
- Stay spread out during the entire fight. Prioritize being spread out above DPSing when 4 stacks of Gronn Lord’s Grasp are present.
- Hide in front of obstacles to avoid long knockbacks from Ground Slam.
- Avoid being in the top two for threat so you aren’t hit by Hurtful Strike.
- Don’t stand in Cave In.
Healers
- Stay spread out during the entire fight.
- Prioritize HoTs as much as possible to mitigate Reverberation. Make sure to cast them before the fifth Ground Slam/Shatter as well.
- Have a healer designated to healing the off tank.
- Hide in front of obstacles to avoid long knockbacks from Ground Slam.
- Don’t stand in Cave In.
Tanks
- Main tank should keep the boss in the center of the room.
- Off tank must constantly build threat to soak Hurtful Strike.
- The secondary off tank should use Intervene on the main tank during Reverberation.
About the Author