Magtheridon’s Lair Raid Guide
Welcome to our Magtheridon’s Lair strategy guide for WoW TBC Classic! Magtheridon’s Lair is located in Hellfire Peninsula as part of Hellfire Citadel. It is one of the earliest raids you can encounter and requires level 65 to enter, although 70 is heavily recommended. It requires 25 players and is more of a DPS race with a requirement on raid composition than anything else.
Magtheridon’s Lair has just a single encounter in it; Magtheridon. This makes the raid quite fast and a great source of loot at the beginning of the expansion. His encounter entails a few relatively straightforward mechanics that can easily be addressed. Beyond that, there are a few other things you’ll need to know about the raid. Our strategy guide will cover this below, including how to enter the lair, how to prepare for it, and detailed instructions on how to kill Magtheridon. Let’s get started so you can get your loot!
Attunement
Magtheridon’s Lair does not have an attunement process. You only need to be level 65 and in a raid group to zone in.
Accessing the Entrance
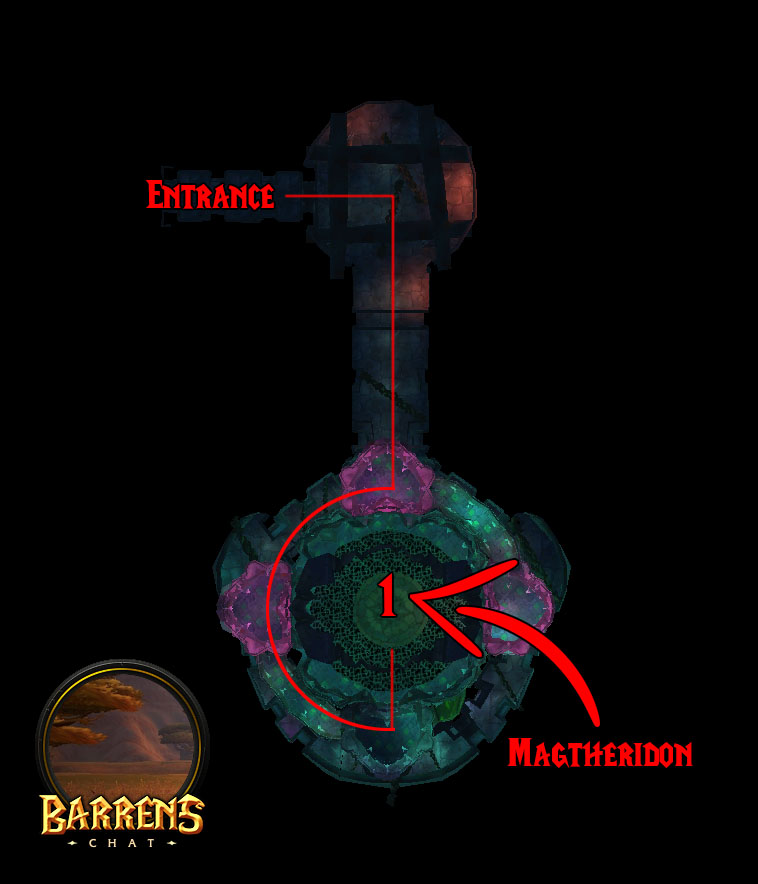
You’ll find the entrance to Magtheridon’s Lair in Hellfire Peninsula. It’s in the middle of the map at Hellfire Citadel. Horde can fly or run from Thrallmar while alliance can fly/run from Honor Hold. The entrance portal and summoning stone can be found in the southwest portion of the citadel on the chasm floor. Hidden in a corner, you’ll see an opening in the wall that will lead you to the entrance to the raid.
Navigating Magtheridon’s Lair
Trash > Magtheridon
The route through Magtheridon’s Lair is linear and involves just one boss encounter. There are trash mobs along the way, which must be killed before dealing with the boss.
Raid Preparation
The requirements for Gruul’s Lair are fairly minimal, beyond needing several warlocks. This is largely due to a lack of an attunement process and being able to zone in at level 65. Despite this, you’re much better off attempting the raid at level 70. This will give access to better gear and all abilities, making the fight significantly easier.
A good composition involves 25 players of level 70. Of them, you’ll need at least 4 tanks, but 5 is better. 8-10 healers is a good range to comfortably keep the raid alive. Your DPS group can be a mix of ranged and melee, but you should prioritize classes that can interrupt. Most importantly, you’ll need 4 warlocks (preferably 5) to handle adds.
Gear is not overly important, but the better it is, the easier the fight will be. Entering with mainly greens and no enchants is a quick recipe for a hard fight. To boost your raid’s DPS output, you should make use of as many consumables as possible. This includes your standard potions, flasks/elixirs, food, and bandages. Lastly, don’t forget to read through the boss fight!
To summarize:
- Composition: 25 players: 4-5 tanks, 8-10 healers, mixed DPS group with preference for interrupters. At least 4 warlocks (5 is better). A druid and paladin/shaman also recommended.
- Gear: The best gear you can get (likely dungeon gear).
- Consumables: Any available raid consumables: potions, flasks/elixirs, bandages, and food.
Trash Mobs
Before fighting Magtheridon, you’ll need to deal with four packs of Hellfire Warders. They are not very deadly, but should be pulled one pack at a time to avoid deaths. Make sure to interrupt Shadow Bolt Volley and run away from Rain of Fire to easily kill them. Failing to kill the trash packs will result in them patrolling and aggroing during the encounter.
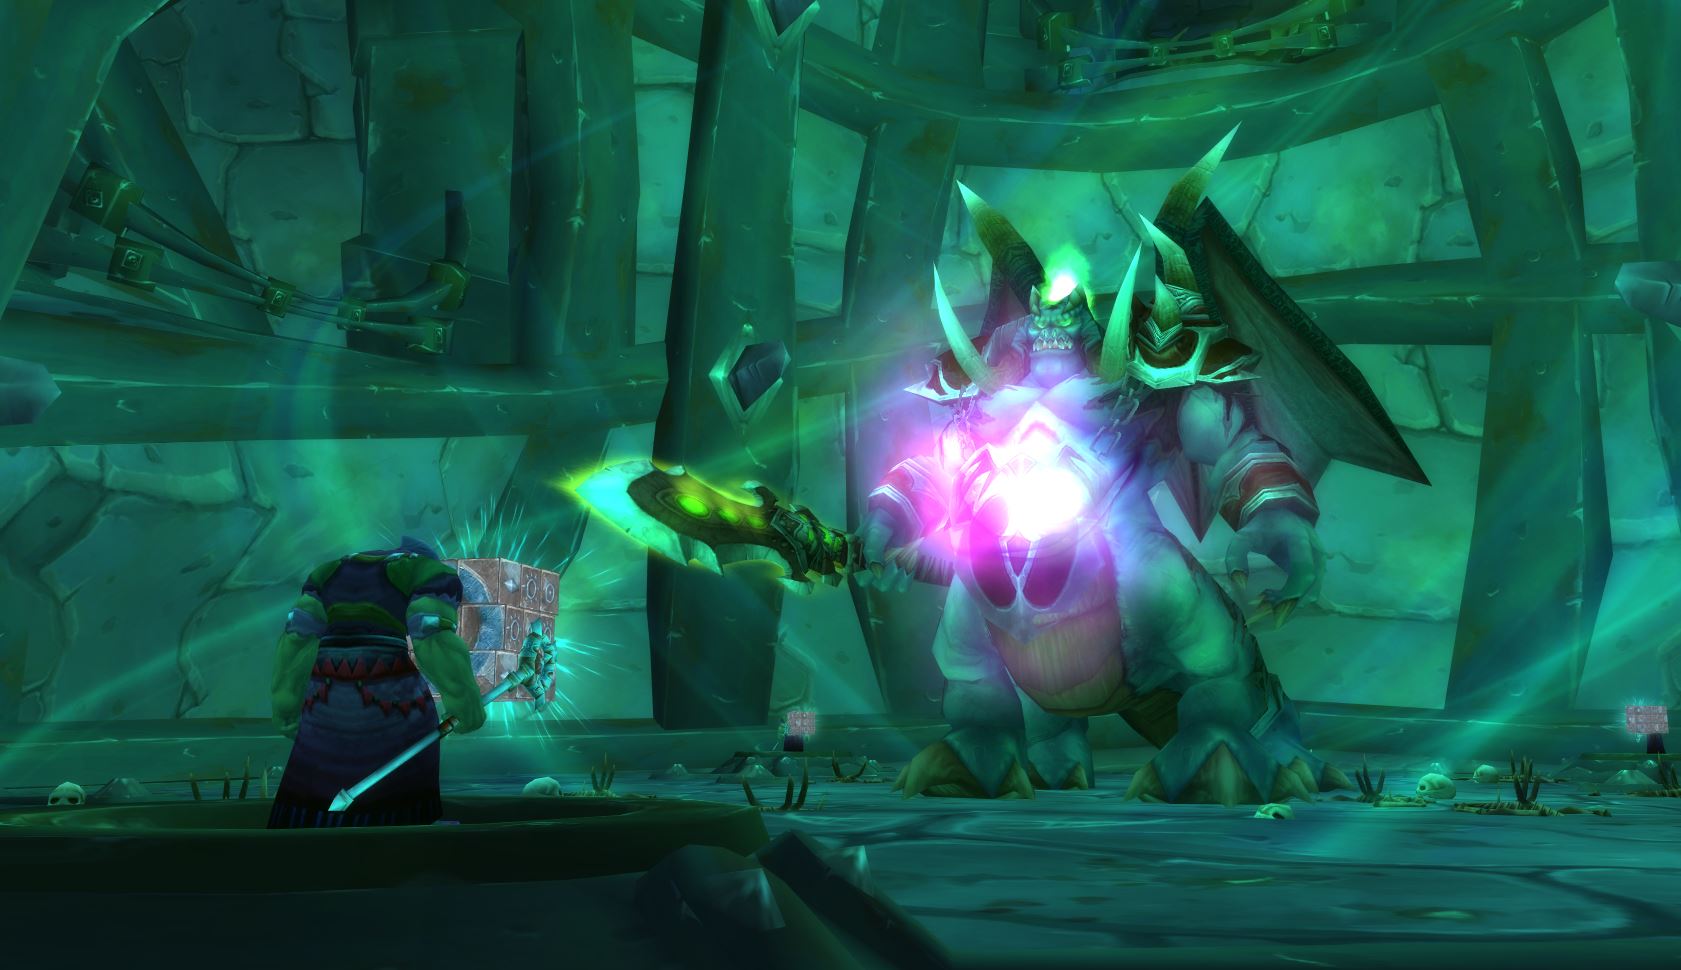
Magtheridon Encounter
The Magtheridon encounter consists of three distinct phases. Phase one involves his Hellfire Channelers and the final two phases involve Magtheridon directly. The fight gets progressively harder with each phase and there are multiple unavoidable mechanics that will result in death if not appropriately handled. Each will be handled a little differently, so we’ll split each phase into an individual breakdown below.
Phase One
In the first phase, you’ll deal entirely with the Hellfire Channelers. There are five of them spread around the room and each must be tanked where they stand to avoid multiple Shadow Bolt Volleys on the raid. This deals light damage to all targets within 30 yards. More problematic is their Dark Mending ability, which heals any channeler for 1/8th of their health. This can and should be interrupted to avoid prolonging phase one. The channelers will also use Fear on a random target.
As you kill each channeler, the surviving channelers will gain a stacking buff; Soul Transfer. This increases casting speed and damage by 30%, meaning the final channeler will be extremely strong. The last thing to note about the channelers is their summoning ability, which is why you need warlocks. This spawns a Burning Abyssal (each channeler can summon them) that does fire damage to nearby targets and hits quite hard. They should be quickly CCed via Banish to render them useless.
Considering this, you’ll need one tank and one warlock by each channeler. If you’re short on warlocks, you can simply offtank the Burning Abyssal and quickly kill it. Phase one is fairly simple if your warlocks are on their game and your melee DPS can reliably interrupt Dark Mending. The phase lasts for two minutes before phase two begins. In that time, you should have at least three channelers dead before Magtheridon begins to attack.
Phase Two
After phase two begins, Magtheridon will become attackable. Let the main tank quickly pick him up and give a few seconds before attacking to build aggro. Kill off the surviving channelers so you can focus on the boss. You’ll now need to deal with Magtheridon’s abilities. The first is your standard Cleave, meaning that raid members will need to avoid standing in front of the boss. He will also cast Conflagration, which turns an area of the floor into fire, dealing heavy damage to anyone standing in it.
Magtheridon will also use two spells on longer cooldowns throughout the fight. The first of them is Quake, which hits the entire raid for 7 seconds, interrupting spell casts and knocking players back every second of the duration. It will be cast every 50 seconds, beginning 40 seconds into the fight. His other ability is Blast Nova, which is the most important mechanic to be aware of. This is cast every minute and will apply a heavy damage DoT to the entire raid if allowed to successfully cast.
However, Blast Nova can be prevented in one way. During phase one, each channeler stood next to a Manticron Cube. These cubes must be used during phase two (and three) simultaneously to interrupt his spell cast. All five cubes must be clicked on and channeled at the same time. Note that they will deal damage each second while channeling, so whoever hits them must be quick about it.
The best way to deal with this is by having four groups of five designated cube clickers for the entire fight with a designated backup for each cube. Beyond this, phase two is fairly simple if your assigned cube clickers know what they’re doing. Simply run away from fire, don’t stand in front of the boss, and burn him down until he reaches 30% health, which will begin phase three.
Phase Three
Phase three is almost the same as phase two, except Magtheridon will now cause the roof to collapse frequently. This will be signaled by him shattering the walls at the beginning of the phase, which delas heavy damage and stuns the entire raid. Because of this, it’s important to delay phase three until Blast Nova occurs to avoid getting stunned when he begins his cast.
After the initial break, the roof will periodically collapse and drop to the ground throughout the fight. A visual indicator will appear on the ground that gives you time to avoid it. If you don’t move quickly enough, it will kill whoever is hit by it. With this in mind, players must always be watching their feet and moving if in range of a collapse. Make sure to not stand not Manticron Cubes to avoid dropping the roof there and making it unusable during Blast Nova.
Beyond this, you’ll need to deal with the same mechanics in phase two (Cleave, Conflagration, Quake, and Blast Nova). Remember to avoid the front of the boss and run away from fire patches on the ground. Stay on top of Blast Nova casts by quickly clicking the Manticron Cubes. By doing this, you’ll surely topple Magtheridon. One last thing to keep in mind is a hard enrage at 22 minutes, but an earlier wipe or kill is far more likely.
Role Summaries
DPS
- Interrupt Dark Mending in phase one.
- Warlocks should Banish Burning Abyssals. Alternatively, they must be quickly tanked and killed.
- At least three channelers should die before phase two.
- Kill remaining channelers before switching to Magtheridon.
- Avoid the front of the boss and run away from ground affected by Conflagration.
- Have 5 designated cube-clickers and 5 backups. They must always simultaneously click the Manticron Cubes to interrupt Blast Nova casts.
- Avoid collapsing roof in phase three.
Healers
- Have at least one healer assigned to each channeler tank in phase one.
- Heal whoever is hit by Burning Abyssals.
- Be prepared for ramping damage toward the end of phase one.
- Avoid the front of the boss and run away from ground affected by Conflagration.
- Use HoTs on the raid before Quake casts.
- Top off the raid before phase three and apply HoTs.
- Quickly heal the entire raid at the beginning of phase three.
- Avoid collapsing roof in phase three.
Tanks
- One tank should be assigned to each channeler in phase one. Keep them in place.
- Help interrupt Dark Mending in phase one.
- Be prepared for heavy damage toward the end of phase one. Use defensive cooldowns.
- Quickly pick up Magtheridon at the start of phase two and bring him near the wall, face him away from the raid.
- Off tanks should avoid the front of the boss and run away from ground affected by Conflagration.
- Use defensive cooldowns at the end of phase two.
- Avoid collapsing roof in phase three.
Author

If I'm not working or spending time with the family I'm probably gaming. Some of my favorite recent games I've played are Far Cry 5, World of Warcraft Classic, and 7 Days to Die.
there’s a debuff after using the cubes that won’t let you use them for another 90s
we’re seeing an issue where the blast nova’s happen too frequently after phase 3 starts. Is that expected?
It was a bug. There’s been a blue post fixing it recently. We just did it tonight and had no issues.
This is the worst boss guide I’ve ever read. GJ
We’d love to hear from you how we could make it better :)
I think y’all did a good job on the guide.
I noticed the buff channelers provide when they die says it increases casting speed by 30%. However the link to the actual spell in the TBC database says 10%.
I think 30% is more accurate, based on experience. Assuming the TBC database link’s information is incorrect.
Not OP, but actually getting your information and the strat right might be a good place to start.
I can accept mistakes being made in the guide, but without telling us what’s wrong, how are we to improve?
The infernals are not killable. They have 2.1million health. (about half of Mag’s health). Having some suggestions for if you don’t have 5 warlocks would be helpful. They can be stunned, feared, put in freezing traps, basically any cc. They have a duration of somewhere between 40 seconds and a minute.
Also as, I believe, was previously mentioned, the number of cube clickers is higher than stated in the guide. We needed 20. 4 sets of 5 before the debuff was falling off the first set.