- Author: Tavon
- Date: May 13, 2022
- Updated: May 25, 2022
- Expansion: TBC Classic


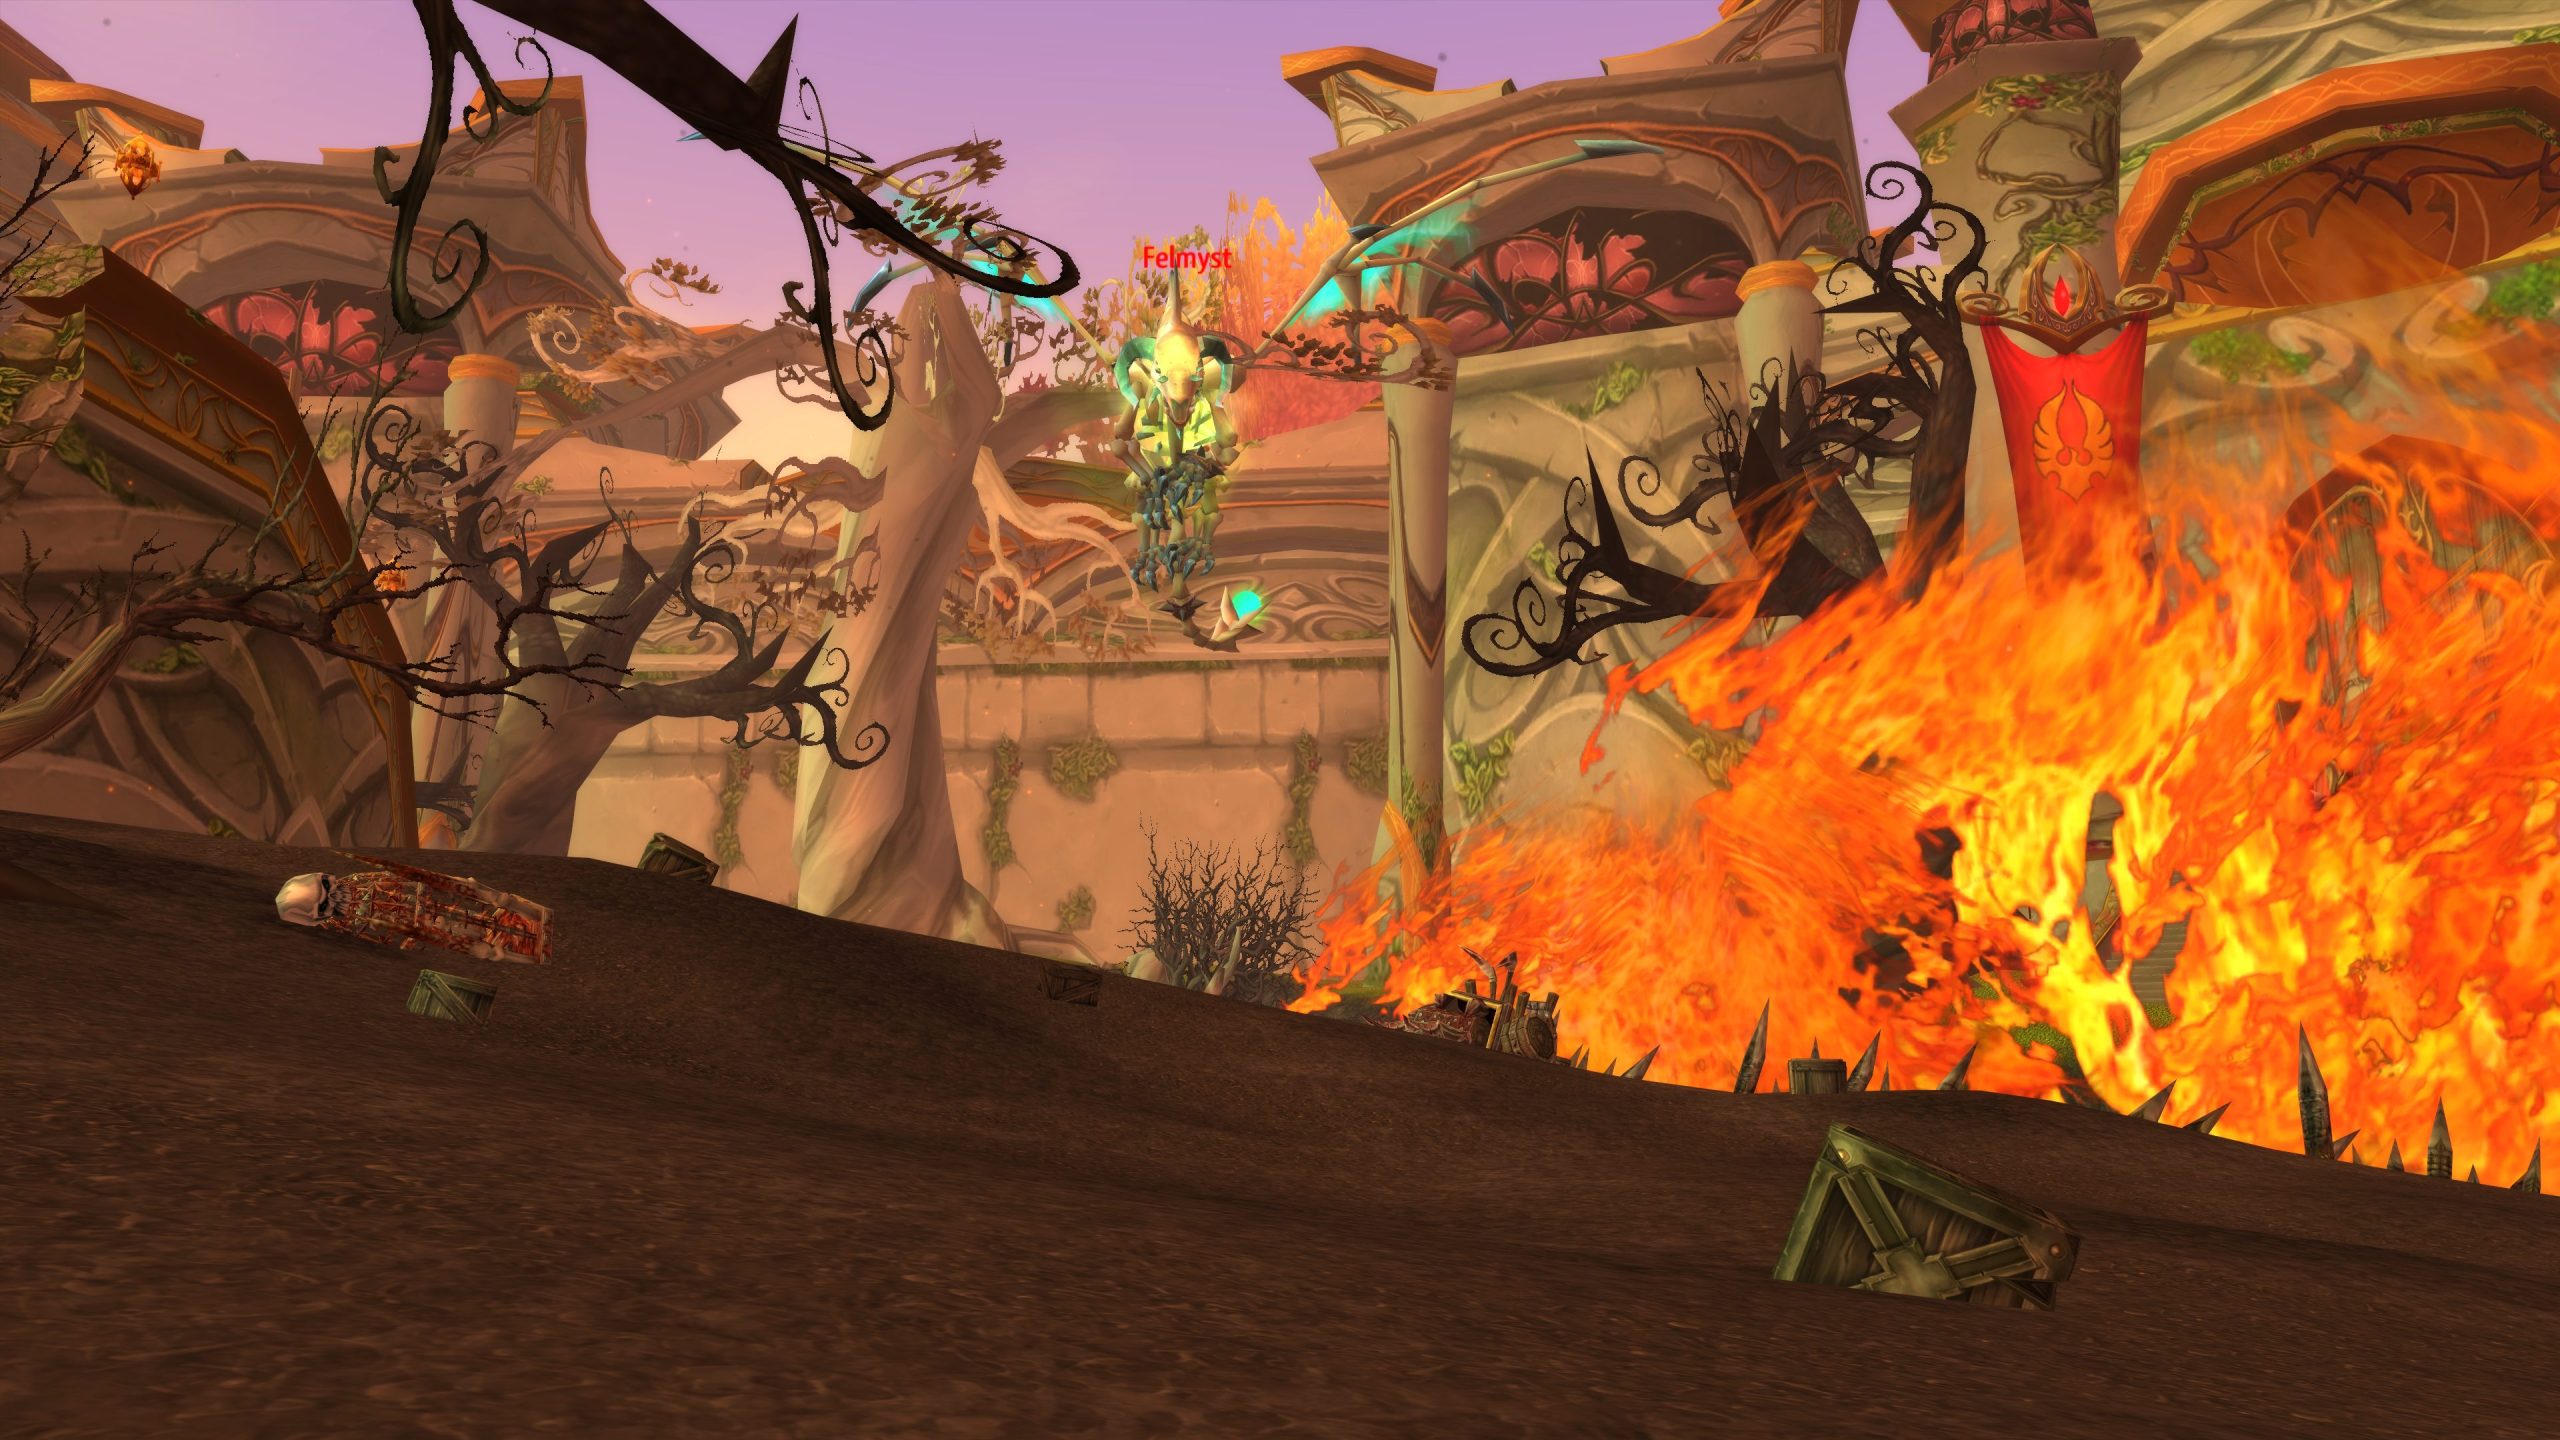
The risen Fel Dragon, Felmyst, is the third boss that players will encounter in the Sunwell Plateau raid. She is located in the Dead Scar, at the exact same place that players fought the previous boss, Brutallus. Formerly the Blue Dragon Madrigosa, Felmyst is risen from her corpse upon Brutallus’ demise, as his blood seeps into the ground, corrupting and animating the dragon’s dead body.
Compared to the other encounters in Sunwell Plateau, Felmyst is considered to be one of the easiest, alongside Kalecgos. That’s not to say it’s easy however — her encounter is highly dynamic, and will require quick reactions in order to avoid multiple mechanics that can kill players and wipe your raid.
This guide will offer a detailed, step-by-step tutorial on how to quell Felmyst’s rage, allowing Madrigosa to die with dignity.
Role Summaries
- Make sure you have multiple Master Healthstones if they are available to your raid, you’ll need them
Ground Phase
- Quickly move to your camp and stay there — see the The Pull section
- Priests: Be ready to Mass Dispel Felmyst’s Gas Nova immediately as she starts casting it
- If Felmyst turns to face your camp, you are being targeted by Encapsulate; immediately run away & use Master Healthstones to survive
- Use mobility spells like Blink & Sprint to move away during Encapsulate
- Paladins, Mages, Rogues: Use Divine Shield, Ice Block & Cloak of Shadows to remove Encapsulate
Air Phase
- Move towards the center of the arena when Felmyst takes off, close to other players
- If you are targeted by Felmyst’s green beam, run away from it n a circular pattern; see the Air Phase section
- Do not touch the green fog left behind by the green beam – you will spawn undead mobs and take big damage
- Stack up with the raid after the 2nd green beam fades
- Stay with the raid and be ready to move to a safe zone 3 times in a row after the 2nd green beam fades; see the Air Phase section
- Wait a few moments before you start DPSing the boss at the start of the fight — the tank can’t do threat until she lands
Ground Phase
- Use your cooldowns when your raid uses Heroism / Bloodlust during the ground phase for maximum damage output
- Shadow Priests, Warlocks: Be careful with your self-damage if Encapsulate is coming up
Air Phase
- Give the tank a few moments to build threat before AoEing the adds
- The tank cannot deal threat while Felmyst is airborne, so watch your threat on her
- If you over-aggro the tank, move in front of Felmyst when she lands and die there, or you’ll wipe the raid
Ground Phase
- Tank Healers: Keep the MT healthy at all times during the ground phase & pump heals when they have Corrosion
- Tank Healers: One of you needs to dispel the main tank when Gas Nova comes
- Raid Healers: Noxious Fumes is easy to heal, but don’t slack; everyone must be at 100% HP at all times in order to survive Encapsulate
- Raid Healers: Use your instant heals to save the player targeted by Encapsulate
Air Phase
- Quickly heal people who get hit by the beam or green poison, the DoT it applies hurts a lot
- Don’t heal the moment adds spawn or they will go after you
- Be between the tank and the adds so they have an easier time picking them up
- Don’t slack and stop healing the tank just because they’re not taking damage for a little bit
Ground Phase
- Make sure Felmyst never faces the raid and that you don’t stand close to anyone else, as Cleave will 1-shot them
- Corrosion causes you to take double damage for 10 seconds, consider using defensive cooldowns & trinkets
Air Phase
- Stand close to the poison left behind by Felmyst’s green beam — that’s where the undead adds will spawn
- Use a spell power trinket or other cooldown to build some threat on the adds quickly
- Offtanks: Pick up any loose adds that start going for DPS or healers
Abilities
Felmyst’s encounter consists of two phases, the ground phase and the air phase, each with different abilities. Felmyst will constantly alternate between those two phases. There is no threat reset between the phases, unlike many bosses with a ground / flying phase split.
Ground Phase
During her ground phase, Felmyst is fought normally, like any other boss. Each ground phase will last 60 seconds before Felmyst transitions to the flying phase. Each ground phase will typically have Felmyst cast Gas Nova and Corrosion twice each, and Encapsulate once — not in that order, and not always that many times. Encapsulate in specific can vary wildly, sometimes being cast 0 times per ground phase and other times 2, but most often just 1.
Air Phase
After 60 seconds of her ground phase, Felmyst will do a ~5 second animation and then take off into the sky, signifying the start of the air phase. During her air phase, she won’t use any of her ground phase abilities, using unique air phase abilities instead. The air phase will last 100 seconds, followed by a ~10 second landing animation, after which the fight goes back to ground phase, repeating from the start.
The air phase is similar to that of Nightbane in Karazhan, in that she cannot really be tanked at this point, she just flies around using her abilities. Ranged players can attack her while she’s immediately overhead, but nobody else can, so they should be mindful of their threat — there’s no threat reset when she lands. Her abilities come in a fixed order: Demonic Vapor twice, followed by Fog of Corruption three times.
Raid Composition & Preparation
The Pull
Felmyst will fly around in the sky around Brutallus’ arena — there is no trash at all before her encounter.
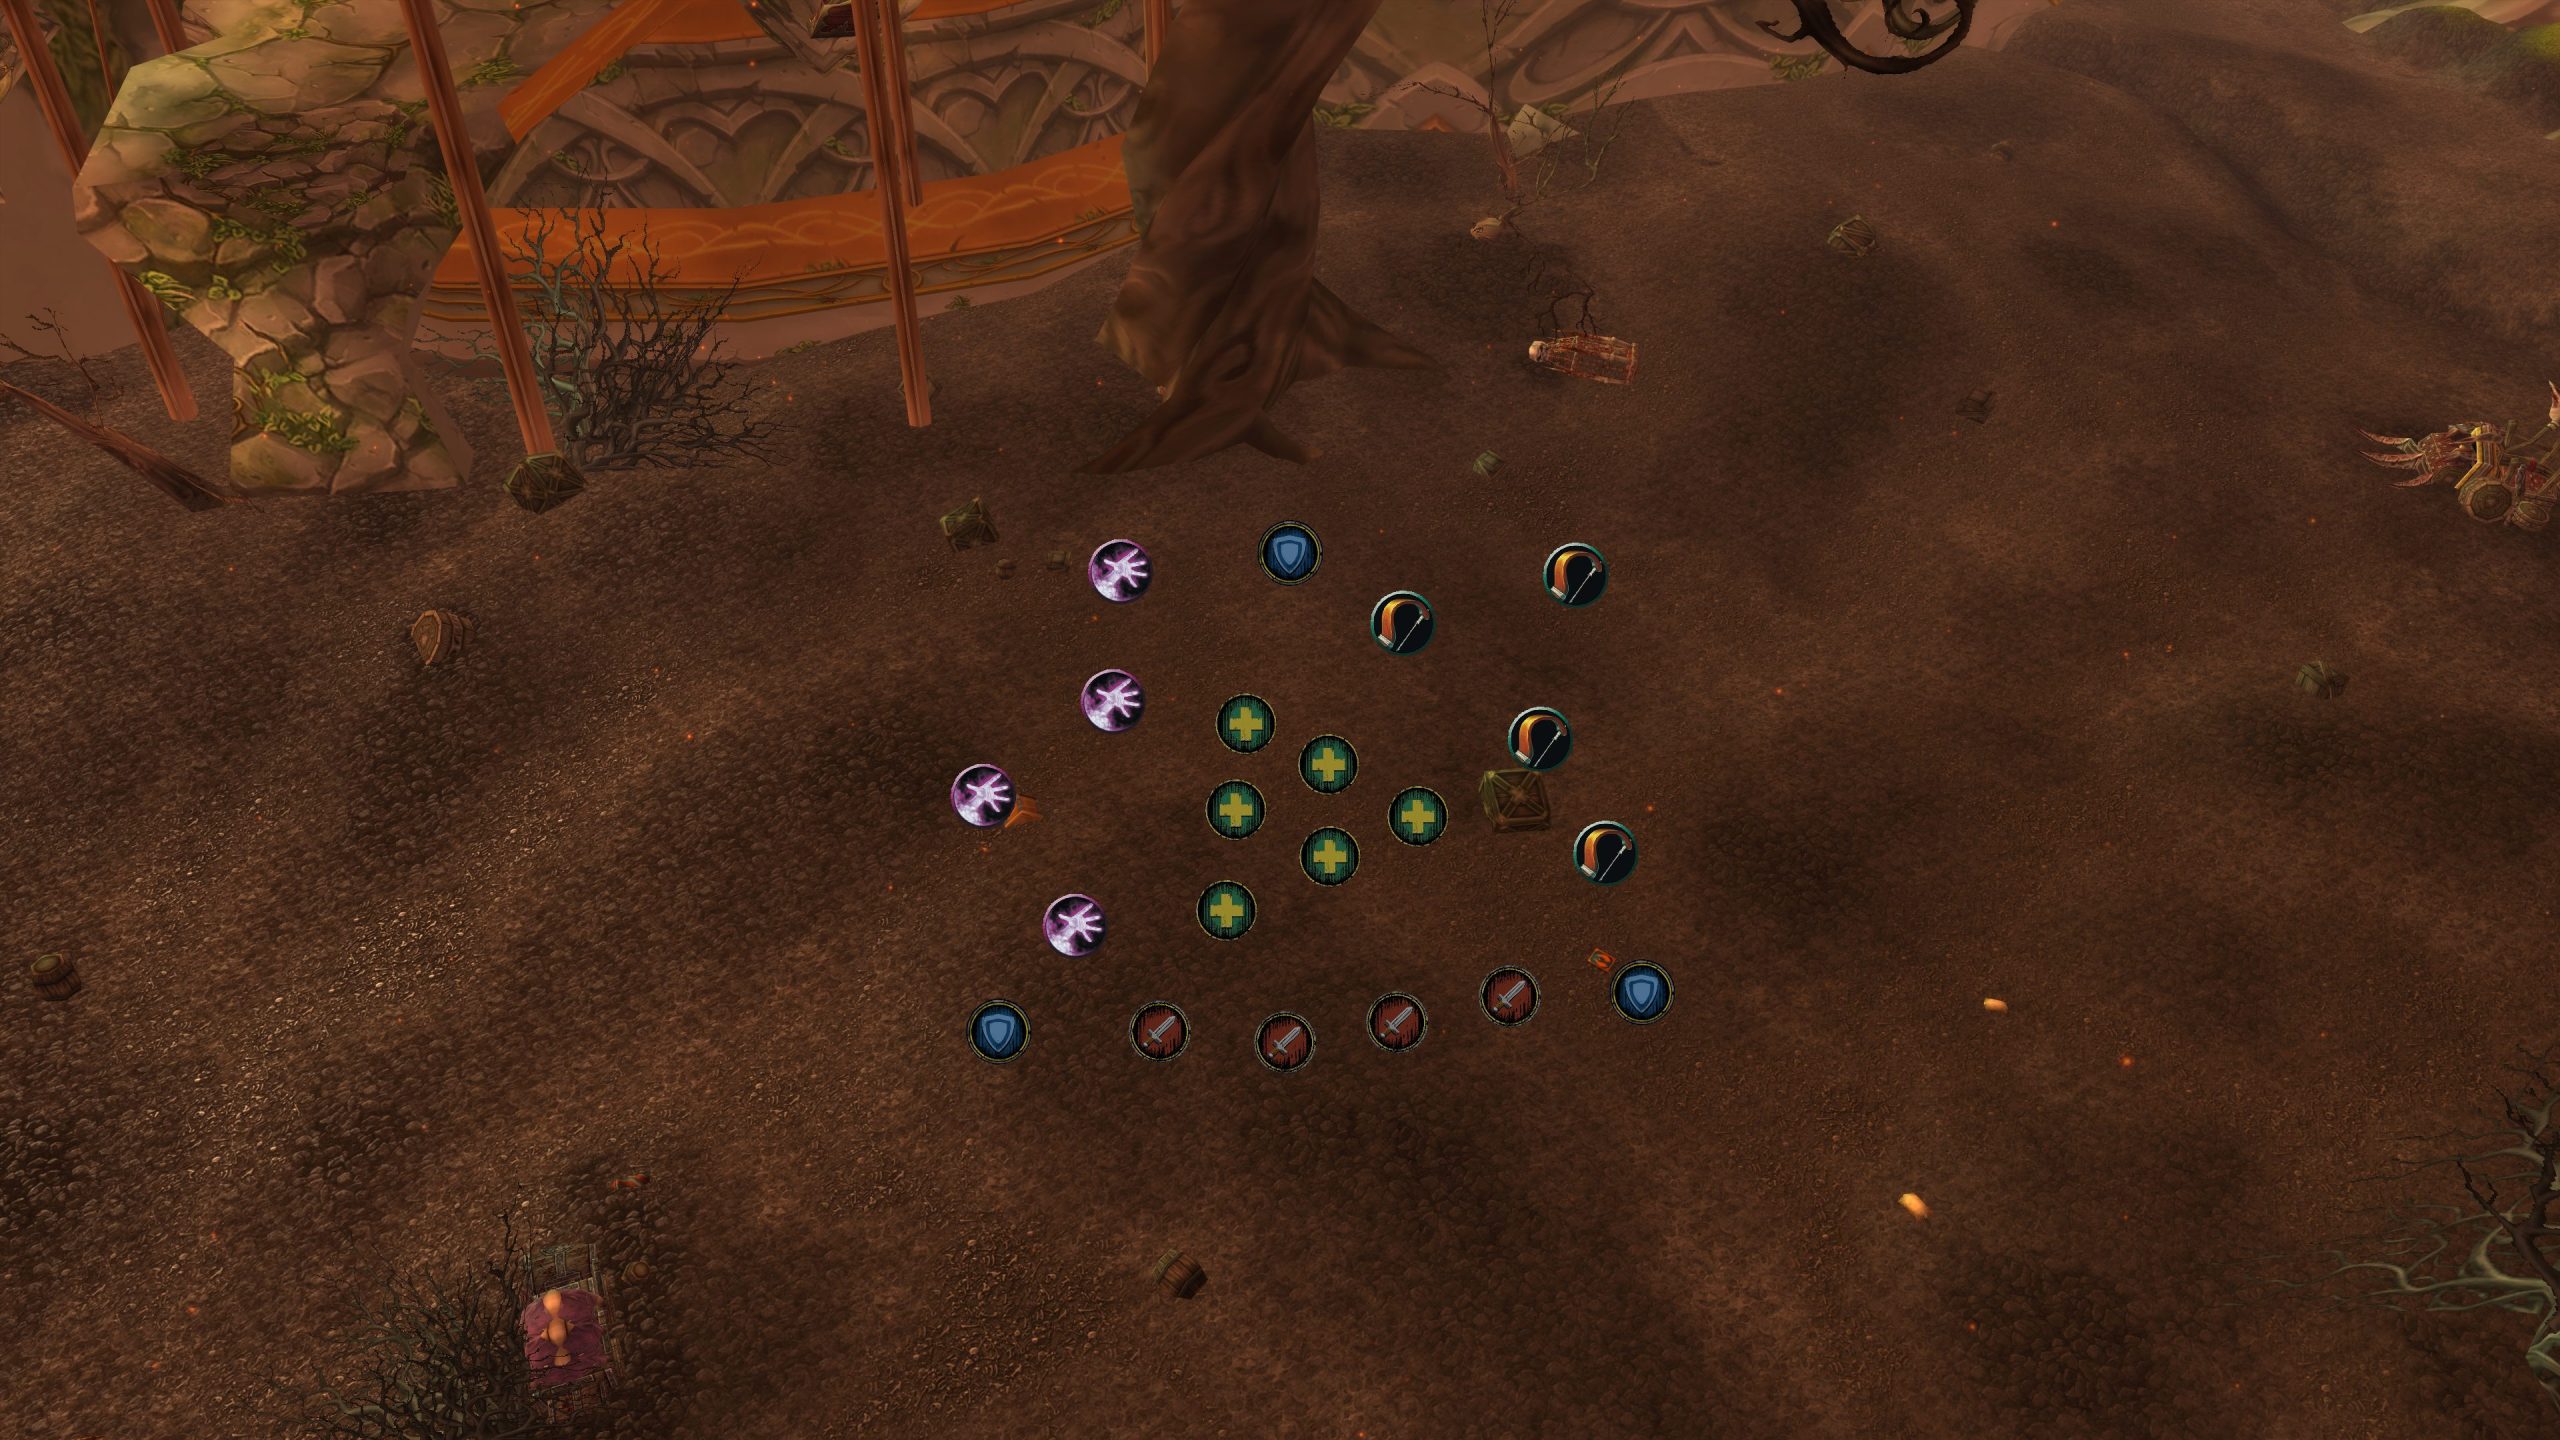
Pulling Felmyst is a bit awkward because she will land at a spot near the spot you engaged her from. For that reason, to make things a bit easier on you, your raid should pre-position as shown in the picture below.
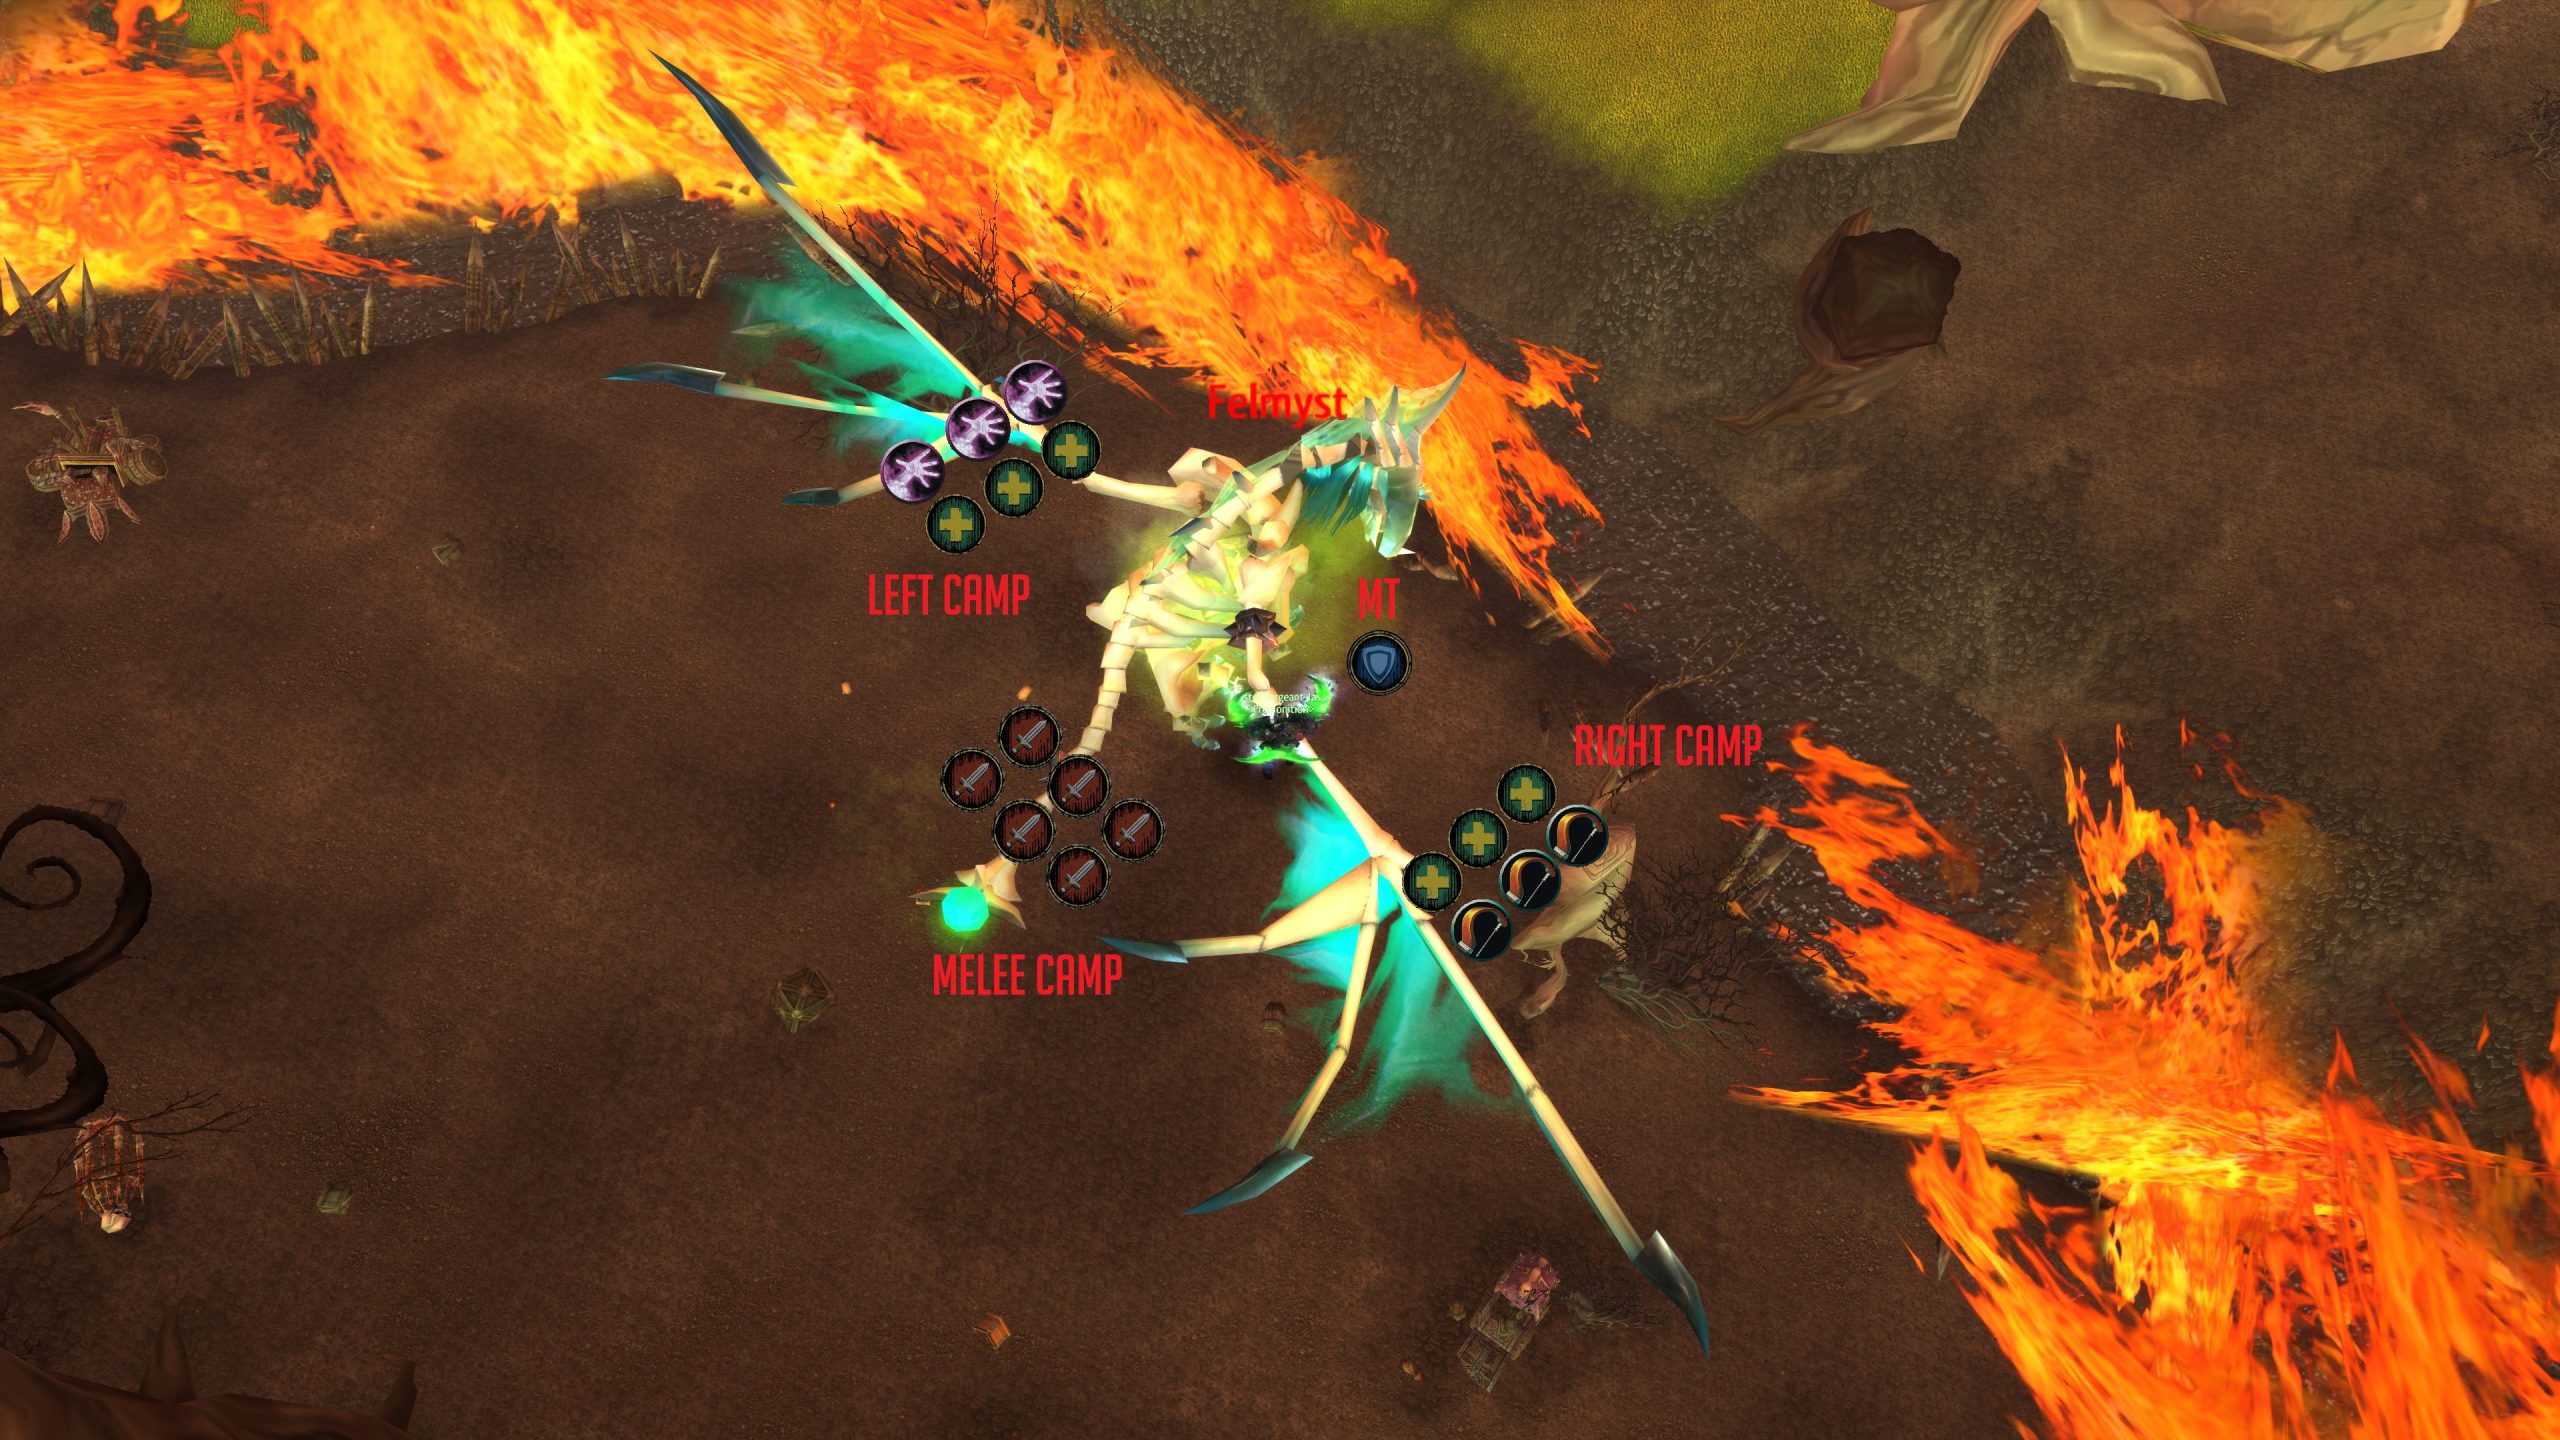
The idea behind the positioning is simple: your raid splits up into 3 separate camps, with a maximum of 10 players each. Melee DPS are behind the boss, while ranged DPS are on each of Felmyst’s sides, ideally with their other group members. Healers are split evenly between the 2 ranged groups. Nobody should ever be in front of Felmyst or anywhere near the main tank, as that’s an easy way to instantly die to her Cleave.
Everyone in the 3 camps keeps close, but not necessarily too close — you just need to be close enough for your Priest to reach all of you with Mass Dispel after Gas Nova is cast, which has a pretty generous 15 yard range, so it’s okay to be slightly further apart so you can quickly move away if your group gets targeted by Encapsulate. This positioning has the advantage that you can immediately see which group Felmyst will cast Encapsulate on as she turns towards them, so they can move right away.
Then, when everyone is in position, have a Hunter move in front of your main tank, then use Misdirection on the main tank and pull her when she’s roughly at the spot shown below.
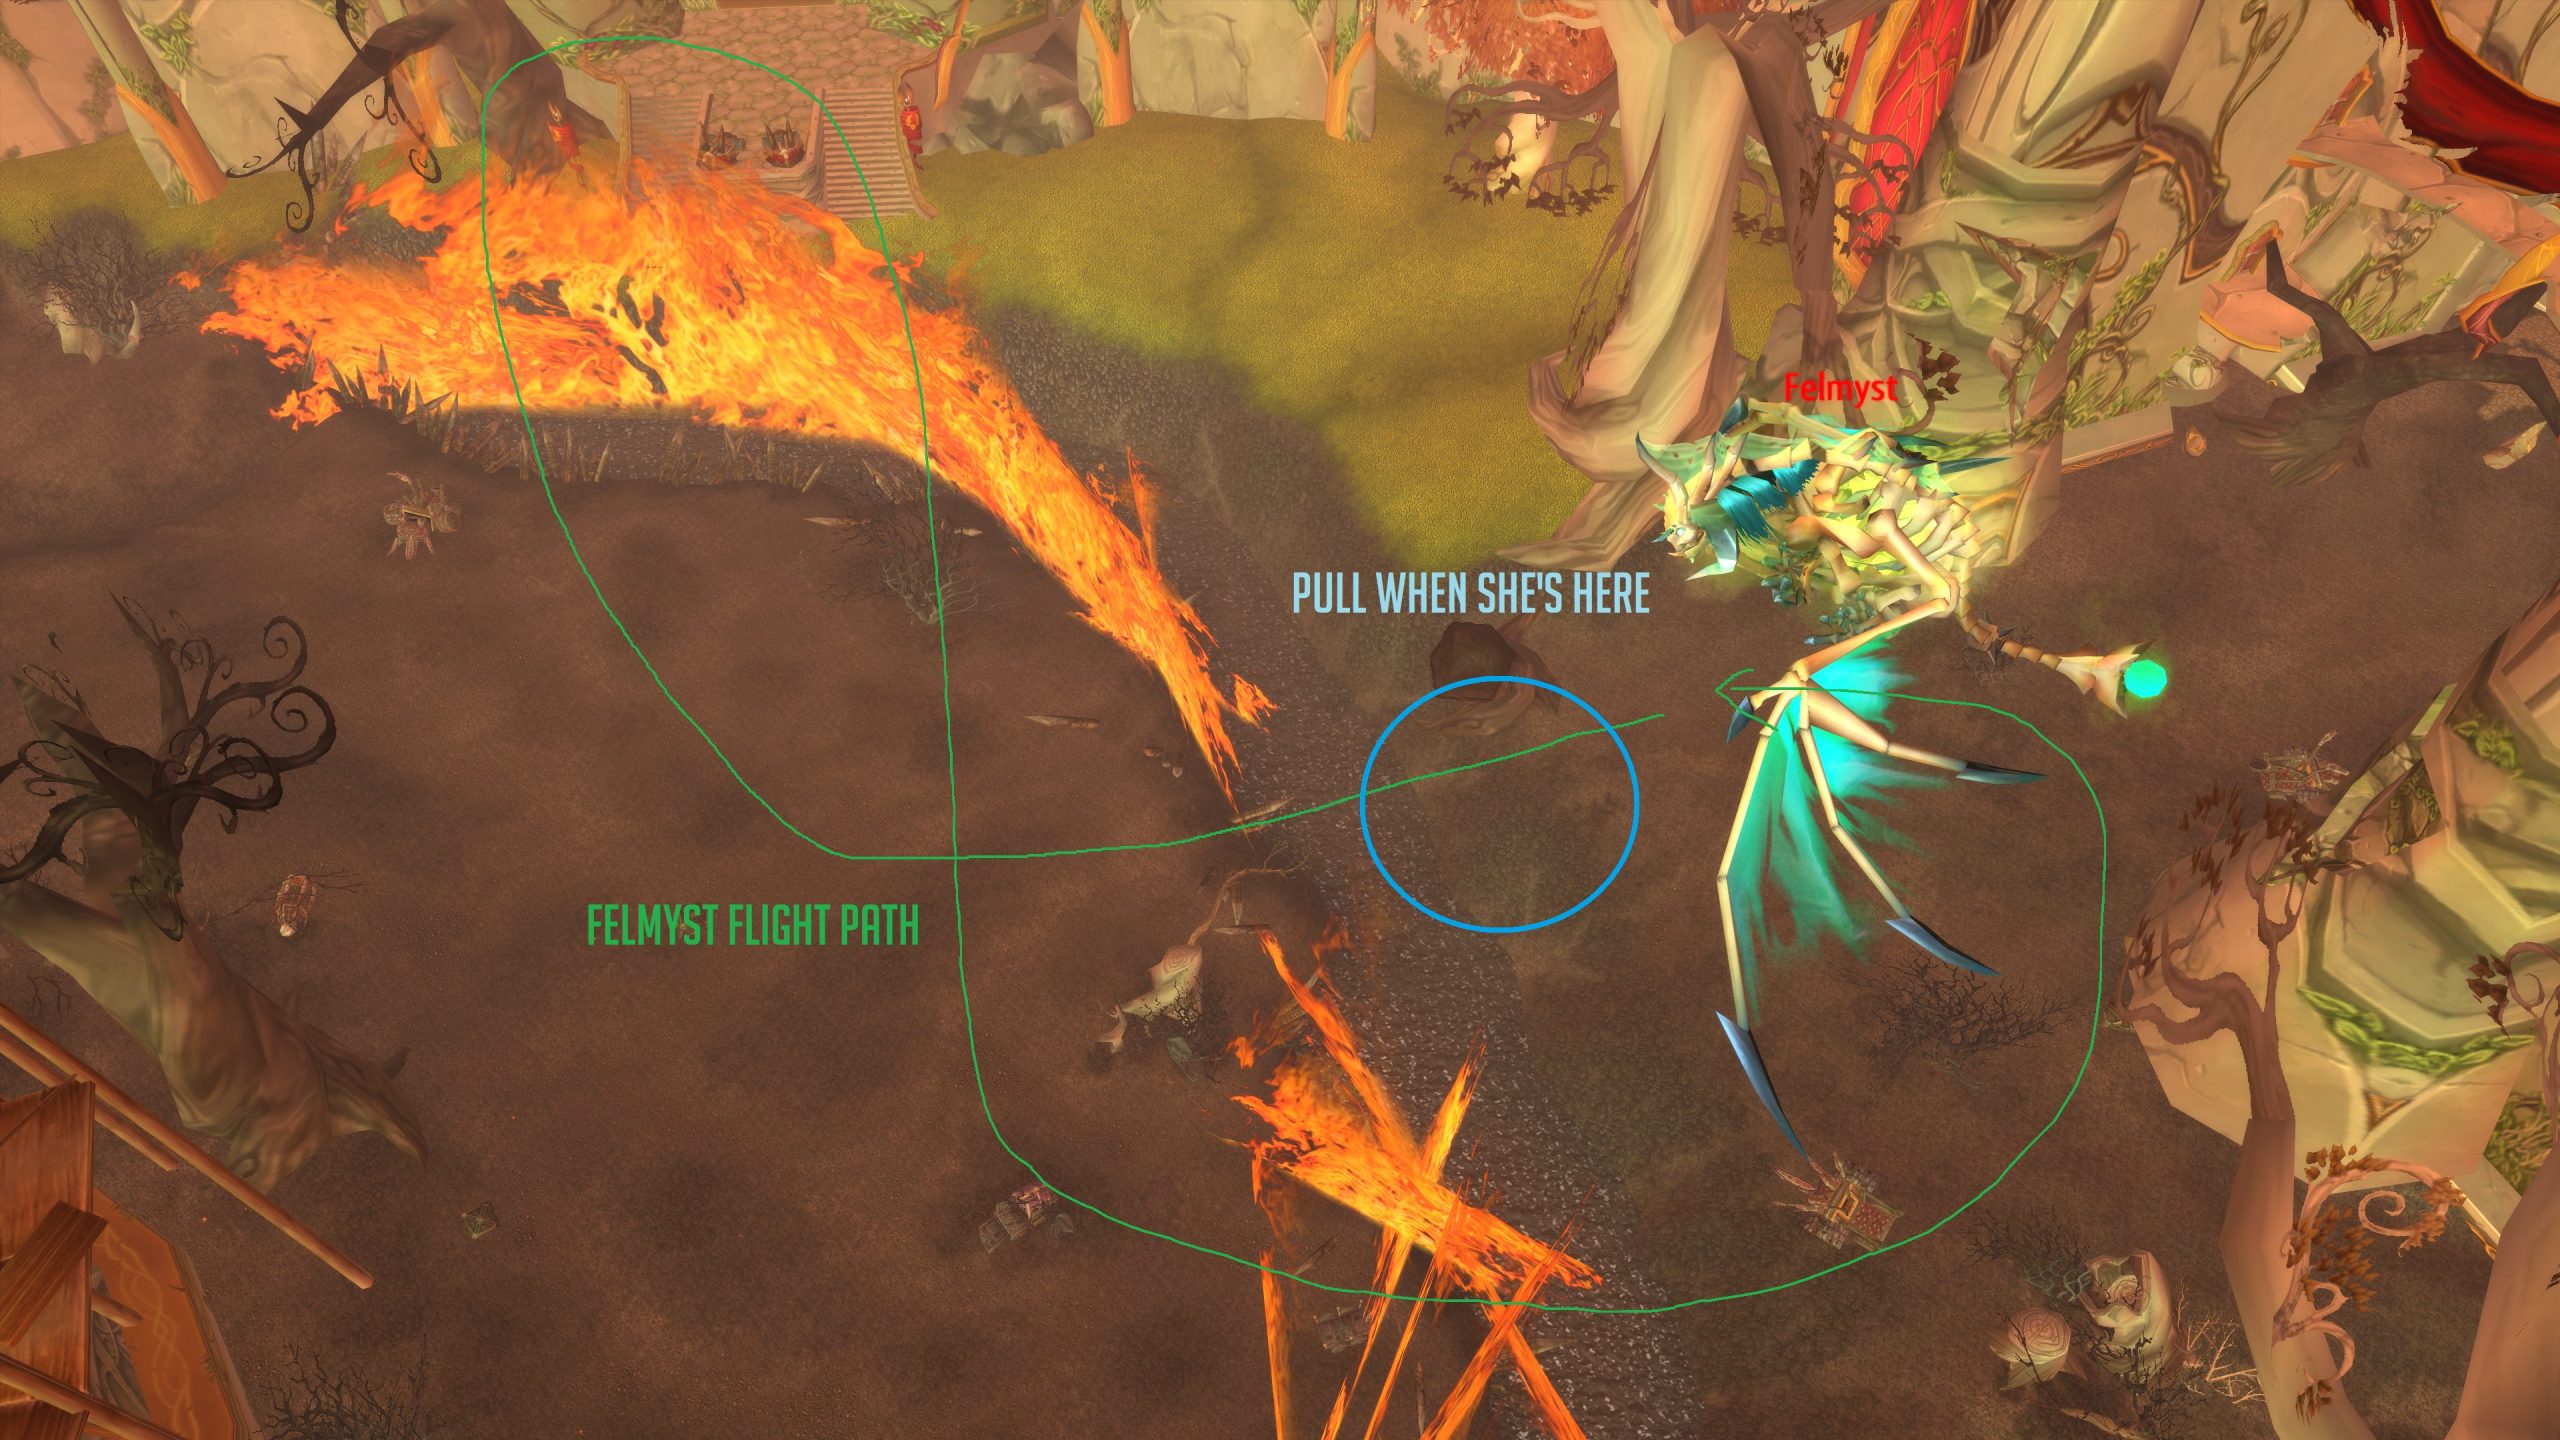
This will minimize how much you need to move, though not completely eliminate it. Felmyst will occasionally be annoying and land at a random spot somewhat close to your Hunter‘s original position, in which case the main tank will need to quickly reposition her and face her away from the raid. Everyone else will need to quickly assume their new positions, with ranged players moving to her sides — don’t just stand still nuking her, move.
Word of caution: Felmyst is attackable by ranged players for a few moments before she lands and finally becoming attackable by melee. Ranged DPS should take it easy until she has fully landed, otherwise they might grab aggro off the main tank and wipe the raid. Your Hunters should use their remaining Misdirections at this point, helping your tank get some threat.
The Fight
This fight will start with Felmyst in her ground phase. During the ground phase, she functions like a normal boss enemy, attacking the target with the highest threat and periodically using her abilities. Each ground phase will last 60 seconds, followed by a ~5 second take-off animation, and then 100 seconds of her air phase.
During her air phase, she flies too high in the sky for melee attacks to reach her, though ranged players can still attack her when she’s flying overhead. She will not be attacking players, but beware — she cannot be taunted, so ranged players will need to be careful not to overtake the tank on threat while she’s airborne. She uses her 2 abilities in a specific pattern (explained in the Air Phase section) and then lands, reverting the fight back to her ground phase.
Throughout this fight, you will go back and forth between roughly 60 second Ground Phases and 100 second Air Phases in which the mechanics are completely separate. During Ground Phase, Felmyst will need to be tanked facing away from the raid, while in Air Phase the boss does not require a tank and instead all raid members must stay safe from the areas effected by Fog of Corruption.
Ground Phase
The first thing you’ll notice about Felmyst is that she doesn’t hit particularly hard, at least when you compare her tank and raid damage to that of the previous 2 bosses. She will use her Noxious Fumes ability almost right away, which will deal 1000 Nature damage to all players within 100 yards every 3 seconds, which your healers should have no trouble out-healing, if your raid is positioned correctly and you have solid healing assignments. She won’t use any of her other abilities for the first 10-15 seconds of the fight, which makes this period the best time for your raid to use Heroism / Bloodlust and nuke.
Then, about 10 to 15 seconds into the fight, she will cast Corrosion on the main tank, dealing 10k Nature damage to them and increasing their Physical damage taken by 100% for 10 seconds. This ability necessitates that your tank healers don’t ever lose focus — the tank must always have a modest amount of health in order to survive Corrosion comfortably, and they need to be ready to react with instant healing spells if necessary. Your raid can keep up damage-reducing debuffs up on Felmyst to give your healers some breathing room here, which include Demoralizing Shout, Thunder Clap and Scorpid Sting.
About 25 to 35 seconds into the ground phase, Felmyst will cast Gas Nova for the first time, instantly dealing 2k Nature damage to your entire raid and applying a DoT to everyone, which deals 3k more and draining 1k every 2 seconds — so it must be dispelled immediately. This is the main reason why the raid is split into camps rather than spreading out; the only way to dispel it before its damage kills people is to have your 1 Priests dispel it off 10 people at once with Mass Dispel. If you have 3 Priests, they can dispel it off the entire raid immediately — less than that, and one of them has to dispel their camp & melee camp. Gas Nova has a 1 sec cast time, so your raid leader should call out for your Priests to start dispelling immediately as she starts casting, else people will take unnecessary damage. Also note that someone will have to dispel your main tank individually, as they are not in any of the camps.
Finally, about 30 to 40 seconds into the ground phase — typically 5 to 10 seconds after Gas Nova, but not necessarily — Felmyst will cast her final and most powerful ability, Encapsulate. She will briefly turn to face a random player in the raid who’s not the MT, and lift them into the air, rendering them unable to move. That player will explode, dealing 3.5k Arcane damage to themselves and every other player within 20 yards every second, for the next 6 seconds. 3.5k damage per second will kill almost everyone in just 2 seconds, coupled with a little bit of of previous Noxious Fumes damage. That’s why it is vital that your raid healers make sure the entire raid is topped off when Encapsulate is possibly coming up.
To counter Encapsulate, everyone must start running away from their camp towards the camp nearest to them THE MOMENT FELMYST TURNS TO FACE THEIR CAMP. People cannot wait until they see themselves taking damage before they start moving — they must move right away, and use a Master Healthstone in order to survive. This is why it will be hugely beneficial for your raid to have multiple Master Healthstones, via multiple Warlocks having different ranks of the Improved Healthstone talent. Mages can instead Blink out, away from any of the camps, so they generally will survive it easily, while other classes should use movement speed boosting abilities like Sprint to get out of there a small bit faster if possible.

Thankfully, there are a couple of other ways to deal with Encapsulate. The targeted player can use Divine Shield, Ice Block or Cloak of Shadows in order to completely remove it off themselves, thus preventing your raid from taking any damage at all. Therefore, those classes should save those abilities in case they get targeted by Encapsulate — don’t use them for a different ability, like Gas Nova. Additionally, Paladins can use their Divine Intervention to remove Encapsulate as well, but they need to be fast and should only do so if the targeted player isn’t a class that can remove it on their own already.
After Encapsulate is over, everyone moves back to their previous spot. Ideally you’ve all survived it, but there’s a decent chance you’ve lost a couple of players here, or at the very least the targeted player, as 3.5k damage per second is a lot for healers to deal with while running for their lives. Thankfully, at this point you’ve seen everything there is to see in the ground phase. Felmyst will likely use Corrosion and Gas Nova 1 to 2 more times, so your healers must stay focused after Encapsulate. There’s a very small chance if Encapsulate was used early on that she will cast it a 2nd time during that ground phase, but that is very unlikely so you generally won’t have to worry about it — just something to keep in mind if she happened to use it early.
Air Phase
After 60 seconds of her ground phase, Felmyst will transition into her air phase. She has a little ~5 second take-off animation, during which your raid can nuke her without worrying about any of her abilities at all. After that she’ll fly up high in the sky, where only ranged DPS players can reach her and only if they’re almost directly underneath her. In short, you can’t really DPS her during this phase, but on the flipside she won’t really be attacking you either. She loses all of her ground abilities during this phase, instead gaining access to 2 new abilities that she uses in the same pattern every time.
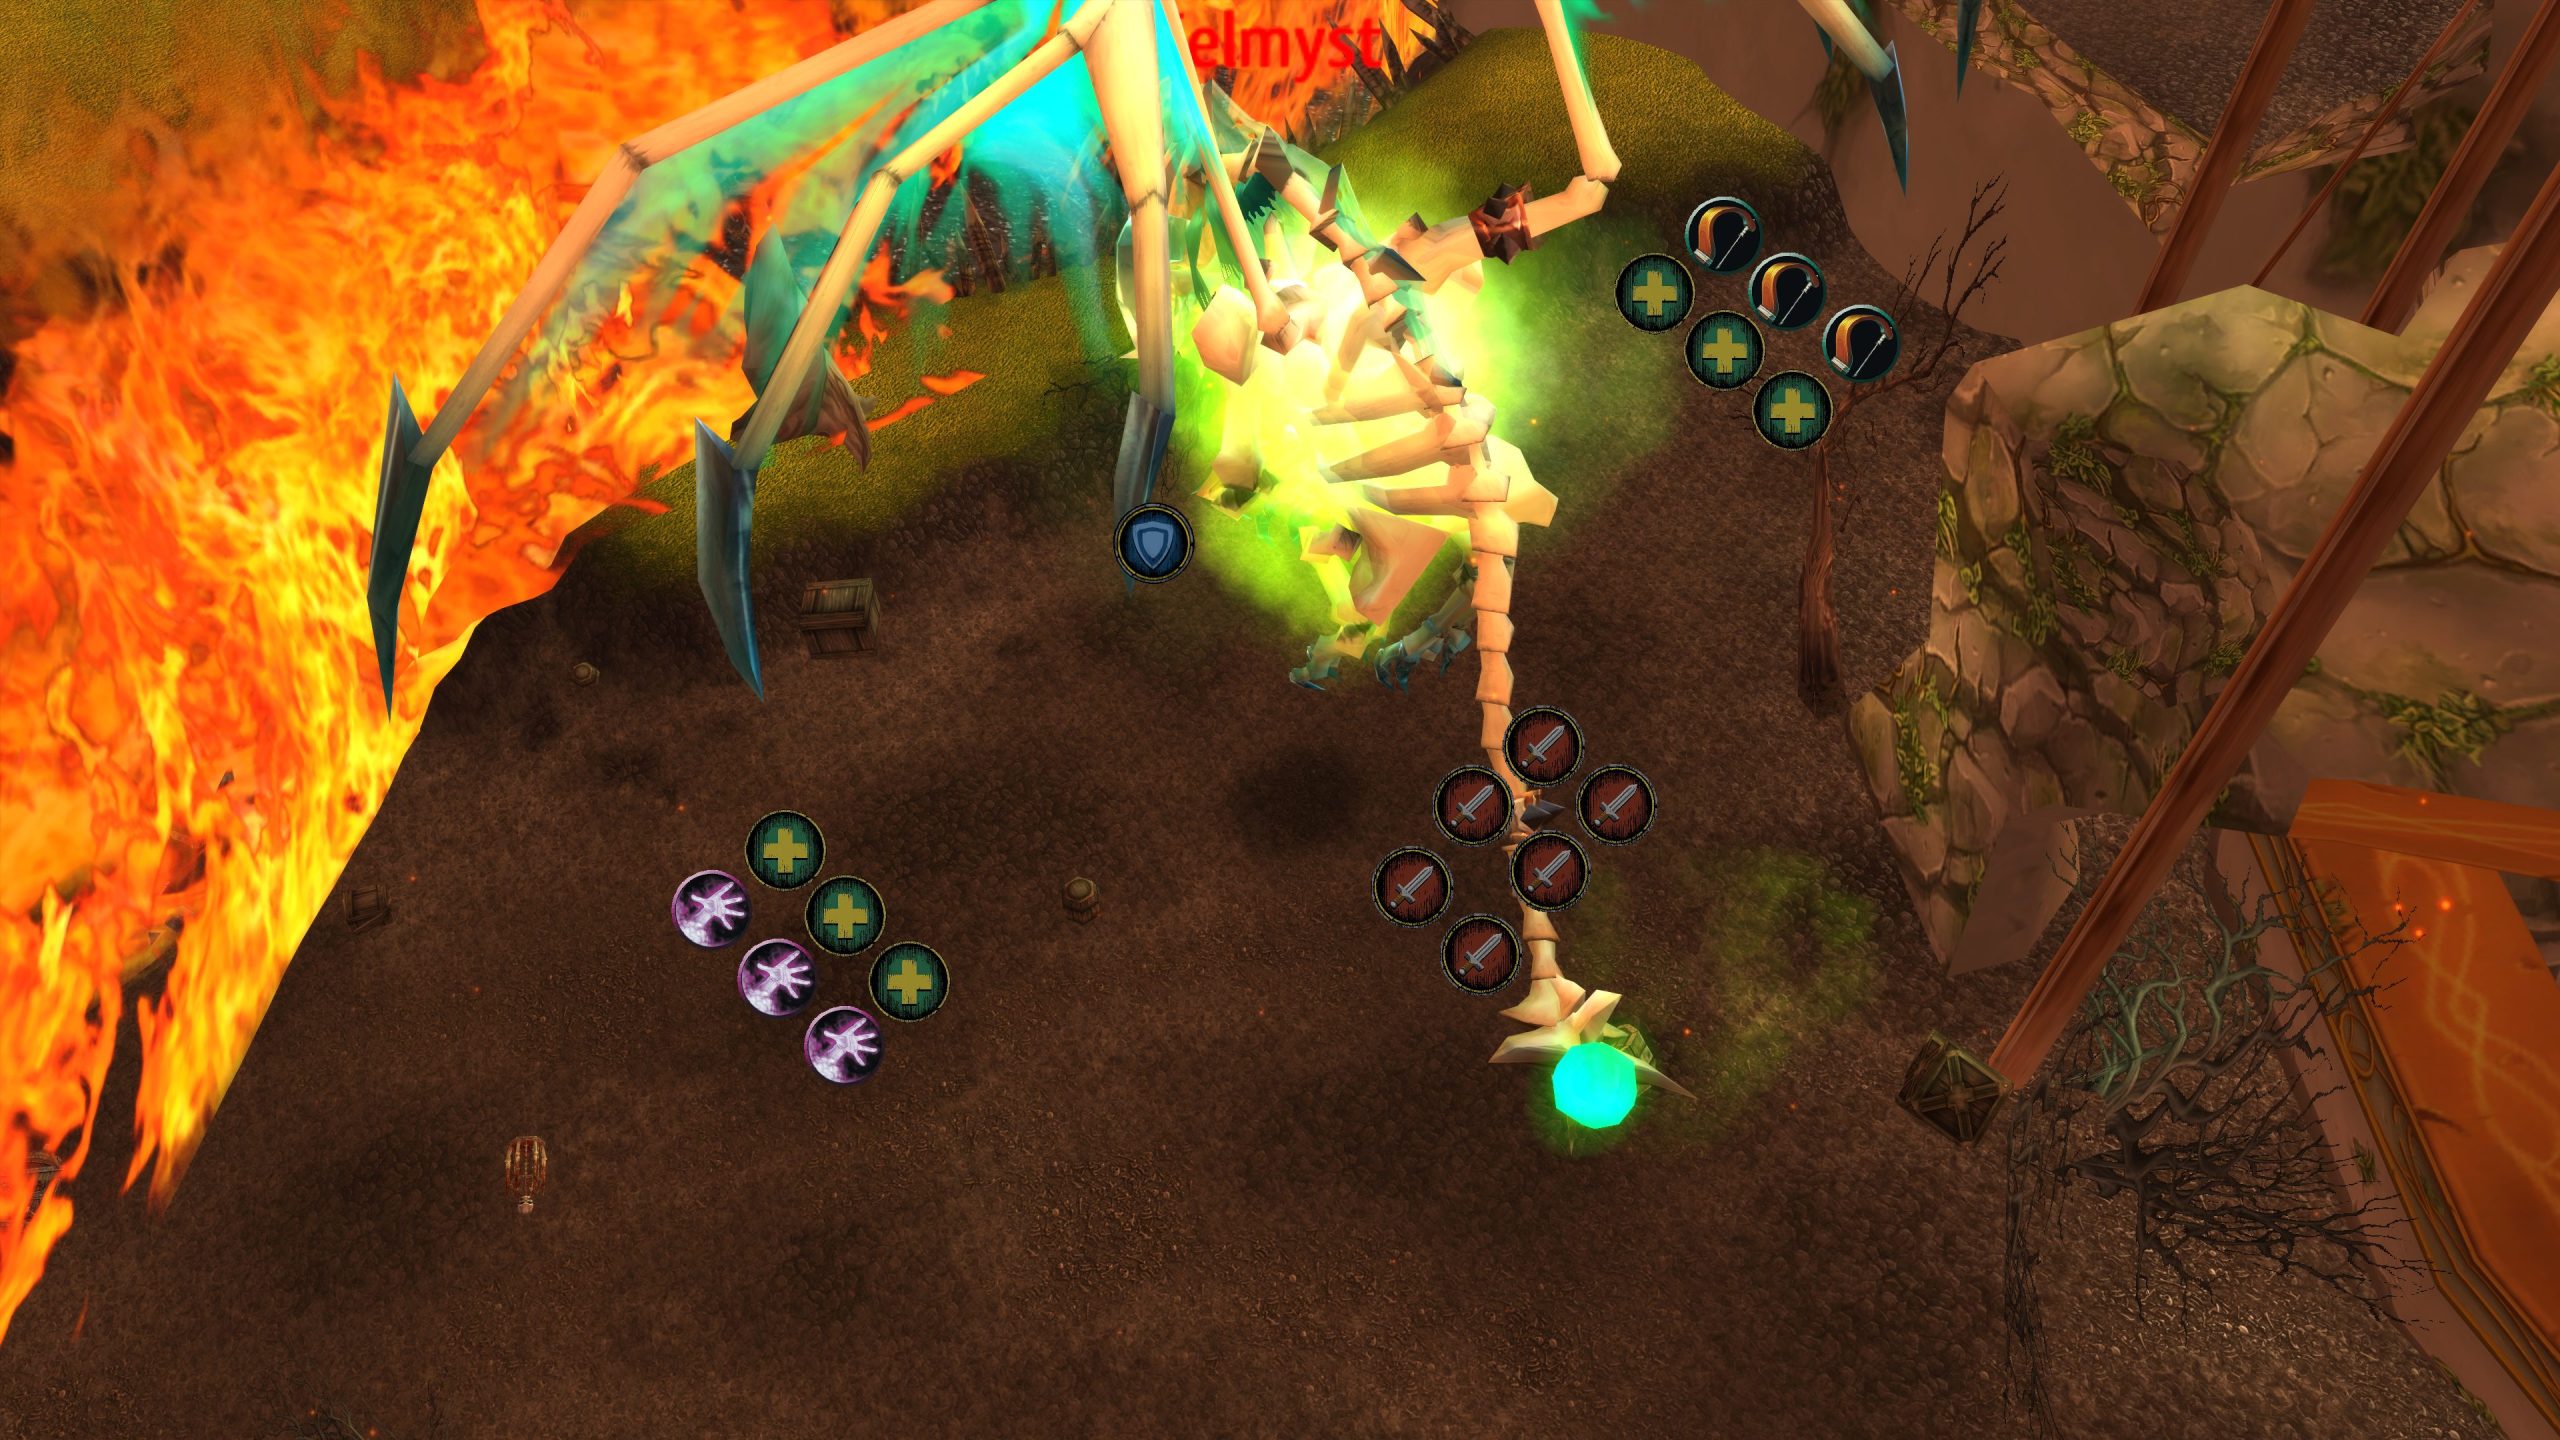
Your raid should get close to the middle of the arena for the air phase, as shown in the picture above. You don’t want to be too close to each other, just near enough that healers — who are ideally in the center of the group — can reach all of you. Keep a little bit of a gap between each other; 3-4 yards is preferable, similar to your gaps during the Brutallus fight. The reason for this positioning is to counter Felmyst’s first air phase ability, Demonic Vapor, which she will cast a few seconds after taking off.
During Demonic Vapor, Felmyst will target a random player in your raid and shoot a green beam on the ground nearby them. The beam will start chasing that player, dealing 4k Nature damage to any player that touches it. Furthermore, it will leave a trail of green fog in its wake, which deals 2k Nature damage and applies a very scary DoT to players who touch it. After 10 seconds, she will stop casting the beam, at which point 6-7 Unyielding Dead elite monsters will spawn from the fog. Every time a player touches the green fog, an extra Unyielding Dead monster will be spawned, making touching it even worse.
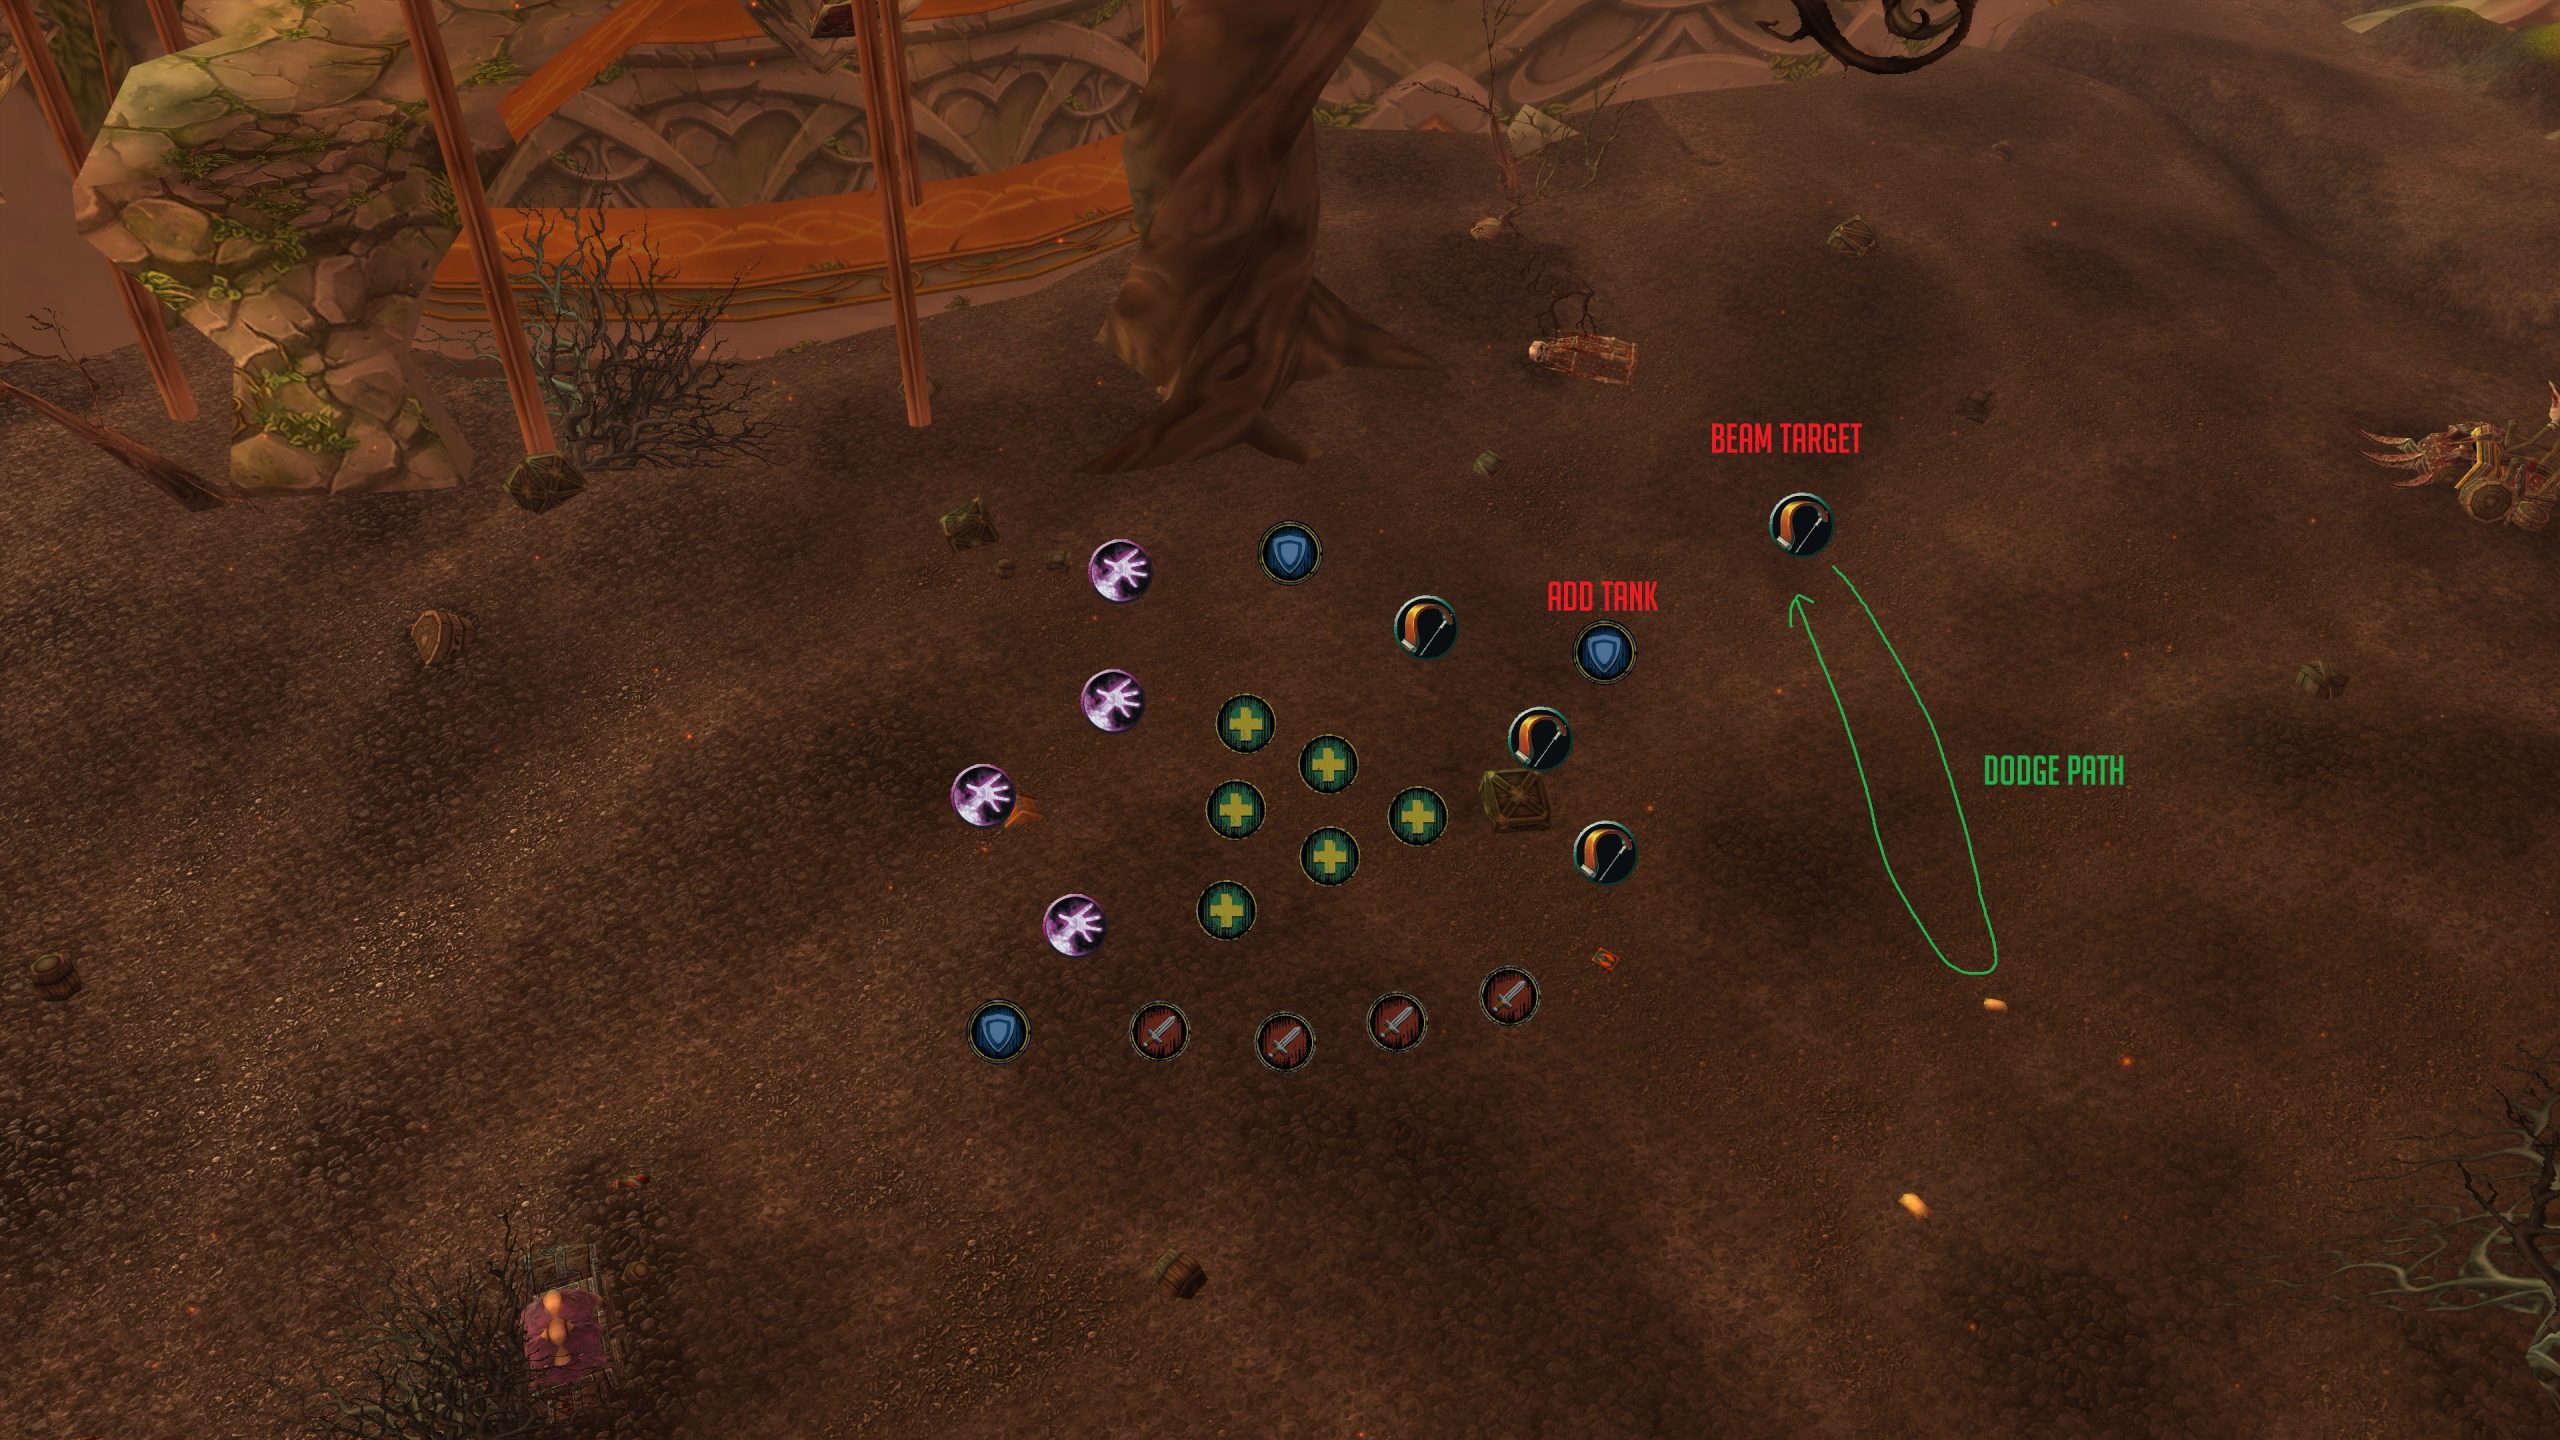
In order to deal with Demonic Vapor, have the player targeted move out of the group and then start running in a straight line away from the beam. However, you ideally want the Unyielding Dead to all spawn relatively close to one another, so once they get far enough from the beam, they should do a sharp turn and start moving back towards their original spot — careful so as not to touch the green fog. That way, they will all spawn close to each other, so the tank responsible for picking up the Unyielding Dead will have a pretty easy time doing so. After the beam it fades, the targeted player moves back to the raid.
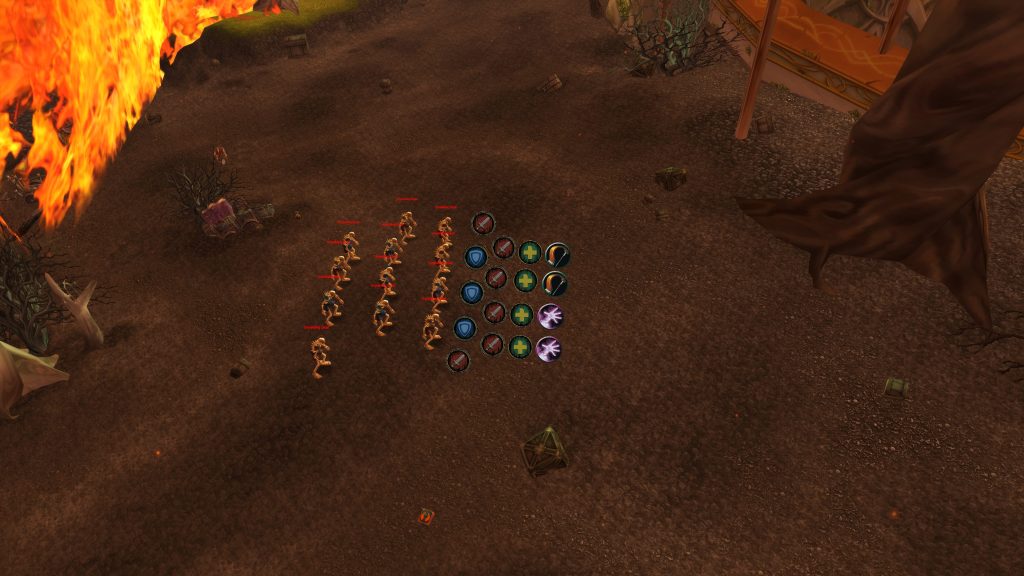
After your tank has had a few seconds to get some threat on the Unyielding Dead, your raid should start AoEing them down. Be careful however — Felmyst will cast Demonic Vapor one more time, and the new target will need to quickly move away from other players, preferably close to where the previous green fog was. Then, when that 2nd beam finishes, your raid should stop their AoE for a little bit and all stack up on the same spot, behind the tank, giving your tank time to build threat on the new Unyielding Dead. Once they have threat, you can once again start blasting them. A Protection Paladin will generally have no problem holding threat on the adds, particularly as they’re undead, so the other tanks can be back-ups here, taunting any mobs that go loose.
Your group has about 10 seconds to finish off the Unyielding Dead before Felmyst uses her final and most dangerous air phase ability, Fog of Corruption. The beginning of this ability is signified by Felmyst flying off to the side of the room and hovering for a few moments. Your entire raid should move to the very center of the arena in preparation.
Then, after a few seconds of hovering there, she will finally move slight. The spot she moves to will determine which of the 3 parts of the map she will use Fog of Corruption on. Players have named those 3 parts “tree side”, “center” and “fire side” for convenience. If you see her moving towards the fire, it means she’ll use it on the fire side. If you see her moving towards the north side of the arena, where you came from after Kalecgos, it means she’ll use it on the tree side. If she moves very slightly, towards the spot shown in the picture above, it means she’ll use it on the center side.
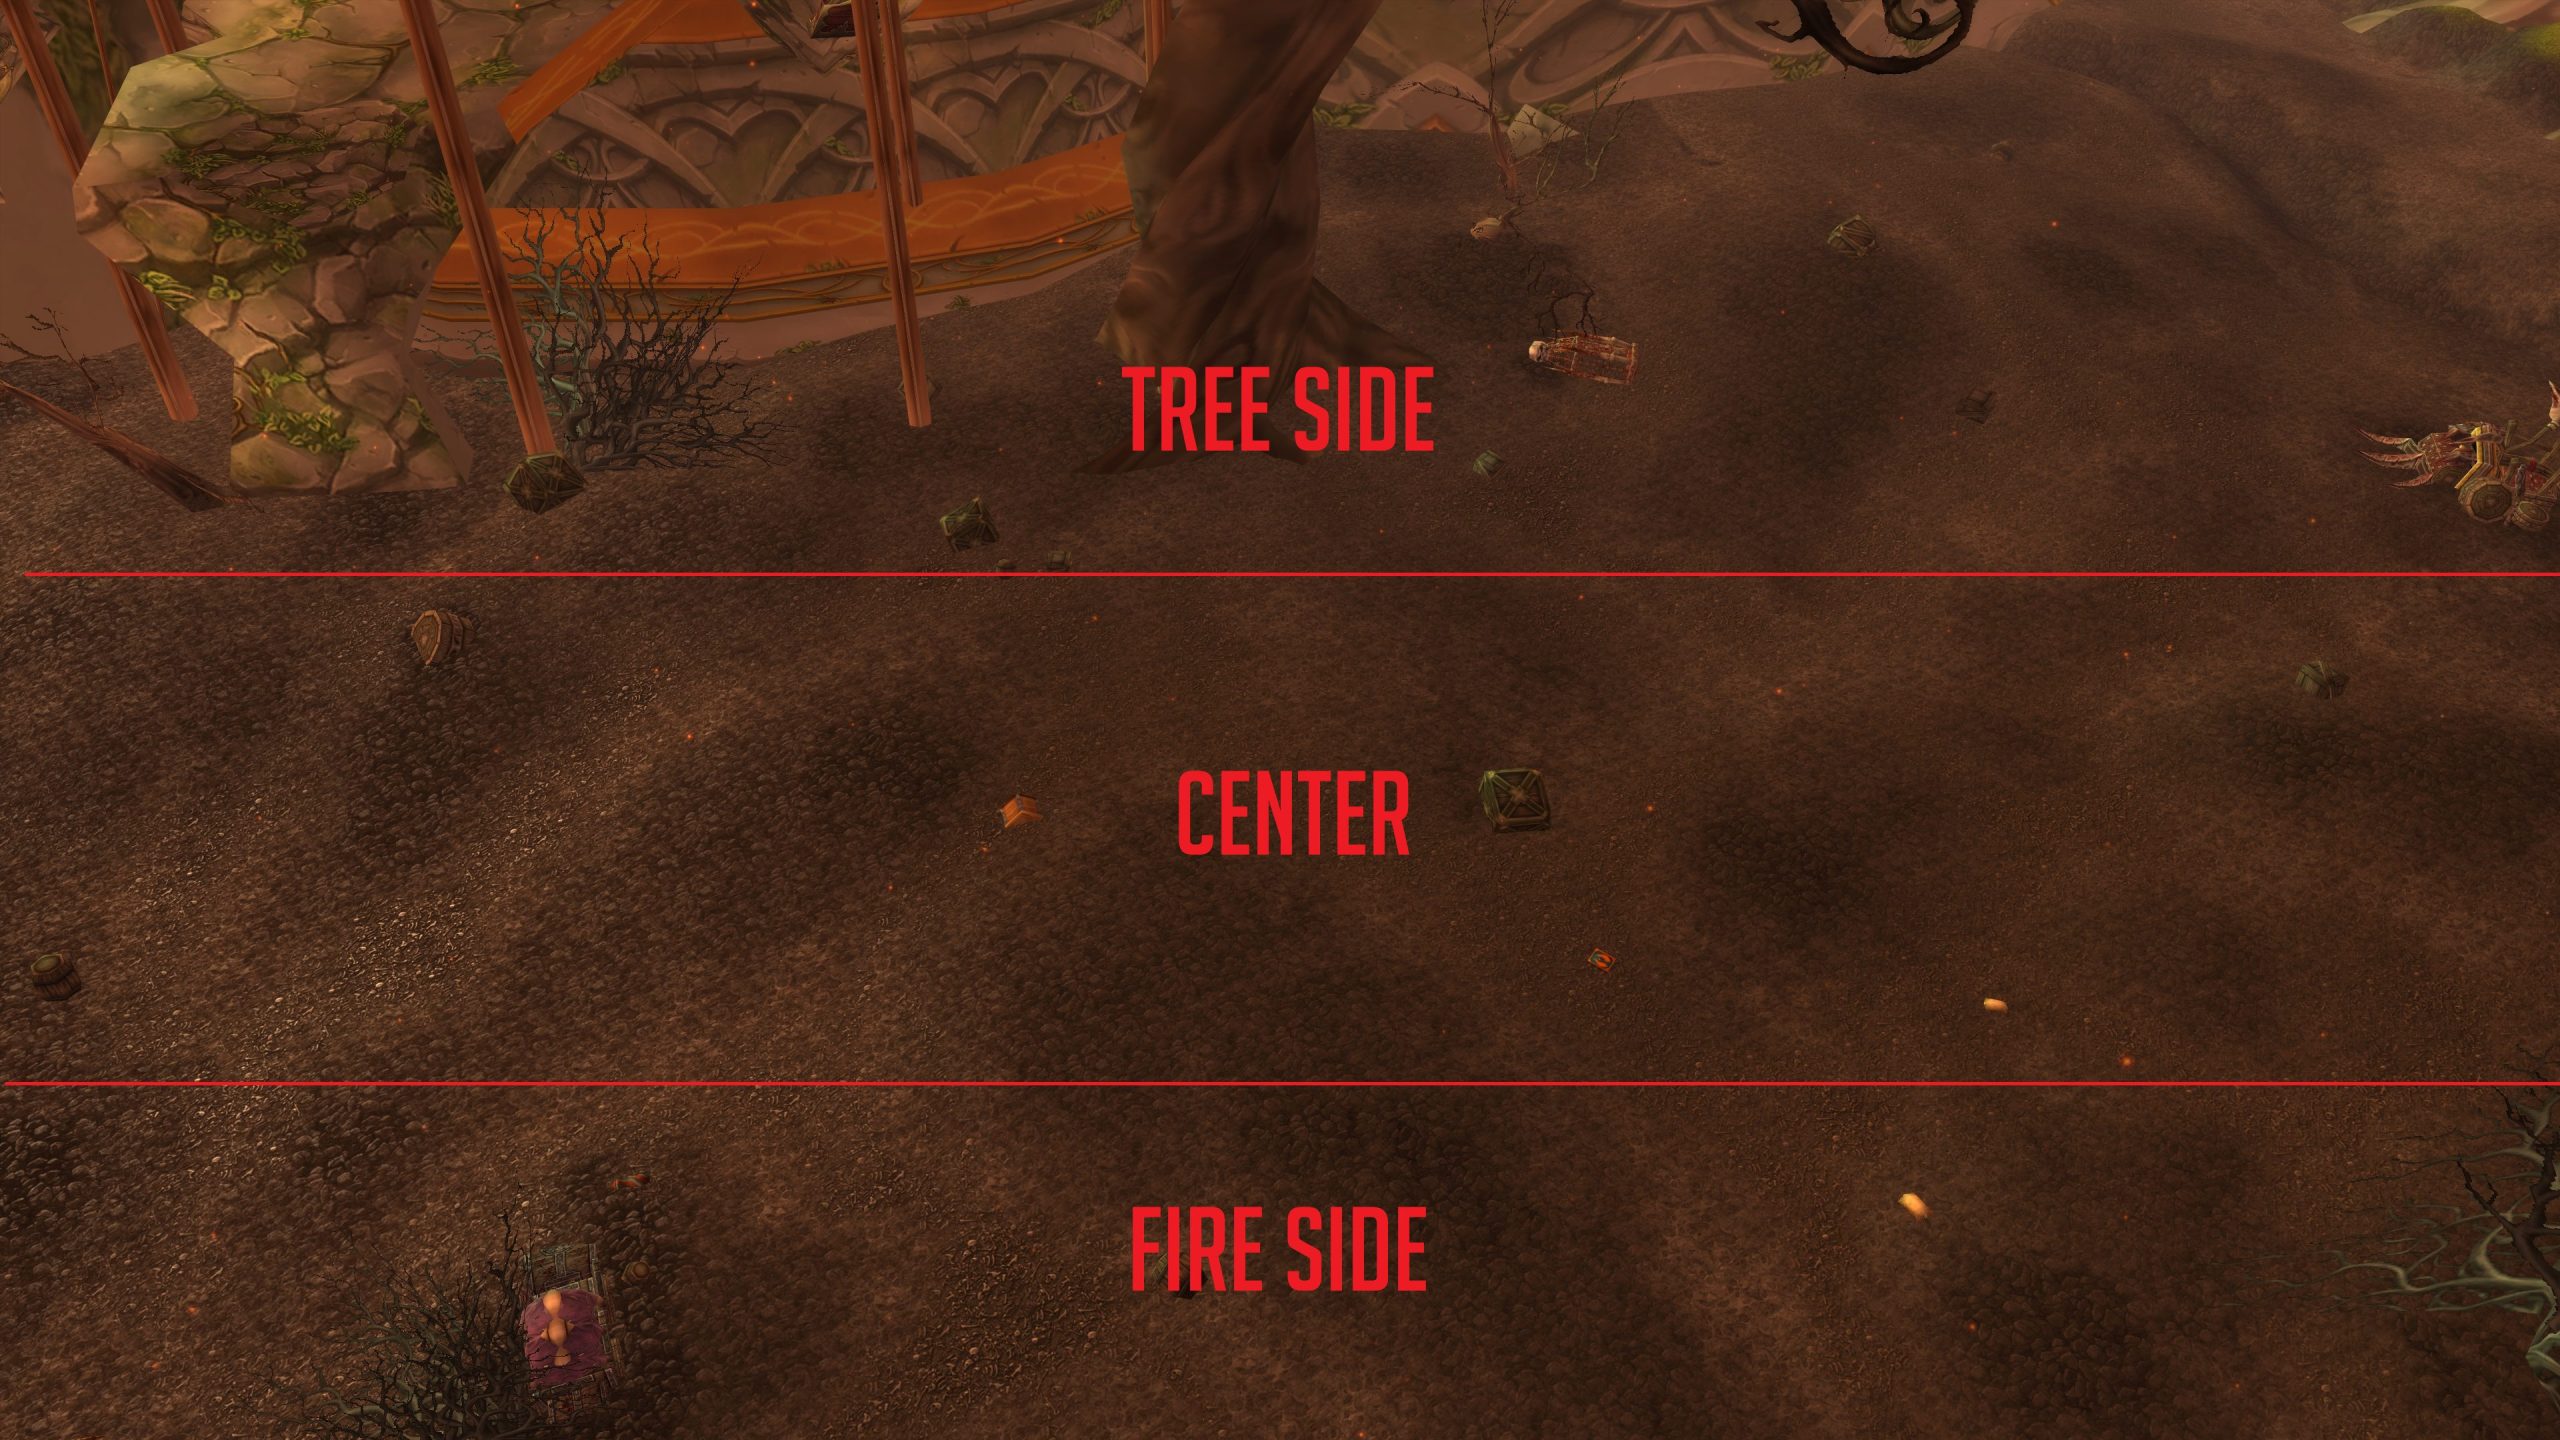
Your entire raid will need to quickly move to one of the 2 zones that Felmyst did not target — so for instance, if she moved towards the tree side, you should move towards the fire side, so you’re as far away from her as possible. When she’s done aiming, she will quickly fly forward in a straight line, leaving a massive wave of green fog in her path. Players that touch the fog will be mind controlled indefinitely, dealing 200% increased damage, having 100% increased speed and being invulnerable to crowd control. This effectively means they are dead, and worst of all, with that massive damage increase there’s a good chance they’re also taking down other players with them — so everyone needs to move quickly towards a safe zone to avoid this at all costs.
You can’t rest easy just yet, unfortunately. After she flies to the opposite side, she will take 5-10 seconds before taking aim and repeating this process. She can pick the same side multiple times in a row or change it up. Your raid will need to move towards the middle of the room and be ready to move to one of the safe zones yet again. It can help if you stay on the opposite side of Felmyst — so if she’s on the west side, you go east, and vice versa.
She will use Fog of Corruption 3 times in a row, before finally landing and beginning her ground phase once again.
Ground Phase… Again
And thus the fight repeats itself. The only difference is that you can’t use the same position every time — Felmyst will always land near the spot where she finished her 3rd Fog of Corruption at, and moving her around can be very risky due to her Cleave and other dangerous ground phase abilities. Therefore, your raid will need to assume their positions around her new spot.
Your Hunters should use their Misdirections on the main tank again, helping them get some threat to compensate for being unable to build threat while she flew around. Players who are dangerously close to the tank, or potentially overtook them, should use their threat wipe abilities, or move to the tank spot and die without jeopardizing the raid, if they don’t have threat wipe abilities.
And that is the entirety of the fight, she will repeat ground phase again, going into air phase 60 seconds later, etc. If you managed to survive Encapsulate the first time around and didn’t lose too many players to silly mistakes during the air phase, then you don’t have anything to be scared of anymore — you’ve seen everything she had to throw at you, and survived the worst of it. The only thing to keep in mind is that this fight can be pretty long — it will take anywhere between 6 to 12 minutes depending on how high your raid’s DPS is, which will typically translate into 2 to 5 air phases. Thus everyone should be prepared for a long fight, using Super Mana Potions and Dark Runes to sustain their mana pool as necessary.
Congratulations! You have finally ended poor Madrigosa’s nightmare, and are one step closer to thwarting the Burning Legion’s plans on Azeroth. Beware however — the 2 toughest bosses of the instance lie ahead, so do not tread lightly.
About the Author
