Alliance Leveling Guide: Netherstorm [Level 68-69]
One of the most unique settings in Outland, the Netherstorm boasts Eco-Domes, haunted towns and Manaforges aplenty.
Part 1

- Find Netherologist Coppernickels (21.8, 55.6) on the Gyro-Plank Bridge to accept
 Off to Area 52.
 - Take your next left and head towards the Ruins of Enkaar, where you’ll find Bot-Specialist Alley (31.4, 56.6). Talk to her to accept
 Recharging the Batteries. Then head northwest to about (28, 51) to find Phase Hunters; attack them until you see the message “The Phase Hunter is very weak” and then use Alley’s Battery Recharging Blaster on them. Once they’re drained, kill them to charge the battery (I don’t know why this is necessary, maybe Alley is just a sadist). Once you’ve gotten to Battery Charge Level 10, you can return to Alley to turn in
  Recharging the Batteries.
 - Follow the road southeast to Area 52 (32, 62), and as you approach:
- Just inside the front entrance find Boots to accept
 Securing the Shaleskin Shale.
 - Talk to Rocket-Chief Fuselage — you should be able to guess where you’ll find him — to turn in
 Off to Area 52 and accept
  You’re Hired! Grats on your new job with the goblins.
 - Check out the Wanted Poster to accept
 Wanted: Annihilator Servo! and
  Breaking Down Netherock. Keep an eye on the chat from now on to see if anyone wants to do these quests, they both require another player or two.
 - Go to the inn (32, 64.4) and make Area 52 your new home (Fun fact: the inkeeper’s name is a solfege for the Close Encounters of the Third Kind theme).
- [ALDOR] Speak with Exarch Orelis to accept
 Distraction at Manaforge B’naar and
  Assisting the Consortium
 - [SCRYER] Speak with Spymaster Thalodien to accept
 Manaforge B’naar and
  Assisting the Consortium.
 - Exit the inn to find Nether-Stalker Khay’ji and turn in
 Assisting the Consortium (for both Aldor and Scryer), accept
  Consortium Crystal Collection.
 - In the southwest of town, see Ravandwyr to accept
 The Archmage’s Staff.
 - Get the flight path on your left just outside the eastern gate from Krexcil (33.8, 64.0)
- Just inside the front entrance find Boots to accept
- Leave Area 52 heading north towards the Ruins of Enkaar, killing Shaleskin Flayers for
 Securing the Shaleskin Shale as you go. Find Maxx A. Million Mk. V (31.4, 56.6), accept
  Mark V is Alive! and complete its escort quest. As you escort the Mark V, you can look for Etherlithium Matrix Crystals — the red glowing crystals on the ground — collect them for
  You’re Hired! as you protect the robot. If you don’t collect 10 during the escort quest, go back into the ruins and find the rest before you proceed. Then talk to Bot-Specialist Alley (31.4, 56.6) to turn in
  Mark V is Alive!
 - Return to Area 52. Once there:
- Talk to Rocket-Chief Fuselage to turn in
 You’re Hired! and accept
  Invaluable Asset Zapping and
  Report to Engineering.
 - Go south across the bridge to Chief Engineer Trep to turn in
 Report to Engineering and accept
  Essence for the Engines.
 - If you finished
 Securing the Shaleskin Shale already, talk to Boots before you leave and turn it in, then accept
  That Little Extra Kick.
- Talk to Rocket-Chief Fuselage to turn in
- Go north again, and don’t forget to kill more Shaleskin Flayers if you still need to for Boots’ questline. If you are on
 That Little Extra Kick, kill Nether Rays instead. Also kill Mana Wraiths for
  Essence for the Engines, and go back to Area 52 once you have what you need for both quests. The drop rate for the Shaleskin Shale can be pretty bad, check the map if you need to find other places to farm for it, and you can always just keep questing and kill Shaleskin Flayers as you find them.
 - Return to Area 52:
- Turn in whatever quest you’re on to Boots. If you turn in
 That Little Extra Kick, make sure you hang out for a bit to watch the fireworks.
 - Speak with Chief Engineer Trep to turn in
 Essence for the Engines and accept
  Elemental Power Extraction.
- Turn in whatever quest you’re on to Boots. If you turn in
- Leave Area 52 heading west and make your way towards Manaforge B’naar.
- [ALDOR] Kill Magisters and Bloodwarders until you’ve completed
 Distraction at Manaforge B’naar.
 - [SCRYER] Take a right at the fork to find Captain Arathyn in a small camp on a hill at (27, 65), he’s riding a mount and should be easy to spot. Note that if you CC him at the start of the fight he won’t summon his mount as an add. Kill him and loot the B’naar Personnel Roster from him.
- [ALDOR] Kill Magisters and Bloodwarders until you’ve completed
- Head southeast until you start finding Sundered Rumblers and Warp Aberrations; they should be near the crumbling edge of the map. Use your Elemental Power Extractor on them (you’ll know you did it right if they glow blue) and then kill them. They should drop blue crystals that you can pick up, note that the crystal will not be on the corpse but nearby instead.
- Once you have the 5 Elemental Power you need, go northeast to the Arklon Ruins (40, 72), then:
- You’ll need to use the Ultra Deconsolodation Zapper on 4 different objects here, they’re all relatively close together:
- Dig-A-Matic at (41.1, 71.8)
- Dredging Claw is at (41.5, 71.8)
- Terrain Analyzer at (40.3, 72.9)
- Big Wagon at (42.5, 72.2)
- Find the brazier at (40.9, 72.5) (all the roads in the ruins lead to it, it’s in the center of the place) and use your Conjuring Powder to summon the demon Ekkorash. Defeat the demon and loot Archmage Vargoth’s Staff.
- Find Pentatharon in the east of the ruins — kill him and loot the Arklon Crystal Artifact.
- You’ll need to use the Ultra Deconsolodation Zapper on 4 different objects here, they’re all relatively close together:
Part 2
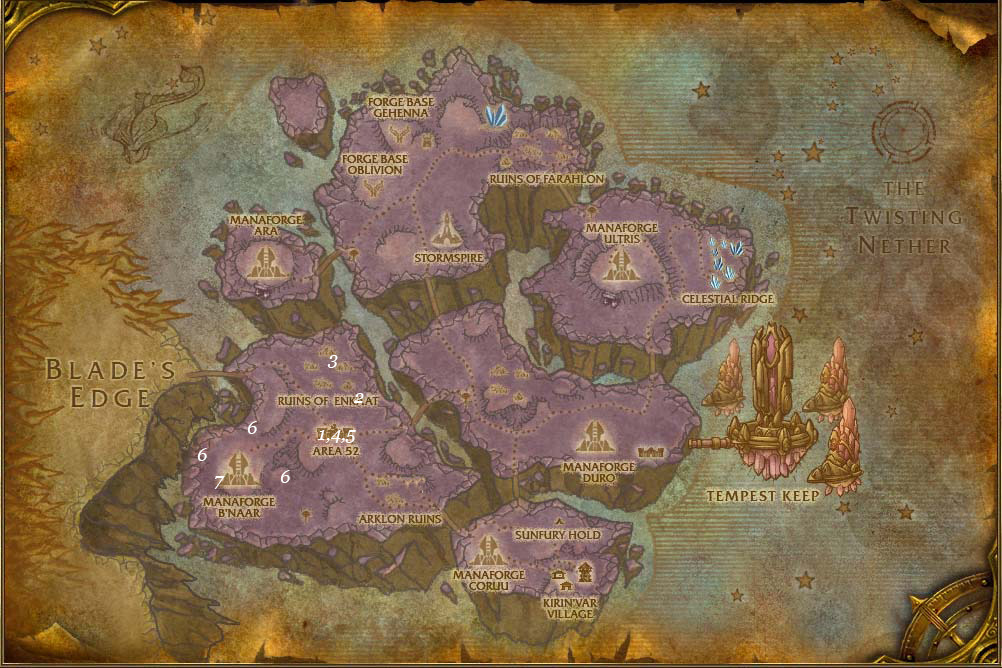
- Return to Area 52 via the road heading northwest:
- Before you enter the town, take a left off of the road and find Lead Sapper Blastfizzle (34, 68) in the trench outside of town to turn in
 Invaluable Asset Zapping and accept
  Dr. Boom. Then go into town.
 - Speak with Chief Engineer Trep to turn in
 Elemental Power Extraction.
 - Talk to Ravandwyr (31.4, 66.2) to turn in
 The Archmage’s Staff and accept
  Rebuilding the Staff. Now use Archmage Vargoth’s Staff. Guess who shows up? Speak with the archmage to turn in
  Curse of the Violet Tower and accept
  The Sigil of Krasus..
 - [ALDOR] Find Exarch Orelis at the inn and turn in
 Distraction at Manaforge B’naar, accept
  Measuring Warp Energies. Next to Orelis you’ll see Anchorite Karja, speak with her to accept
 Naaru Technology.
 - [SCRYER] Talk to Spymaster Thalodien in the inn to turn in
 Manaforge B ‘naar, accept
  High Value Targets. Nearby find Magistrix Larynna to accept
  Bloodgem Crystals.
- Before you enter the town, take a left off of the road and find Lead Sapper Blastfizzle (34, 68) in the trench outside of town to turn in
- Leave Area 52 and go to Camp Boom (34, 60). This quest can be a pain in the butt, as you might struggle to avoid the tiny bombs Dr. Boom sends out, and the Dr. hits pretty hard himself. You’re supposed to be able to run in, throw a Boom’s Doom, and run out while you wait for the cooldown. If you die, try resurrecting on top of the smallest oil drum to Dr. Boom’s right — this can sometimes make him unable to target you. You might have to experiment a bit to find the best place to stand where he won’t aggro.
- Once Dr. Boom is dead, head north to the Ruins of Enkaat, and kill Disembodied Draenor until you’ve collected 4 Flawless Crystal Shards for
 Rebuilding the Staff.
 - Return to Area 52, talk to Ravandwyr (31.4, 66.2) to turn in
 Rebuilding the Staff and accept
  Curse of the Violet Tower.
 - Leave town heading south to Blastfizzle (34, 68) in the trench to turn in
 Dr. Boom!
 - [ALDOR] Head west to reach Manaforge B’naar. Once there, go to the following coordinates and use the Warp-Attuned Orb where the pipes enters the ground:
- Northern Pipeline – (25.4, 60.4)
- Western Pipeline – (21.2, 67.5)
- Southern Pipeline – ( 20.9, 71.0)
- After you measure the southern pipeline, go north and enter the manaforge, then find a console (23.2, 68.1) to turn in
 Naaru Technology and accept
  B’naar Console Transcription. Then continue on your counter-clockwise collection of the measurements
 - Eastern Pipeline – (28.9, 71.8)
- [SCRYER] Head west to reach Manaforge B’naar. Kill Sunfury Magisters until one of them drop a Bloodgem Shard. Then head to the nearest big red crystal and use the Bloodgem to complete the objectives for
 Bloodgem Crystals. While doing so, find and kill Sunfury Warp-Masters, Geologists (they can be found east of manaforge) and Warp-Engineers inside the manaforge for
  High Value Targets.
Part 3

- Head southeast to the of the bridge east of the Arklon Ruins . Cross it and continue southeast to Kirin’var Village and make your way to the town square (57, 85). Once there:
- Speak with Apprentice Andrethan to accept
 Indispensable Tools.
 - Nearby, talk to Thadell to accept
 Needs more Cowbell.
 - Speak with the custodian Dieworth to accept
 Malevolent Remnants and
  A Fate Worse Than Death. From now on, kill Severed Spirits, Mana Seekers and Mageslayers for these quests.
 - Go back down to the bottom of the tower, speak with Lieutenant-Sorcerer Morran to accept
 The Unending Invasion.
- Speak with Apprentice Andrethan to accept
- Head south from the tower and find Abjurist Belmara, who patrols near (59,88). Kill her and loot her book, Belmara’s Tome to accept
 Abjurist Belmara.
 - Next head east to the building with the clock-tower at (60, 87). Find Battle-Mage Dathric inside and kill him. Pick up Dathric’s Blade from him to accept
 Battle-Mage Dathric.
 - Head outside and find the path that runs past the building; Cohlien Frostweaver should be around (59, 86). Kill him and pick up Cohlien’s Cap to accept
 Cohlien Frostweaver.
 - Go northeast to the blacksmith’s house (61, 85) and kill the Kirin’Var Apprentices that hang out by the forge until you retrieve the Smithing Hammer.
- Conjurer Luminrath patrols the road (60, 85), northwest of the blacksmith’s house. Kill him and grab Luminrath’s Mantle and right-click it to accept
 Conjurer Luminrath.
 - Head northeast and then over the bridge to the Chapel Yard and find Bessy nearby (59, 78) out in a field. This is an escort quest, so make sure you’re ready before you begin it. Once prepared, speak with Bessy to turn in
 Needs More Cowbell and accept
  When the Cows Come Home. This is soloable as long as you let Bessy take aggro first, and buff her if you can. It also seems possible to die and come back and res and continue escorting Bessy. Once she makes it to Thadell you can turn in
  When the Cows Come Home to him.
 - Speak with Apprentice Andrethan to turn in
 Indispensable Tools and accept
  Master Smith Rhonsus.
 - Now we’re going to put some ghosts to rest!
- Go west to the nearby houses, killing Mana Seekers and Mageslayers if you haven’t completed
 A Fate Worse Than Death yet. Go into the house closest to the tower, and get close to the weapon rack (56.9,86.8) — it should sparkle when you’re close enough — and use Dathric’s Blade in your inventory.
 - Leave this house and continue up the road, skip one house and then go “into” the next one and find the dresser at (56.4, 87.8). Use Luminrath’s Mantle near it.
- Skip another house and go into the one at the end of the road. In the front of the house you’ll find the Mana Bomb Fragment for The Unending Invasion (55.7, 87.2). Then enter the house just to the northwest and find the bookshelf at (55.5, 86.5) and use Belmara’s Tome near it.
- From the doorway of Belmara’s house, turn right and you’ll see across the street a house with a footlocker at (55, 87), use Cohlien’s Cap near it.
- Go west to the nearby houses, killing Mana Seekers and Mageslayers if you haven’t completed
Part 4

- Return to the tower with all the NPCs, and speak with Morran to turn in
 The Unending Invasion and accept
  Potential Energy Source. Then speak with Dieworth to turn in
  Battle-Mage Dathric,
  Conjurer Luminrath,
  Cohlien Frostweaver, and
  Abjurist Belmara, accept
  The Annals of Kirin’Var.
 - Now you’ll have to kill poor Battle-Mage Dathric again! Go east to the town hall building (the one with the clocktower) at (60, 87) and slay Dathric once more; this time he’ll drop the Annals of Kirin’Var.
- Continue northeast to the blacksmith’s house and kill Master Smith Rhonsus (61, 85).
- Return to the tower and speak to Dieworth to turn in
 The Annals of Kirin’Var and accept
  Searching for Evidence. Then go talk to Apprentice Andrethan and turn in
  Master Smith Rhonsus.
 - Go northeast across the bridge to the farm again, and go into the barn at (60, 78). Interact with the Necromantic Focus to turn in
 Searching for Evidence and accept
  A Lingering Suspicion.
 - Exit the barn, and find Tormented Citizens in this part of the village. If you get close enough, they’ll transform into the Loathsome Remnant you need to kill/loot to complete
 A Lingering Suspicion. Make sure you let the spirits transform into ghosts before you kill them, or you wont get the quest item drops. Also try not to DPS them when they cast soulbind.
 - Return to the tower in the middle of the town, talk to Dieworth to turn in
 A Lingering Suspicion, accept
  Capturing the Phylactery.
 - Go across the bridge again, go straight until you hit a small hill, then go right and look on your right for the three outhouses (small buildings) on the side of the chapel. Click on the middle one to find Naberius’s Phylactery — return to Dieworth to turn in
 Capturing the Phylactery.
 - You can accept
 Destroy Naberious! from Dieworth if you want, and try to solo it or get a group. Cross the bridge to the Chapel Yard, then head to the chapel at the northeast end of the area (62, 79) to find him. If you defeat him, turn the quest in with Dieworth. Some notes on Naberious:
- Clear the interior adds before you aggro him, and you can clear the ones outside if you plan on kiting him a lot.
- Avoid the red circles on the ground by constantly moving, otherwise you’ll lose a lot of HP
- If you aren’t solo, he can cast mind control.
- You can avoid his frost bolt by breaking line of sight.
- Leave the village and go west to Manaforge Coruu, specifically (51, 82). North of the road, go through the camp and look on the ground for the Energy Isolation Cube with a purple glowing light inside — you want to collect these — and find Spellbinder Maryana nearby. Kill her and loot the Sigil of Krasus, then use the Archmage Vargoth’s Staff to summon Vargoth and turn in
 The Sigil of Krasus, accept
  Krasus’s Compendium. Finish collecting Energy Isolation Cubes for
 Potential Energy Source before you leave.
Part 5

- Return to the Town Square of Kirin’var Village, talk to Lieutenant-Sorcerer Morran by the tower to turn in
 Potential Energy Source and accept
  Building a Perimeter.
 - Now we’re going to look for some scrolls:
- Head to the fountain just south of the tower, then enter the house to the southwest to find Krasus’s Compendium – Chapter 2 at (57.6, 89.6).
- Leave this house and go to the 2nd house on your right to grab Krasus’s Compendium – Chapter 1 (58.6, 89.2).
- Exit that house, and go to the closest house to the northeast to find Krasus’s Compendium – Chapter 3 (58.8, 87.9).
- Use Vargoth’s Staff to summon him again, turn in
 Krasus’s Compendium and accept
  Unlocking the Compendium.
- Time to activate some runes! They are coin-shaped, blue, semi-transparent, and hang out in the air.
- Go east of the central tower to (59.2, 85.3) and use the Rune Activation Device on the Eastern Rune.
- Go north across the bridge and head west up the hill to (57.4, 82.9) and use the Rune Activation Device on the North Eastern Rune.
- Now jump down the hill and go southwest to (54.3, 86.1) and activate the Western Rune, which is at the base of the cliff that the village sits on.
- Return to Lieutenant-Sorcerer Morran and turn in
 Building a Perimeter, accept
  Torching Sunfury Hold. Then speak with nearby Dieworth to accept
  The Sunfury Garrison.
 - Leave the village and go north to Sunfury Hold (56, 81).
- Start killing Sunfury Archers for
 The Sunfury Garrison, finish the objectives for this quest before you leave the area.
 - Look for a Sunfury Flamekeeper to kill so you can steal their Flaming Torch. Once you have one, it will last for 5 minutes. Simply clear your way to one of the tents with a ballista near by. Stand in between the two objects and throw your torch, then wait for them to stop burning and repeat 3 more times.
- Head to (56, 79) near the center of the camp and wait for Spellbinder Maryana to show up (if she isn’t there), clear any nearby adds before engaging her. Kill her and loot the Heliotrope Oculus, then use Vargoth’s staff to summon him. turn in
 Unlocking the Compendium and accept
  Summoner Kanthin’s Prize.
- Start killing Sunfury Archers for
- Go west on the road from Sunfury Hold, then go right at the fork and cross the bridge. Follow the road to again go right at the fork and you’ll reach Manaforge Duro. Summoner Kanthin patrols the road in front of the manaforge — kill Kanthin, loot the Stone of Glacius and use Vargoth’s staff to summon the Archmage. Turn in
 Summoner Kanthin’s Prize, accept
  Ar’kelos the Guardian.
 - Head south and return to Kirin’var Village:
- Speak with Morran to turn in
 Torching Sunfury Hold.
 - Speak with Dieworth to turn in
 The Sunfury Garrison and accept
  Down With Daellis.
 - Enter the tower and you’ll be confronted by the arcane golem Ar’kelos. Kill the golem and then go to the top of the tower and find Vargoth. Talk to him to turn in
 Ar’kelos the Guardian, but don’t worry about accepting the follow-up
  Finding the Keymaster, though you can certainly follow the quest chain if you want to and you can find a partner.
- Speak with Morran to turn in
- Head north (by way of the western bridge) to Manaforge Duro once more, and look for Master Daellis Dawnstrike patrolling the western path near (56, 66); kill him to complete
 Down With Daellis.
 - Return to the tower in Kirin’var Village, speak with Custodian Dieworth to turn in
 Down with Daellis.
 - Turn right around again and cross the bridge west of Sunfury Hold. This time go east past Manaforge Duro until you reach Cosmowrench (65, 66). Once there, speak with Harpax (65.5, 66.8) to grab the flight path, then enter Cosmowrench and speak with Sab’aoth (66.4, 67.2) to accept
 Bloody Imp-ossible!
 - Leave town and head just a bit north, where you should find plenty of Warp Chasers. Make sure you’re near the Warp Chaser, then use Zeppit’s Crystal and kill the Warp Chaser. If done correctly, the little imp will gather the blood and you’ll receive a Warp Chaser Blood vial. Make sure you’re decently close when the mob dies (no long-ranged mage spells), and you’ll need to wait a few moments for Zeppit to collect the blood, so don’t go running off right after you kill the Warp Chaser. Also note that Zeppit can only drain one at a time, so don’t bother killing a bunch with AoE. Return to Sab’aoth and turn in
 Bloody Imp-ossible! once you’ve collected enough blood.
Part 6

- Return back to Area 52 (save the hearthstone if you plan to learn skills), and then:
- Talk to Nether-Stalker Khay’ji outside of the inn and turn in
 Consortium Crystal Collection and accept
  A Heap of Ethereals.
 - Speak with Papa Wheeler and accept
 Pick Your Part.
 - [ALDOR] In the Inn, talk to Exarch Orelis to turn in
 Measuring Warp Energies. Speak with nearby Anchorite Karja to turn in
  B’naar Console Transciption and accept
  Shutting Down Manaforge B’naar.
 - [SCRYER] In the Inn, speak with Spymaster Thalodien to turn in
 High Value Targets and accept
  Shutting Down Manaforge B’naar. Speak to Magistrix Larynna next to him to turn in
  Bloodgem Crystals.
 - Restock, repair armor, learn skills if needed, etc
- Talk to Nether-Stalker Khay’ji outside of the inn and turn in
- Leave Area 52 heading west and go southwest to Manaforge B’naar. Head to the southern entrance of the manaforge to find Overseer Theredis — kill him and loot the B’naar Access Crystal. When ready, right click the “console” (it’s the big pink crystal), then defend it until the quest is complete.
- Leave the manaforge and head southeast to The Heap (28, 78), start killing Zaxxis Raiders and Zaxxis Stalkers in the area while you search their camp for Ethereal Technology (glass boxes and cylinders glowing with pink light). Stay here until you’ve completed the objectives for
 A Heap of Ethereals as well as
  Pick Your Part.
 - Return to Area 52:
- Speak with Papa Wheeler to turn in
 Pick Your Part, accept
  In A Scrap With The Legion and
  Help Mama Wheeler.
 - Talk to Nether-Stalker Khay’ji and turn in
 A Heap of Ethereals and accept
  Warp-Raider Nesaad.
 - [ALDOR] Speak with Anchorite Karja in the inn to turn in
 Shutting Down Manaforge B’naar, accept
  Shutting down Manaforge Coruu. Talk to nearby Exarch Orelis to accept
  Attack on Manaforge Coruu.
 - [SCRYER] Find Spymaster Thalodien in the inn to turn in
 Shutting Down Manaforge B’naar, accept
  Stealth Flight. Go outside the eastern gate and find Veronia (33.8, 64.2) to turn in
  Stealth Flight and accept
  Behind Enemy Lines.
- Speak with Papa Wheeler to turn in
- Go southwest to The Heap again, this time to (28.2, 79.4) where you can find and kill Warp-Raider Nesaad.
- [ALDOR] Head east from Nesaad through the Arklon Ruins to the bridge that leads to Manaforge Coruu (46, 81).
- Start killing Sunfury Arcanists outside, then once you’ve gotten most or all the 9 arcanists you need, go inside to kill 5 Sunfury Researchers for
 Attack on Manaforge Coruu.
 - Inside the manaforge, you should be able to find Overseer Seylanna at (49, 81) — kill her for the Coruu Access Crystal, then use it on the console and protect it for 2 minutes just like at the other manaforge. Sometimes one of the techs can get behind the console, so make sure you’re checking back there and interrupting anyone trying to stop you from getting that sweet XP.
- Start killing Sunfury Arcanists outside, then once you’ve gotten most or all the 9 arcanists you need, go inside to kill 5 Sunfury Researchers for
- [SCRYER] Get back to Area 52, then speak again with Veronia and tell her you’re ready.
- You’ll fly to Manaforge Coruu and land near Caledis Brightdawn. Speak with him to turn in
 Behind Enemy Lines and accept
  A Convincing Disguise.
 - Head north towards the manaforge and kill Sunfury Arcanists until you get Sunfury Arcanist Robes (found anywhere), Sunfury Researchers until you collect Sunfury Researcher Gloves (found inside the manaforge) and Sunfury Guardsmen until you find a Sunfury Guardsman Medallion (found near entrances to the manaforge). Once you’ve collected all three pieces, return to Caledis Brightdawn to turn in
 A Convincing Disguise and accept
  Information Gathering.
 - Put on your Sunfury Disguise and go into Manaforge Coruu. Avoid the Arcane Annihilator (who can see through your disguise) as you make your way to the side room in the south of the manaforge(48, 84). Stand close to Commander Dawnforge and Arcanist Ardonis and listen to their conversation, then once you get a quest update, return to Caledis Brightdawn to turn in
 Information Gathering and accept
  Shutting Down Manaforge Coruu.
 - Go back into the manaforge to find Overseer Seylanna (49, 81). Take the Coruu Access Crystal she dropsand then use the console to begin the shutdown. Defend the console for 2 minutes. Once finished, return once more to Caledis Brightdawn to turn in
 Shutting Down Manaforge Coruu and accept
  Return to Thalodien.
- You’ll fly to Manaforge Coruu and land near Caledis Brightdawn. Speak with him to turn in
- Go north and slightly east to cross the bridge, then take the left turn at the fork and continue on the road to Eco-Dome Midrealm (46, 56). Once there:
- Talk to Gahruj to accept
 Drijya Needs Your Help. Ask in chat and see if you can find a group for this quest while you grab the rest of the quests here.
 - Speak with nearby Mama Wheeler (46.6, 56.4) to turn in
 Help Mama Wheeler and accept
  One Demon’s Trash…
 - Find Mehrdad to accept
 Run a Diagnostic and
  New Opportunities.
 - Talk to Shauly Pore, accept that sometimes Blizzard is too on the nose with the joke NPCs, and accept
 Keeping up Appearances.
- Talk to Gahruj to accept
- Leave the dome and go south on the road to find Drijya (48, 63.4) and turn in
 Drijya Needs Your Help. If you have a group, you can now easily do Drijya’s escort quest
  Sabatoge the Warp-Gate! You can probably still solo it if you want. Let Drijya go first and get attacked by the mobs, or he won’t help you fight them. When Drijya says “Let’s get outta here”, don’t leave right away just follow him, or you’ll fail the quest.
 - Southeast of the Eco-Dome lies the Scrap Field (50, 59). Head there and start killing Mo’arg Doomsmiths and Gan’arg Engineers for
 In A Scrap With The Legion. While there, look for Fel Reaver Parts for
  One Demon’s Trash… Make your way north as you do so.
 - As you clear north, you’ll pass under a big purple pipeline. Once you do, take a left into the eco-dome and a few meters north you should find the Diagnostic Equipment at (48.2, 55), click on it to get the Diagnostic Results. Kill the rest of what you need for
 In A Scrap With The Legion and find the rest of the Fel Reaver Parts for
  One Demon’s Trash…
 - Head into the eco-dome and kill Ripfang Lynx (they hang out in the western side of the dome) for their pelts to complete Keeping Up Appearances. While doing so , look for the Ivory Bells you need for
 New Opportunities, they tend to grow near other plants.
Part 7

- Return to Midrealm Post and:
- Speak with Mama Wheeler to turn in
 One Demon’s Trash… and accept
  Declawing Doomclaw.
 - Talk to Mehrdad to turn in
 Run a Diagnostic! and
  New Opportunities, accept
  Deal With the Saboteurs.
 - Talk with Shauly Pore to turn in
 Keeping up Appearances and accept
  The Dynamic Duo.
 - See Gahruj to turn in
 Sabotage the Warp-Gate!
- Speak with Mama Wheeler to turn in
- Cross the southwestern bridge and return to Area 52. Once there:
- Speak with Papa Wheeler to turn in
 In A Scrap With The Legion.
 - Talk to Nether-Stalker Khay’ji to turn in
 Warp-Raider Nesaad and accept
  Request for Assistance.
 - [ALDOR] Speak with Anchorite Karja in the inn to turn in
 Shutting down Manaforge Coruu and accept
  Shutting Down Manaforge Duro. Then talk to nearby Exarch Orelis to turn in
  Distraction at Manaforge B’naar and accept
  Sunfury Briefings.
 - [SCRYER] Speak with Spymaster Thalodien to turn in
 Return to Thalodein and accept
  Shutting Down Manaforge Duro. Next to him, talk to Magistrix Larynna to accept
  Kick Them While They’re Down.
- Speak with Papa Wheeler to turn in
- Go back across the bridge to the dome, and at Midrealm Post talk to Gahruj to turn in
 Request for Assistance and accept
  Rightful Repossession.
 - Leave the dome heading east, and head towards Doomclaw at (50.6, 57.2), who is underneath the pipeline, right before it curves downhill. If you don’t want to fight through mobs, head further east and swing around to approach him from the east. Kill him and grab Doomclaw’s Hand from his corpse.
- Continue east and then south to Manaforge Duro (60, 68):
- [ALDOR] You’ll need to collect the Sunfury Military Briefing (drops from Sunfury Bowmen and Centurions) and the Sunfury Arcane Briefing (drops from Sunfury Conjurers). While there, look for the Boxes of Surveying Equipment scattered around the area to complete
 Rightful Repossession. Once done with that stuff (or while waiting for respawns), it’s the same drill as the other manaforges: Enter (the northeast entrance is less heavily guarded) and head to the the southern part of the building, kill the Overseer (59.8, 68.2), take their crystal and use it on the console, then protect the console.
 - [SCRYER] You need to kill Sunfury Conjurers, Bowmen, and Centurions for
 Kick Them While They’re Down. While killing, look for the Boxes of Surveying Equipment scattered around the area to complete
  Rightful Repossession. Once done with that stuff (or while waiting for respawns), it’s the same drill as the other manaforges: Enter (the northeast entrance is less heavily guarded) and head to the the southern part of the building, kill the Overseer (59.8, 68.2), take their crystal and use it on the console, then protect the console.
- [ALDOR] You’ll need to collect the Sunfury Military Briefing (drops from Sunfury Bowmen and Centurions) and the Sunfury Arcane Briefing (drops from Sunfury Conjurers). While there, look for the Boxes of Surveying Equipment scattered around the area to complete
- Return to Midrealm Post:
- Speak with Gahruj to turn in
 Rightful Repossession and accept
  An Audience with the Prince.
 - Talk to Mama Wheeler to turn in
 Declawing Doomclaw and accept
  Warn Area 52!
- Speak with Gahruj to turn in
- We better Warn Area 52! Go back over the southwest bridge to Area 52. Once there:
- Talk to Fuselage, turn in
 Warn Area 52! and accept
  Doctor Vomisa, Ph.T.
 - [ALDOR] Speak with Anchorite Karja (32, 64.2) to turn in
 Shutting Down Manaforge Duro, skip Shutting Down Manaforge Ara. Talk to nearby Exarch Orelis (32, 64.2) to turn in
  Sunfury Briefings, accept
  Outside Assistance.
- Note: you can accept
 Shutting Down Manaforge Ara if you want — it’s difficult to solo but simple with 3 players. If you choose to accept
  the quest, it’s the same as the other ones — Go to Manaforge Ara, find the Overseer (26.2, 39.6), get the Access Crystal, use it on the console, defend the console. You will end up at Ara a few times during the following steps
- Note: you can accept
- [SCRYER] Speak with Spymaster Thalodien in the inn to turn in
 Shutting Down Manaforge Duro, skip Shutting Down Manaforge Ara (see above Aldor note if you want to try it with a group). Then talk to nearby Magistrix Larynna to turn in
  Kick Them While They’re Down and accept
  A Defector.
- Talk to Fuselage, turn in
- Head east of Area 52 on the road, taking a left at the fork to find the tent at (37.2, 63.8), talk to the doc to turn in
 Doctor Vomisa, Ph.T. You can optionally accept
  You, Robot, which is a pretty fun quest, but can be a challenge without a group:
- When you’re ready, use the Scrap Reaver Controller to start the action. Use the Scrap Reaver to take aggro from Negatron and try to use low DPS abilities and spells so you don’t get targeted. Good luck! If you complete You, Robot, you should also accept
 Back to the Chief! and turn it in with Rocket-Chief Fuselage the next time you’re in Area 52.
- When you’re ready, use the Scrap Reaver Controller to start the action. Use the Scrap Reaver to take aggro from Negatron and try to use low DPS abilities and spells so you don’t get targeted. Good luck! If you complete You, Robot, you should also accept
- Continue east over the bridge and head into the Eco-Dome. Find the lake at 46, 53 and start killing Barbscale Crocolisks until you’ve completed
 Deal With the Saboteurs.
 - See Mehrdad (46.4, 56.4) to turn in
 Deal with the Saboteurs, accept
  To the Stormspire.
 - Take the road north and slightly west through the dome and up to the bridge, then cross it to get to Stormspire. Continue on the road until you reach the bottom of the elevator, which is the entrance to Stormspire:
- Talk to Aurine Moonblaze at the bottom of the elevator to accept
 Flora of the Eco-Domes.
 - Ride the elevator up and go straight to find Ghabar and turn in
 To the Stormspire, accept
  Diagnosis: Critical.
 - Find Zephyrion. Speak with him to accept
 Surveying the Ruins.
 - Nearby, find Nether-Stalker Nauthis to accept
 The Minions of Culuthas and
  Fel Reavers, No Thanks!
 - Head up the ramp and take a left, go into the building with the Image of Nexus-Prince Haramad to turn in
 An Audience with the Prince and accept
  Triangulation Point One.
 - Exit the building, grab the flight path on your right, then go the other direction to find Audi the Needle. Speak with her to turn in
 The Dynamic Duo and accept
  Retrieving the Goods.
 - Down the ramp and to the left find the inn and make Stormspire your home.
- Talk to Aurine Moonblaze at the bottom of the elevator to accept
- Leave town via the elevator you rode up on and head a bit away from the elevator to find Farahlon Lashers (they’re big flowers). Get them low HP, then use the Energy Field Modulator on them to mutate them and finish them off; do this until you’ve completed Flora of the Eco-Domes.
- Head to the north east part of the dome to find the Sutheron Generator (47.6, 26.8). Once at the generator, use the Diagnostic Device to obtain the Diagnostic Results.
- Leave the dome and go northeast to the Ruins of Farahlon (50, 24) and kill Hounds and Eyes of Culuthas for
 The Minions of Culuthas. Warlock players should consider enslaving an Eye of Culuthas as they cast a debuff that adds 50% spell effectiveness on the target. While killing the mobs, plant the Surveying Markers for
  Surveying the Ruins:
- Follow the road up the hill, and take two lefts to find the banner for Marker One at (51.7, 20.5)
- Head back to the main path, and continue east. The road will loop around the hill, follow the road up and take a left to find Marker Two at (54.6, 22.8)
- Go back to the fork and take the other path to find Marker Three at (55.8, 19.9)
- Once done in the ruins, go back the way you came and follow the road west past Forge Base: Gehanna to Forge Base: Oblivion (40, 28). Kill Gan’arg Mekgineers in the area until you’ve collected 5 Condensed Nether Gas. Then find one of the Inactive Fel Reavers (they’re hard to miss) and right click it to load it up with gas to complete
 Fel Reavers, No Thanks!
 - Go southwest towards Tuluman’s Landing at (34, 38), just south of the bridge that leads to Manaforge Ara:
- [ALDOR] Speak with Kaylaan to turn in
 Outside Assistance and accept
  A Dark Pact.
 - Talk to Wind Trader Tuluman and accept
 Dealing with the Foreman.
 - Speak with Nether-Stalker Oazul to accept
 Neutralizing the Nethermancers.
- [ALDOR] Speak with Kaylaan to turn in
- Cross the bridge west to Manaforge Ara:
- [ALDOR] Now you’ll need to kill stuff for
 A Dark Pact. The Gan’arg Warp-Tinkers can be found near the entrance to the manaforge, and also in the mine entrance below the manaforge. The Daughters of Destiny can be a pain because they’ll usually have an add, luckily the add is needed for a different quest. The camps around the manaforge are a good place to find this mob. Mo’arg Warp-Masters can be found inside the manaforge, and also in the mine entrance below. Sunfury Nethermancers are scattered around the area, kill them for
  Neutralizing the Nethermancers.
 - [SCRYER] Head to the southern entrance of the manaforge and speak to Magister Theledorn (26.2, 41.6) to turn in
 A Defector and accept
  Damning Evidence. Sunfury Nethermancers are scattered around the area, kill them for
  Neutralizing the Nethermancers, and also kill any demon you find for
  Damning Evidence. Note that you can complete
  Damning Evidence while in the mine that we enter on the next step (30).
- [ALDOR] Now you’ll need to kill stuff for
- Now go to the mine below the manaforge (26, 43 is the entrance, you can turn around and jump down after you talk to Theledorn) and clear the mobs to reach Foreman Sundown (26.4, 42.2). Talk to him and turn in
 Dealing with the Foreman, accept
  Dealing with the Overmaster. Head to the northernmost part of the tunnel to find Overmaster Grindgarr, and kill him. Finish collecting Orders From Kael’thas for Damning Evidence before you leave.
Part 8

- Hearthstone back to Stormspire:
- Leave the inn heading left towards the elevator. Speak with Ghabar to turn in
 Diagnosis: Critical and accept
  Testing the Prototype.
 - See Zephyrion to turn in
 Surveying the Ruins.
 - Speak with Nether-Stalker Nauthis next to Zephyrion, turn in
 The Minions of Culuthas and
  Fel Reavers, No Thanks!, accept
  The Best Defense.
 - Take the elevator down, talk to Aurine Moonblaze to turn in
 Flora of the Eco-Domes, accept
  Creatures of the Eco-Domes.
- Leave the inn heading left towards the elevator. Speak with Ghabar to turn in
 Creatures of the Eco-Domes is pretty much the same as the previous quest from Aurine — get the Talbuk Sires or Does low hp (you’ll get a Talbuk Sire/Doe has weakened message), then use the Talbuk Tagger on them. Unlike those dang flowers, the Talbuk won’t attack you after you use the quest item on them. (40, 35) is a good place to find Talbuk, as is (44, 28). Return to Aurine once finished, turn in
  Creatures of the Eco-Domes and accept
  When Nature Goes Too Far.
- Head northeast to the lake at (44, 28) and find the hydra Markaru in the lake. Melee classes will have to swim down to his body to DPS him, and unfortunately he’ll sometimes use an ability that pushes you away. Easy kill, however. Once finished, grab the Hulking Hydra Heart and return to Aurine and turn in
 When Nature Goes Too Far.
 - Leave the dome north to find the road, and head southwest to Tuluman’s Landing (34, 38):
- [ALDOR] Talk to Kaylaan and turn in
 A Dark Pact, accept
  Aldor No More.
 - Speak with Tuluman to turn in
 Dealing with the Overmaster.
 - Holler at Nether-Stalker Oazul to turn in
 Neutralizing the Nethermancers.
- [ALDOR] Talk to Kaylaan and turn in
- Follow the road northeast past Forge Base: Oblivion, then head north off the road at the entrance to the dome. Go to around (41, 24) and kill Wrathbringers until you complete
 The Best Defense.
 - Continue northeast and go north at the fork to enter Eco-Dome Fairfield:
- You should find Tashar (44.6, 14.6) nearby. Speak with him to turn in
 Testing the Prototype and accept
  All Clear!
 - Begin killing nearby Scythetooth Raptors for your new quest.
- Also start searching for Dome Generator Segments for
 Retrieving the Goods — they can be found in raptor nests.
 - Once finished with both quest objectives, return to Tashar and turn in
 All Clear! Wait a bit for him to do his repairs, then speak with him again and accept
  Success!
- You should find Tashar (44.6, 14.6) nearby. Speak with him to turn in
- Return to Stormspire and go up the elevator:
- Go straight to find Ghabar and turn in
 Success!
 - See Nether Stalker Nauthis to turn in
 The Best Defense and accept
  Teleport This!
 - Head up the to Audi the Needle and turn in
 Retrieving the Goods.
- Go straight to find Ghabar and turn in
- Go back down the elevator, then head north and slightly west to reach Forge Base: Gehenna. Once there, find the three teleporters: (42.3, 21.1), (41.1, 19.4), and (39.2, 20.4). Clear an area on one side so that you can approach a Forgelord close to the teleporter, and make sure you leave it alive. Use the Mental Interference Rod on the Forgelord — you should now be able to use the demon’s abilities to blow up the teleporters. If the demon aggros on you, just run away rather than killing it. Note that hunters and warlocks will have to dismiss their pet in order to control the demon, and warlocks can also simply use Enslave Demon rather than using the quest item. Players with add-ons for their hotbar also may have to disable them in order to properly access the pet menu for the demon — control + 5 should also be the default hotkey in case you don’t get the menu and don’t want to disable anything.
- Return to Stormspire and speak once more with Nether-Stalker Nauthis to turn in
 Teleport This!
 - [ALDOR] Catch a gryphon to Area 52, and talk to Exarch Orelis in the inn to turn in
 Aldor No More — you can hearth back to Stormspire if you don’t want to fly back.
 - Leave Stormspire and head north east through the Ruins of Farahlon — stay on the road as it curves southeast and cross the bridge to reach the Protectorate Watch Post (58, 31):
- Talk to Wind Trader Marid to accept
 A Not-So-Modest Proposal.
 - Find Researcher Navuud and accept
 Electro-Shock Goodness!
 - Nearby, speak with Commander Ameer and accept
 The Ethereum.
 - Talk with Professor Dabiri to accept
 Recipe for Destruction.
 - Find Flesh Handler Viridius, accept
 Captain Tyralius from him, and don’t think too hard about what the title ‘Flesh Handler’ implies.
- Talk to Wind Trader Marid to accept
- Head back towards the bridge, and from the bridge go south west to the Ethereum Staging Grounds (56, 37):
- Once you run into the first Void Waste, drink Navuud’s Concoction and kill the Void Waste — it will split into globules, and you’ll need to kill those too. Stay in the area where you find the Void Wastes until you’ve completed
 Electro-Shock Goodness! If you need to wait for a respawn, you can work on killing ethereums (see below).
 - At the Ethereum Staging Grounds, kill Ethereum Assassins, Shocktroopers, and Researchers for
 The Ethereum.
 - Captain Zovax patrols the camp, look for him and take him out.
- Once you’ve completed the quest objectives, go to Ethereum Transponder Zeta (56.8, 38.7) to speak with Ameer and turn in
 The Ethereum, accept
  Ethereum Data.
 - Nearby to the southwest (55.8, 39.9) you should be able to see the Ethereum Data Cell on the ground — grab it and return to the Image of Ameer to turn in
 Ethereum Data and accept
  Potential For Brain Damage = High.
 - Kill ethereals, and drink the essence they drop. Once you imbibe the ethereal goodness, you’ll be able to see Ethereum relays — destroy as many as you can before the buff wears off. The relays look like Eels and seem to only spawn above the water. Keep drinking the essence (just kill more mobs if you need more) and killing relays until you’ve collected the 15 Ethereum Relay Data you need, then return to the Image of Commander Ameer to turn in
 Potential For Brain Damage = High, accept
  S-A-B-O-T-A-G-E.
 - Go to the southern part of the Staging Grounds to find Ethereum Archons and Overlords. Watch them and wait for one to begin an animation where a purple cloud starts to form around them — kill them once the animation finishes and they should drop the Prepared Ethereum Wrapping you need. This quest seems bugged at times, so you may not see the animation, in which case you can attempt to just farm them like normal until one drops, or you can try abandoning and grabbing the quest again. Either way, once you’ve got what you need, return to Commander Ameer’s Image to turn in
 S-A-B-O-T-A-G-E, but don’t accept
  Delivering the Message yet!
 - This quest can be frustrating, but it’s doable with some prep. Before you accept
 Delivering the Message, clear your way south to the conduit at (56.3, 42.8) — it’s the big glass pillar with a crystal at the top on the southeastern side of the camp — then run back and accept the quest. It should be much easier to escort the NPC to the objective now that the way is cleared.
 - The final quest in this chain, Nexus-King Salhadaar, is also accepted from the Image of Commander Ameer at the Ethereum Transponder. However, it requires a group, so don’t bother trying to solo it; if you can’t get a group, just skip it.
- Once you run into the first Void Waste, drink Navuud’s Concoction and kill the Void Waste — it will split into globules, and you’ll need to kill those too. Stay in the area where you find the Void Wastes until you’ve completed
- Find Warden Icoshock (55, 40), who is to your southwest hanging out by all the pink orbs. Kill him, take his Prison Key. Ignore the nearby prison balls, and instead head to the lonely prison ball to your west west at (53.3, 41.4) to free Captain Tyralius.
- Leave the staging grounds heading south, then go east up the hill to find Agent Araxes (59.4, 45) and accept
 The Flesh Lies… then head east a bit to the entrance of the Access Shaft Zeon. Use the Protectorate Igniter on the corpses from as far away as possible as you move through the tunnel (just right-click it, you don’t have to target anything). Take your immediate left (it’s easy to miss, so use your minimap) and take the next two lefts as well find Agent Ya-six (60.8, 41.4). Speak with him to accept
  Arconus the Insatiable. Behind Ya-six is the Teleporter Power Pack you need for
  A Not-So-Modest Proposal, so grab it! Now return to the entrance and this time take the right-hand path until you find Arconus the Insatiable. Kill him, then leave the Access Shaft and talk to Agent Araxes to turn in
  The Flesh Lies…
 - Head east and then north to loop around the eastern side of Manaforge Ultris. Once you see the first Seeping Sludge, drink Navuud’s Concoction and start killing them — they’ll split into globules that you need to destroy until you’ve completed the second objective of
 Electro-Shock Goodness! Once you’ve cleared the first pool, follow the nearby road north up the hill and kill Voidshriekers and Unstable Voidwraiths to collect Fragments of Dimensius for
  Recipe for Destruction. Stay in this area until you’ve completed both quests.
 - Head northeast of the manaforge, to where the roads meet at (66.7, 33.9), then use the Triangulation Device in your inventory and you’ll be shown where to stand to complete Triangulation Point One.
- Head east to the Celestial Ridge, then clear your way down the ramp to reach the teleporter at (71.2, 39). Use it to speak with the Image of Wind Trader Marid to turn in
 A Not-So-Modest-Proposal and accept
  Getting Down to Business.
 - Kill Nether Drakes and Dragons until you’ve got all the Nether Dragon Essence you need. When finished, return to the teleport pad and speak with the Shrouded Figure (70.9, 38.8) just north of the pad to turn in
 Getting Down to Business and accept
  Formal Introductions.
 - Go north to (71.2, 35.1) to speak with Tyri to turn in
 Formal Introductions and accept
  A Promising Start. Then wander the Celestial Ridge collecting Nether Dragonkin Eggs (they’re everywhere). Return to Tyri when finished to turn in
  A Promising Start and accept
  Troublesome Distractions.
 - Leave the Celestial Ridge and follow the road west back to the Protectorate Watch Post (58, 31). Once there:
- Speak with Professor Dabiri to turn in
 Recipe for Destruction and accept
  On Nethery Wings.
 - Find and speak with Flesh Handler Viridius, he should still be wandering around. Turn in
 Captain Tyralius with him.
 - Talk to Researcher Navuud (59.2, 32.4) to turn in
 Electro-Shock Goodness!
 - Speak with nearby Commander Ameer to turn in
 Arconus the Insatiable.
 - Find Dealer Hazzin (58.4, 31.4) to turn in
 Triangulation Point One and accept
  Triangulation Point Two.
 - Talk to Wind Trader Marid (58, 31.5) and he’ll lead you to the edge of the camp. If you want to avoid fighting him with his guards, stay close to him the whole time he’s walking and then run past him to the rocks he’s standing near when he stops to talk to you. If done correctly, you can avoid pulling his 2 guards. However you do it, just make sure he’s dead at the end.
- Now we’re going to talk to the Netherdrake next to Professor Dabiri to begin
 On Nethery Wings. This is a super easy bombing mission, just start clicking the Phase Disruptor once you’re close to the mana-forge. Once it works, you’ll need to click it a few more times and then complete the quest. No aiming required! Speak to Dabiri to turn in
  On Nethery Wings once you land.
 - If you want, you can accept
 Dimensius the All-Devouring from Professor Dabiri. This quest is better done in a group, but can be soloed. When ready, talk to Captain Saeed, who stands in front of a group of soldiers, then follow him up the hill. With 2 people, one player can go find Captain Saeed when he respawns and send him back into battle. The trick is to not kill the adds in the fight, as while his adds are up, Dimensius will only use avoidable attacks. Ranged classes will want to stay in the hallway, healers should try to buff and heal Saeed. If you can’t find a group and fail soloing it, feel free to skip this.
- Speak with Professor Dabiri to turn in
- Go east back to the Celestial Ridge and talk to Tyri (71.2, 35.1) to turn in
 Troublesome Distractions. If you want, you can accept
  Securing the Celestial Ridge, as it is easy with a partner or a group, manageable by yourself. If you choose to do this quest, accept it and head to the southeast edge of the ridge (72, 43). If you’re neutral with Netherwing, make sure you set your status to At War before you call Veraku. When ready, use the Challenge of the Blue Flight horn. The dragon that shows up can be cc’d, and should go down fairly easily.
 - Hearthstone back to Stormspire, then leave the city and go west over the bridge to towards Manaforge Ara. Follow the path up the hill and once you reach a camp with mobs near (29, 41.2) use the Triangulation Device and it will give you a mark — stand where it shows you and you’ll complete the quest objective for
 Triangulation Point Two. Go back over the bridge to find Wind Trader Tuluman (34.6, 37.8) on the other side, talk with him to turn in
  Triangulation Point Two, but don’t worry about accepting
  Full Triangle, we’re almost done here.
 - [SCRYER] Go back to Stormspire, then fly to Area 52 and speak with Spymaster Thalodien (32, 64) in the inn to turn in
 Damning Evidence, ignore the rest of the questline.
 - If you want to go to a major city to train, shop, repair etc, do so now. Then, find your way to Allerian Stronghold in Terrokar Forest. Leave the stronghold and head east and slightly north to find the bridge (71, 50) over the easternmost river, cross it to enter Shadowmoon Valley.
Extra XP In Netherstorm
Grinding Mobs
Starting from level 67, you can begin farming Manaforge B’naar in the western part of Netherstorm. Mobs in this zone drop Sunfury Signets and Netherweave Cloth for extra gold. Area 52 is close by, so you shouldn’t have any problems with bag space, as you can quickly sell off trash and re-stock.
There’s a similar spot suitable for level 68-69 on the eastern side: Manaforge Duro. Drop, and mob density is identical to the previous location. In addition, Cosmowrench is nearby to sell loot and re-stock.
Author
An avid reader of sci-fi, fantasy, and history. Believes disagreement should mean discourse, not flame wars. Still searching for that next game that grabs him the way (those mimics in) Dark Souls did.
