HealBot Continued Addon Guide
Players often refer to mouseover healing tools as “HealBot.” That’s because the original HealBot addon was the first of its kind: an addon that made it easy to bind your spells to mouse clicks, similar to using mouseover macros. It also came with highly customizable group unit frames to replace the default game ones. HealBot Continued carries on that legacy.
HealBot Continued and addons like it (such as VuhDo) are particularly popular among healers, who spend most of their time in group content interacting with unit frames. We’ll cover all of the addon’s options so you can set everything up exactly how you want it. But first, let’s get HealBot Continued installed!
Installing HealBot Continued
HealBot Continued is available to download on CurseForge, Wago, and WoWInterface. You can install it manually or by using the addon manager of your choice.
We have a separate guide for How to Install and Manage Addons, so go check that out if you need some help!
Setting Up HealBot Continued
Once you have HealBot Continued installed in your Addons folder, you’ll need to make sure it’s enabled in your game.
Start up World of Warcraft, and on your character selection screen, look for the AddOns button in the bottom left corner. Make sure that the following are enabled:
- HealBot
- HealBot Data
- HealBot Extra Skins
- HealBot Options
- HealBot Tooltips
Now load into the game and you should see some HealBot panels on your screen. You’re good to go!
Plugins for HealBot Continued
Before we start customizing HealBot Continued, there’s one more thing to go over. There are several plugins available to extend HealBot Continued – addons for your addon! You can find them on CurseForge or the HealBot Continued website (which links back to CurseForge for download). They are installed like any other addon, but they only work when HealBot Continued is installed. Here are a few notable ones:
- HealBot Plugin Extra Buttons: Adds more mouse binding options for MMO mice that have a lot of buttons.
- HealBot Plugin Threat: A threat meter that shows each group member’s threat based on their rather than your current target.
- HealBot Plugin MyCooldowns: Displays your cooldowns as progress bars.
- HealBot Plugin TimeToDie: Displays a meter with the current damage that is being taken by each player in your group and how long before they die at the current rate.
- HealBot Plugin TimeToLive: Displays a meter that tracks required, incoming, and pending resurrections.
Customizing HealBot Continued
If you’ve taken a look at HealBot Continued’s options yet, you might be feeling overwhelmed. Don’t worry, we’ll walk you through what everything does.
HealBot Continued Chat Commands
Before we get into the menu, here are some chat commands to make customizing and troubleshooting easier.
- Type
/hb hto display commands in the chat window - Type
/hb hsto display more commands in the chat window - Type
/hbor/hb oto display the options menu - Type
/hb tto toggle HealBot on or off - Type
/hb dto restore HealBot options to default
There are more commands that you can find by typing /hb h or /hb hs into the chat window. There is also a table of chat commands on the HealBot website, here. The ones listed above should be plenty to get you started.
HealBot Continued Options Menu
Now let’s look at the options menu. There are a lot of settings in here! Some of them are fairly straightforward while others require some explanation. We’ll go through section by section.
At the bottom of the menu are a few buttons that appear regardless of what page you are on. These are for restoring the addon’s default settings and reloading your UI.
The HealBot section is open when you first open the options menu. It has some basic information about the addon.
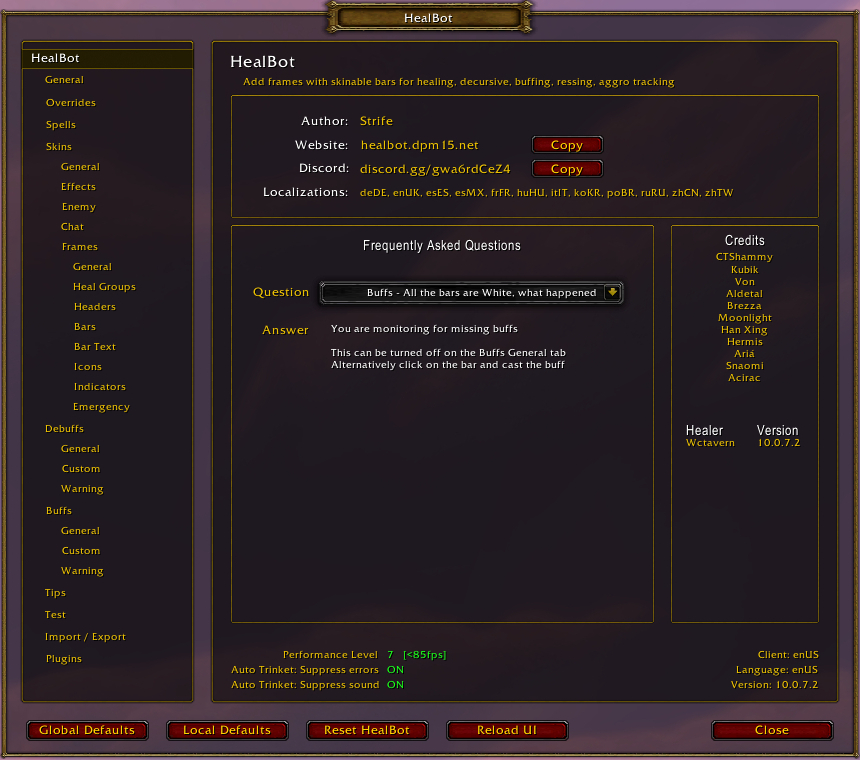
- The top section lists the author, website, Discord, and available languages for HealBot.
- In the middle there is a Frequently Asked Questions section with a dropdown menu.
- Next to the FAQ area is a list of Credits for the addon.
- The bottom section gives some client information including the version number.
The General section has some basic options for setting up HealBot.
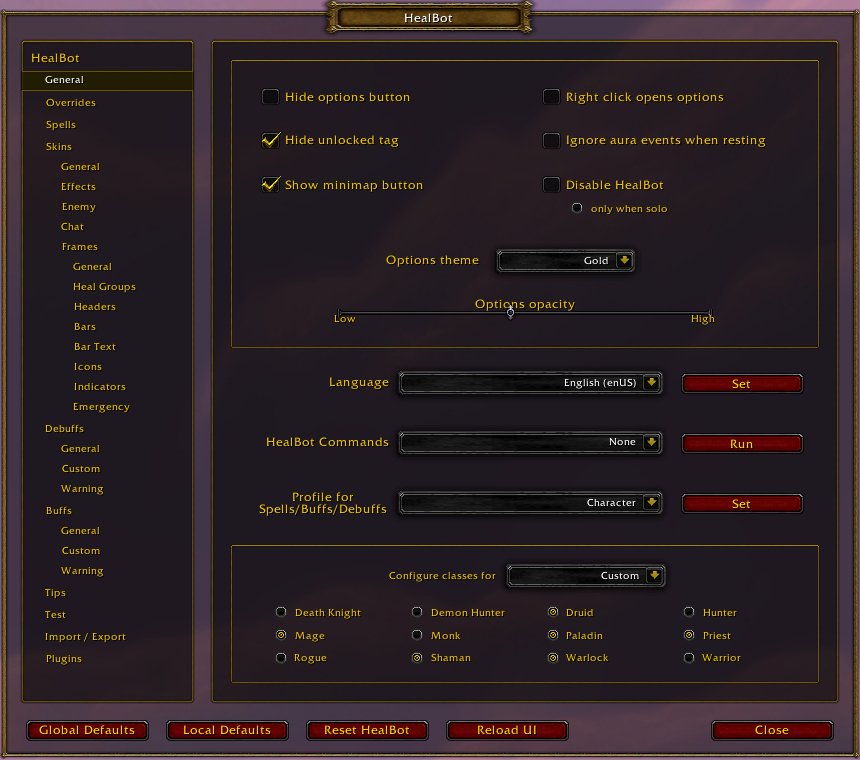
- Hide options button: This will toggle the “Options” link that appears at the bottom of the main HealBot frame.
- Hide unlocked tag: This will toggle the word “Unlocked” on frames that are unlocked and can be moved.
- Show minimap button: This will toggle the HealBot button on the minimap.
- Right click opens options: This will allow right-clicking the edge of a frame to open the options menu.
- Ignore aura events when resting: This will toggle buff and debuff monitoring when you are in a city or inn.
- Disable HealBot: Toggles HealBot. Use the only when solo option to disable HealBot outside of group content.
- Options theme: Use the dropdown menu to change the options menu’s color scheme. Use the Options opacity slider to change the transparency.
- Language: Use the dropdown menu to change the language used by the HealBot options menu.
- HealBot Commands: Use the dropdown menu to select a command to run. (See the HealBot Commands tab above for a list of commands.)
- Profile for Spells/Buffs/Debuffs: Use the dropdown menu to choose if your spells, buffs, and debuff settings will be Character-specific or shared as a Class or Global profile.
- Configure classes for: These are archaic settings from when healers had very specific assignments back in the days of 40 man raiding. You probably don’t need to mess with this.
These are the options for the HealBot Commands dropdown menu:
- Clear BlackList: You can blacklist players from HealBot using the HealBot menu on unit frames (mouse button 5 by default). This command clears that list.
- Copy current spells to all specs: Uses your current spells for all specs of the same class.
- Reset custom buffs: Resets all the settings for monitored buffs on the unit frames.
- Reset bar positions: Resets the bar positions to default settings.
- Reset buffs: Resets all the buffs to class defaults.
- Reset debuffs: Resets the general debuffs to class defaults.
- Reset custom debuffs: Resets the custom debuffs to class defaults.
- Reset skins: Resets all skins settings to defaults.
- Reset spells: Resets all spells to class defaults.
- Toggle Dislike Mount: Make your current mount less likely to be called when using the Random Mount command.
- Toggle Exclude Mount: Exclude your current mount completely from being called when using the Random Mount command.
- Toggle suppress errors when using auto trinkets: You can disable the error message that displays when an auto trinket can’t be used.
- Toggle suppress sound when using auto trinkets: You can disable the sound that plays when an auto trinket can’t be used.
- Toggle Custom Cures – Default Cast By: You can set the default “cast by” setting for custom debuffs.
- Toggle include Main Assist with Tanks: You can set the unit frames to include units with Main Assist in the Main Tanks group.
- Recover Group/Raid 25/Raid 40 skin: You can use these commands to recover skins that came with HealBot if they are missing.
The Overrides section allows you to override various skin settings.
Each tab is activated by using the Override Effects dropdown at the top. This dropdown lets you decide whether to use the current skin settings or the override options that appear in the tab. Current skin settings can be found in the Skins section of the options menu.
The Effects tab of the Overrides section has settings for visual effects that apply to your unit frames. These settings override those from the Effects page of the Skins section.
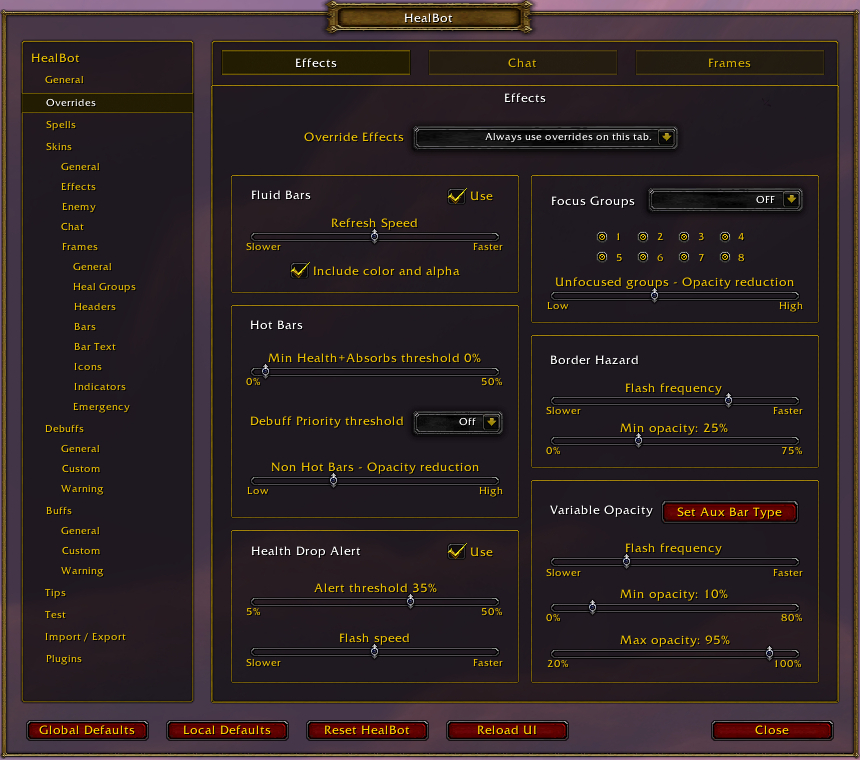
- Fluid Bars: You can choose to use a smooth effect when health goes up or down.
- Hot Bars: You can choose to highlight bars that are below a certain health or debuff priority threshold, and fade other bars that are not.
- Health Drop Alert: You can choose to display a flashing effect on a unit frame when its health drops below a certain threshold.
- Focus Groups: You can use these settings to highlight certain raid groups and fade the rest.
- Border Hazard: You can adjust the appearance of the border that appears around a unit that has threat.
- Variable Opacity: You can adjust effects that appear on auxiliary bars using these sliders.
The Chat tab of the Overrides section has settings for sending messages to chat channels under certain conditions. These settings override those from the Chat page of the Skins section.
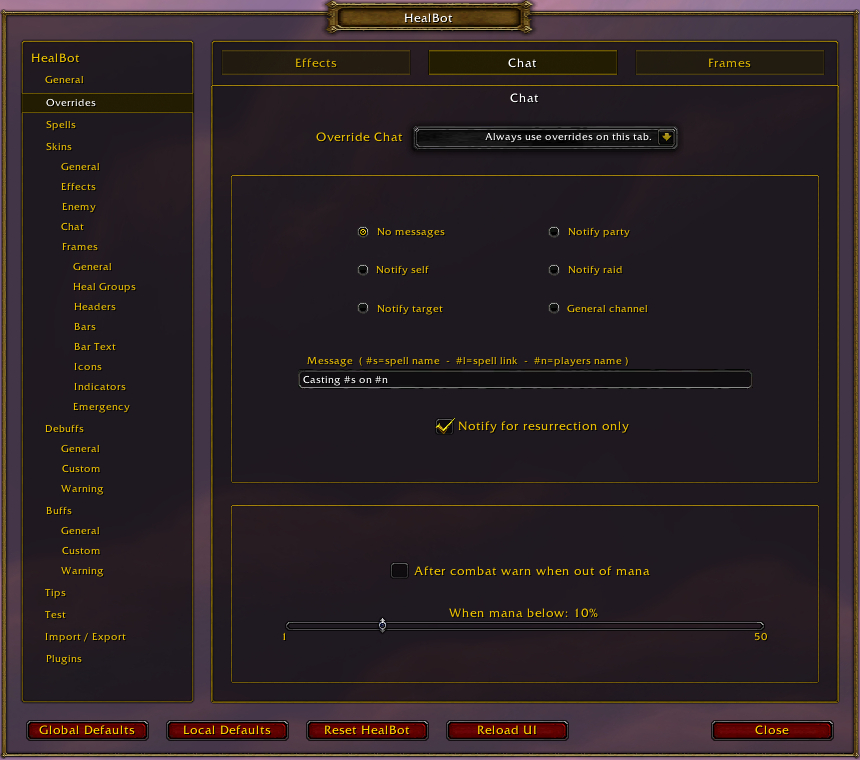
- No messages: Disable chat messages.
- Notify self: A notification will appear in your chat tab that only you can see.
- Notify target: You will send a whisper to the target of your spell.
- Notify party: You will send a message in the party chat channel.
- Notify raid: You will send a message in the raid chat channel.
- General channel: You will send a message to your current general chat channel.
- Message: You can customize the message that is sent to your chosen chat channel here. Use #s to include the name of the spell being cast and #n to include the name of the unit it is being cast on.
- Notify for resurrection only: Checking this box will send a message to your chosen chat channel ONLY when you are casting a resurrect spell.
- After combat warn when out of mana: You can automatically use the “out of mana” emote when your mana is below the threshold set by the slider.
The Frames tab of the Overrides section has settings for hiding certain default Blizzard frames. These settings override those from the Frames pages of the Skins section.
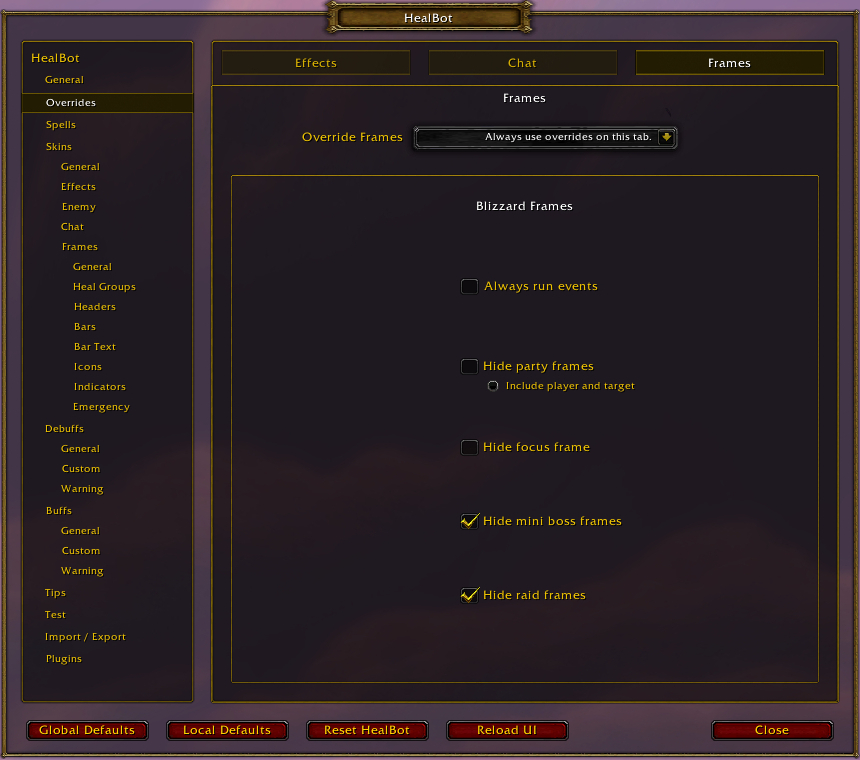
- Always run events: This setting keeps blizzard frames updated so you don’t have to reload when you toggle them. It’s resource intensive to run, however.
- Hide party frames: This setting hides the default Blizzard party frames.
- Include player and target: This setting hides the default Blizzard player and target frames.
- Hide focus frame: This setting hides the default Blizzard focus frame.
- Hide mini boss frames: This setting hides the default Blizzard boss frame.
- Hide raid frames: This setting hides the default Blizzard raid frames.
The Spells section allows you to bind your mouse buttons to spells, macros, items, or commands.
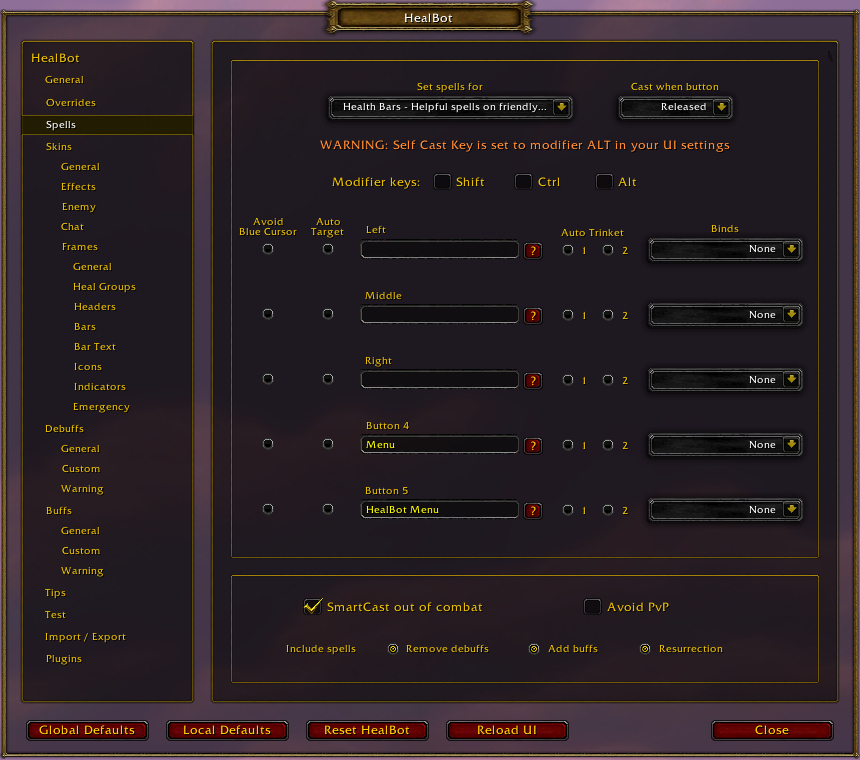
- Set spells for: Choose the circumstances you would like to bind spells or commands for.
- Cast when button: Choose whether to cast spells when the mouse button is pressed or when it is released.
- Modifier keys: Ticking these boxes changes the current key+click combo you are binding. For example, you can bind different spells to use when you have Shift+Ctrl held down.
- Avoid Blue Cursor: If this is activated, an invalid spell will not give you a blue error cursor.
- Auto Target: If this is activated, using this binding will also target the unit it is being used on.
- Type spells or commands you would like to bind into the text box for each mouse button.
- There is a Spell Selector button next to each text box (the question mark [?] icon). You can use this to select spells and commands from dropdown menus. (See the Spell Selector tab above).
- Auto Trinket: If this is activated, using this binding will also attempt to use your equipped trinket(s).
- Binds: You can also choose to bind a key or the mouse wheel to the spell or command. You will then be able to use either the mouse button binding chosen or the key binding.
- SmartCast out of combat: If this is checked, HealBot will intelligently select spells to cast when you are out of combat based on certain conditions.
- Avoid PvP: If this is checked, you will not cast on players who are PVP flagged if you aren’t flagged yourself. This will avoid accidentally flagging yourself for PVP.
- Include spells: The selected spell types will be included in SmartCast’s intelligent spell selection. For example, using any binding on a unit frame if the person is dead will automatically cast Resurrection if it is checked.
The Spell Selector window appears when you click the question mark [?] button beside any button.
- Healing spells: Select from your spells that heal their target.
- Other spells: Select from non-healing spells that can be cast on friendly targets.
- Macros: Select from the macros you have made in the game’s macro menu.
- Items: Select usable items from your equipment and inventory.
- Commands: Select from some pre-configured HealBot commands such as target, assist, menu, and mount commands.
- Emotes: Select an emote to use from the default game emotes.
The Skins section is the most robust part of the HealBot menu, as it contains most of the settings that affect the appearance of the unit frames.
There is a section that appears at the top of all pages under Skins:
- Use skin: Use this dropdown to select the current skin to apply/edit. Use the Delete button to delete the currently selected skin.
- New skin: Enter a name into the text box for your new skin. It will use the settings from the skin that is currently selected under Use skin. Use the Save button to create the new skin.
The General page under the Skins section is where you can select which skin to use under which circumstances.
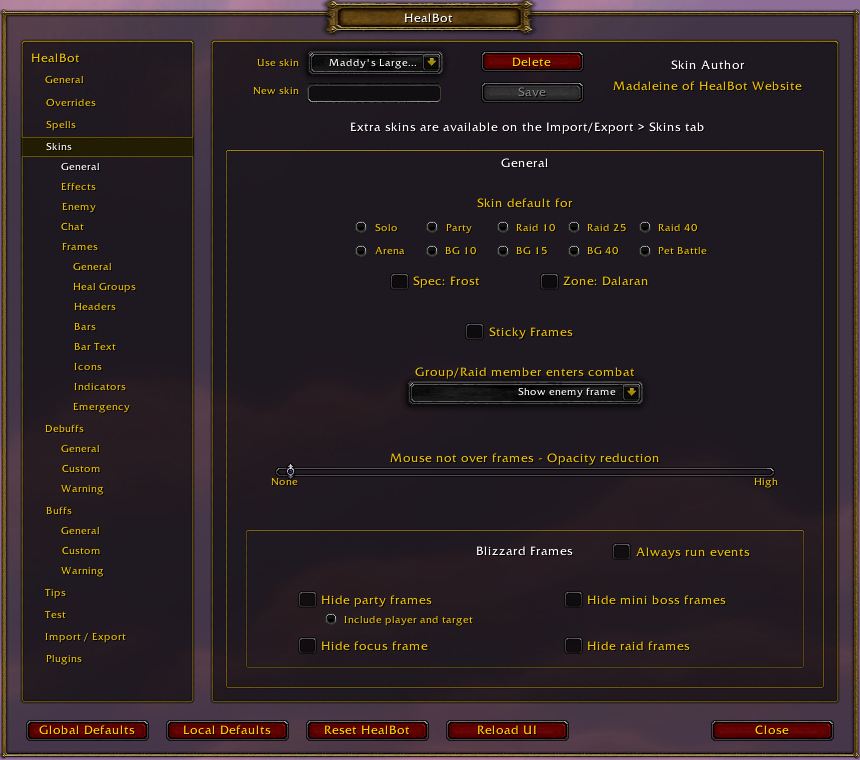
- Skin default for: Select the group size(s) you would like to use the currently selected skin for.
- Spec: If checked, the currently selected skin will be used for this talent spec.
- Zone: If checked, the currently selected skin will be used for this zone.
- Sticky Frames: If checked, frames will magnetically attach to other nearby frames when moved.
- Group/Raid member enters combat: Select what happens if a group member enters combat and you don’t.
- Mouse not over frames: You can change the transparency of unit frames when the mouse is not over them.
- Always run events: If checked, Blizzard frames will stay updated even if they are hidden (useful if you want to be able to toggle them on and off).
- The other checkboxes under Blizzard Frames will hide specific default Blizzard unit frames.
The Effects page under the Skins section is where you can apply visual effects to your unit frames. Note that the settings in this tab can be overridden by those in the Effects tab of the Overrides section.
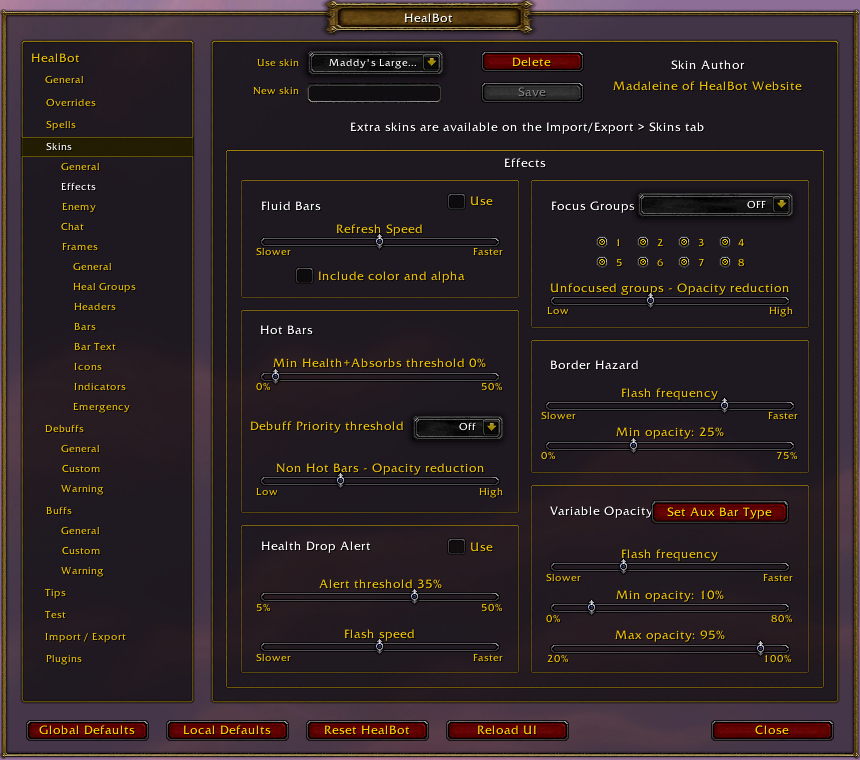
- Fluid Bars: You can choose to use a smooth effect when health goes up or down.
- Hot Bars: You can choose to highlight bars that are below a certain health or debuff priority threshold, and fade other bars that are not.
- Health Drop Alert: You can choose to display a flashing effect on a unit frame when its health drops below a certain threshold.
- Focus Groups: You can use these settings to highlight certain raid groups and fade the rest.
- Border Hazard: You can adjust the appearance of the border that appears around a unit that has threat.
- Variable Opacity: You can adjust effects that appear on auxiliary bars using these sliders.
The Enemy page under the Skins section has the settings for the enemy frame.
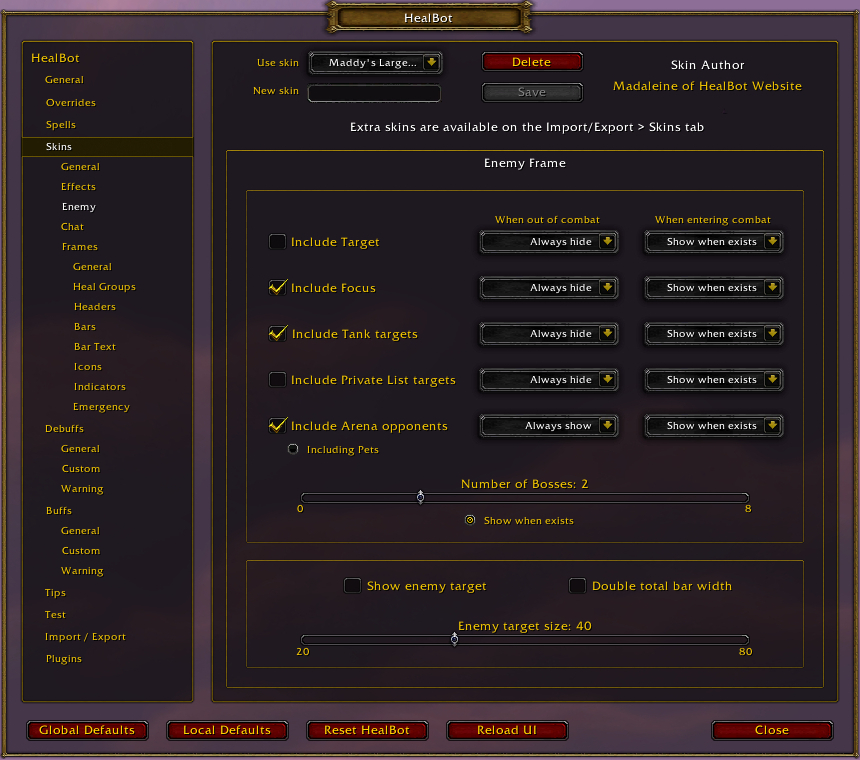
- Include Target: If this is checked, you will see an enemy frame for your current target.
- Include Focus: If this is checked, you will see an enemy frame for your focus target.
- Include Tank targets: If this is checked, you will see enemy frames for all tanks.
- Include Private List targets: If this is checked, you will see enemy frames for all units on your private list.
- Include Arena opponents: If this is checked, you will see enemy frames for your arena opponents. If Including Pets is checked, you will see enemy frames for their pets as well.
- When out of combat/When in combat: Use these dropdowns to decide whether to show or hide each enemy frame in and out of combat.
- Number of Bosses: Use this slider to determine the maximum number of boss frames that will appear.
- Show when exists: If this is checked, you will only see bars for bosses that are currently present in the fight.
- Show enemy target: If this is checked, you will see the target-of-target for all enemy frames that are enabled.
- Double total bar width: If this is checked, it will make the enemy frame larger to accommodate the target-of-target bar.
- Enemy target size: Use this slider to determine the percentage of the enemy frame’s width that will be devoted to the target-of-target bar.
The Chat page under the Skins section has settings for sending messages to chat channels under certain conditions. Note that the settings in this tab can be overridden by those in the Chat tab of the Overrides section.
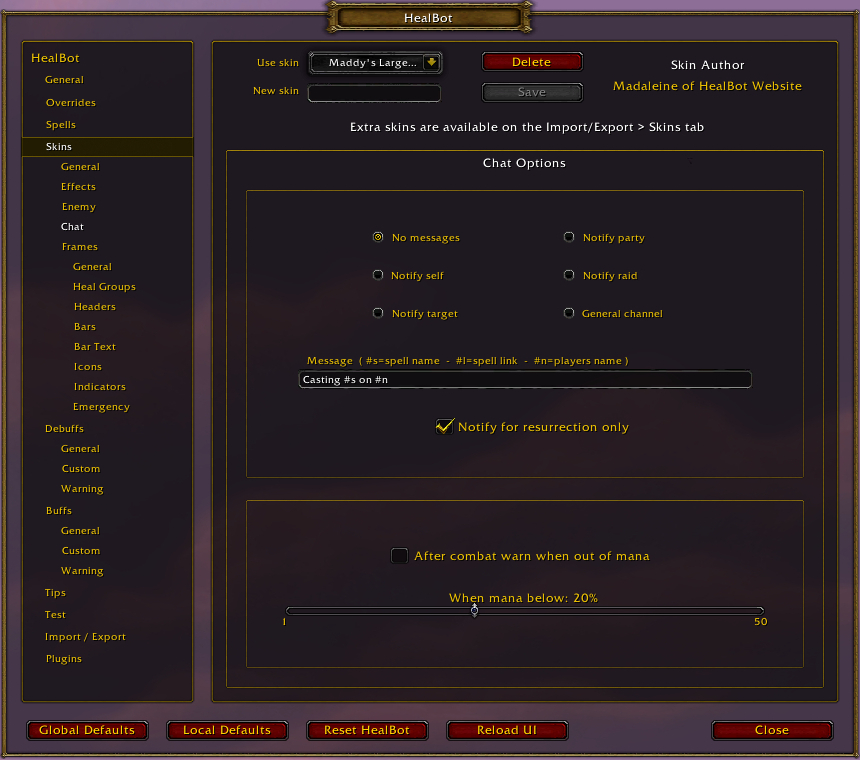
- No messages: Disable chat messages.
- Notify self: A notification will appear in your chat tab that only you can see.
- Notify target: You will send a whisper to the target of your spell.
- Notify party: You will send a message in the party chat channel.
- Notify raid: You will send a message in the raid chat channel.
- General channel: You will send a message to your current general chat channel.
- Message: You can customize the message that is sent to your chosen chat channel here. Use #s to include the name of the spell being cast and #n to include the name of the unit it is being cast on.
- Notify for resurrection only: Checking this box will send a message to your chosen chat channel ONLY when you are casting a resurrect spell.
- After combat warn when out of mana: You can automatically use the “out of mana” emote when your mana is below the threshold set by the slider.
This section of the menu will be covered in its own section of this guide (HealBot Continued Options Menu: Frames). Scroll down to find it!
The Debuffs section has settings for how debuffs are displayed on HealBot’s unit frames.
At the top of this section are a few options that appear on every page:
- Monitor debuffs: If this is checked, debuff monitoring is enabled.
- also in combat/Only in a Group or Raid/also when mounted: Each of these settings enables debuff monitoring under certain conditions.
The General page of the Debuffs section has settings that determine how debuffs are displayed and dispelled by HealBot.
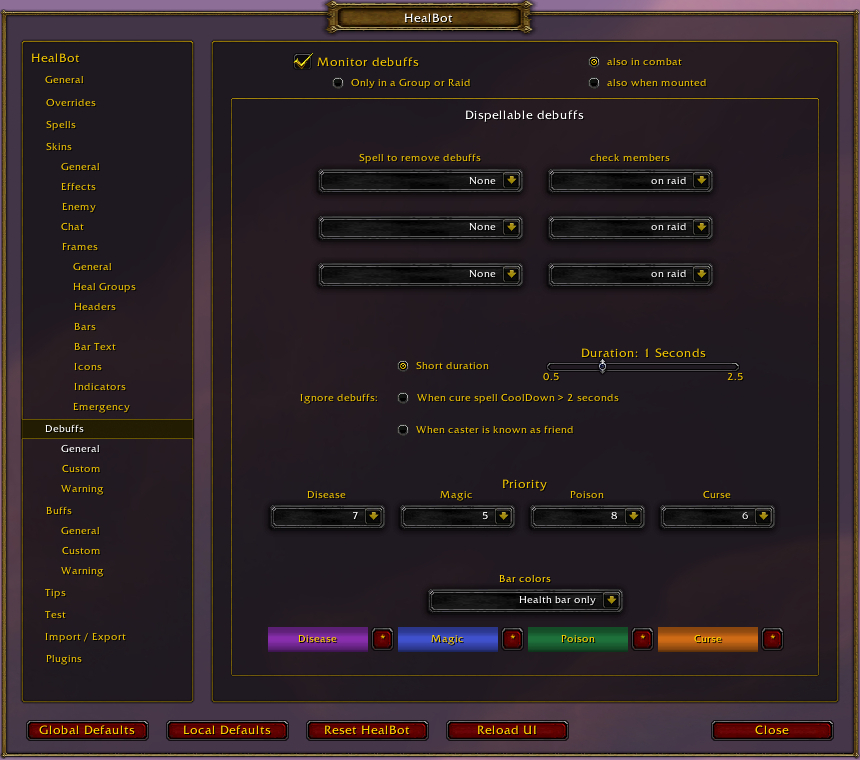
- Spell to remove debuffs: The associated unit frames chosen under check members will only display debuffs that can be removed by the spell selected in this dropdown menu.
- check members: The unit frames to monitor for the spell that you chose in Spell to remove debuffs.
- Ignore debuffs: You can choose to ignore debuffs that have a Short duration (duration chosen by the slider to the right), When cure spell CoolDown > 2 seconds (when you can’t remove the debuff), or When caster is known as friend (when it was cast by a friendly unit).
- Priority: These dropdowns will determine the priority of different debuff types, with 1 being the highest priority and 20 being the lowest. This will determine the order that HealBot attempts to dispel them.
- Bar colors: Use this dropdown to determine how the debuff colors will be displayed on unit frames (such as by changing the health bar color or adding a border around the frame).
- The colors associated with each debuff type can be changed by clicking the asterisk [*] button next to the type.
The Custom page of the Debuffs section has settings for monitoring custom debuffs. This includes debuffs you can’t dispel but might still want to know about.
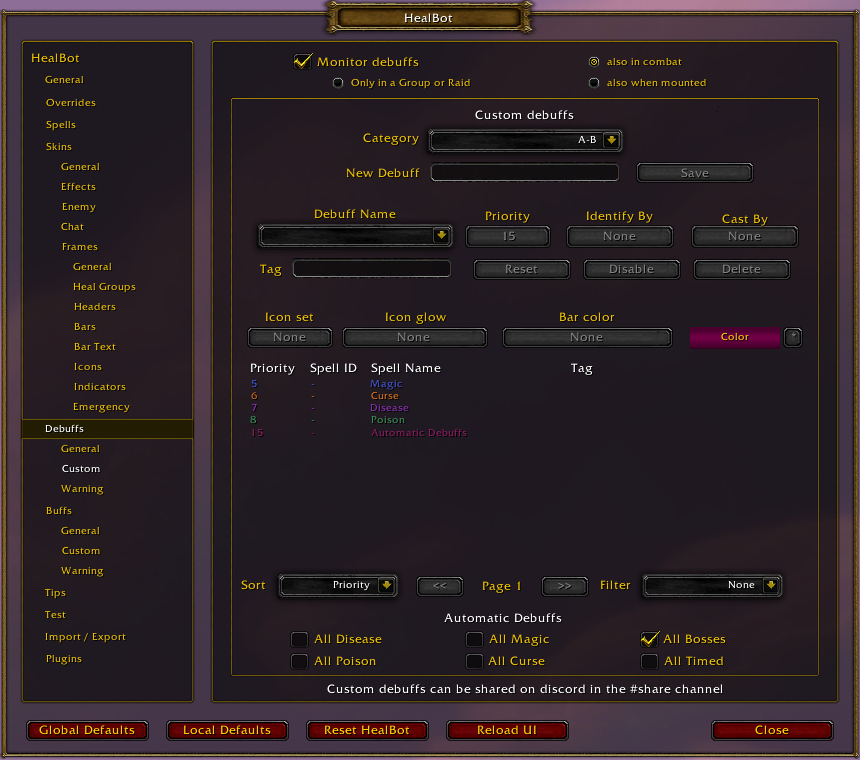
- Category: Use this dropdown to sort your custom debuffs into categories.
- New Debuff: Enter the name of your debuff here and click Save to add it to the currently selected category.
- Debuff Name: Use this dropdown to select the debuff you want to modify.
- Priority: Use this dropdown to select the priority of the currently selected debuff, with 1 being the highest priority and 20 being the lowest. This will determine the order that HealBot attempts to dispel it when there are multiple debuffs present.
- Identify By: HealBot can attempt to track this debuff by its name or spell ID.
- Cast By: Use this dropdown to filter the selected debuff’s monitoring based on who cast it.
- Tag: Use this text box to assign a tag to the currently selected debuff.
- Reset/Disable/Delete: Apply any of these actions to the currently selected debuff.
- Icon set: Use this dropdown to select the type of icon that will be used for the currently selected debuff.
- Icon glow: Use this dropdown to decide how the glow will appear on the icon for the currently selected debuff.
- Bar color: Use this dropdown to determine how the debuff color will be displayed on unit frames (such as by changing the health bar color or adding a border around the frame).
- The color associated with the currently selected debuff can be changed by clicking the asterisk [*] button next to the Color bar.
- Sort: Use this dropdown to sort the debuff list by priority, spell name, or tag.
- Filter: Use this dropdown menu to filter the debuff list by priority or tag.
- Automatic Debuffs: Use these checkboxes to always show debuffs of certain types.
The Warning page of the Debuffs section has settings for how alerts are displayed when a unit gets a debuff.
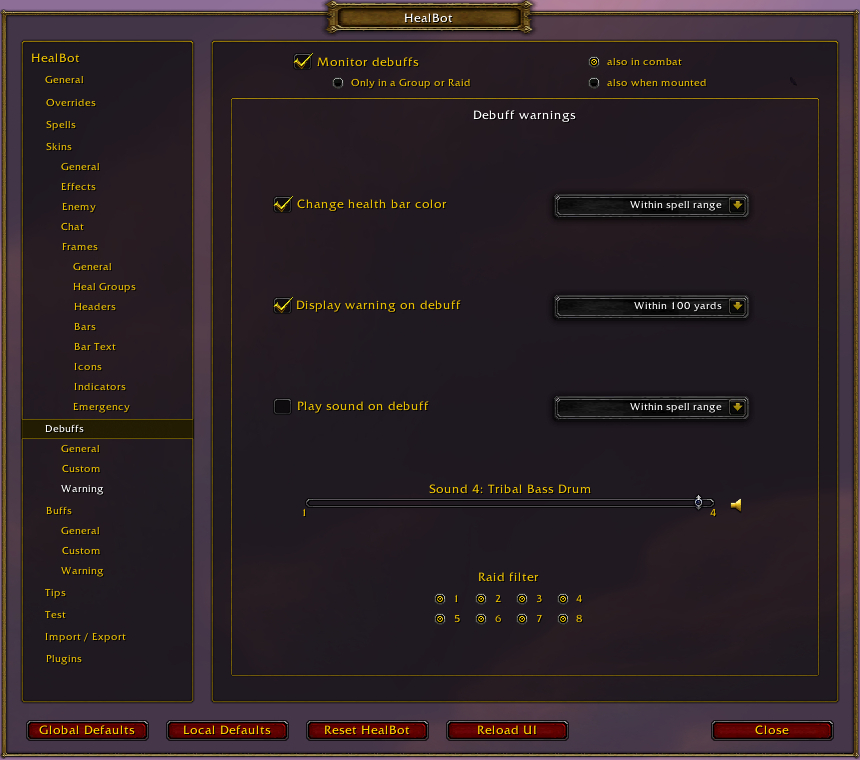
- Change health bar color: If checked, the color associated with the debuff will be applied to the unit frame.
- Display warning on debuff: If checked, a text warning will appear when a unit gets a debuff.
- Play sound on debuff: If checked, a sound warning will play when a unit gets a debuff. The sound played is chosen by the slider below this option.
- There are dropdown menus for each of the above three settings to determine whether the alert appears always or only when the unit is within a certain range.
- Raid filter: You can choose not to monitor certain groups by deselecting their group number here.
The Buffs section has settings for how buffs are displayed on HealBot’s unit frames.
At the top of this section are a few options that appear on every page:
- Monitor buffs: If this is checked, buff monitoring is enabled.
- also in combat/Only in a Group or Raid/also when mounted: Each of these settings enables debuff monitoring under certain conditions.
The General page of the Buffs section has two tabs: General Buffs and Extra Buffs. The General Buffs tab allows you to select buffs to monitor and automatically cast on unit frames if they are missing.
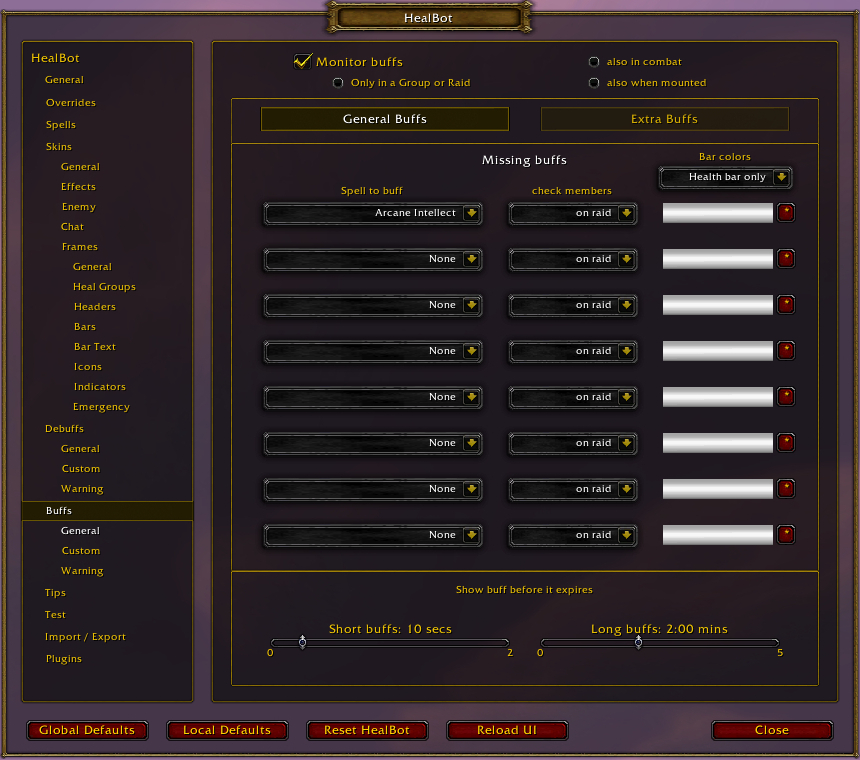
- Spell to buff: Use this dropdown to select a buff to monitor and automatically cast when it is missing.
- check members: Use this dropdown to select which units to track for the associated Spell to buff.
- Bar colors: Use this dropdown to choose how the buff’s color will be applied to unit frames, and select the color for each Spell to buff using the asterisk [*] button beside it.
- Show buff before it expires: Use the sliders to determine when HealBot will alert you of an expiring buff. Short buffs are buffs with durations that are less than a few minutes; Long buffs are buffs that last for 10 minutes or more.
The Extra Buffs tab of the General page in the Buffs section contains options for tracking additional buffs that are not included under General Buffs, such as weapon enchants and food buffs.
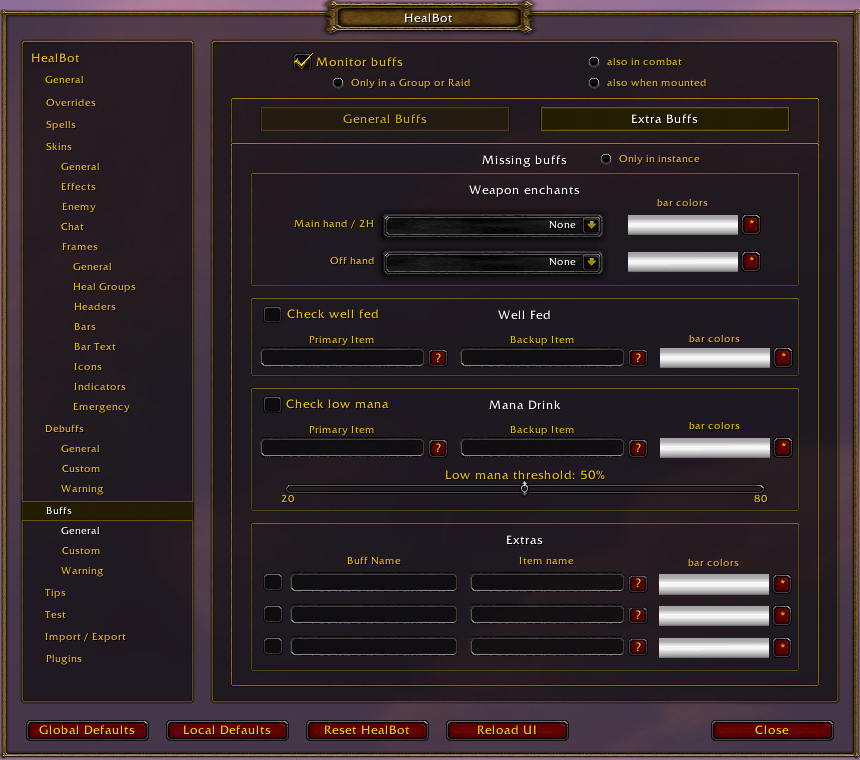
- Only in instance: If this is activated, the buffs on this tab will only be tracked when you are in an instance.
- Weapon enchants: Use the dropdown menu to choose enchantment buffs to track for your main hand and off-hand weapon.
- Check well fed: If this is checked, HealBot will track the food buffs you select in the area below this box.
- Primary Item/Backup Item: You can type the food item here or use the question mark [?] button to switch this to a dropdown menu, which will display any applicable food items from your inventory.
- Check low mana: If this is checked, HealBot will track your mana, and automatically use the water you select in the area below this box when it is low. You can change the Low mana threshold using the slider.
- Extras: These options will track any other buff items you want to use, such as potions or scrolls.
- bar colors: Next to ever buff item, you can adjust the color associated with it by clicking the asterisk [*] button.
The Custom page of the Buffs section has settings for monitoring custom buffs, including any HoTs or absorbs that you might want to track.
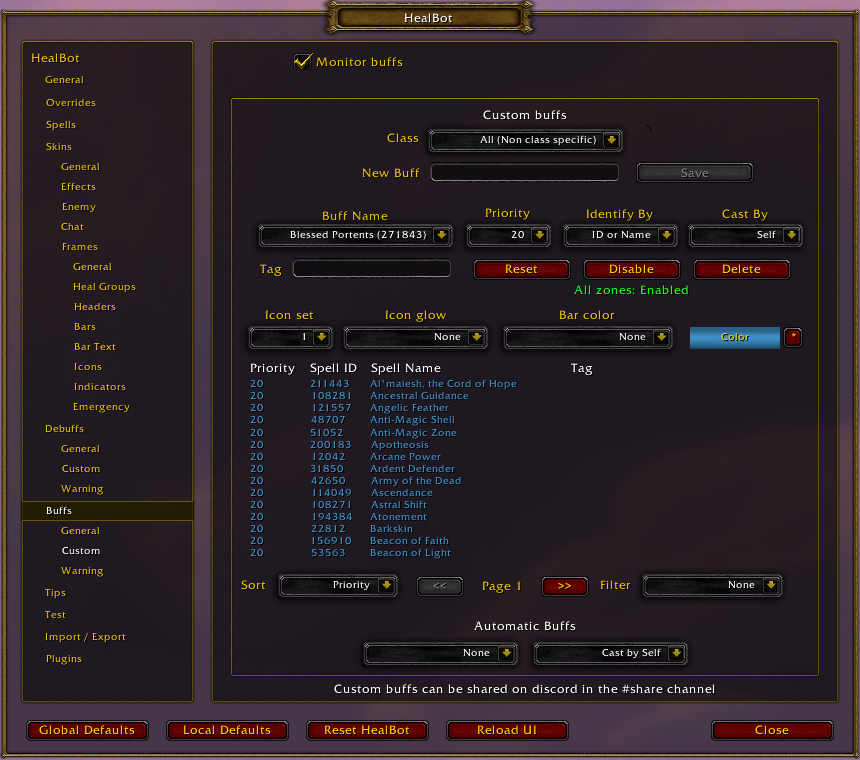
- Class: Use this dropdown to sort your custom buffs by class.
- New Buff: Enter the name of your buff here and click Save to add it to the currently selected category.
- Buff Name: Use this dropdown to select the buff you want to modify.
- Priority: Use this dropdown to select the priority of the currently selected buff, with 1 being the highest priority and 20 being the lowest. This will determine the order that HealBot displays it when multiple buffs are present.
- Identify By: HealBot can attempt to track this buff by its name or spell ID.
- Cast By: Use this dropdown to filter the selected buff’s monitoring based on who cast it.
- Tag: Use this text box to assign a tag to the currently selected buff.
- Reset/Disable/Delete: Apply any of these actions to the currently selected buff.
- Icon set: Use this dropdown to select the type of icon that will be used for the currently selected buff.
- Icon glow: Use this dropdown to decide how the glow will appear on the icon for the currently selected buff.
- Bar color: Use this dropdown to determine how the buff color will be displayed on unit frames (such as by changing the health bar color or adding a border around the frame).
- The color associated with the currently selected buff can be changed by clicking the asterisk [*] button next to the Color bar.
- Sort: Use this dropdown to sort the buff list by priority, spell name, or tag.
- Filter: Use this dropdown menu to filter the debuff list by priority or tag.
- Automatic Buffs: Use these dropdown menus to always show buffs of certain types.
The Warning page of the Buffs section has settings for how alerts are displayed when a unit gets a buff.
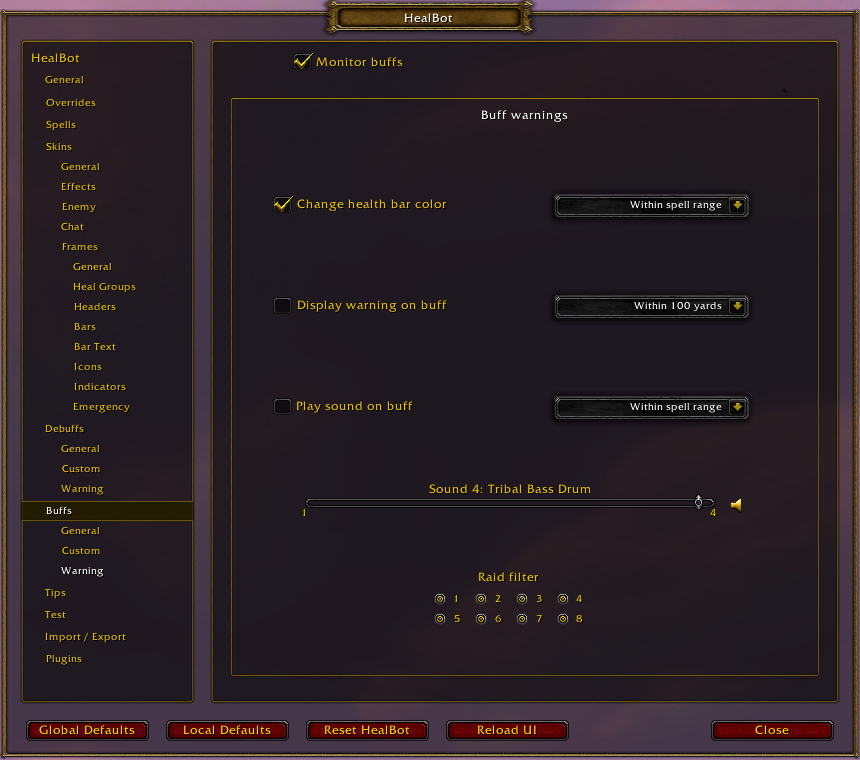
- Change health bar color: If checked, the color associated with the buff will be applied to the unit frame.
- Display warning on buff: If checked, a text warning will appear when a unit gets a buff.
- Play sound on buff: If checked, a sound warning will play when a unit gets a buff. The sound played is chosen by the slider below this option.
- There are dropdown menus for each of the above three settings to determine whether the alert appears always or only when the unit is within a certain range.
- Raid filter: You can choose not to monitor certain groups by deselecting their group number here.
The Tips section contains settings for the tooltips that appear when hovering over HealBot frames.
The General tab of the Tips section contains settings for when and how the tooltips will display for HealBot frames.
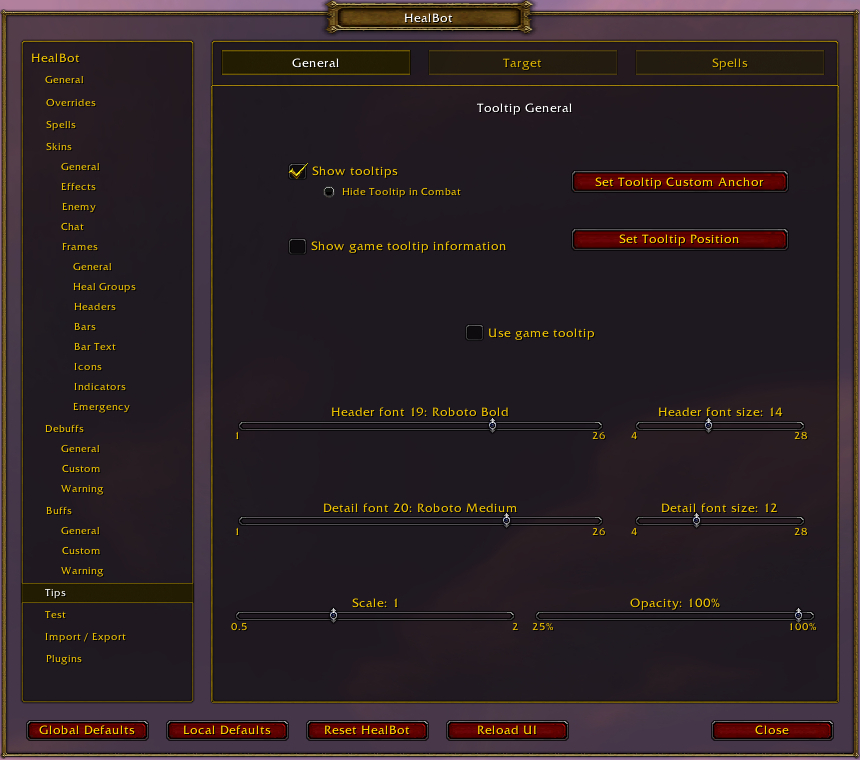
- Show tooltips: If this is checked, tooltips will appear when hovering over HealBot frames. You can also choose to Hide Tooltip in Combat with a separate radial button.
- Show game tooltip information: If this is checked, the information displayed in the HealBot tooltip will be the same that would be displayed in the default tooltip. The tooltip will still use HealBot styling, however.
- Set Tooltip Custom Anchor: Clicking this button will bring up a box that you can position to set where the tooltip will appear.
- Set Tooltip Position: Clicking this button will take you to the Frames section, where you can set a custom position for the tooltip for each frame.
- Use game tooltip: If this is checked, the HealBot tooltip will use the default game tooltip styling (or any tooltip addon you have installed) instead of the options below.
- There are sliders for selecting font and font size for the header and details.
- There is a slider for scaling the tooltip and one for setting its transparency.
The Target tab of the Tips section is where you can choose what information is displayed in the tooltip based on the unit you are hovering over.
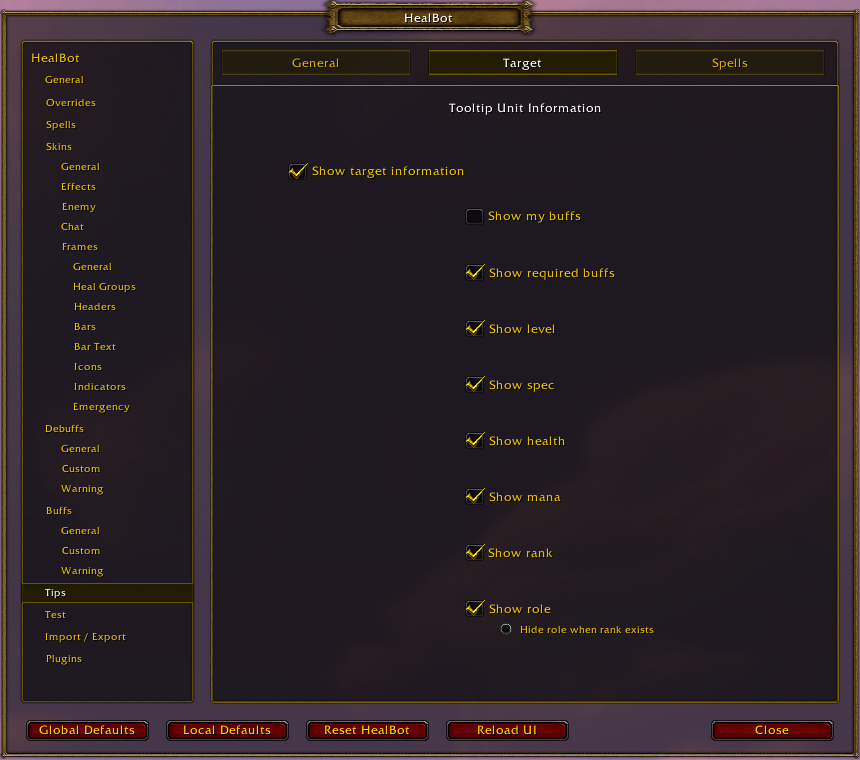
- Show target information: If this is unchecked, you will only see your bound spells in the tooltip and not the unit information.
- Show my buffs: If this is checked, the tooltip will display your current buffs that are on the unit.
- Show required buffs: If this is checked, the tooltip will display your buffs that are missing from the target.
- Show level: If this is checked, the tooltip will display the unit’s level.
- Show spec: If this is checked, the tooltip will display the unit’s current talent specialization.
- Show health: If this is checked, the tooltip will display the unit’s current and total health. This will also display their current location on the left side.
- Show mana: If this is checked, the tooltip will display the unit’s current and total mana. This will also display their current threat or group on the left side.
- Show rank: If this is checked, the tooltip will display any special group roles such as Raid Leader or Master Looter.
- Show role: If this is checked, the tooltip will display the unit’s current role (tank/healer/dps). You can also choose to Hide role when rank exists to show roles such as Raid Leader or Master Looter in place of this.
The Spells tab of the Tips section is where you can choose if and how you want to display your bound spells and/or monitored buffs on the HealBot tooltip.
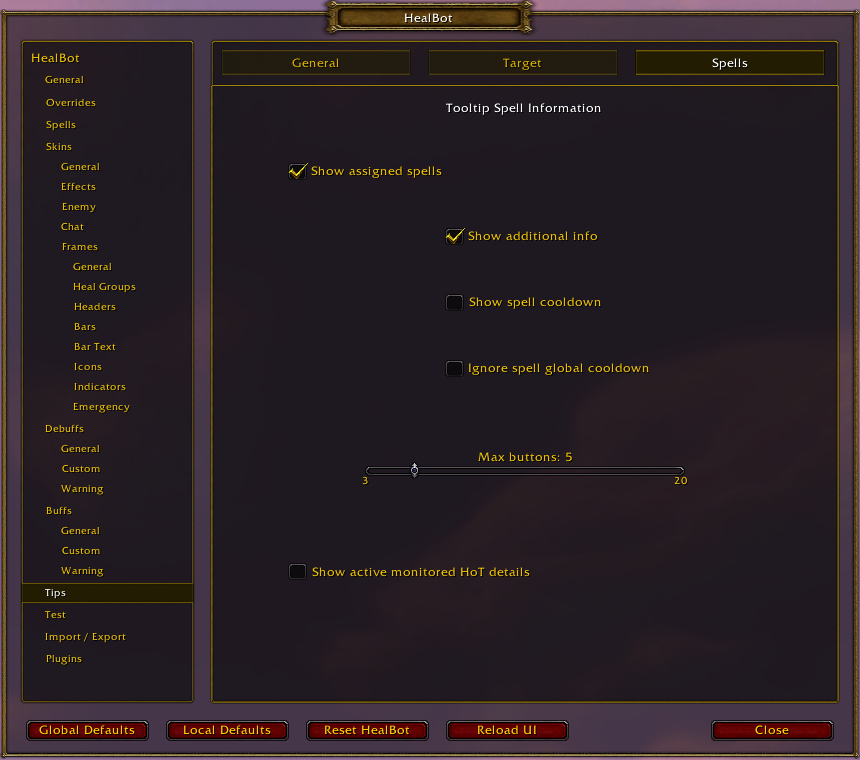
- Show assigned spells: If this is checked, the tooltip will display a list of your bound spells that can be used on the unit frame.
- Show additional info: If this is checked, the tooltip will also display info such as the type (command, item) beside each bound spell.
- Show spell cooldown: If this is checked, the remaining coolodown will also display next to each bound spell in the tooltip.
- Ignore spell global cooldown: If this is checked, the global cooldown will not be considered a cooldown in itself.
- Max buttons: Use this slider to adjust how many bound spells to list in the tooltip.
- Show active monitored HoT details: If this is checked, monitored buffs will also display who cast the spell and the duration left.
The Test section is where you can test out your unit frames without having to join a group to see how everything looks. Test frames can be moved around on the screen, so this is also where you will go to adjust the positions of your frames.
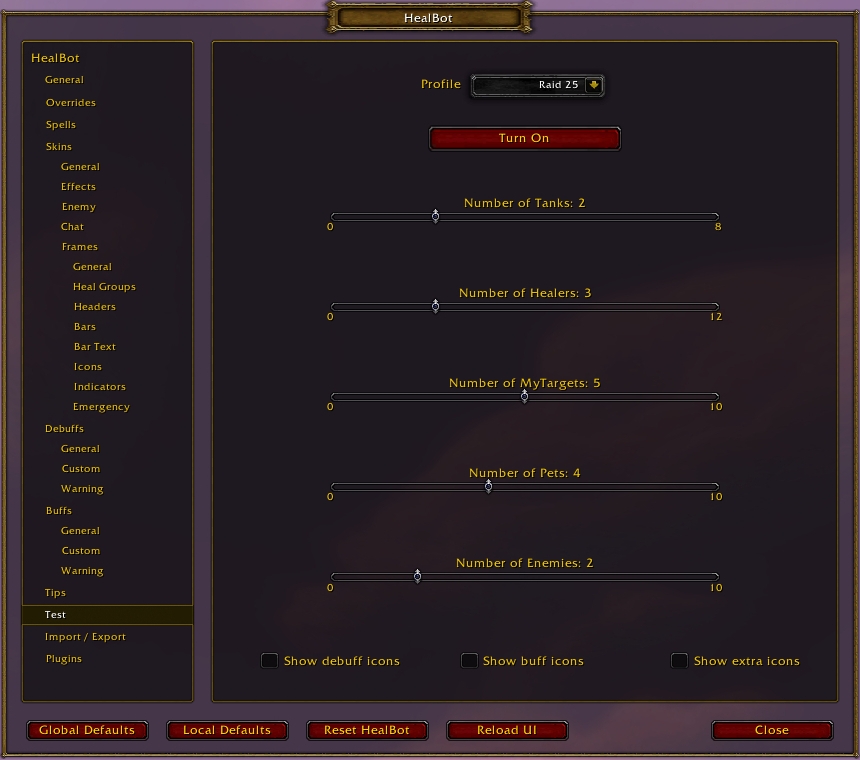
- Profile: Use this dropdown menu to select the group size you want to display.
- Turn On: Click this button to display the selected group size in your unit frames. This will fill empty slots with example units of different classes and roles so you can see how everything looks. Click Turn Off to go back to normal.
- There are several number sliders that you can use to adjust the example units that fill your test frames.
- Show debuff icons/Show buff icons/Show extra icons: Check these boxes to see how your buff, debuff, and other icons look on your test frames.
The Import/Export section is where you can save or load HealBot settings for yourself and other users.
The Skins tab of the Import/Export section is where you can save or load skins for HealBot.

- Select Skin: Use this dropdown menu to choose a skin you want to export.
- Post Link: Clicking this button will create a link in chat that other HealBot users can use to import the selected skin.
- Export: Clicking this button will fill the text box below it with a long text string that can be copied and pasted to import it elsewhere or saved as a backup.
- Extra Skins: You can import a bunch of built-in HealBot skins using this dropdown menu.
- Import: Clicking this button will import a skin if you have pasted its text string into the large text box below the button.
The Custom Debuffs tab of the Import/Export section is where you can save or load custom debuffs settings for HealBot.
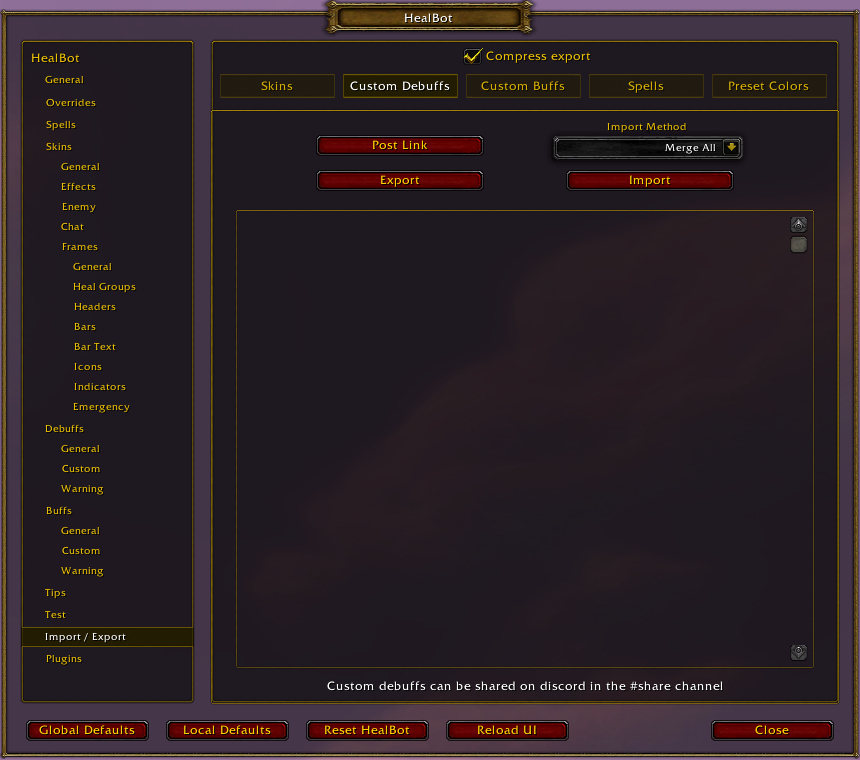
- Post Link: Clicking this button will create a link in chat that other HealBot users can use to import your custom debuffs.
- Export: Clicking this button will fill the text box below it with a long text string that can be copied and pasted to import it elsewhere or saved as a backup.
- Import Method: When importing custom debuffs, you can choose whether to keep your current custom debuffs as well.
- Import: Clicking this button will import custom debuffs if you have pasted the text string into the large text box below the button.
The Custom Buffs tab of the Import/Export section is where you can save or load custom buffs settings for HealBot.
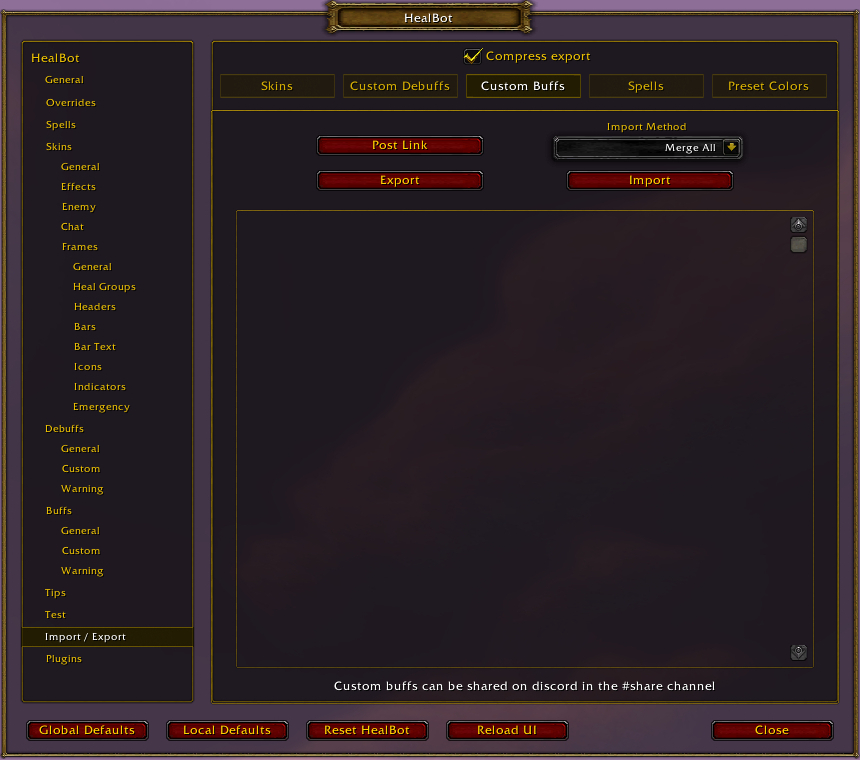
- Post Link: Clicking this button will create a link in chat that other HealBot users can use to import your custom buffs.
- Export: Clicking this button will fill the text box below it with a long text string that can be copied and pasted to import it elsewhere or saved as a backup.
- Import Method: When importing custom buffs, you can choose whether to keep your current custom buffs as well.
- Import: Clicking this button will import custom buffs if you have pasted the text string into the large text box below the button.
The Spells tab of the Import/Export section is where you can save or load spell settings for HealBot.

- Post Link: Clicking this button will create a link in chat that other HealBot users can use to import your spells.
- Export: Clicking this button will fill the text box below it with a long text string that can be copied and pasted to import it elsewhere or saved as a backup.
- Import Method: When importing spells, you can choose whether to keep your current spells as well.
- Import: Clicking this button will import spells if you have pasted the text string into the large text box below the button.
The Preset Colors tab of the Import/Export section is where you can save or load color settings for HealBot.
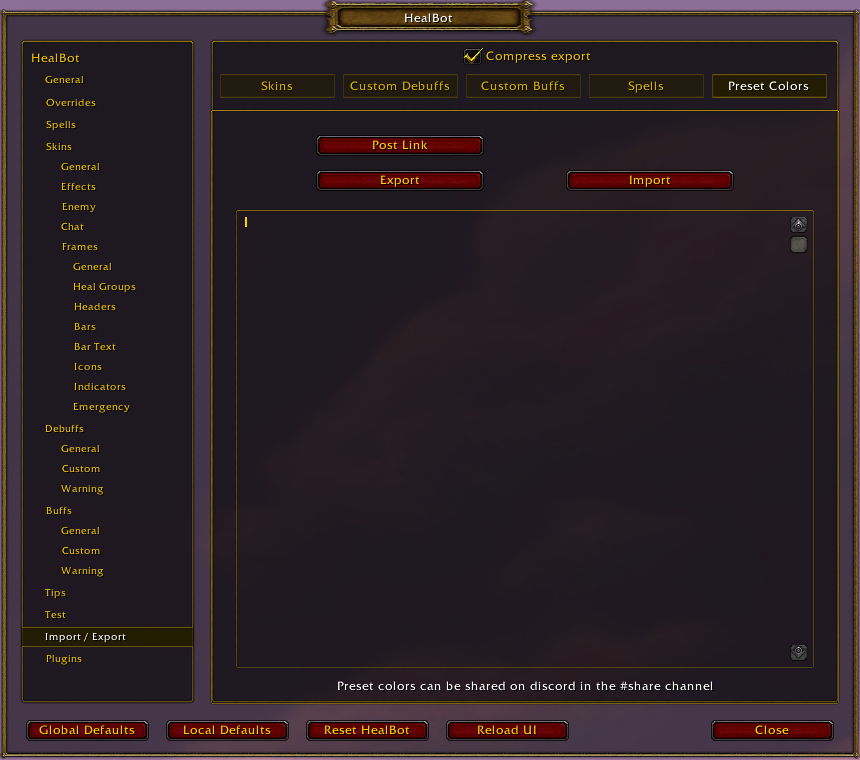
- Post Link: Clicking this button will create a link in chat that other HealBot users can use to import your colors.
- Export: Clicking this button will fill the text box below it with a long text string that can be copied and pasted to import it elsewhere or saved as a backup.
- Import: Clicking this button will import colors if you have pasted the text string into the large text box below the button.
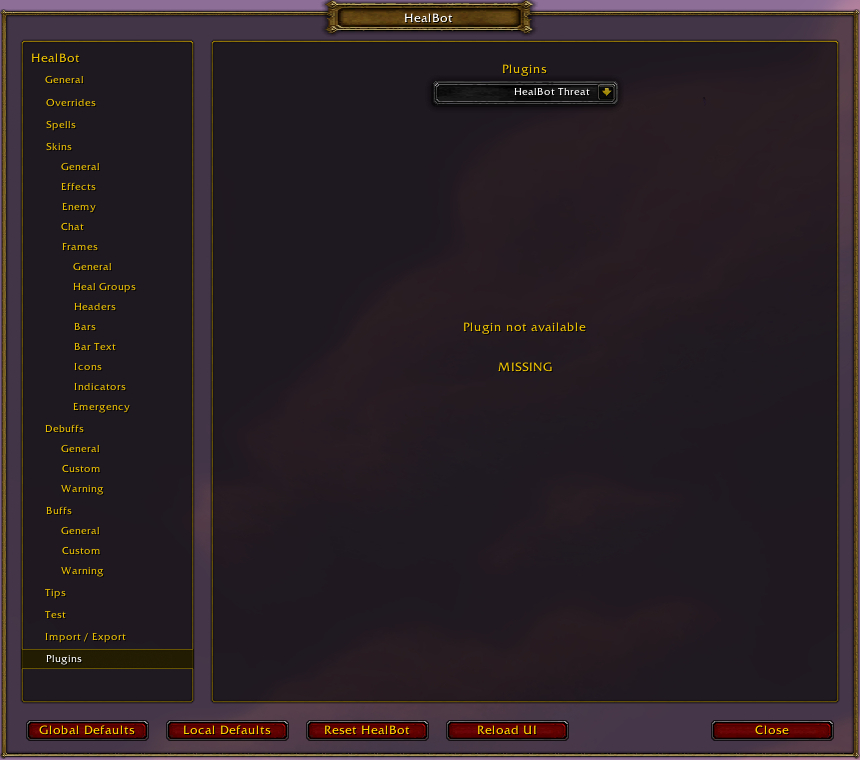
The Plugins section will contain settings for any HealBot plugins that are installed.
HealBot Continued Options Menu: Frames
The Frames section of the HealBot options menu is rather large, so we’ve separated it from the rest of the options for easier navigation. Let’s go through these settings now.
There is a Frame dropdown menu at the top of most of the pages in this section. HealBot can display up to 10 frames per skin. Use this dropdown menu to select the frame you want to modify in the settings. There is also a button to Copy current frame and tabs to other frames, which will apply all the settings on the current page to all frames in this skin.
The General page of the Frames section has settings for adjusting the position and spacing of the current frame.

- Alias: You can give the frame a name here.
- Lock frame: Use this dropdown menu to choose whether the frame is always locked, always unlocked, or can be unlocked by holding down a key.
- Close autmoatically: Use this dropdown menu to choose whether to automatically hide the frame when out of combat and none of the bars require attention.
- Frame padding: Use this slider to set the spacing around the frame.
- Frame anchor: Use this dropdown menu to set the relative position of the frame on the screen.
- Bars anchor: Use this dropdown menu to set the relative position of the bars on the frame.
- Grow Direction/Bar Orientation: Use these dropdown menus to choose the direction the frame expands.
- Position tooltip: Use this dropdown menu to set the location of the tooltip relative to the frame.
- Frame scale: Use this slider to set the scale of the frame.
- Sticky frame vertical/horizontal offset: Use these sliders to adjust the spacing of the frame relative to the frame it is stuck to.
- Background/Border: Use the asterisk [*] button next to either of these options to set their color.
The Heal Groups page of the Frames section has settings for choosing what units will be displayed in each frame.

- Arrows: Use the up and down arrows to arrange the order that groups will be displayed.
- Frame: Use the dropdown menus to select the frame that will display the associated Group.
- Group: Choose whether or not to show each unit type. If a box is checked, that unit type will appear in the associated Frame.
- Allow Duplicates: If this box is checked, units can appear in more than one group where applicable.
The Headers page of the Frames section is divided into two tabs. These settings modify the headers that appear above HealBot’s unit frames.
The Bars tab of the Headers page has settings for the headers that appear above the bars in your frames, such as the group number.
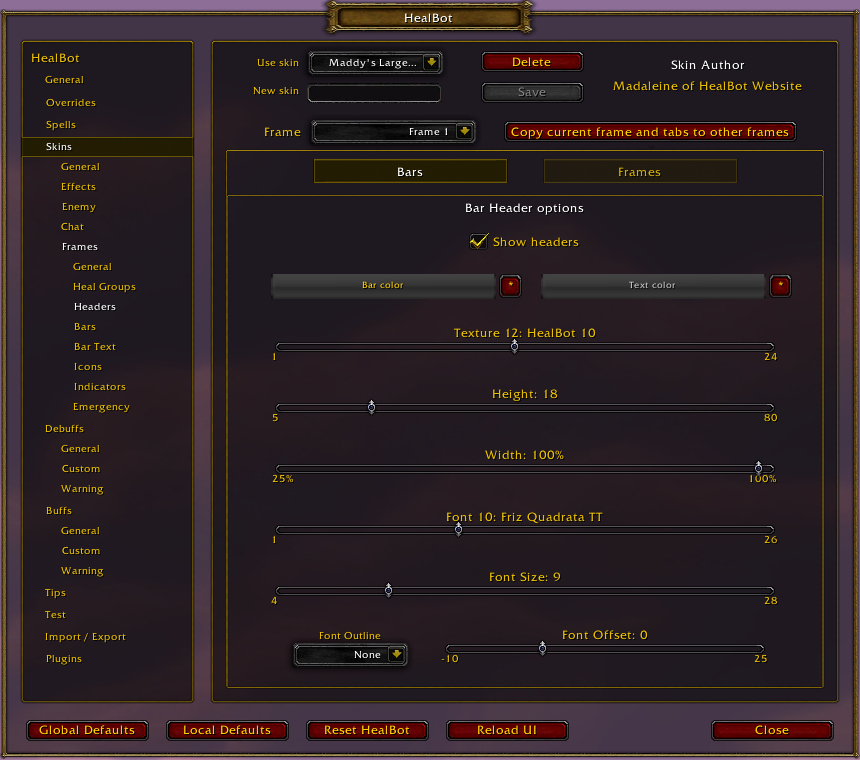
- Show headers: If this is checked, bar headers will be displayed on the selected frame.
- Bar color/Text color: Click the asterisk [*] button beside either option to set its color.
- Texture: Use this slider to choose the background texture for bar headers.
- Height/Width: Use these sliders to adjust the size of bar headers.
- Font/Font Size/Font Outline/Font Offset: Use these settings to adjust the font used by the bar headers.
The Frames tab of the Headers page has settings for the headers that appear above the frames.
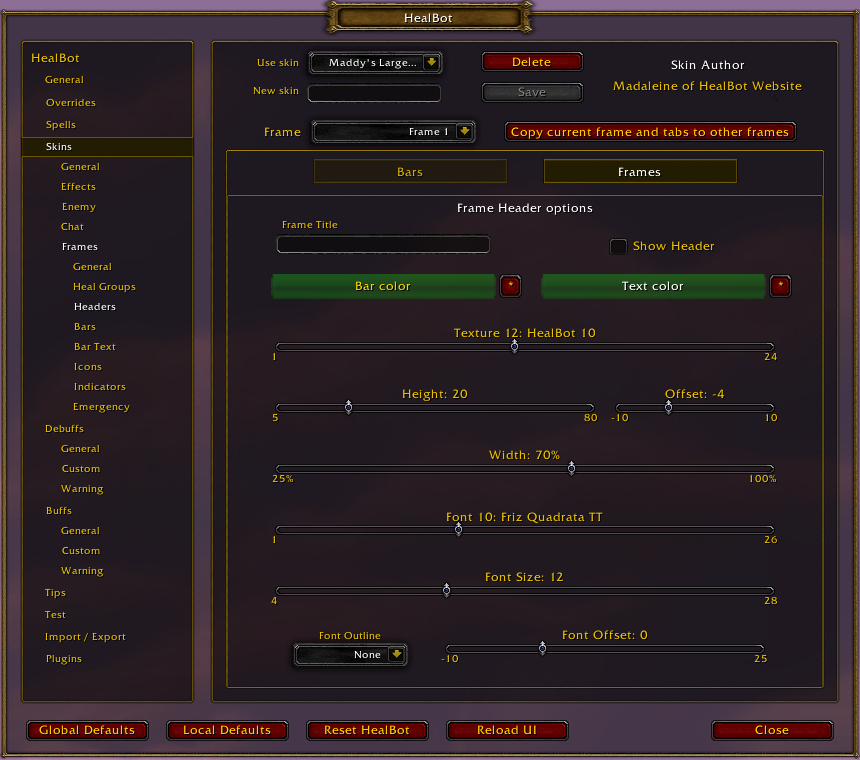
- Show headers: If this is checked, frame headers will be displayed on the selected frame.
- Bar color/Text color: Click the asterisk [*] button beside either option to set its color.
- Texture: Use this slider to choose the background texture for frame headers.
- Height/Width: Use these sliders to adjust the size of frame headers.
- Font/Font Size/Font Outline/Font Offset: Use these settings to adjust the font used by the frame headers.
The Bars page of the Frames section is where you can modify the appearance of HealBot’s unit frame bars.
The General tab of the Bars page has settings for the layout and texture used by Healbot’s unit frame bars.
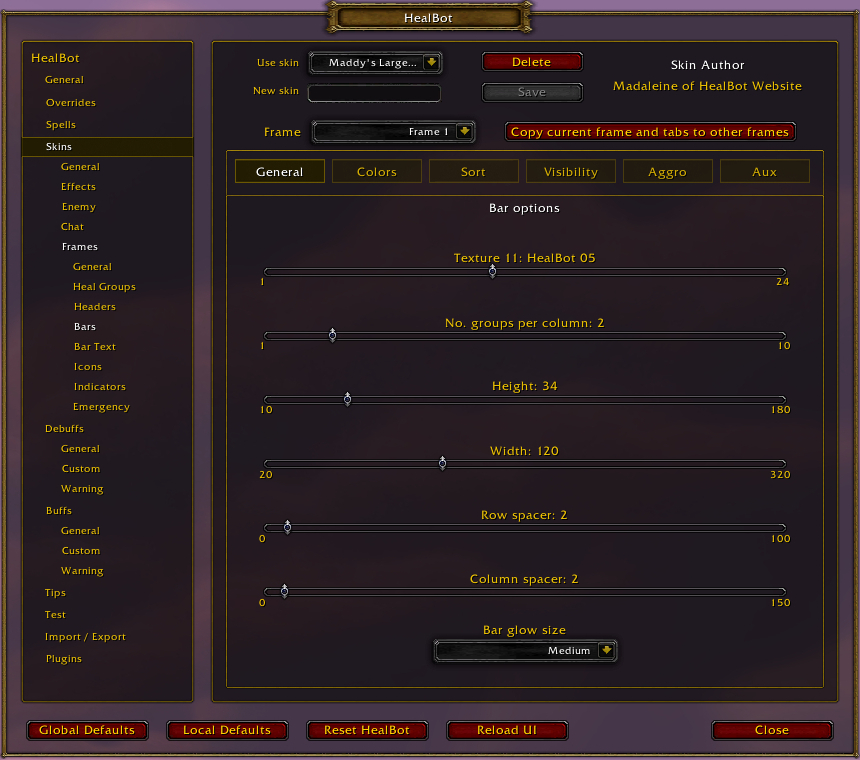
- Texture: Use this slider to change the background texture of the bars.
- No. groups per column: Use this slider to adjust how many groups will appear in each vertical column.
- Height/Width: Use these sliders to adjust the size of the bars.
- Row spacer/Column spacer: Use these sliders to adjust the space between each row or column.
- Bar glow size: Use this dropdown menu to adjust the size of the glow effect when it is applied.
The Colors tab of the Bars page has options for adjusting the color and opacity of HealBot’s unit frame bars.
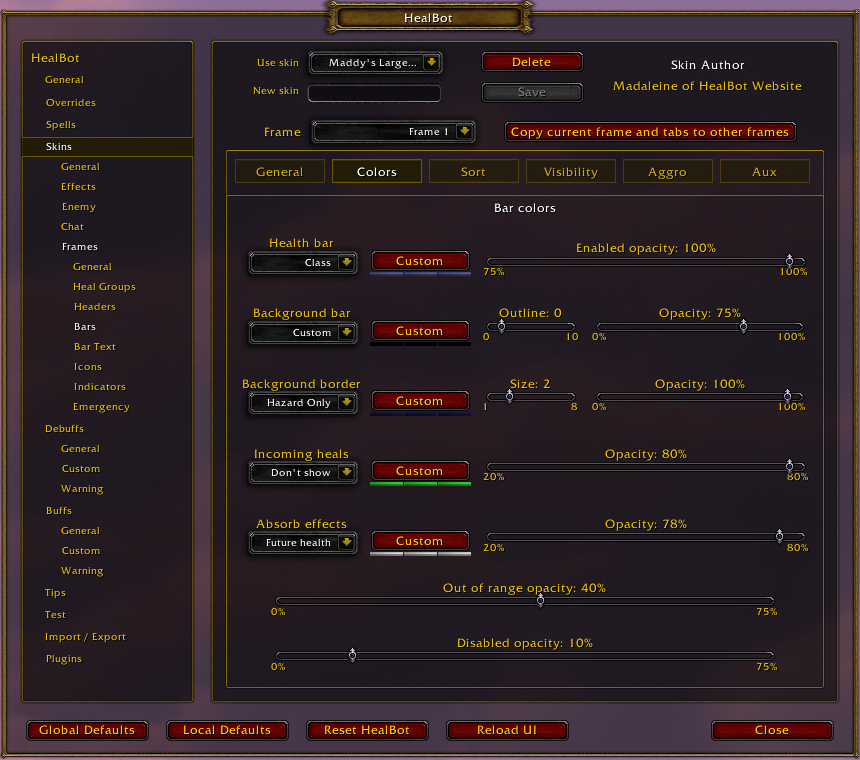
- Each bar type has a dropdown menu where you can choose how to color the bars: using class colors, health-based colors, or a custom color. If a custom color is chosen, you can change the color with the Custom button to the right of the dropdown menu. You can then adjust the opacity of that bar by using the Opacity slider to the right.
- Health bar: The health bar is the main bar for each unit frame.
- Background bar: The background bar appears behind the health bar and any aux bars.
- Background border: This is the border that appears around the entire unit.
- Incoming heals: This is the bar that shows how much health is incoming on the target from healing spells. It overlays the health bar.
- Absorb effects: This bar shows the amount of absorption that is currently on the unit from spells like priest shields. It overlays the health bar.
- Out of range opacity: Use this slider to adjust the bar’s transparency when the unit is out of range.
- Disabled opacity: Use this slider to adjust the bar’s transparency when you are out of combat and the unit does not require any attention (healing, buff, debuff).
The Sort tab of the Bars page has options for choosing how bars are organized within groups.
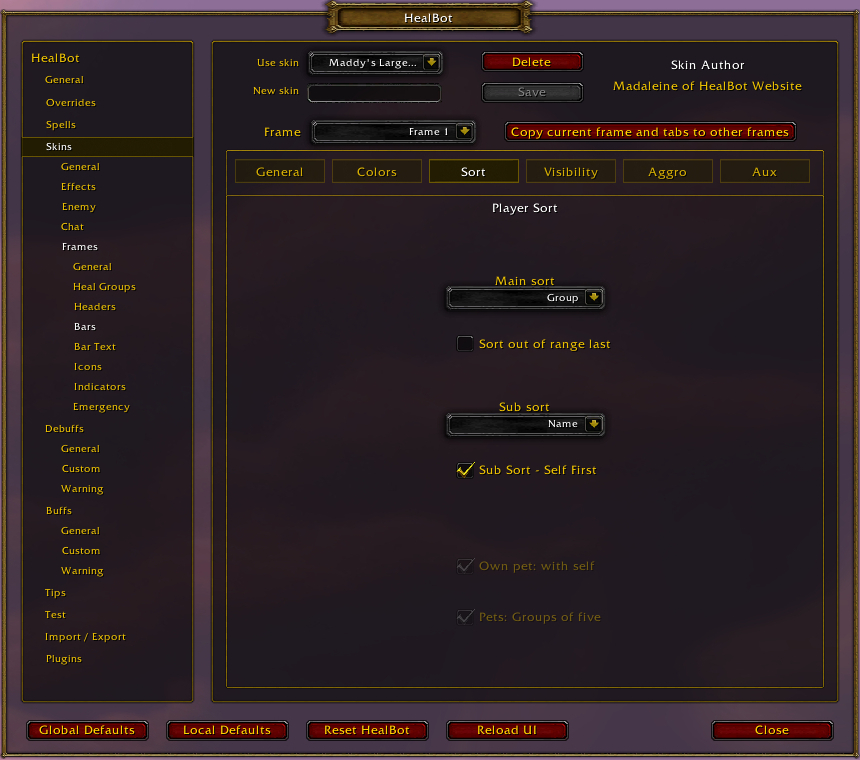
- Main Sort: Use this dropdown menu to choose the primary sorting method. Options include Name, Class, Group, Max health, Role, and Unit ID.
- Sort out of range last: You can choose to separate players that are out of range. Good for situations where groups are splitting up.
- Sub sort: Use this dropdown menu to choose a secondary sorting method. HealBot will priorities the Main Sort method first. Options are the same as those in the Main Sort dropdown menu.
- Sub Sort – Self First: You can choose to put yourself at the top of the group by checking this box.
- Own pet: with self: You can chose to sort your own pet at the top of the group with yourself by checking this box.
- Pets: Groups of five: You can sort pets by groups of five like player groups by checking this box.
The Visibility tab of the Bars page has options for choosing when bars appear in HealBot’s unit frames.
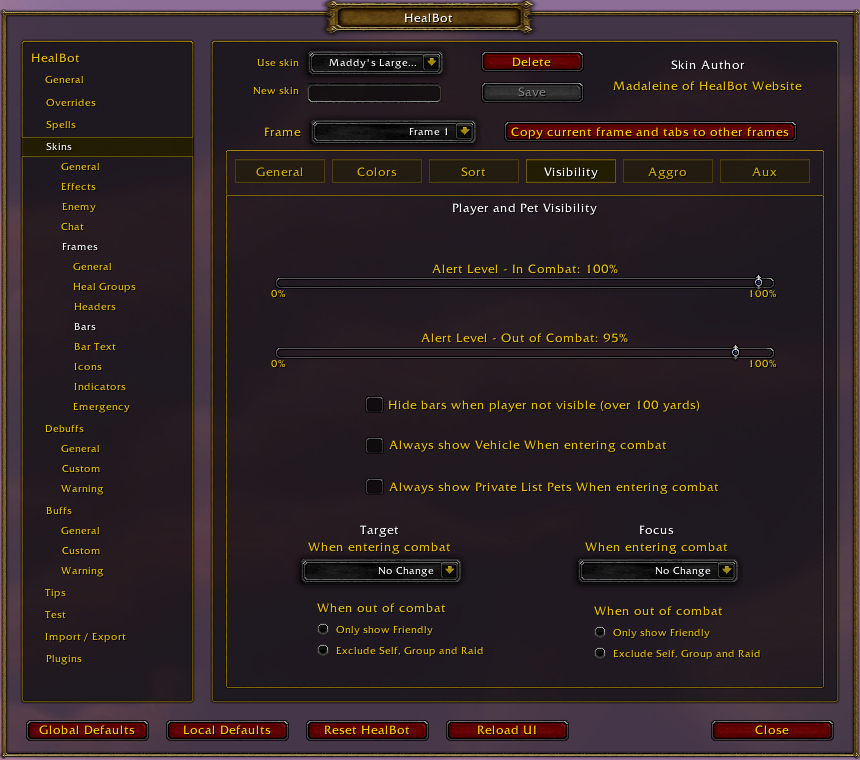
- Alert Level – In Combat: Choose the health percentage at which bars will show when you are in combat. Setting this to 100% will always display bars in combat.
- Alert Level – Out of Combat: Choose the health percentage at which bars will show when you are not in combat. Setting this too 100% will always display bars out of combat.
- Hide bars when player not visible: If this is checked, players who are more than 100 yards away will not appear in your bars.
- Always show Vehicle When entering combat: If this is checked, vehicle bars will always be shown when you are in combat.
- Always show Private List Pets When entering combat: If this is checked, pets of players in your Private List will always be shown in combat.
- Target – When entering combat: Use this dropdown menu to choose whether your target frame is automatically shown or hidden when you enter combat.
- Target – When out of combat: Use these radial buttons to select if your target frame should show hostile units or units in your group when you are out of combat.
- Focus: When entering combat: Use this dropdown menu to choose whether your focus frame is automatically shown or hidden when you enter combat.
- Focus: When out of combat: Use these radial buttons to select if your focus frame should show hostile units or units in your group when you are out of combat.
The Aggro tab of the Bars page has settings for modifying the appearance of threat alerts on your HealBot frames.
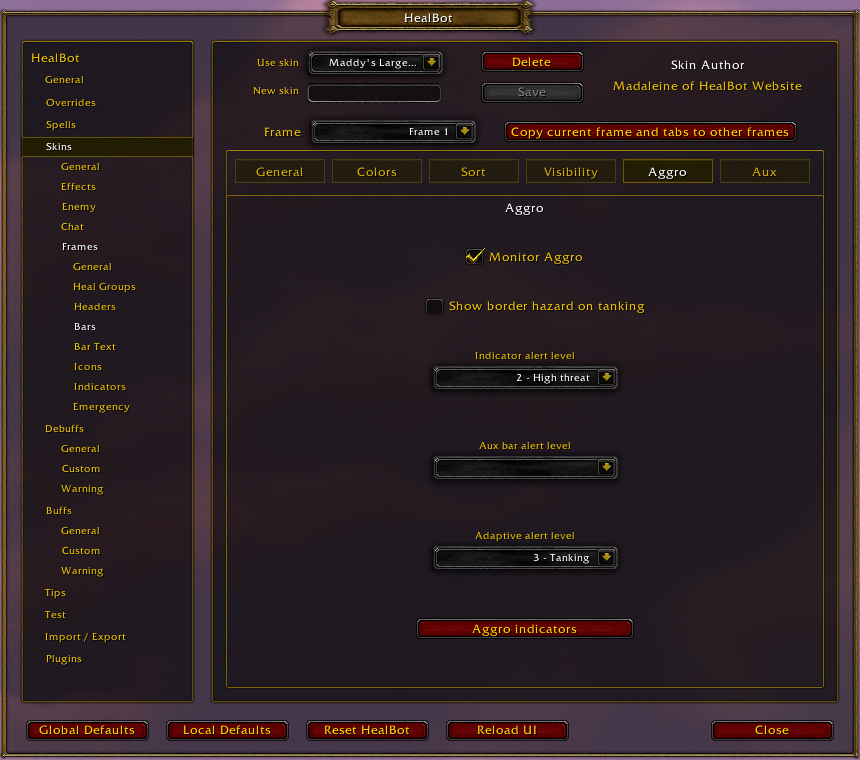
- Monitor Aggro: If this box is checked, HealBot will monitor aggro and display alerts according to the other options on this tab.
- Show border hazard on tanking: If this is checked, a border effect will appear around a unit that has top threat on an enemy.
- Indicator alert level: Use this dropdown menu to set the threat level that will cause an alert to appear on your main bars.
- Aux bar alert level: Use this dropdown menu to set the threat level that will cause an alert to appear on your aux bars.
- Adaptive alert level: Use this dropdown menu to set the threat level that will cause an alert to override your bar colors when using adaptive colors.
- Aggro indicators: This button takes you to the Aggro tab of the Indicators section.
The Aux tab of the Bars page is where you can set up auxiliary bars for power, threat, and many other types of information. There are two sub-tabs which we’ll cover below.
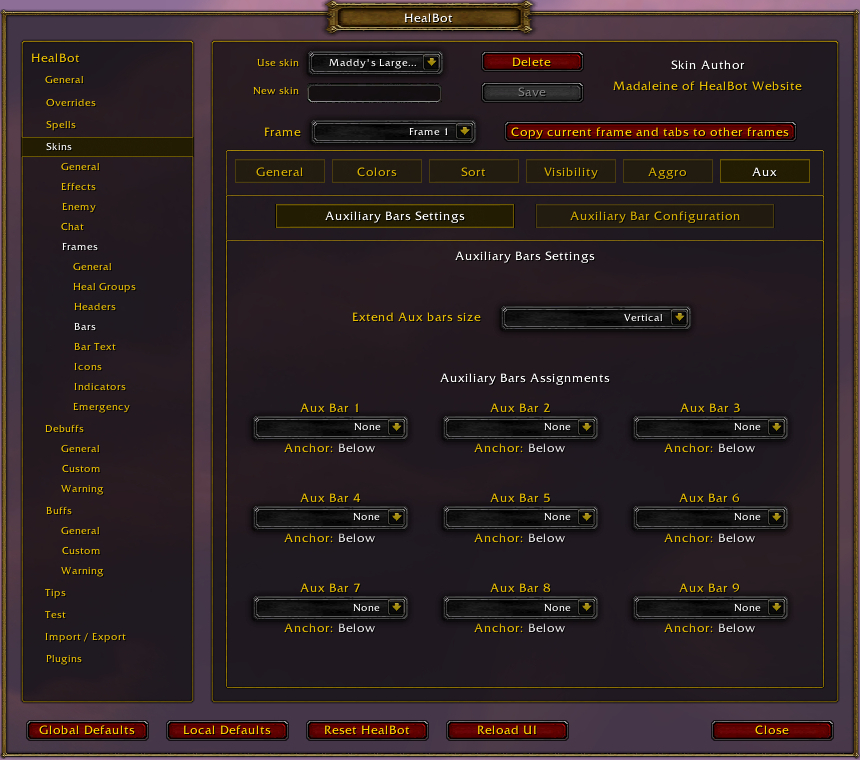
- Extend Aux bars size: Use this dropdown menu to decide how aux bars will display when they appear on both sides of the health bar.
- Auxiliary Bars Assignments: Use these dropdown menus to select what information will appear in each aux bar.
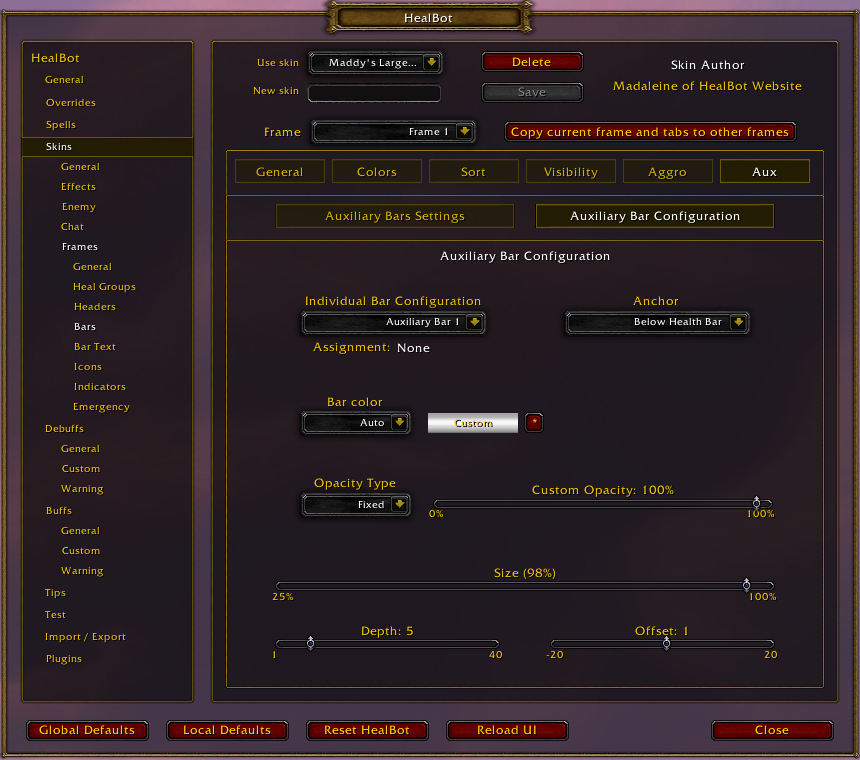
- Individual Bar Configuration: Use this dropdown menu to select the auxiliary bar you would like to modify on this tab.
- Anchor: Use this dropdown menu to set the position of the selected auxiliary bar relative to the health bar or another auxiliary bar.
- Bar color: Use this dropdown menu to decide how the selected auxiliary bar will be colored. You can choose class color, auto, or a custom color. If custom color is chosen, use the asterisk [*] button next to the dropdown menu to select the color.
- Opacity Type: Use this dropdown menu to decide if the auxiliary bar will have a fixed transparency based on the health bar, a variable one using flash effect settings, or a custom opacity. If custom is chosen, use the slider to the right to set the opacity.
- Size: Use this slider to set the size of the auxiliary bar relative to the health bar.
- Depth: Use this slider to set the height or width of the auxiliary, depending on its orientation.
- Offset: Use this slider to set the spacing between the auxiliary bar and other bars.
The Bar Text page of the Frames section is where you can modify the text that appears on HealBot’s bars.
The Name tab of the Bar Text page has settings for adjusting the appearance of names on unit frames. There are two sub-tabs which we’ll cover below.

- Show name on bar: If this is checked, then names will appear on your bars using the settings from this page.
- Enable UTF8 library: Use this radial button to improve compatibility with international characters. (Not usually needed on English only servers).
- Show class on bar/Show role when set: If these are checked, the class and/or role will appear in the same location as the name.
- Role label text: You can set the text that will display for each role, if you are showing roles.
- Aggro indicator on name: Use this dropdown to choose characters you would like to add to the unit name when they have threat.
- Horizontal Alignment: Use this dropdown to select the alignment for the name and class/role text.
- Font/Font size: Use these sliders to select the font used by name and class/role text.
- Vertical Offset/Horizontal Offset: Use these sliders to adjust the position of the name text.
- Max Characters: Use this slider to limit the length of the name text, or set it to Auto to let HealBot size it according to the font and bar width.
- Font Outline: Use this slider to choose how thick you want the outline to be around the text, if any.
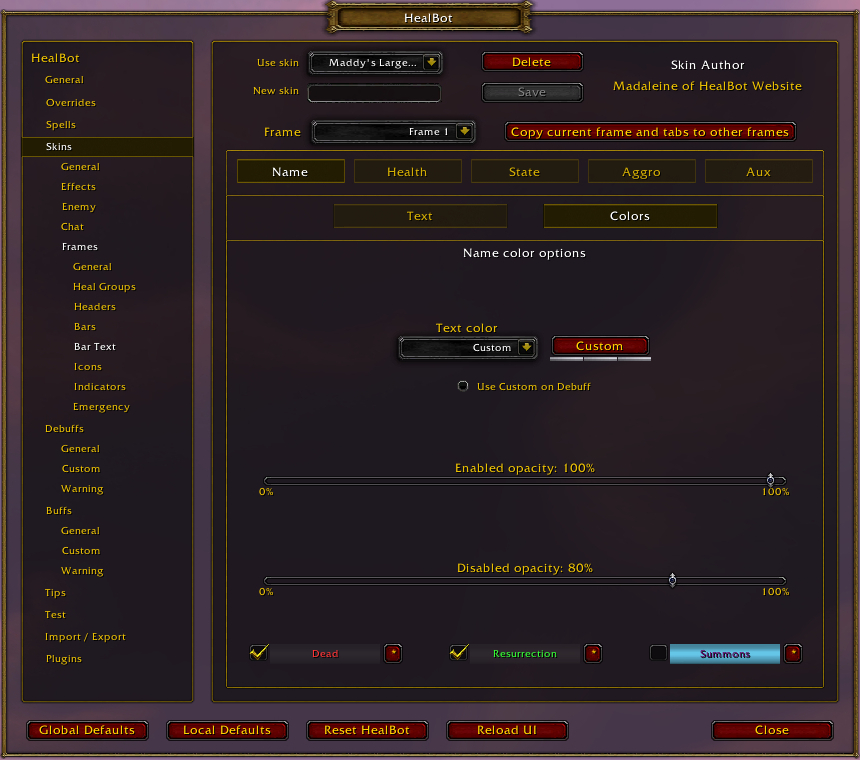
- Text color: Use this dropdown to decide if unit names should be colored by class, health, or custom colors. If custom is chosen, use the Custom button to the right to select a color.
- Use Custom on Debuff: If this radial button is active, the color chosen with the Custom button will only be used when the unit has a debuff.
- Enabled opacity/Disabled opacity: Use these sliders to determine the transparency of name text when the unit is active or not active (out of combat and does not require attention for healing/buffs/debuffs).
- Dead/Resurrection/Summons: Use these checkboxes to select whether to use a special color on names when they are dead or being resurrected or summoned. Use the asterisk [*] button to the right of each option to select the color used.
The Health tab of the Bar Text page has settings for adjusting the appearance of health text on unit frames. There are four sub-tabs which we’ll cover below.
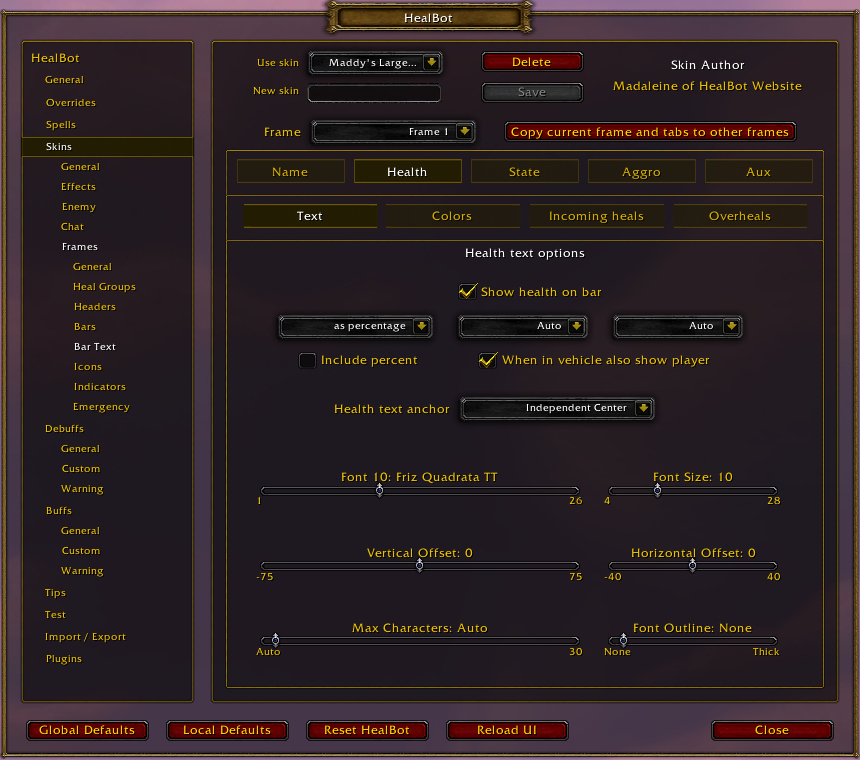
- Show health on bar: If this is checked, health text will appear on your bars using the settings on this page.
- There are three dropdown menus that determine the formatting of the health text. The menus to the right are changed by the selection in the menus to the left. So select the display type first (health, delta, or percentage), then the first formatting option, then the second.
- Include percent: Adds the health as a percentage beside the other display type you chose. Redundant if you chose “as percentage.”
- When in vehicle also show player: If this is checked, you will be able to see a player’s health even when they are in a vehicle.
- Health text anchor: Use this dropdown to choose if the health text is positioned relative to the health bar or name text or independent.
- Font/Font size: Use these sliders to select the font used by health text.
- Vertical Offset/Horizontal Offset: Use these sliders to adjust the position of the health text.
- Max Characters: Use this slider to limit the length of the health text, or set it to Auto to let HealBot size it according to the font and bar width.
- Font Outline: Use this slider to choose how thick you want the outline to be around the text, if any.
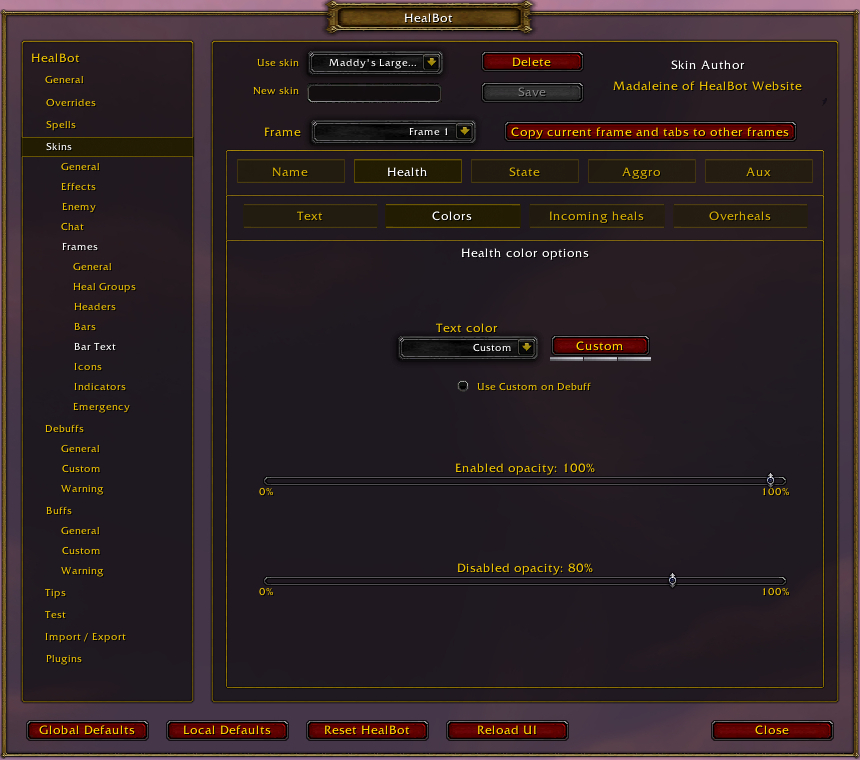
- Text color: Use this dropdown to decide if health text should be colored by class, health, or custom colors. If custom is chosen, use the Custom button to the right to select a color.
- Use Custom on Debuff: If this radial button is active, the color chosen with the Custom button will only be used when the unit has a debuff.
- Enabled opacity/Disabled opacity: Use these sliders to determine the transparency of health text when the unit is active or not active (out of combat and does not require attention for healing/buffs/debuffs).

- On full health ignore all incoming heals and absorbs: If this is checked, you will not see any incoming heals or absorbs when the player’s health is full.
- There are two dropdown menus for selecting how incoming heals and absorbs will appear: included in the health text, separate, or not at all.
- Separate format: If you have set either incoming heals or absorbs to appear separately, you can format the text with this dropdown menu.
- Separate Color: If you have set either incoming heals or absorbs to appear separately, you can use this dropdown menu to choose whether to set their color to the health color or a custom color. If custom color is chosen, use the asterisk [*] button below to select a color.

- There is a dropdown menu at the top of this sub-tab where you can choose whether to show overheals for your own heals, everyone’s, or not at all.
- Overheals format: You can format the overheal text using this dropdown menu.
- Overheals color: You can select the color of overheal text using this dropdown menu. If custom color is chosen, you can use the asterisk [*] button below to select a color.
The State tab of the Bar Text page has settings for adjusting the appearance of special condition-based text on unit frames. There are two sub-tabs which we’ll cover below.
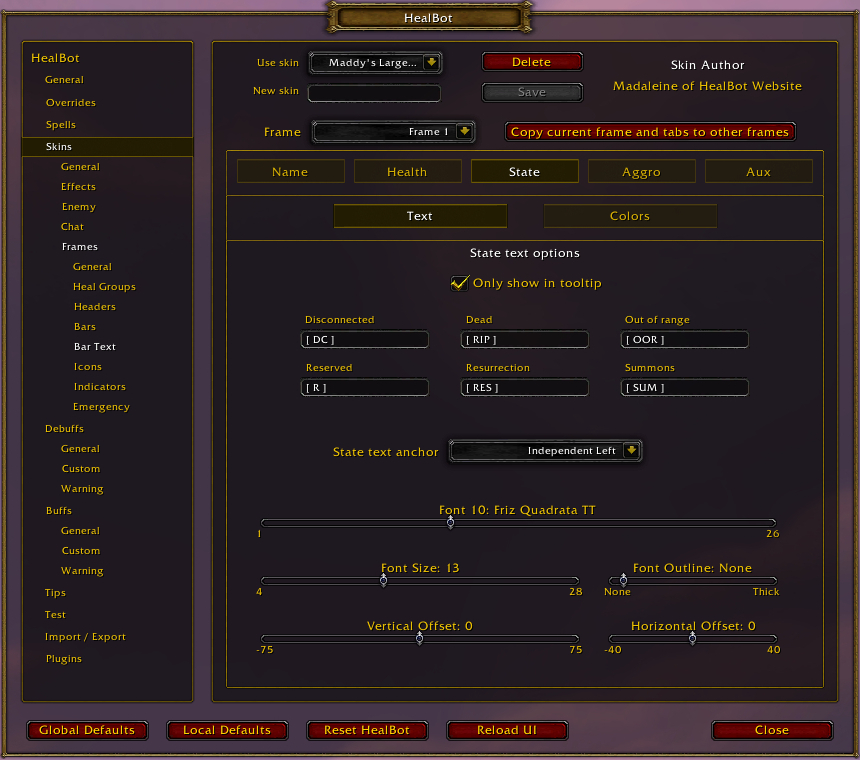
- Only show in tooltip: If this is checked, state text will only show up in the tooltip and not on the unit frame itself.
- There are several text boxes where you can set the text that will display based on various conditions.
- State text anchor: Use this dropdown menu to select whether the state text should be positioned relative to the health bar or name text or independently.
- Font/Font size: Use these sliders to select the font used by health text.
- Vertical Offset/Horizontal Offset: Use these sliders to adjust the position of the health text.
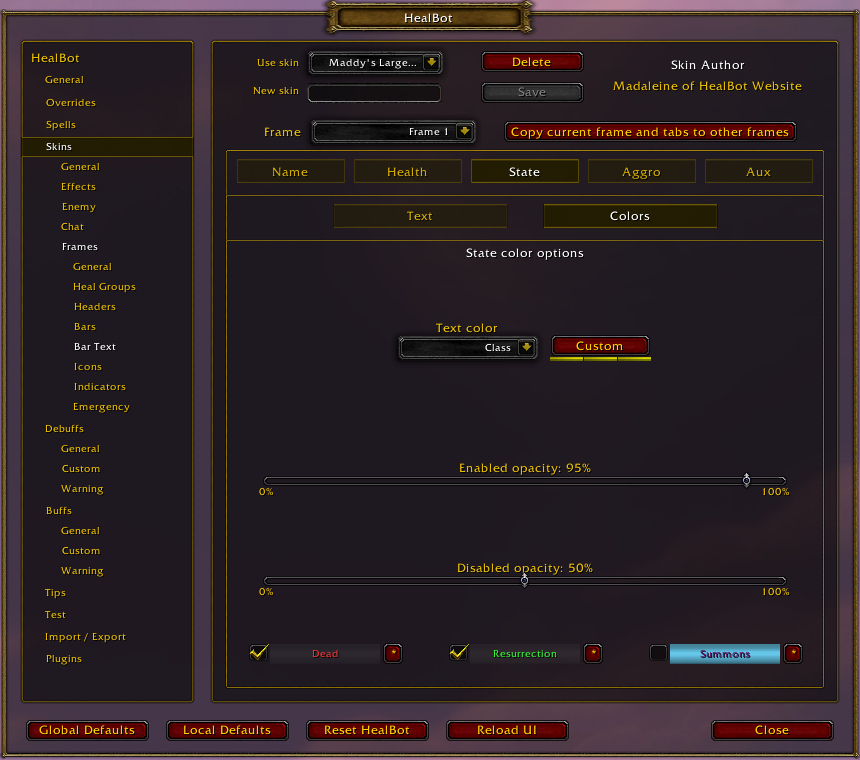
- Text color: Use this dropdown to decide if state text should be colored by class, health, or custom colors. If custom is chosen, use the Custom button to the right to select a color.
- Enabled opacity/Disabled opacity: Use these sliders to determine the transparency of state text when the unit is active or not active (out of combat and does not require attention for healing/buffs/debuffs).
- Dead/Resurrection/Summons: Use these checkboxes to select whether to use a special color on state text when a unit is dead or being resurrected or summoned. Use the asterisk [*] button to the right of each option to select the color used.
The Aggro tab of the Bar Text page has settings for adjusting the appearance of threat-based text on unit frames. There are two sub-tabs which we’ll cover below.
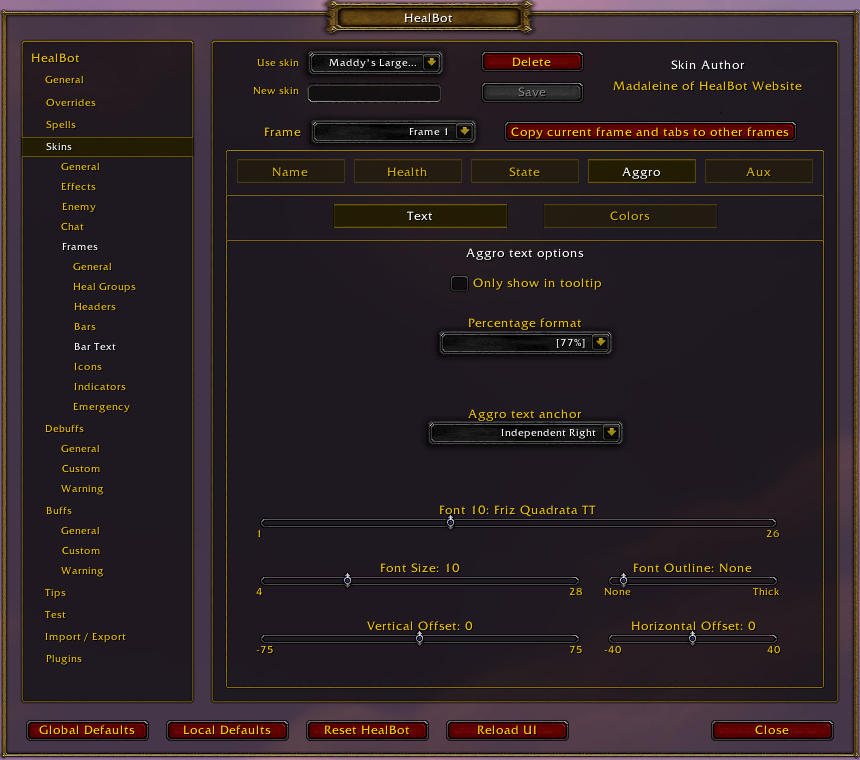
- Only show in tooltip: If this is checked, aggro text will only show up in the tooltip and not on the unit frame itself.
- Percentage format: Use this dropdown menu to format the aggro text.
- Aggro text anchor: Use this dropdown menu to select whether the aggro text should be positioned relative to the health bar or name text or independently.
- Font/Font size/Font Outline: Use these sliders to select the font used by aggro text.
- Vertical Offset/Horizontal Offset: Use these sliders to adjust the position of the aggro text.
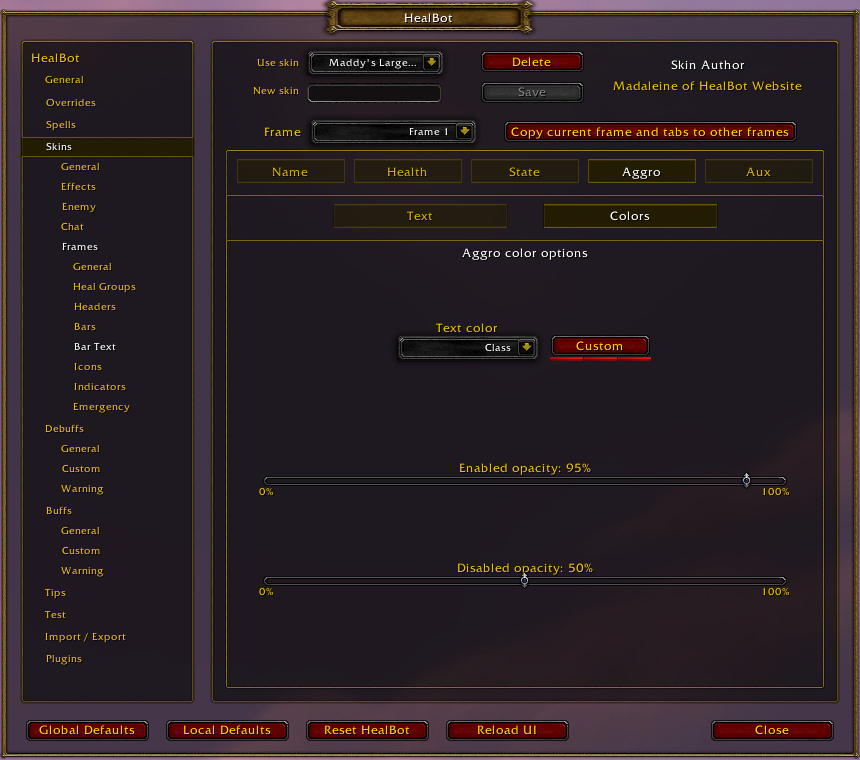
- Text color: Use this dropdown to decide if aggro text should be colored by class, health, or custom colors. If custom is chosen, use the Custom button to the right to select a color.
- Enabled opacity/Disabled opacity: Use these sliders to determine the transparency of aggro text when the unit is active or not active (out of combat and does not require attention for healing/buffs/debuffs).
The Aux tab of the Bar Text page has settings for adjusting the appearance of text on auxiliary bars. There are two sub-tabs which we’ll cover below.
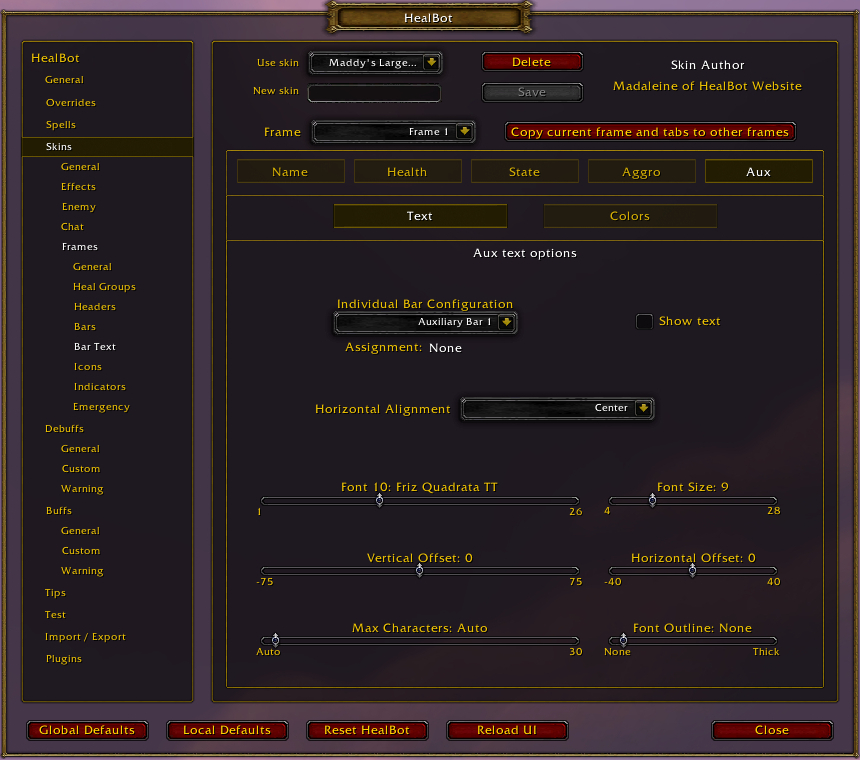
- Individual Bar Configuration: Use this dropdown menu to select the auxiliary bar you would like to modify. The rest of the settings on this tab will apply to the bar chosen here.
- Show text: Check this box to display text on the selected auxiliary bar.
- Horizontal Alignment: Use this dropdown to select the alignment of the text on the selected auxiliary bar.
- Font/Font size: Use these sliders to select the font used by the auxiliary text.
- Vertical Offset/Horizontal Offset: Use these sliders to adjust the position of the auxiliary text.
- Max Characters: Use this slider to limit the length of the auxiliary text, or set it to Auto to let HealBot size it according to the font and bar width.
- Font Outline: Use this slider to choose how thick you want the outline to be around the text, if any.
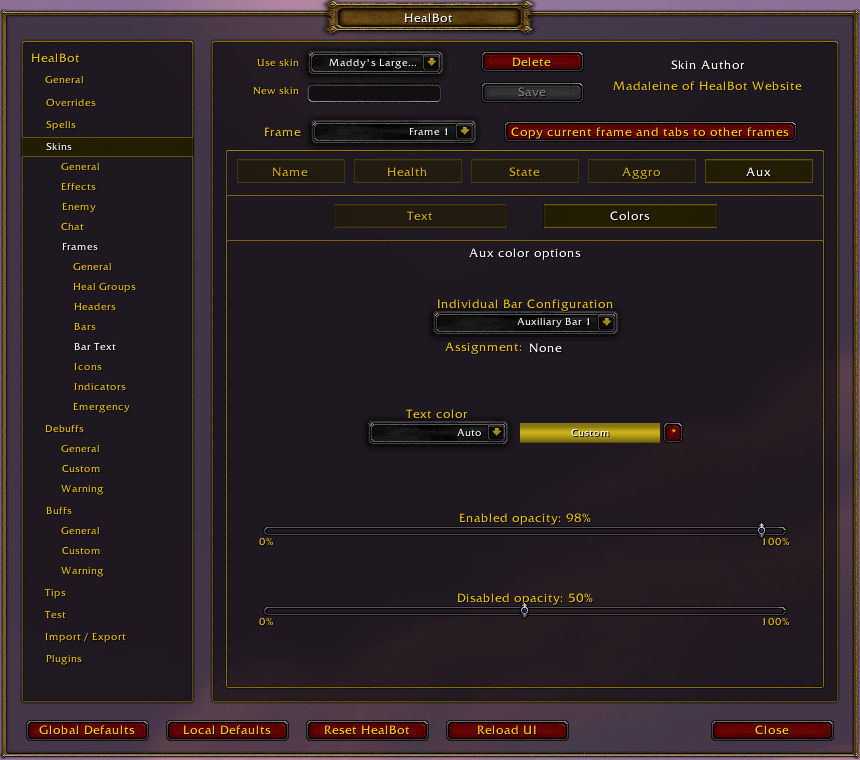
- Individual Bar Configuration: Use this dropdown menu to select the auxiliary bar you would like to modify. The rest of the settings on this tab will apply to the bar chosen here.
- Text color: Use this dropdown to decide if the auxiliary text should be colored by class, health, or custom colors. If custom is chosen, use the Custom button to the right to select a color.
- Enabled opacity/Disabled opacity: Use these sliders to determine the transparency of the auxiliary text when the unit is active or not active (out of combat and does not require attention for healing/buffs/debuffs).
The Icons page of the Frames section has options for how icons are displayed on HealBot’s unit frames for buffs, debuffs, and more.
The Debuffs tab of the Icons page has settings for adjusting the appearance of debuff icons on unit frames. There are two sub-tabs which we’ll cover below.
- Icon Position: Use this dropdown menu to set the location of the debuff icons relative to the health bar.
- Icon Anchor: Use this dropdown menu to set the starting point of the debuff icons relative to its position.
- Vertical Offset/Horizontal Offset: Use these sliders to fine-tune the position of the debuff icons relative to their anchor.
- Max Icons: Use this slider to set the maximum number of debuff icons to display. This also affects class/role and target marker icons.
- Icon Scale/Icon Spacer: Use these sliders to adjust the size and spacing of the debuff icons.
- Double Row: Check this box to divide the icons into two stacked rows. This will also reduce their size by half to ensure they fit.
- Opacity: Always use enabled: If this is checked, debuff icons will always appear even if the bar isn’t showing.
- Opacity: Fade on expire: If this is checked, the debuff icons will fade as they expire. Use the slider below to adjust when they begin to fade.
- Show icon text: Use the radial buttons to select whether to show the number of stacks (count) and/or the remaining duration of the debuff.
- Show duration from: Use this slider to adjust the duration that should be shown if Duration is activated above.
- Duration warning from: Use this slider to adjust the point at which the text color turns red if Duration is activated above.
- Font/Font Size/Font Outline: Use these settings to adjust the font for the debuff icon text.
The Buffs tab of the Icons page has settings for adjusting the appearance of buff icons on unit frames. There are two sub-tabs which we’ll cover below.
- Icon Position: Use this dropdown menu to set the location of the buff icons relative to the health bar.
- Icon Anchor: Use this dropdown menu to set the starting point of the buff icons relative to its position.
- Vertical Offset/Horizontal Offset: Use these sliders to fine-tune the position of the buff icons relative to their anchor.
- Max Icons: Use this slider to set the maximum number of buff icons to display. This also affects class/role and target marker icons.
- Icon Scale/Icon Spacer: Use these sliders to adjust the size and spacing of the buff icons.
- Double Row: Check this box to divide the icons into two stacked rows. This will also reduce their size by half to ensure they fit.
- Opacity: Always use enabled: If this is checked, buff icons will always appear even if the bar isn’t showing.
- Opacity: Fade on expire: If this is checked, the buff icons will fade as they expire. Use the slider below to adjust when they begin to fade.
- Show icon text: Use the radial buttons to select whether to show the number of stacks (count) and/or the remaining duration of the buff. You can also choose whether to show the text only for your own spells.
- Show duration from: Use this slider to adjust the duration that should be shown if Duration is activated above.
- Duration warning from: Use this slider to adjust the point at which the text color turns red if Duration is activated above.
- Font/Font Size/Font Outline: Use these settings to adjust the font for the debuff icon text.
The Extras tab of the Icons page has settings for adjusting the appearance of various additional icons on unit frames. There are four sub-tabs which we’ll cover below.
- Show Class: If this is checked, class icons will be displayed on unit frames.
- show role when set: If this is activated, the role icons will be displayed on unit frames.
- Icon Position: Use this dropdown menu to set the location of the class/role icons relative to the health bar.
- Icon Anchor: Use this dropdown menu to set the starting point of the class/role icons relative to their position.
- Vertical Offset/Horizontal Offset: Use these sliders to fine-tune the position of the class/role icons relative to their anchor.
- Icon Scale: Use this slider to adjust the size of the class/role icons.
- Opacity: Always use enabled: If this is checked, class/role icons will always appear even if the bar isn’t showing.
- Show Raid Target: If this is checked, raid target icons (skull, square, etc.) will appear on your unit frames. You can use the radial buttons below this option to enable or disable individual icons.
- Icon Position: Use this dropdown menu to set the location of the icons relative to the health bar.
- Icon Anchor: Use this dropdown menu to set the starting point of the icons relative to their position.
- Vertical Offset/Horizontal Offset: Use these sliders to fine-tune the position of the icons relative to their anchor.
- Icon Scale: Use this slider to adjust the size of the icons.
- Opacity: Always use enabled: If this is checked, icons will always appear even if the bar isn’t showing.
- Show Ready Check: If this is checked, you will see ready check icons on your unit frames.
- Show Leader: If this is checked, you will see an icon for the group leader, raid assist, and master looter on your unit frames.
- Show AFK: if this is checked, you will see an AFK icon on units that are AFK.
- Show Combat State: If this is checked, you will see an icon on each unit that is in combat.
- Show Hostile: If this is checked, you will see an icon on units that are hostile.
- Icon Position: Use this dropdown menu to set the location of the icons relative to the health bar.
- Icon Anchor: Use this dropdown menu to set the starting point of the icons relative to their position.
- Vertical Offset/Horizontal Offset: Use these sliders to fine-tune the position of the icons relative to their anchor.
- Icon Scale: Use this slider to adjust the size of the icons.
- Opacity: Always use enabled: If this is checked, icons will always appear even if the bar isn’t showing.
- Show Out of Range Direction: If this is checked, you will see an arrow pointing to the direction of the unit when they are out of range.
- Only on Mouse Over: If this is activated, the out of range arrow will only show up when you mouse over the unit.
- Icon Position: Use this dropdown menu to set the location of the icons relative to the health bar.
- Icon Anchor: Use this dropdown menu to set the starting point of the icons relative to their position.
- Vertical Offset/Horizontal Offset: Use these sliders to fine-tune the position of the icons relative to their anchor.
- Icon Scale: Use this slider to adjust the size of the icons.
- Opacity: Always use enabled: If this is checked, icons will always appear even if the bar isn’t showing.
The Indicators page of the Frames section covers various status indicators that can appear on your unit frames.
The Aggro tab of the Indicators page has settings for the status indicator that appears on a unit when it has threat.
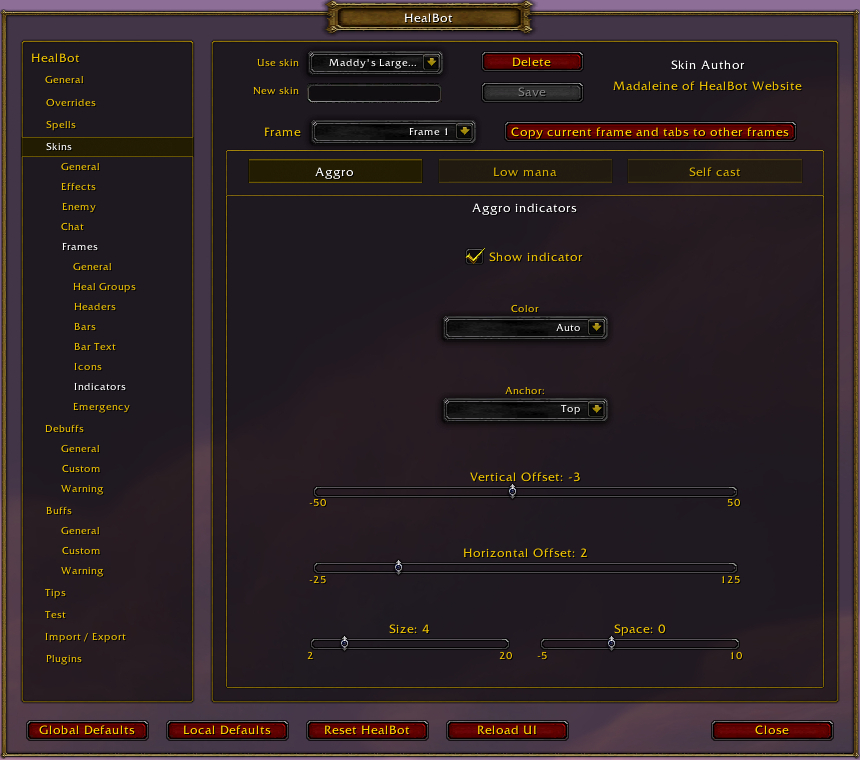
- Show indicator: If this is checked, a status indicator will appear on a unit if it has threat.
- Color: Use this dropdown menu to choose the color of the aggro indicator.
- Anchor: Use this dropdown menu to choose the positioning of the aggro indicator on the frame.
- Vertical Offset/Horizontal Offset: Use these sliders to fine-tune the position of the indicator relative to its anchor.
- Size/Space: Use these sliders to adjust the size and spacing of the aggro indicator.
The Low mana tab of the Indicators page has settings for the status indicator that appears on a unit when it has low mana.
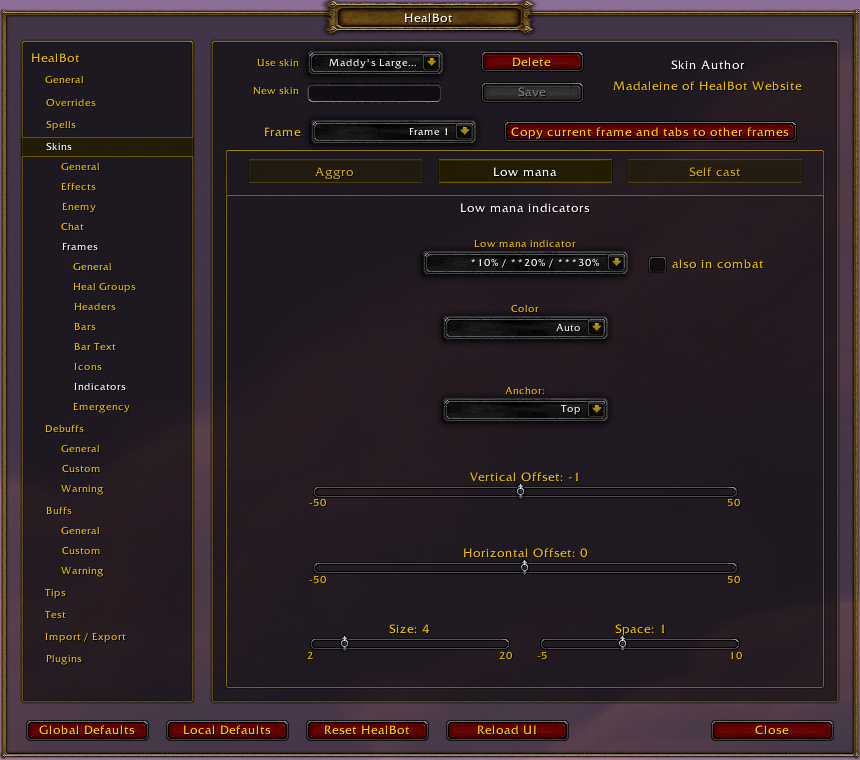
- Low mana indicator: Choose at what percentage of a unit’s mana the low mana indicator will appear on the unit frame, if at all.
- also in combat: If this is checked, the low mana indicator will also display when you are in combat.
- Color: Use this dropdown menu to choose the color of the low mana indicator.
- Anchor: Use this dropdown menu to choose the positioning of the low mana indicator on the frame.
- Vertical Offset/Horizontal Offset: Use these sliders to fine-tune the position of the indicator relative to its anchor.
- Size/Space: Use these sliders to adjust the size and spacing of the low mana indicator.
The Self cast tab of the Indicators page has settings for the status indicator that appears on icons of spells that you cast yourself.
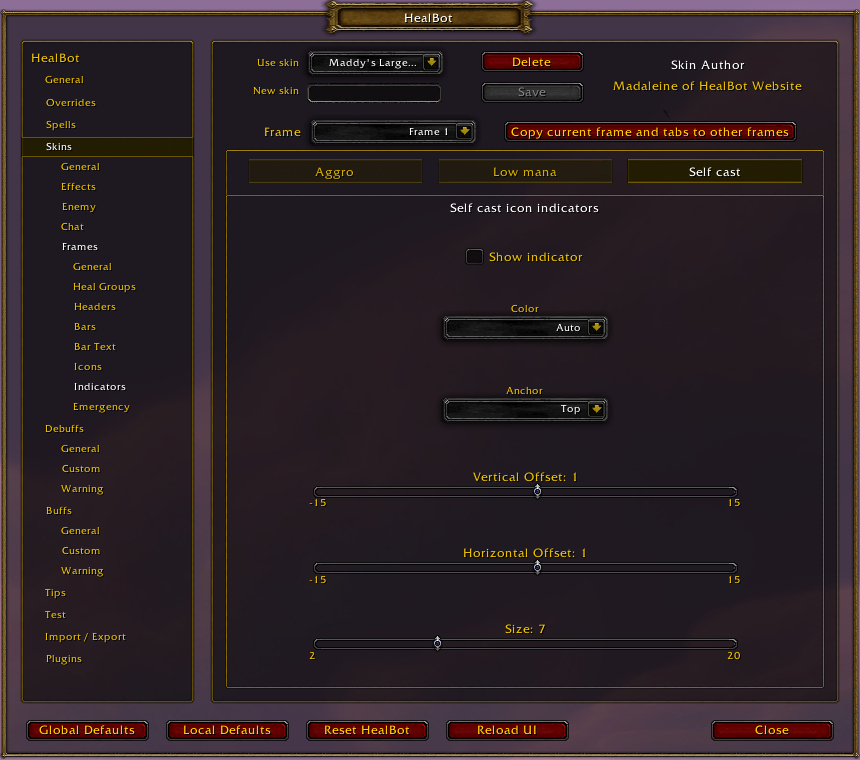
- Show indicator: If this is checked, a status indicator will appear on an icon if you cast the spell yourself.
- Color: Use this dropdown menu to choose the color of the self cast indicator.
- Anchor: Use this dropdown menu to choose the positioning of the self cast indicator on the icon.
- Vertical Offset/Horizontal Offset: Use these sliders to fine-tune the position of the indicator relative to its anchor.
- Size: Use this slider to adjust the size of the self cast indicator.
The Emergency page of the Frames section contains options for the emergency bars. Emergency bars are extra bars that you can enable next to health bars which use different spell bindings when you click on them.
The General tab of the Emergency page has settings for the size, positioning, and appearance of emergency bars.

- Use the Emergency Bar: If this is checked, emergency bars will appear next to your health bars. These bars use different spell bindings than the regular health bars (bindings can be set on the Spells page by selecting Emergency bars in the dropdown menu).
- Texture: use this slider to select a background texture for the emergency bars.
- Height/Width: Use these sliders to adjust the size of the emergency bars relative to the health bars.
- Anchor: Use this dropdown menu to set the position of the emergency bars relative to the health bars.
- Vertical Offset/Horizontal Offset: Use these sliders to fine-tune the position of the emergency bars relative to their anchor.
The Colors tab of the Emergency page has settings for adjusting the color and opacity of the emergency bars.
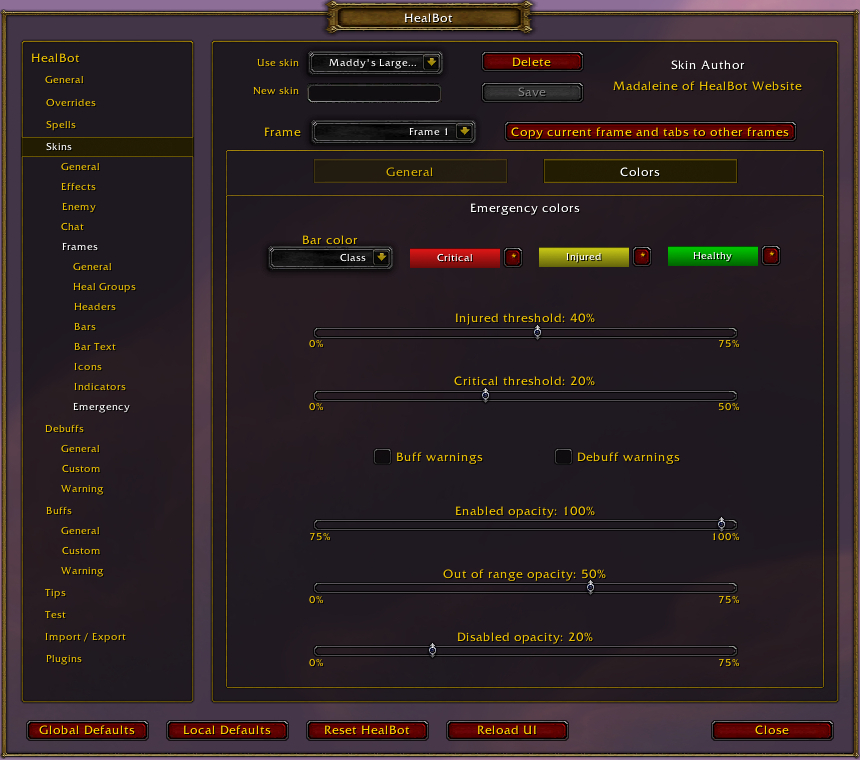
- Bar color: Use this dropdown menu to select whether the emergency bars are colored based on class, health, or a custom color. If Custom is chosen, you can use the asterisk [*] buttons to the right to select the color for Critical, Injured, and Healthy states.
- Injured threshold/Critical threshold: Use these sliders to adjust the health percentage thresholds for the Critical and Injured states. The Healthy state is anything above these percentages.
- Buff warnings/Debuff warnings: If these boxes are checked, warning colors for buffs and/or debuffs will be displayed on the emergency bars.
- Enabled opacity/Out of range opacity/Disabled opacity: Use these sliders to set the transparency of the emergency bars based on whether the unit is in range or if their bar is inactive (out of combat with no healing/buffs/debuffs needing attention).
Backup Your Healbot Continued Profile!
There’s nothing worse than spending hours on your interface and then having to start over from scratch. You may need to reinstall World of Warcraft for one reason or another, or some kind of error could reset your profile. Make sure you have a backup of your profile on a different hard drive or in cloud storage. You may also want to make a copy of your profile any time you’re going to make significant changes to it, so you can easily go back if you want to.
There are two ways to back up your HealBot Continued profile: you can either do it in the game, or using a script downloaded from the HealBot Continued website. We’ll cover both methods below.
Backing Up in the Game
To back up your profile in the game, go to the Import/Export section of the HealBot options menu. You have a few options at the top here for what you want to back up:
- Skins
- Custom Debuffs
- Custom Buffs
- Spells
- Preset Colors
You may want to come back and save each of these to be sure you have everything backed up. For now, choose Skins and select the skin you want to save. Click Export. This will give you a long text strong. Copy the entire thing and paste it into a text file or wherever you want to save your backup. If you need to restore your profile later, you can paste this string into the Import box on the same page.
Backing Up with the Windows Script
HealBot Continued has its own backup and restore script that you can run in Windows to easily back up your profile. You can download it from the Healbot Continued website here: Backup and Restore Healbot configuration.
Extract the zip file to your World of Warcraft _retail_ folder. By default this should be C:ProgramFiles(x86)WorldofWarcraft_retail_. Double-click Backup_HealBot.bat to run it. Type B and boom, you have a backup!
To restore from a backup, you will use the same bat file and type R.
Author

I've been playing World of Warcraft on and off since vanilla, usually as a healer or caster and often as a guild leader. I play both retail and classic. I also love RPGs, sandboxes, and sims.
Is there a way to show heal absorbs in Healbot?
This is what I came here for, I want to know it too
Use this weakaura, it works well with Healbot. You only need to import need, no need to config anything. https://wago.io/WMzKnm0zo
Hello, I am having trouble with some boss debuffs in 11.1 showing, and some M+ dungeons. Is there a way to enable ALL debuffs be shown? Or do I have to manually add them to healbot and that’s why they arnt showing?