Details! Damage Meter Addon Guide
Details! Damage Meter is a powerful addon for tracking damage, healing, threat, and much more in World of Warcraft. The addon combs through your combat log and parses information into easy to read charts and meters. Its reports are consistent with those of sites such as Warcraft Logs, so you can see exactly what your logs will show in real time.
Details isn’t the only damage meter available, but it’s the most widely used and feature-rich. It is highly customizable, it has a lot of useful tools, and it features built-in compatibility for WeakAuras and Plater Nameplates. We’ll go over all of the addon’s options so you can customize everything to your liking. But first, let’s get Details installed!
Installing Details
Details is available to download on CurseForge, Wago, and WoWInterface. You can install it manually or by using the addon manager of your choice.
We have a separate guide for How to Install and Manage Addons if you need some help with installation.
Setting up Details
When you have Details installed in your Addons folder, you can log into the game and make sure it’s enabled. On your character selection screen, look for the AddOns button in the bottom left corner. Make sure that the following are enabled:
- Details! Damage Meter
- Details!: Storage
- Details!: Compare 2.0
The following are optional plugins that come with Details which you may also want to enable:
- Details!: Raid Check (plugin)
- Details!: Encounter Breakdown (plugin)
- Details!: Streamer (plugin)
- Details!: Tiny Threat (plugin)
- Details!: Vanguard (plugin)
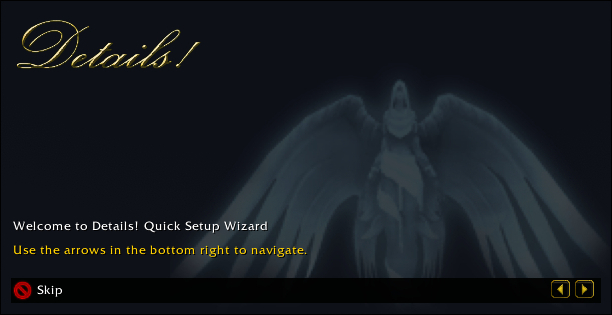
Now you can load into the game and you should see a Details window in your interface. If this is your first time installing Details, you’ll also see the Details Quick Setup Wizard. The setup wizard will walk you through some basic options and is a good place to start, but you are free to skip it if you choose. Everything in the wizard can be modified in the Details Options Panel later.
Customizing Details
If you’ve checked out the Details menus at all, you might be feeling a little overwhelmed. Not to worry, we’ll walk you through what everything does.
Details Chat Commands
Before we get into configuring Details, here are some chat commands to make working with the addon a little easier.
- Type
/deor/detailsto display some Details commands in your chat window. - Type
/de show [window number]to show the designated Details window. Type/de hide [window number]to hide it./de toggle [window number]will hide/show the window intelligently. - Type
/de resetto clear the data from Details. - Type
/de options [window number]to open the options menu for the designated Details window. - Type
/de meto open the Player Breakdown window for yourself. - Type
/de spellsto open the Spell List. This is a convenient way to search for a spell’s ID or to be able to read its tooltip. - Type
/de statsto open the Statistics window, where you can view stats for past boss kills with your guild. - Type
/de versionto get a text box with the current Details version that you can easily copy. - Type
/de reinstallto completely reset Details to its default setup. This will erase all of your settings!
Details Window Controls
Now let’s take a look at the actual Details window. There are some menu icons on the upper right side that we will look at in a moment, but first, there are a few things you can do in the window itself.
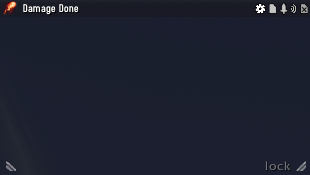
- Lock/unlock: Click the button in the lower right corner will enable or disable moving the window around on the screen.
- Resize: There are two sets of diagonal lines in the bottom corners. Clicking on these will allow you to drag the window to make it bigger or smaller. Hover over one of them to see some additional options for resizing windows.
- Group: If you have more than one window open, they can snap together to form a group. You will see a lock icon on one of them that you can use to un-group them.
- Bookmarks: Right-click inside the window to open the Bookmarks. These are shortcuts to different data that can be displayed in the window. You can add bookmarks for quickly swapping your meters.
- Stretch: Click on the little tab at the top of the window and drag it up to stretch it.
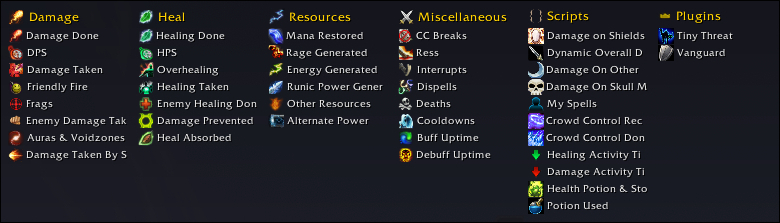
- Display: Right-click in the title bar (but not where the icons are) to see all the different types of information that you can display in the window.
Now we’ll look at the menu icons on the upper right of the window.
The Main Menu button looks like a gear. Hovering over it brings up a menu with the following options:
- Standard: This mode will only show raid or party members in your meters.
- Everything: This mode will show everything in your meters, even players not in your group.
- Plugins: This menu will let you select plugin data to show in your window, such as Tiny Threat.
- Window Control: This menu will let you close a window, create a new one, or re-open one that has been closed.
- Spell List: This option will open the Spell List page of the Details menu.
- Statistics: This option will open the Statistics page of the Details menu.
- Options Panel: This option will open the Options page of the Details menu.
The Segments button looks like a piece of paper. Hovering over it brings up a menu with the following options:
- At the top of the menu, there will be a list of individual fights that you can view in the window.
- Current Segment: Clicking this will view the current segment, which is the current or most recent fight.
- Overall Data: Clicking this will view overall data from all available segments.
- Hovering over any of these options will give you some information about the segment(s).
The Display button looks like a sword. Hovering over it brings up a menu with the same options you see when you right-click on the title bar.
There is also an option under Scripts to Manage Custom Displays. This will take you to the Scripts page of the Details menu, where you can configure custom data to display in the window.
The Report button looks like sound waves. Hovering over it will bring up a single option: Report Results. Clicking this option will bring up a box with a few options for how you would like to report the data:
- The dropdown menu at the top of the window will let you choose a channel or whisper target for your report.
- Whisper: Type an in-game name here to whisper the report to if Whisper is selected in the dropdown menu.
- Lines: How many rows from your meters will be reported, starting at the top.
- Reverse: If this button is checked, the report will be sent in reversed order, from the bottom.
The Reset button looks like a page with an X. Hovering over it brings up a menu with two options:
- Reset Overall Data: This will clear your Overall Data segment so you can start a new one without completely erasing past segments.
- Reset All Data: This will completely clear all the current data segments. You will not be able to view them at all anymore.
Details Tools
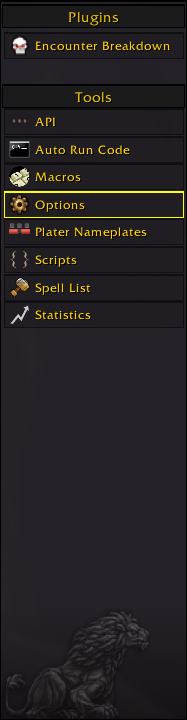
The Details menu includes several tools which have their own menu pages. You probably don’t need to worry about these if you’re not an advanced user, but just in case, let’s take a look at them:
- API: This page contains snippets of code that you probably don’t need to worry about unless you’re developing an addon.
- Auto Run Code: You can enter custom code for Details to run in this page. Choose the event that will run the code from the Event dropdown.
- Macros: This page displays a list of macro commands you can use to perform certain actions related to Details.
- Options: This page contains all of the window customization options. There’s a separate section covering this page below.
- Plater Nameplates: If you have the Plater Nameplates addon installed, Details can display real-time dps in the nameplate. Use the settings on this page to choose if and how it is displayed.
- Scripts: This page is where you can create custom displays for your windows. This requires a bit of coding.
- Spell List: This page is where you can view all of the spells you have encountered in the game since you’ve had Details installed. You can search for a spell, view its ID, and even read its tooltip.
- Statistics: This page is where you can view statistics for past boss kills with your guild.
There may also be pages listed under Plugins for other tools such as the Encounter Breakdown plugin.
Details Options Panel
Now let’s take a look at the Details Options Panel. Yes, it is very detailed, but we’ll walk you through everything! First, there are a few options that appear on every tab:
- Scale: Use this slider at the top of the window to resize the panel to your liking.
- Create Test Bars: Clicking this button at the bottom of the window will create some example bars on your Details windows so you can see how everything looks. Clicking the button once will animate the test bars, clicking again will freeze them. To clear the test bars, you’ll need to use the Reset button on the Details window.
- Version Notes: Clicking this button will bring up the version notes for the last few versions of Details.
- Search: Typing in this box will bring up the Search Results tab, which will show every setting that matches your query.
- Editing Group: When this button is checked, the settings in the Options Panel will affect all Details windows in the same group as the currently selected window.
- Editing Window: Use this dropdown menu to select a Details window to modify. Most settings in the Options Panel will only affect the window selected here.
Now we’ll go through the tabs that appear on the left side of the main panel.
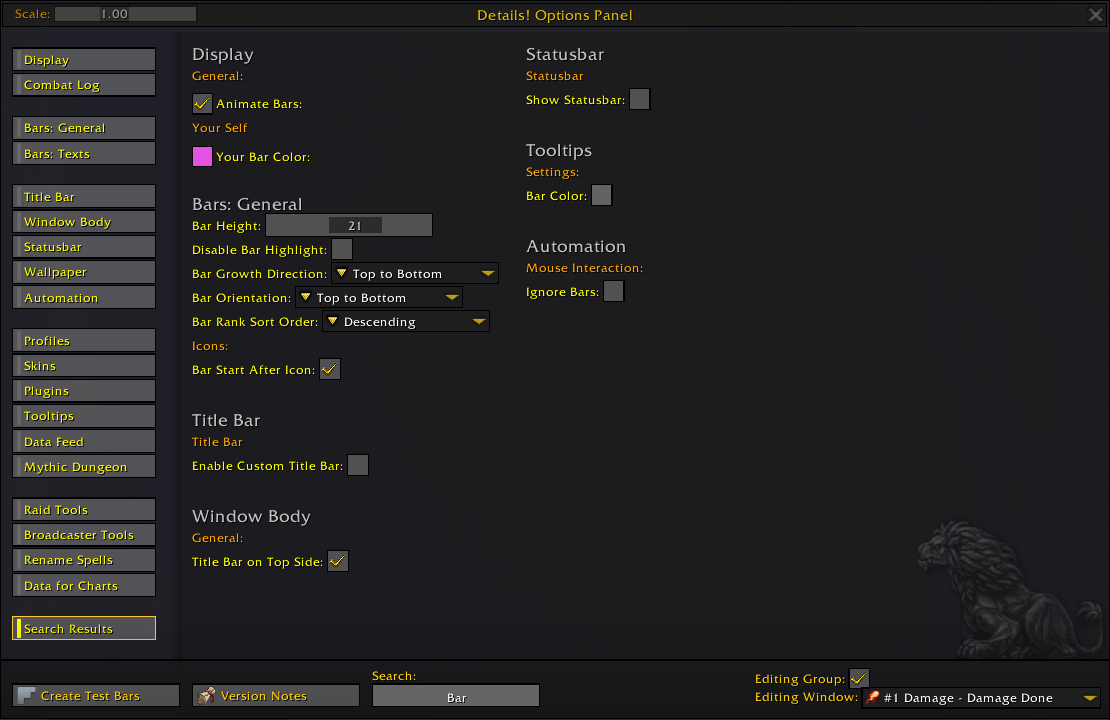
The Display tab of the Details Options Panel has various settings for controlling the general functionality of the currently selected Details window.
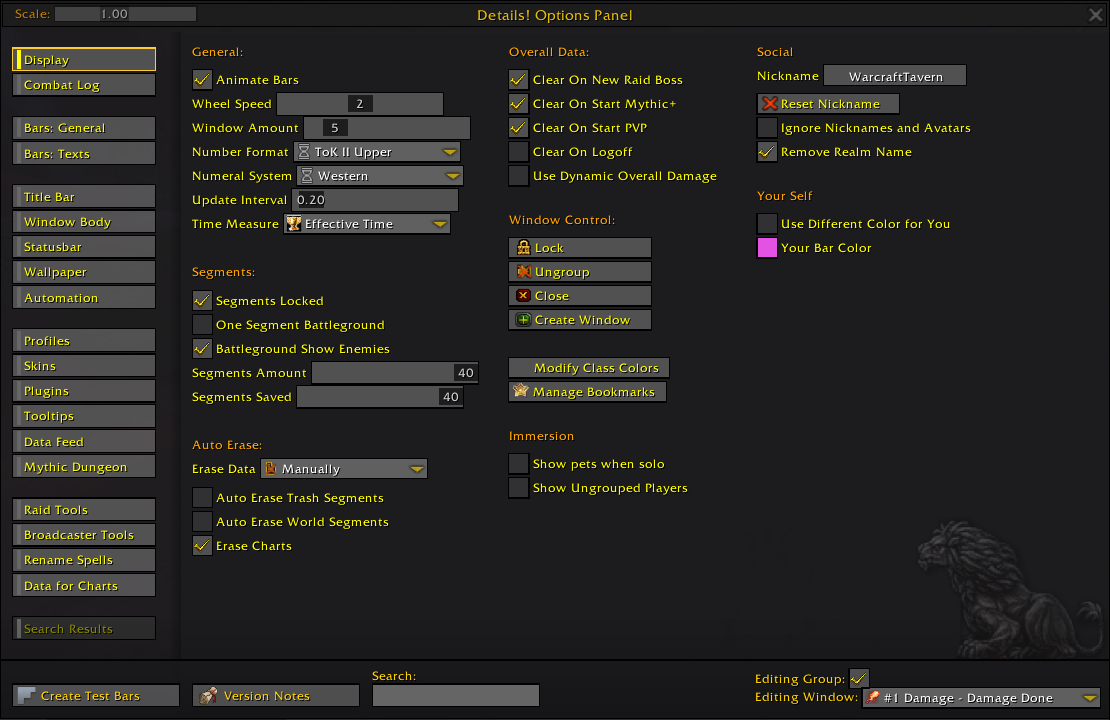
- Animate Bars: If this is checked, bars will animate to reflect the changing numbers in real time.
- Wheel Speed: This slider adjusts the speed of the scroll inside the window.
- Window Amount: This slider adjusts the maximum number of Details windows you can have open.
- Number Format: Use this dropdown menu to choose the way that numbers will be formatted. Hover over each option for an example.
- Numeral System: Use this dropdown menu to choose between Western and East Asian numerals.
- Update Interval: This slider adjusts how frequently the Details window will update.
- Time Measure: Use this dropdown menu to choose whether a raid member’s data is paused when they are inactive.
- Segments locked: If this is checked, all Details windows will reflect the same segment.
- One Segment Battleground: If this is checked, all the data from a battleground will be saved to a single segment.
- Battleground Show Enemies: If this is checked, enemy players will also be shown in the Details window.
- Segments Amount: This slider adjusts the total number of segments that can be kept during the game session.
- Segments Saved: This slider adjusts the number of segments that can be kept between different game sessions.
- Erase Data: Use this dropdown menu to choose whether data will be reset when entering a new instance.
- Auto Erase Trash Segments: If this is checked, non-boss segments will be automatically cleared.
- Auto Erase World Segments: If this is checked, outdoor world segments will be automatically cleared.
- Erase Charts: If this is checked, all chart data will be cleared when you log out.
- The first four checkboxes will clear your overall data under different circumstances if checked.
- Use Dynamic Overall Damage: If this is checked, if you have Damage Done Overall displayed in the window, it will automatically swap to Dynamic Overall Damage when you enter combat.
- Lock: Click this button to lock or unlock the currently selected Details window. Windows can only be moved when they are unlocked.
- Ungroup: Click this button to remove the currently selected window from its window group so that it can be moved independently.
- Close: Click this button to close the window. Closed windows can be reopened at any time. To permanently close a window, use the Delete option in the Window Body tab.
- Create Window: Click this button to create a new Details window.
- Modify Class Colors: Click this button to open a window in which you can select the colors associated with each class. You can also select colors to display in the death log.
- Manage Bookmarks: Click this button to open a window in which you can configure your bookmarks. Bookmarks appear when you right-click inside a Details window.
- Show pets when solo: If this is checked, your pet will appear separately in your meters when you are solo.
- Show Ungrouped Players: If this is checked, other nearby players will appear in your meters when you are not in a group.
- Nickname: Whatever you type into this text box will appear in place of your character name on all Details windows, including those of your guild members!
- Reset Nickname: Clicking this button reverts your nickname back to your character name.
- Ignore Nicknames and Avatars: Clicking this will use character names instead of the nicknames set by your guild members.
- Remove Realm Name: If this is checked, you won’t see realm names as part of character names in Details.
- You can use these options to set a unique bar color for your character to separate yourself visually in the meters.
The Combat Log tab of the Details Options Panel has settings for if and how various data will be tracked.
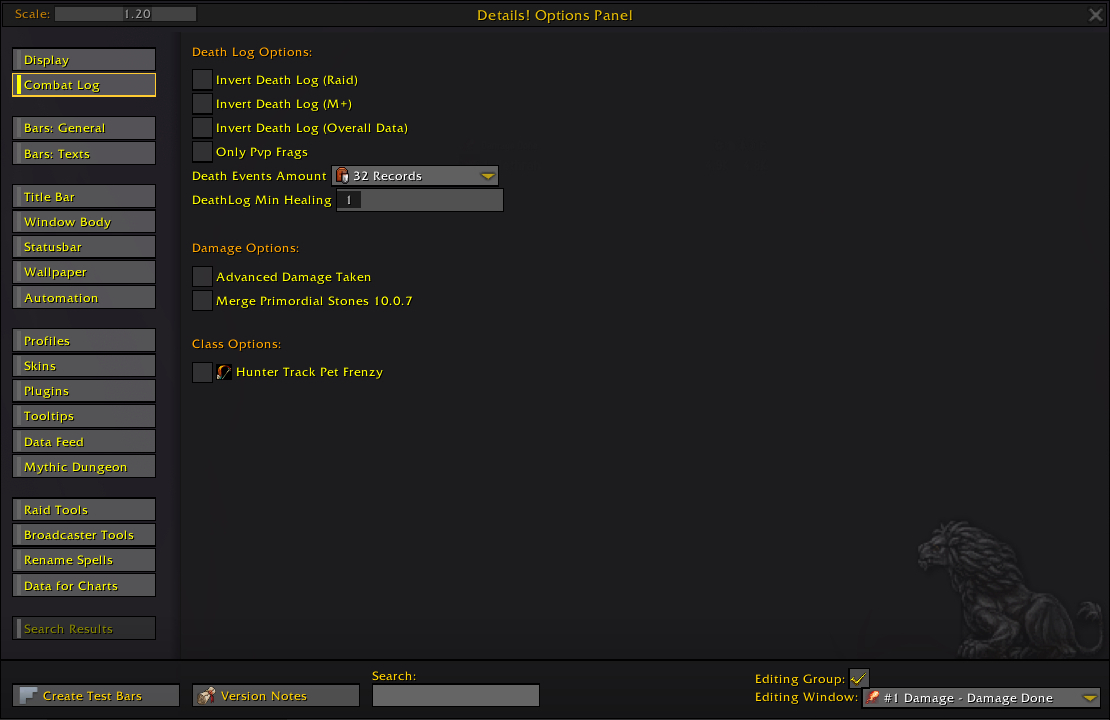
- Invert Death Log (Raid): If this is checked, the Death Log will be listed in reverse order when you are in a raid.
- Invert Death Log (M+): If this is checked, the Death Log will be listed in reverse order when you are in a Mythic+ dungeon.
- Invert Death Log (Overall Data): If this is checked, the Death Log will be listed in reverse order when you are viewing overall data.
- Only Pvp Frags: If this is checked, the Frags display will only show kills against enemy players.
- Death Events Amount: Use this dropdown menu to determine the number of death records that will appear in the Death Log.
- DeathLog Min Healing: Use this slider to set a threshold below which heals will not appear in the Death Log. Use the plus and minus buttons to fine-tine or right-click in the bar to manually enter a value.
- Advanced Damage Taken: If this is checked, the Damage Taken display will always use Everything mode rather than Standard mode. This means that units outside of your current group will be included.
- Merge Primordial Stones 10.0.7: If this is checked, data for Primordial Stones will be combined rather than listed individually.
- Hunter Track Pet Frenzy: If this is checked, your pet’s Frenzy buff will be tracked as part of your hunter’s data.
The Bars: General tab of the Details Options Panel has settings for controlling how your bars look, aside from their text.
- Bar Height: Use this slider to adjust the size of the bars in your Details window.
- Spacing: Use this slider to adjust the distance between each bar.
- Disable Bar Highlight: If this is checked, hovering over a bar won’t make it brighter.
- Fast Updates: If this is checked, data is updated slightly faster.
- Always Show Me: If this is checked, your own bar will always be visible, even if it should be ranked below the visible area.
- Bar Growth Direction: Use this dropdown menu to choose the direction the bars will start from.
- Bar Orientation: Use this dropdown menu to choose the direction the bars will fill in.
- Bar Rank Sort Order: Use this dropdown menu to choose the whether bars will sort from highest or lowest ranking.
- Texture: Use this dropdown to select the texture used for the bars.
- Custom Texture File: You can type a file name into this text box to load a custom texture for the bars.
- Remove Custom Texture: Clicking this button will remove a custom texture and use the one from the Texture dropdown instead.
- Color: Click this button to set the color and transparency of the bars.
- Color by Player Class: If this is checked, your bars will be colored by the character’s class instead of using the color selected above.
- Texture: Use this dropdown menu to select a texture that will overlay each of the bars.
- Color: Click this button to choose a color and transparency for the bar overlay.
- Texture: Use this dropdown menu to select a texture to appear behind each bar.
- Color: Click this button to set the color and transparency of the background.
- Color by Player Class: If this is checked, your bar background will be colored by the character’s class instead of using the color selected above.
- Texture: Use this dropdown menu to select the icon set to use for the specialization icon next to the bars.
- Custom Texture File: You can type a file name into this text box to load a custom texture for the icons.
- Bar Start After Icon: If this is checked, the bar’s edge will line up with the other side of the icon so they don’t overlap.
- Icon Size Offset: Use this slider to adjust the size of the icons.
- Show Faction Icon: If this is checked, characters from the opposite faction will appear with their faction icon instead of their specialization icon.
- Faction Icon Size Offset: Use this slider to adjust the size of the faction icons.
- Show Arena Role Icon: If this is checked, characters encountered in an arena will appear with their role icon instead of their specialization icon.
- Arena Role Icon Size Offset: Use this slider to adjust the size of the arena icons.
- Enabled: If this is checked, bar text will appear in vertical columns instead of all together.
- Auto Alignment: If this is checked, text will align automatically based on its length.
- Unit Name Size Offset: Use this slider to adjust the offset of the name on the bars.
- Text Offset 1/2/3: Use these sliders to adjust the offset of the number texts.
- Enabled: If this is checked, an extra bar will appear in the window reflecting the total of all the other bars.
- Only in Group: If this is checked, the total bar will not show up when you are solo.
- Color: Click this button to select the color and transparency of the total bar.
- There are two Color options here, one for each arena team. Clicking either button will allow you to select the color and transparency of their bars.
- Enabled: If this is checked, borders will appear around each bar row.
- Color: Click this button to select a color and transparency for the bar border.
- Size: Use this slider to adjust the size of the bar border.
- Color by Player Class: If this is checked, your bar border will be colored by the character’s class instead of using the color selected above.
The Bars: Texts tab of the Details Options Panel has settings for controlling how text appears on your bars.
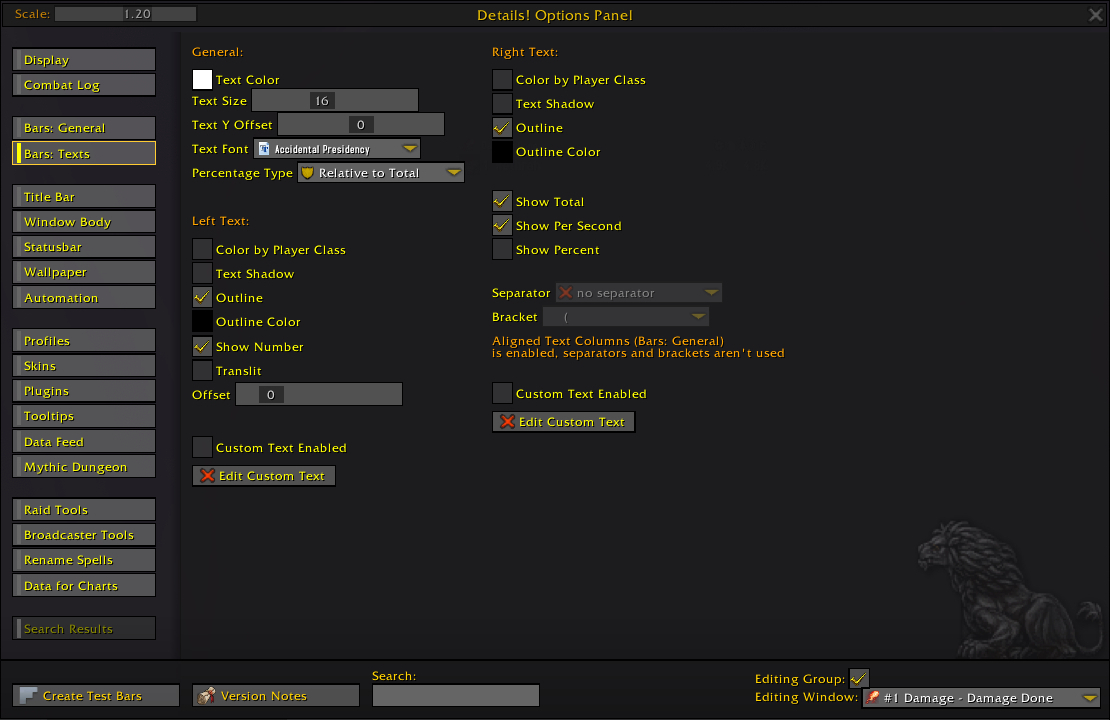
- Text Color: Click this button to select the color and transparency of all bar text.
- Text Size: Use this slider to adjust the size of all bar text.
- Text Y Offset: Use this slider to adjust the vertical offset for all bar text.
- Text Font: Use this dropdown menu to select a font for all bar text.
- Percentage Type: Use this dropdown menu to choose whether percentages will be displayed relative to the total or relative to the top unit.
- Color by Player Class: If this is selected, the text on the left side will be colored by the character’s class.
- Text Shadow: If this is selected, the text on the left side will have a shadow effect.
- Outline: If this is selected, the text on the left side will have an outline.
- Outline Color: Click this button to select the color and transparency of the text outline.
- Show Number: If this is checked, each bar will show its rank number.
- Translit: If this is checked, non-Western characters will be translated to Western ones.
- Offset: Use this slider to adjust the positioning of the left side text.
- Custom Text Enabled: If this is checked, the left side text will display the custom text you choose with the button below.
- Edit Custom Text: Clicking this button will bring up a text editor where you can type custom text to display.
- Color by Player Class: If this is selected, the text on the right side will be colored by the character’s class.
- Text Shadow: If this is selected, the text on the right side will have a shadow effect.
- Outline: If this is selected, the text on the right side will have an outline.
- Outline Color: Click this button to select the color and transparency of the text outline.
- Show Total: If this is checked, each bar will show the total data for the unit.
- Show Per Second: If this is checked, each bar will show the per-second data for the unit.
- Show Percent: If this is checked, each bar will show the percentage data for the unit.
- Separator: Use this dropdown menu to select a text character to separate the per second and percent data. This only applies if Align Text Columns is disabled in the Bars: General tab.
- Bracket: Use this dropdown menu to select the text characters to enclose the per second and percent data. This only applies if Align Text Columns is disabled in the Bars: General tab.
- Custom Text Enabled: If this is checked, the right side text will display the custom text you choose with the button below.
- Edit Custom Text: Clicking this button will bring up a text editor where you can type custom text to display.
The Title Bar tab of the Details Options Panel has settings to customize the title bar that appears at the top of the Details window by default.
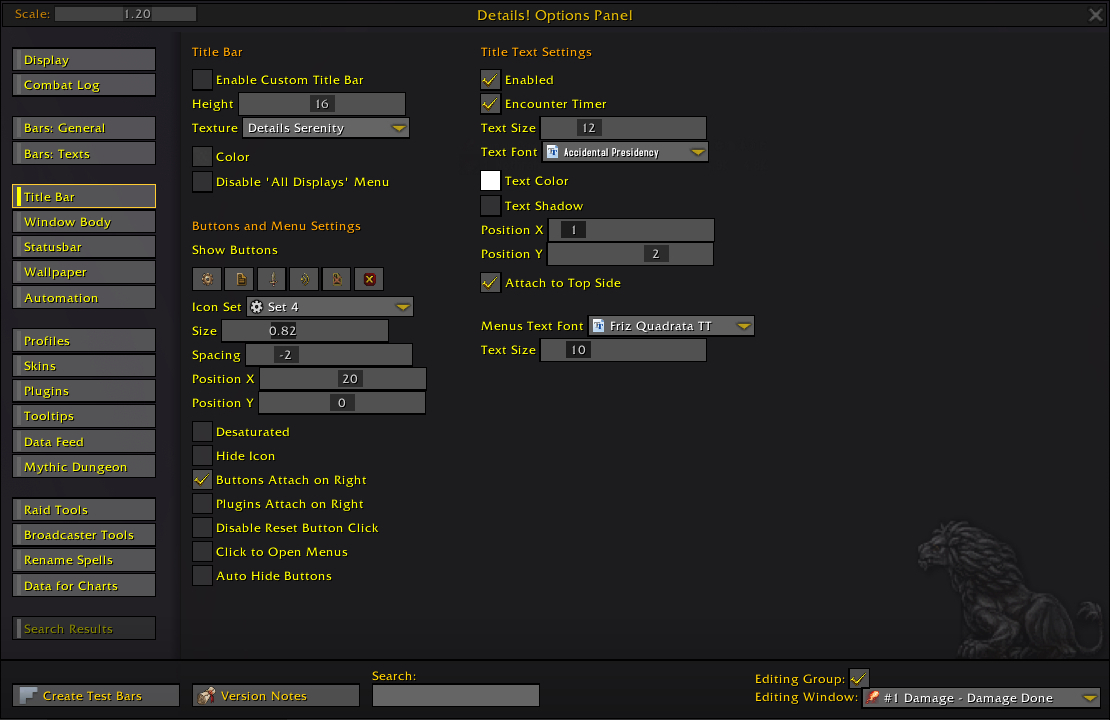
- Enable Custom Title Bar: If this is checked, the title bar will use the custom settings from this section instead of those defined by the current skin.
- Height: Use this slider to adjust the height of the title bar.
- Texture: Use this dropdown menu to select the background texture for the title bar.
- Color: Use this button to select the color and transparency for the title bar.
- Disable ‘All Displays’ Menu: If this is checked, you will see your Bookmarks instead of the All Displays menu when you right-click the title bar.
- Show Buttons: Click on any of these menu buttons to enable or disable it on the Details window.
- Icon Set: Use this dropdown menu to choose the icon set that will be used for the menu buttons.
- Size: Use this slider to adjust the size of the menu buttons.
- Spacing: Use this slider to adjust the spacing of the menu buttons.
- Position X/Position Y: Use these sliders to adjust the positioning of the menu buttons.
- Desaturated: If this is checked, the menu buttons will appear in grayscale.
- Hide Icon: If this is checked, the title bar will not show the icon associated with the selected display data.
- Buttons Attach on Right: If this is checked, the menu buttons will appear on the right side of the title bar.
- Plugins Attach on Right: If this is checked, any plugin buttons will appear on the right side of the title bar.
- Disable Reset Button Click: If this is checked, the Reset menu button won’t reset the data, you will have to select an option from its menu instead.
- Click to Open Menus: If this is checked, you will have to click on the menu buttons to open the menus instead of just hovering over them.
- Auto Hide Buttons: If this is checked, the menu buttons will automatically hide when the mouse is not over the Details window.
- Enabled: If this is checked, the current display title will appear as text in the title bar.
- Encounter Timer: If this is checked, a stopwatch will appear to the left of the title text.
- Text Size: Use this slider to adjust the size of the title text.
- Text Font: Use this dropdown menu to select a font for the title text.
- Text Color: Click this button to select the color and transparency for the title text.
- Text Shadow: If this is checked, a shadow will appear around the title text.
- Position X/Position Y: Use these sliders to adjust the position of the title text.
- Attach to Top Side: If this is checked, the title text will anchor to the top of the title bar.
- Menus Text Font: Use this dropdown menu to select the font for the window menus.
- Text Size: Use this slider to adjust the size of the window menu text.
The Window Body tab of the Details Options Panel has settings for modifying the appearance of the Details window.
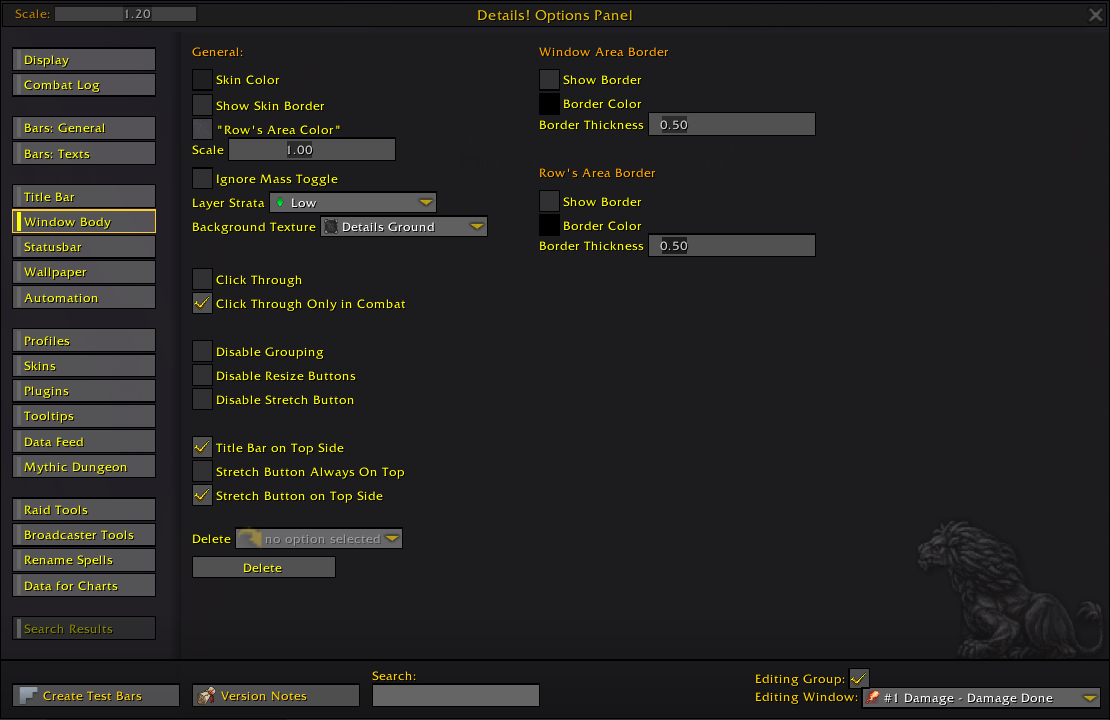
- Skin Color: Click this button to select the color and transparency of the selected Details window.
- Show Skin Border: If this is checked, a border will appear around the window.
- “Row’s Area Color”: Click this button to select the color and transparency of the background when the rows appear.
- Scale: Use this slider to adjust the size of the window.
- Ignore Mass Toggle: If this is checked, this window will not toggle when all windows are shown or hidden.
- Layer Strata: Use this dropdown menu to select the layer the Detail windows will appear in the interface. Lower options will move it behind other interface elements while higher options will bring it to the front.
- Background Texture: Use this dropdown menu to select the texture for the window background.
- Click Through/Click Through Only in Combat: Use these checkboxes to decide if you will be able to click through the window in or out of combat.
- Disable Grouping: If this is checked, windows that are placed next to each other won’t snap together to form groups.
- Disable Resize Buttons/Disable Stretch Button: These checkboxes will disable the buttons that allow you to stretch and resize the window.
- Title Bar on Top Side: If this is checked, the title bar will appear at the top of the window. Otherwise it appears at the bottom.
- Stretch Button Always On Top: If this is checked, the stretch button will always be on the top level of the interface, above other elements.
- Stretch Button on Top Side: If this is checked, the stretch button will be attached to the top of the window. Otherwise it appears at the bottom.
- Delete: Use this dropdown menu to select a window to permanently close. Click the Delete button to close it.
- Show Border: If this is checked, the window border will be shown.
- Border Color: Use this button to select the color and transparency of the window border.
- Border Thickness: Use this slider to select the size of the window border.
- Show Border: If this is checked, the row border will be shown.
- Border Color: Use this button to select the color and transparency of the row border.
- Border Thickness: Use this slider to select the size of the row border.
The Statusbar tab of the Details Options Panel has settings for the statusbar that can appear at the bottom of the window.
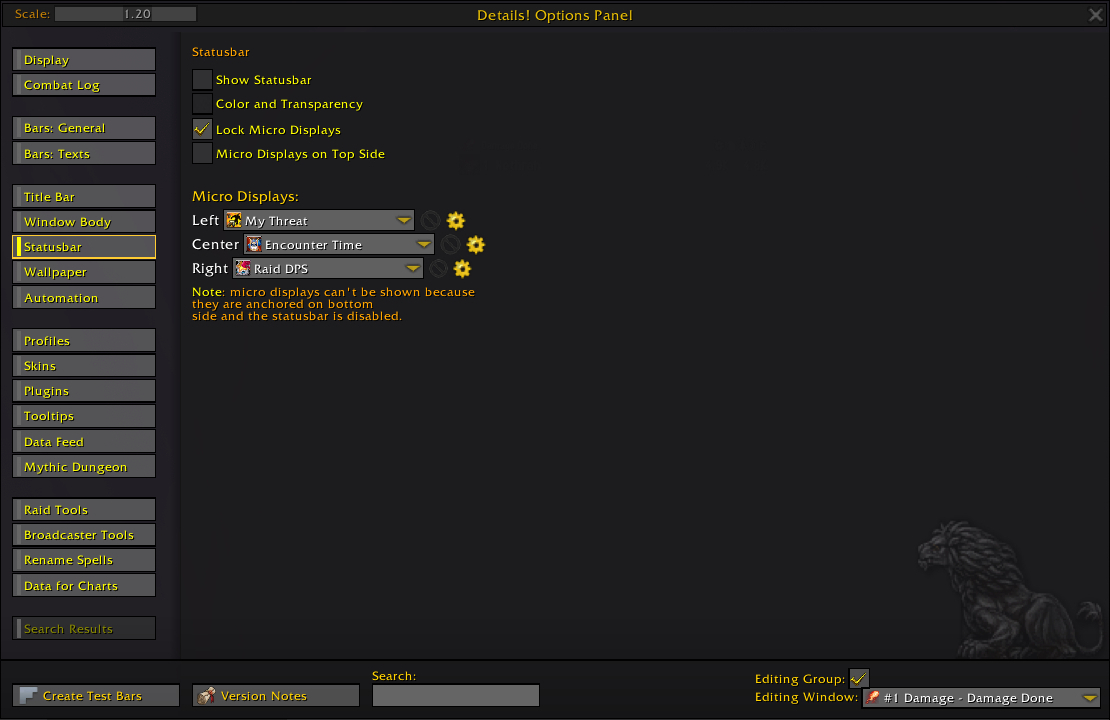
- Show Statusbar: If this is checked, the statusbar will be shown at the bottom of the window.
- Color and Transparency: Use this button to select the color and transparency of the statusbar.
- Lock Micro Displays: If this is checked, you won’t be able to interact with the status bar by clicking it.
- Micro Displays on Top Side: If this is checked, the statusbar will move to the top of the window. Otherwise it appears at the bottom.
- Use the dropdown menus to select the information that will display in each area of the statusbar.
- Click the circle with the line through it to hide or show each micro display.
- Click the gear icon to select each micro display’s font and alignment.
The Wallpaper tab of the Details Options Panel is where you can select and align a wallpaper background for the window.
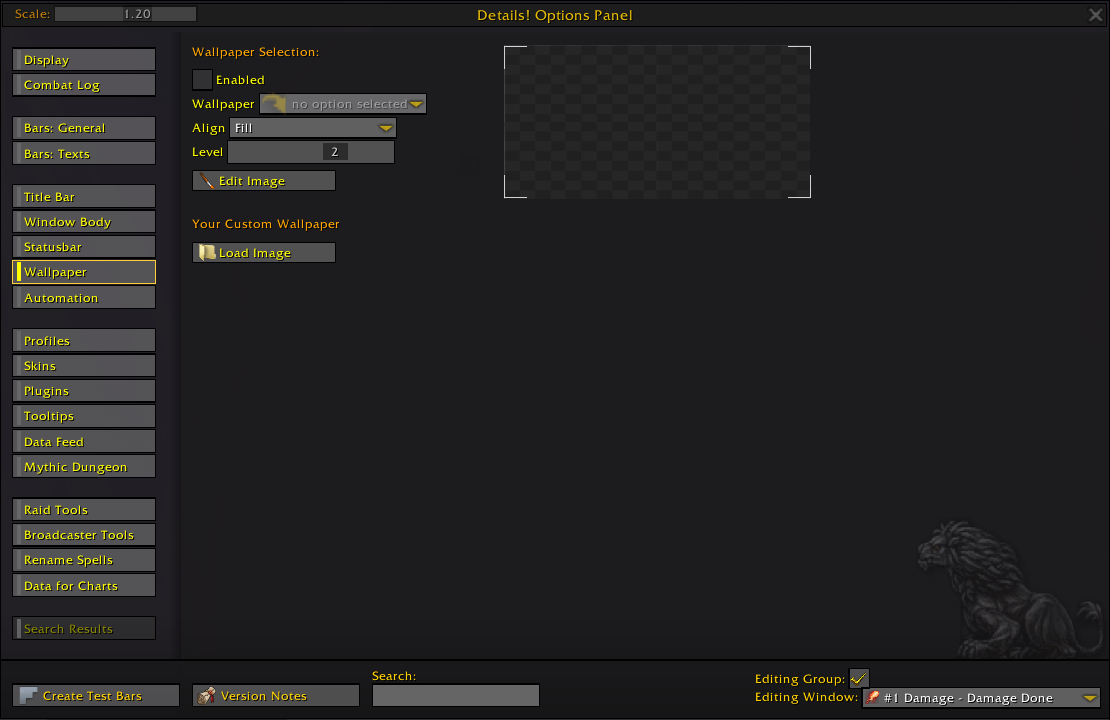
- Enabled: If this is checked, the selected wallpaper will be used as the background for the window.
- Wallpaper: Use this dropdown menu to select a pre-installed background for the window.
- Align: Use this dropdown menu to select how the wallpaper will line up inside the window.
- Level: Use this slider to adjust the interface layer of the wallpaper.
- Edit Image: Use this button to open an image editor where you can crop, recolor, and flip the selected wallpaper.
- Load Image: Use this button to select a custom file to use as the background image for the window.
The Automation tab of the Details Options Panel has settings for automatically switching, hiding, and showing content in the Details window.
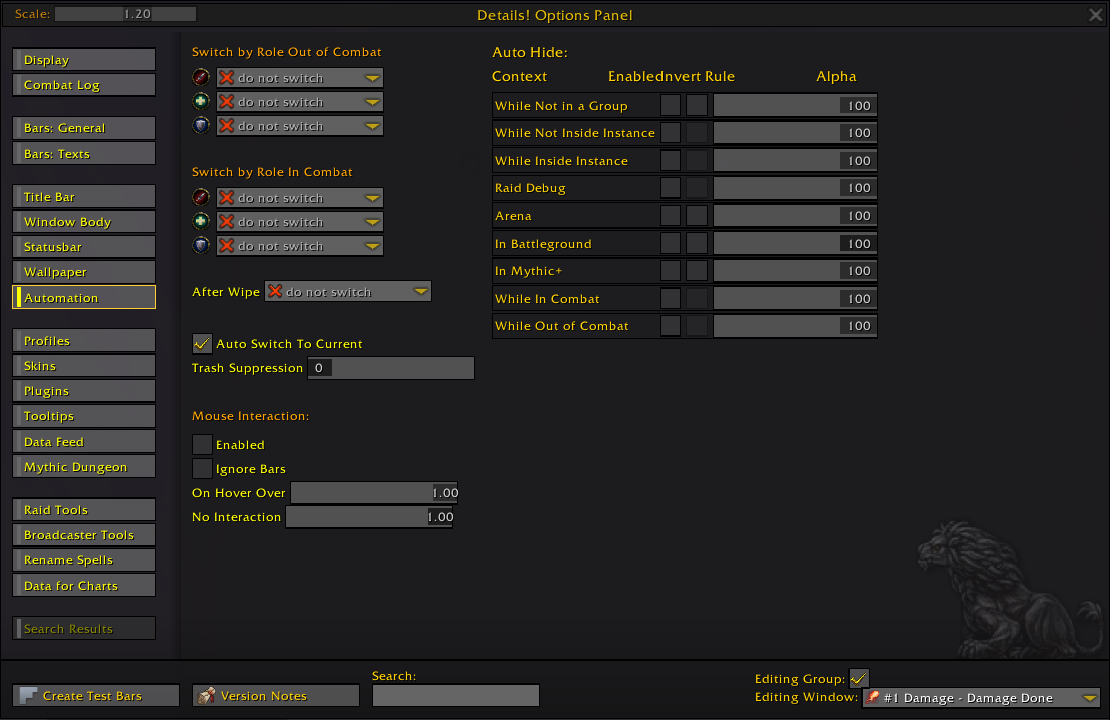
- Use the dropdown menus to select the display to show for each role when you are in or out of combat or after a wipe.
- Auto Switch to Current: If this is checked, the window will switch to the current data segment whenever you enter combat.
- Trash Suppression: Use this slider to prevent auto switching on trash for the given number of seconds after a boss encounter.
- Enabled: If this is checked, you will be able to interact with the window using your mouse.
- Ignore Bars: If this is checked, bars won’t be affected by mouse interaction.
- On Hover Over: Use this slider to adjust the transparency level of the window when you hover over it.
- No Interaction: Use this slider to adjust the transparency of the window when your mouse is not over it.
- Use the Enabled checkboxes to enable automatically hiding the window under various conditions.
- Use the Invert checkboxes to enable showing the window only under the enabled conditions.
- Use the Alpha sliders to adjust the transparency of the window under the given condition (set to 0 to hide completely).
The Profiles tab of the Details Options Panel is where you can import and export profiles to save or copy them.

- Current Profile: Displays the currently selected profile.
- Select Profile: Use this dropdown menu to select a different profile to apply.
- Save Size and Position: If this is checked, the window size and positioning will be saved with the profile.
- Create Profile: Type a name into the text box and click the Create Profile button to make a new profile based on the current one.
- Remove Profile: Use the dropdown menu to select a profile you want to delete and click Remove Profile to delete it.
- Export Profile: Use this button to get a long text string that you can copy and paste to save or share.
- Import Profile: Use this button to open a window where you can paste an exported text string to load a profile.
- Use On All Characters: If this is checked, you will use this profile on all of your characters by default (unless they have another profile selected).
- Select Profile: Use this dropdown menu to select the profile that will be used for all characters by default.
The Skins tab of the Details Options Panel is where you can select and save skins to modify the appearance of the Details window.
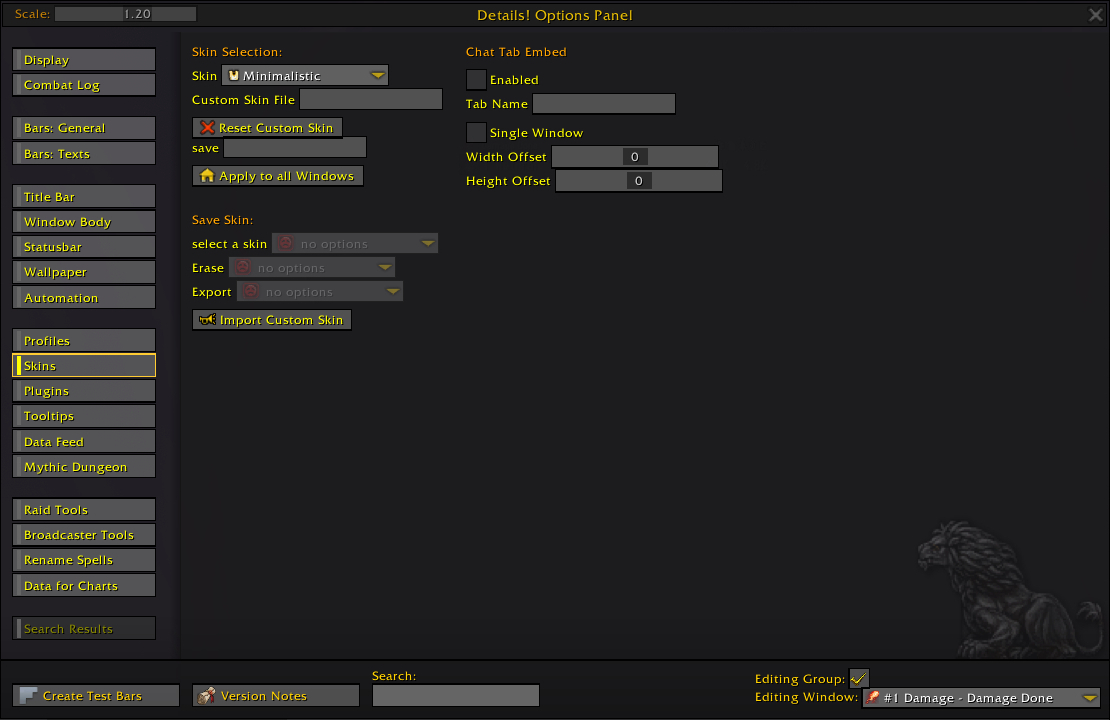
- Skin: Use this dropdown to select an existing skin to apply to the Details window. Details comes with several skins pre-installed.
- Custom Skin File: Type a file name into this text box to use as a custom skin.
- Reset Custom Skin: Clicking this button will clear the custom skin and use the currently selected skin from the dropdown menu above it.
- save: Type a name here to create a new skin based on the current one.
- Apply to all Windows: Click this button to apply the currently selected skin to all Details windows.
- select a skin: Use this dropdown menu to select a skin. This list only includes skins you’ve imported or saved, not pre-installed skins.
- Erase: Use this dropdown menu to delete a skin you have saved.
- Export: Use this dropdown menu to export a skin you have saved as a text string so you can save or share it.
- Import Custom Skin: Click this button to bring up a text area where you can paste an exported skin string to import it.
- Enabled: If this is checked, the Details window will be moved into the chat tab you enter below.
- Tab Name: Type the name of the chat tab you would like to embed your Details window into in this text box.
- Single Window: If this is checked, only one Details window will be embedded. Otherwise two will appear in the same chat tab (if at least two windows are open).
- Width Offset/Height Offset: Use these sliders to adjust the size of the Details window inside the chat tab.
The Plugins tab of the Details Options Panel has a list of all of your currently installed plugins for Details and options for customizing them. Details comes with a few plugins installed by default, and others can be found on CurseForge.
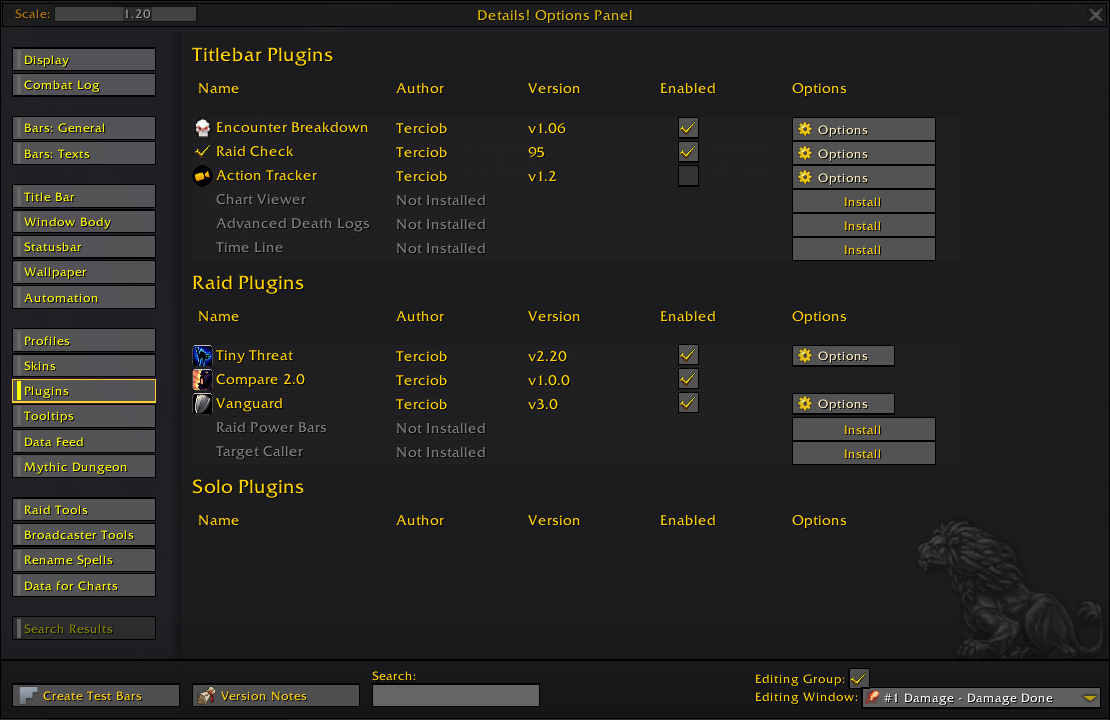
- Name: The name of the plugin.
- Author: The name of the author of the plugin.
- Version: The version number for the plugin.
- Enabled: If this is checked, the plugin is currently active in your game.
- Options: Click this button to configure the plugin. If the plugin is not installed, you will see an Install button in its place which will give you a link to download it from.
The Tooltips tab of the Details Options Panel is where you can modify the tooltips that appear when you hover over the Details window.

- Text Shadow: If this is checked, a shadowy outline will appear around the text in the Details tooltip.
- Text Size: Use this slider to adjust the size of the text in the Details tooltip.
- Text Font: Use this dropdown menu to select a font for the Details tooltip.
- Text Color: Click these buttons to select the color and transparency of the left side, right side, and header of the Details tooltip.
- Bar Color/Background Color/Divisor Color: Click these buttons to select the color and transparency of the bars, background, and dividers in the Details tooltip.
- Show Amount: If this is checked, you will see a number at the top of the Details tooltip indicating how many items are listed.
- Number Format: Use this dropdown menu to select the format of the number that appears when Show Amount is checked.
- Maximize Method: Use this dropdown menu to decide if the tooltip will always be maximized or if certain blocks will only be shown when Shift, Ctrl, and/or Alt is pressed.
- Anchor: Use this dropdown menu to choose whether the Details tooltip will originate on the bar you are hovering over or at a certain point on the screen.
- Move Anchor Point: If you chose Point on Screen from the dropdown menu above, click this button to move the tooltip anchor around on the screen.
- Tooltip Side: Use this dropdown menu to select which side of the tooltip will attach to the anchor.
- Anchor Side: Use this dropdown menu to select which side of the anchor the tooltip will appear on.
- Distance X/Distance Y: Use these sliders to adjust the spacing of the tooltip from the anchor.
The Data Feed tab of the Details Options Panel has settings for how data is displayed and reported in Details.
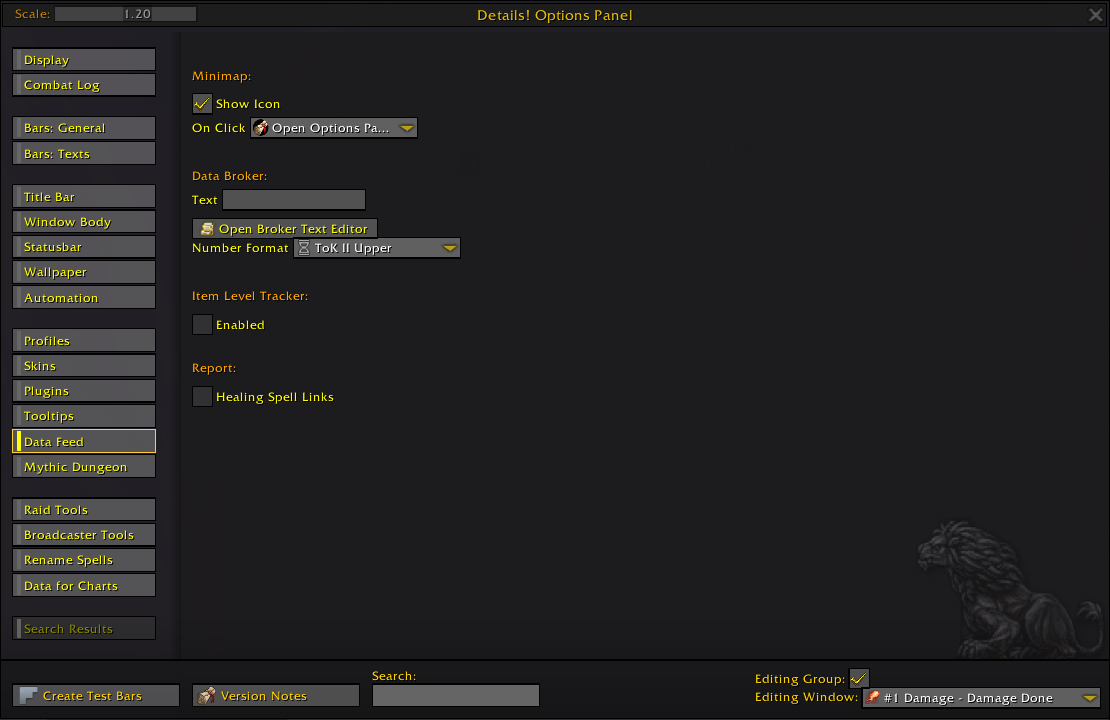
- Show Icon: If this is checked, the Details button will appear on your minimap.
- On Click: Use this dropdown menu to determine what the Details minimap button does when left-clicked.
- Text: Text entered here will appear in the Details data text that can be used by other addons. Hover over the text box for codes you can use.
- Open Broker Text Editor: Click this button to open a text editor for the data broker.
- Number Format: Use this dropdown menu to format the data broker text.
- Enabled: If this is checked, Details will track the item level of players in your group when you are out of combat.
- Healing Spell Links: If this is checked, helpful spells will have links instead of just names in your chat reports.
The Mythic Dungeon tab of the Details Options panel has a few options for how the Details window will handle data when you are in a mythic dungeon.
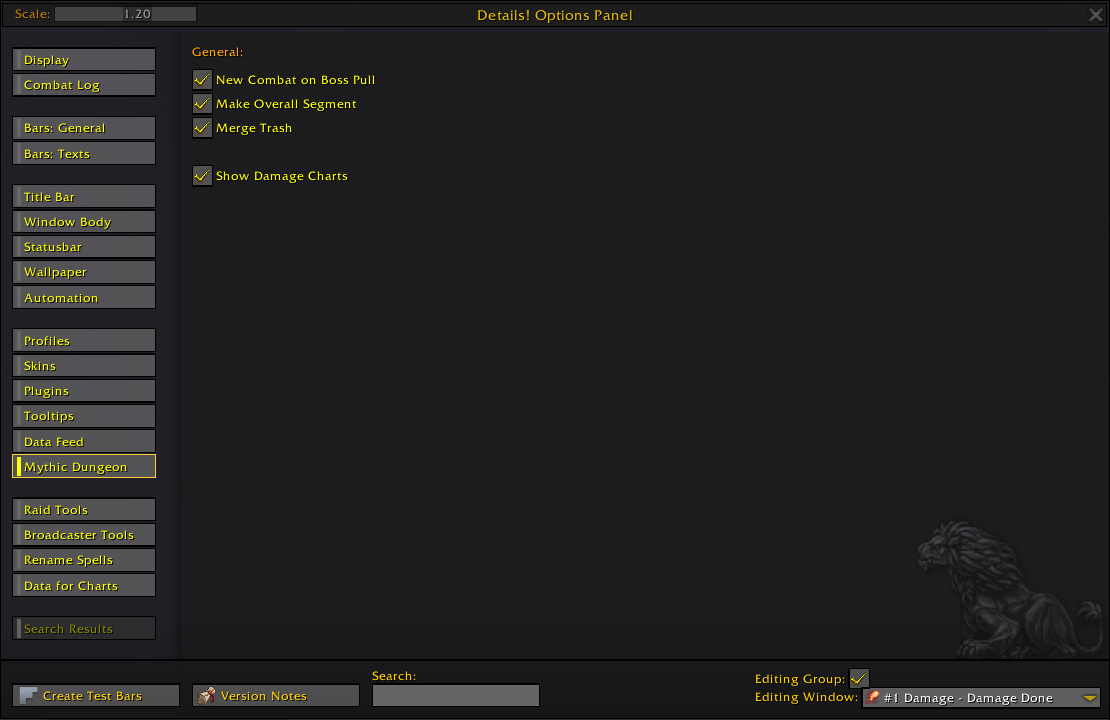
- New Combat on Boss Pull: If this is checked, Details will start a new combat segment when a boss is pulled, even if you were already in combat.
- Make Overall Segment: If this is checked, Details will make an overall segment from the mythic dungeon data when the dungeon is done.
- Merge Trash: If this is checked, trash will be merged rather than divided into separate segments.
- Show Damage Charts: If this is checked, Details will show you a damage chart at the end of the dungeon.
The Raid Tools tab of the Details Options Panel has settings for announcing deaths, cooldowns, and interrupts as well as modifying the death recap window.
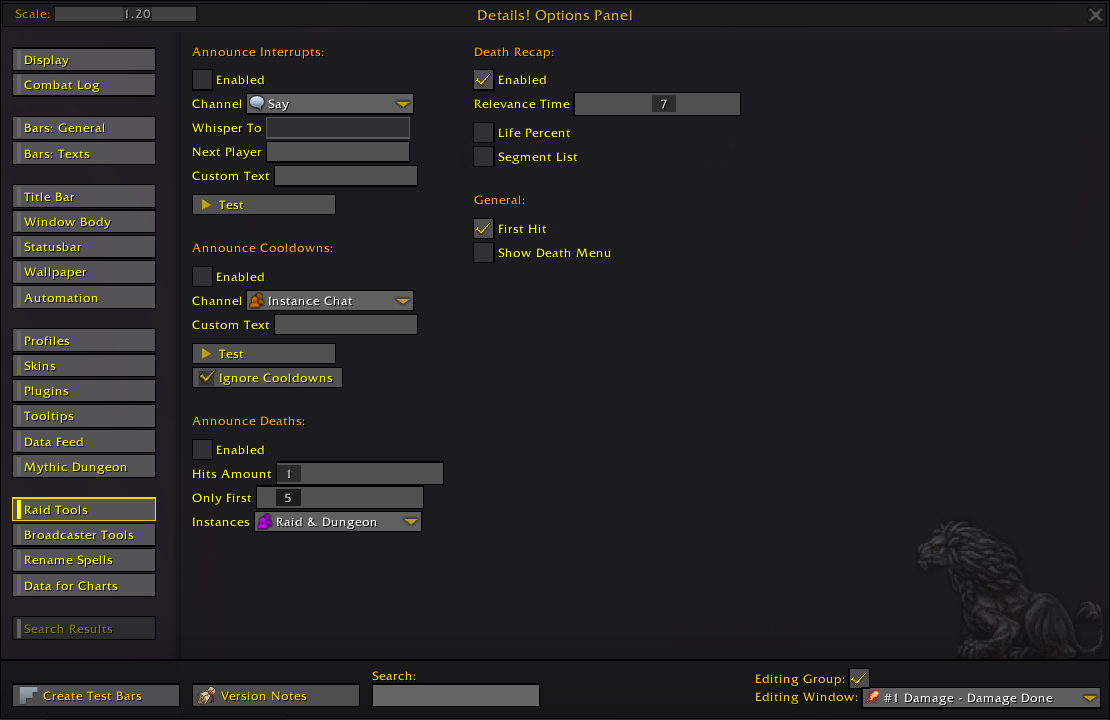
- Enabled: If this is checked, your successful interrupts will send a message to the chat channel selected below.
- Channel: Use this dropdown menu to select the chat channel that your interrupts will announce to.
- Whisper To: Use this text box to enter a name if Whisper is selected in the dropdown menu above.
- Next Player: Use this text box to enter the name of the next player in an interrupt sequence.
- Custom Text: Use this text box to customize the interrupt announcement text.
- Test: Click this button to test your interrupt announcement. A message will be sent to the appropriate channel as if an interrupt had been cast.
- Enabled: If this is checked, you will send a message to the chat channel selected below when you use a cooldown.
- Channel: Use this dropdown menu to select the chat channel that your cooldowns will announce to.
- Custom Text: Use this text box to customize the cooldown announcement text.
- Test: Click this button to test your cooldown announcement. A message will be sent to the appropriate channel as if a cooldown had been used.
- Ignore Cooldowns: Click this button to select cooldowns that should not be announced.
- Enabled: If this is checked, you will send a message to the chat channel selected below announcing player deaths and what killed them.
- Hits Amount: Use this slider to adjust how many hits will be included in the death announcement.
- Only First: Use this slider to adjust how many deaths will be announced before the messages stop sending during a single encounter.
- Instances: Use this dropdown menu to select the channel that deaths are reported to.
- Enabled: If this is checked, Details will modify the default Death Recap screen.
- Relevance Time: Use this slider to adjust the time before the death that is considered relevant for the death recap.
- Life Percent: If this is checked, the death recap will show the percent of health the player had when each hit was taken.
- Segment List: If this is checked, the death recap will also list previous segments.
- First Hit: If this is checked, Details will name who made the first hit and most likely started the fight in your chat panel.
- Show Death Menu: If this is checked, you will see a panel below the Release/Death Recap window with some shortcuts to Details data.
The Broadcaster Tools tab of the Details Options Panel has a few optional tools that can be especially useful if you are streaming or recording your gameplay for others to watch.
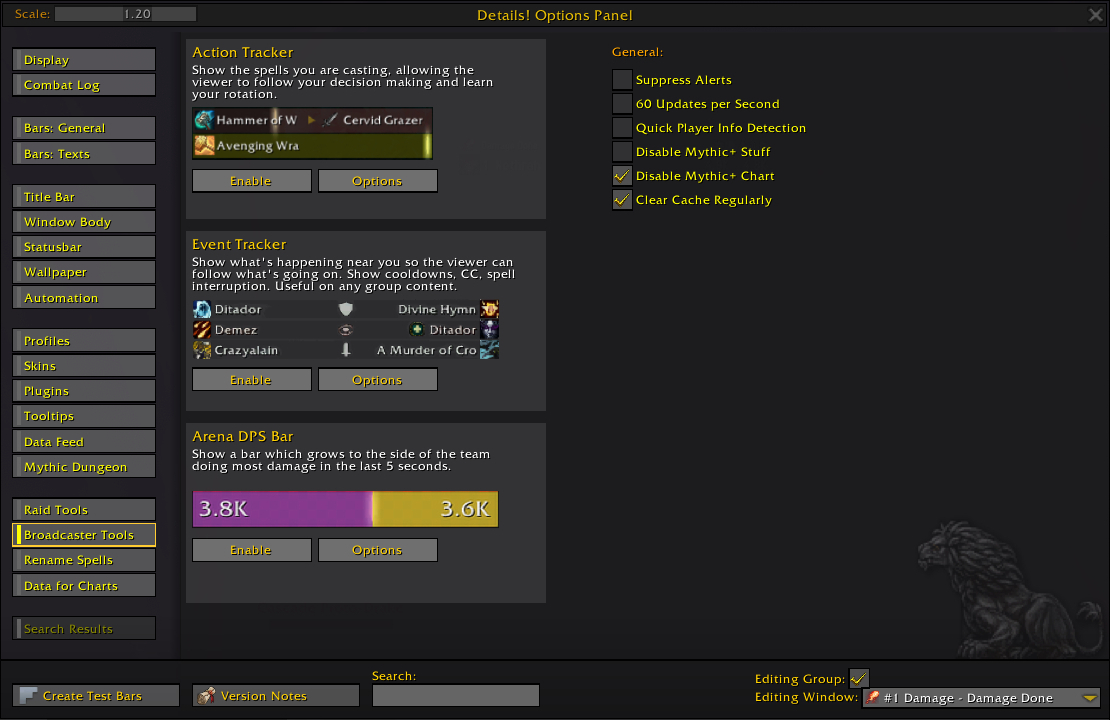
- Enable: Click this button to open a special Details window that will track your spells as you cast them along with their targets. Click Disable to close it.
- Options: Click this button to adjust the settings for the Action Tracker.
- Enable: Click this button to enable a special Details window that lists spells that are cast nearby and who their targets are. Click Disable to close it.
- Options: Click this button to configure the Event Tracker, including what types of spells are tracked.
- Enable: Click this button to show a large bar ony your screen that reflects the damage each side is dealing in an arena match. Click Disable to hide it.
- Options: Click this button to configure the Arena DPS Bar.
- Suppress Alerts: If this is checked, Details alerts will be hidden.
- 60 Updates per Second: If this is checked, Details will update a lot faster.
- Quick Player Info Detection: If this is checked, player info will be updated a lot faster in Details.
- Clear Cache Regularly: If this is checked, Details will clear its cache more frequently.
The Rename Spells tab of the Details Options Panel is where you can change the names of spells as they are shown in Details windows.
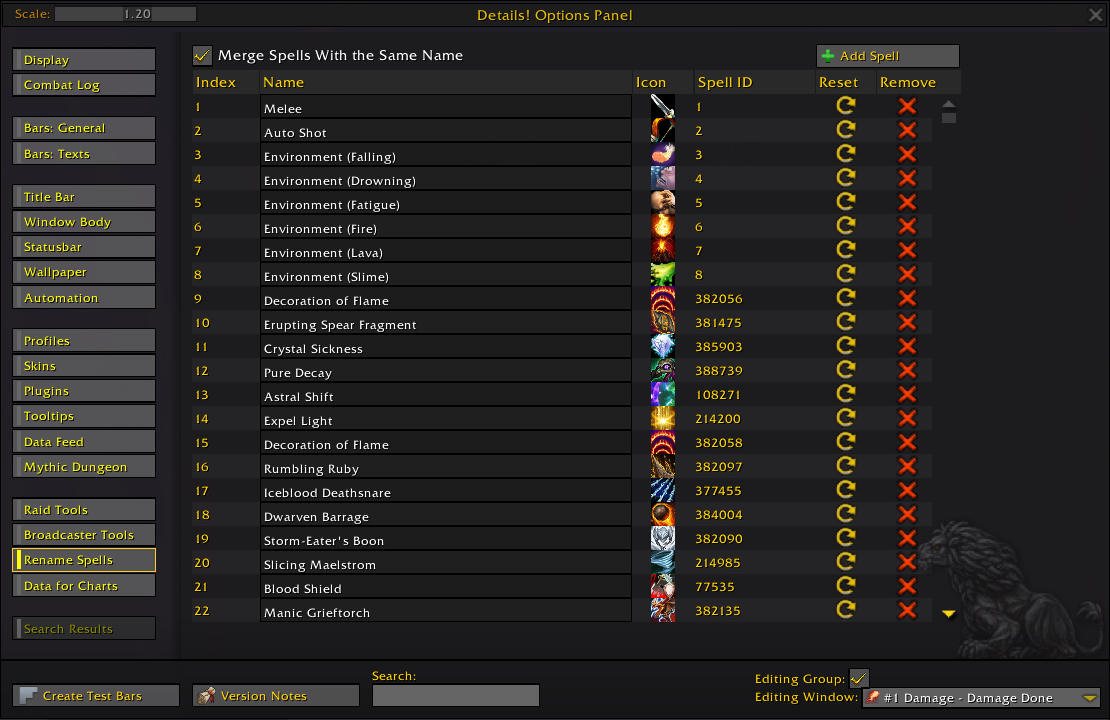
- Index: An arbitrary numbering of spells in the order they are listed in this panel.
- Name: The name of the spell. Click in this area to edit the text.
- Icon: The icon that is associated with the spell. Click to select a different one.
- Spell ID: The ID number for the spell in the game.
- Reset: Click this button to revert your edits to the spell’s name and icon.
- Remove: Click this button to remove the spell from the list.
The Data for Charts tab of the Details Options Panel is where you can configure data sets for use in charts.
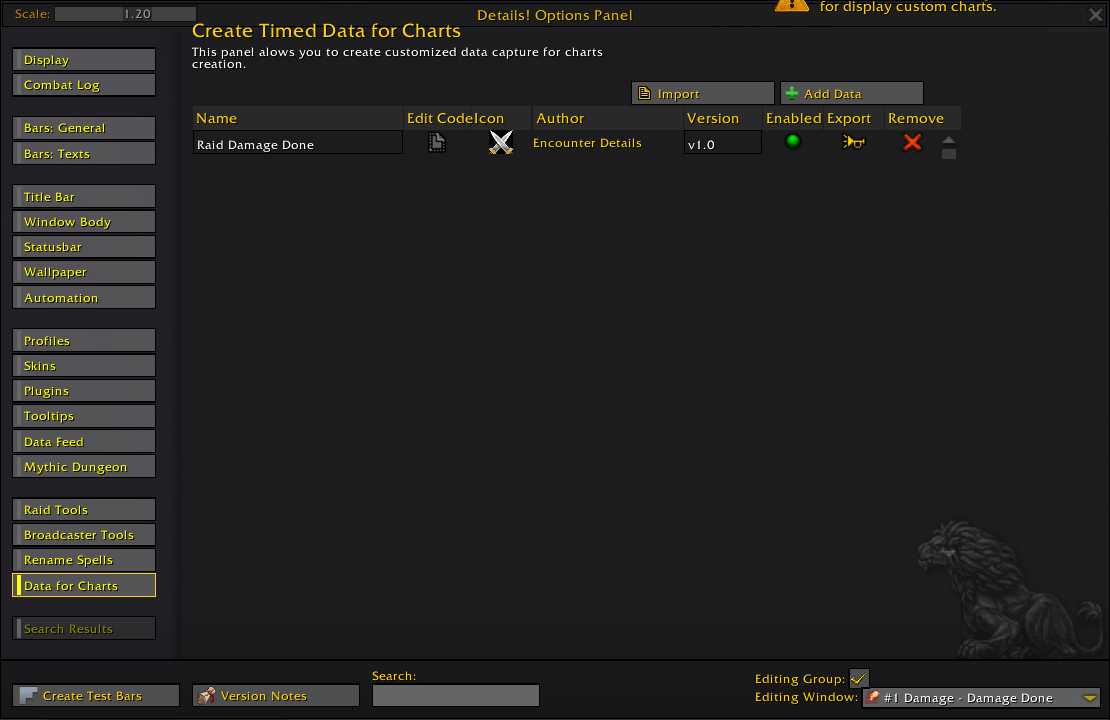
- Import: Click this button to bring up a window where you can enter chart data to import.
- Add Data: Click this button to bring up a window where you can create a new set of chart data.
- Name: The name of the data set that can be used by charts. Click in this area to edit the text.
- Edit Code: Click this button to edit the script used for the data.
- Icon: The icon associated with the data set. Click it to select a different icon.
- Author: The name of the data set’s author.
- Version: The version number for the data set. Click in this area to edit the text.
- Enabled: A green circle means that the data set is enabled. Click it to disable it. Some plugin data sets can’t be disabled.
- Export: Click this button to bring up a window with a long text string that you can copy to save or share the data set.
- Remove: Click this button to delete the data set.
The Search Results tab of the Details Options Panel will only appear if you type something into the Search text box at the bottom of the window. The tab will be populated with any Details settings that match your query.
Backup Your Details Profile!
There’s nothing worse than spending hours on your interface and then having to start over from scratch. It’s always a good idea to backup your addon profiles on a different hard drive or in the cloud. You may also want to make a copy of your profile any time you’re going to make significant changes to it, so you can easily revert the changes if you want to.
How to Make a Copy of Your Profile
You can create a new profile by going to the Profiles tab in the Details Options Panel. Look for the text box labeled “Create Profile” and type in a name for your profile, then click the Create Profile button below it. You’ll have a new copy of the profile that was active when you created the new one.
To copy your skin, go to the Skins tab in the Details Options Panel. Locate the text box labeled “save” and type in a name for your skin. Hit Enter and you’ll have a new copy of the skin that was active when you created it.
How to Save a Backup of Your Profile
To backup your profile, go again to the Profiles tab in the Details Options Panel. Click Export Profile. This will give you a long text string. Copy the entire thing and paste it into a text file or wherever you want to save your backup. If you need to restore your profile later, you can paste this string into the Import Profile box.
To backup your skin, go back to the Skins tab in the Details Options Panel. Select your skin from the Export dropdown menu. This will give you a long text string that you can copy and paste into a text file or anywhere else that you want to save your backup. If you need to restore your skin later, you can paste this string into the Import Custom Skin window.
Author

I've been playing World of Warcraft on and off since vanilla, usually as a healer or caster and often as a guild leader. I play both retail and classic. I also love RPGs, sandboxes, and sims.