- Author: Luxrah
- Date: May 28, 2025
- Updated: May 28, 2025
- Expansion: Mists of Pandaria
The Destruction Warlock’s rotation focuses on maximizing your damage by generating Burning Embers through many of your fire spells and spending them to deal heavy blows through Chaos Bolt and Shadowburn. You’ll also need to incorporate important buffs and cooldowns to make the most of your strong burst cleave damage.
Spell Priority
Be sure that you always have the Grimoire of Sacrifice buff. Check the Demon Pets section for the list of demons that you can sacrifice and what each gives you when you use this. You will not have a demon pet active in combat with this talent.
If you are fighting more than 7 targets, you should simply spam Fire and Brimstone with Incinerate, as you will be generating a constant stream of Burning Embers. Otherwise you can follow the priority list below.
- Cast Rain of Fire if you are fighting more than one enemy.
- This spell channels automatically, so you will have to keep an eye on its duration so you can maintain it, like a DoT.
- Cast Havoc if you are fighting more than one enemy and are about to cast Chaos Bolt or Shadowburn twice.
- Cast Shadowburn if your target is below 20% health and any of the following are true:
- You have at least 3.5 Burning Embers available.
- You have a big buff or proc available.
- You are out of mana.
- The target will die within the next few seconds.
- Cast Fire and Brimstone when you have Burning Embers available if you are fighting more than 3 enemies.
- Cast Curse of the Elements to apply and maintain it if you are responsible for this debuff.
- Cast Immolate to apply and maintain the DoT on targets who will live for more than a few seconds.
- Pandemic will extend the duration by up to half, so you can safely refresh it when it makes the most sense to do so. Aim to do it whenever you have a significant buff to maximize its damage.
- Cast Conflagrate if you have 2 charges available.
- Cast Chaos Bolt if you have at least 3.5 Burning Embers available or a large buff such as Dark Soul: Instability or Skull Banner.
- Cast Conflagrate if you have 1 charge available.
- Cast Fel Flame if you have to move and you don’t have the Kil’jaeden’s Cunning talent.
- Cast Incinerate otherwise.
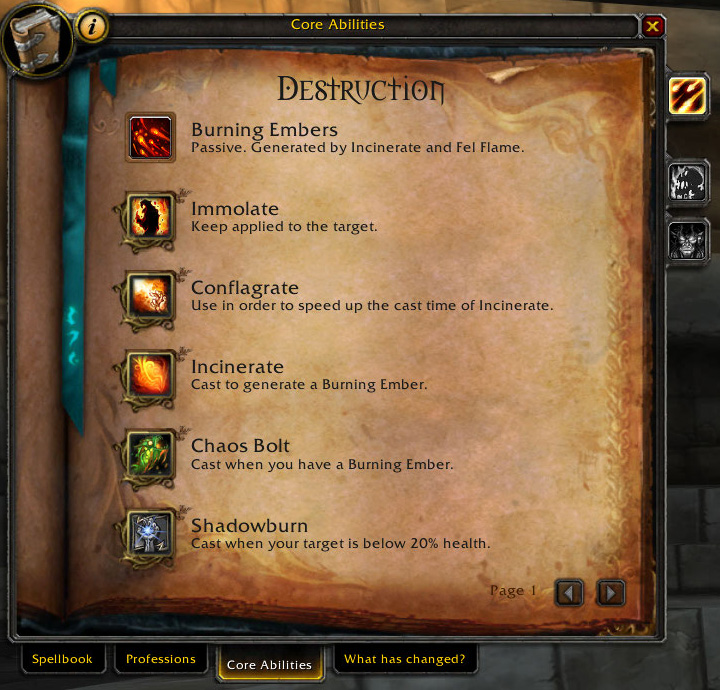
Burning Embers
Burning Embers are the secondary resource for Destruction Warlocks in addition to your mana pool. You can have up to 4 Burning Embers at a time.
This resource is generated by your basic damaging spells:
- Incinerate and Conflagrate each fill 10% of a Burning Ember when they hit, or 20% when they crit.
- Immolate has a low chance to fill 10% of a Burning Ember when it crits.
- Rain of Fire has a low chance to fill 10% of a Burning Ember each time it ticks.
Once generated, Burning Embers can be spent to cast the following:
- Chaos Bolt, Ember Tap, Flames of Xoroth, and Shadowburn each cost 1 Burning Ember
- While Fire and Brimstone is active, your Immolate, Incinerate, Conflagrate, Curse of the Elements, and Curse of Enfeeblement each cost 1 Burning Ember and will deal AoE damage.
Demon Pets
As a Destruction Warlock you will typically be using Grimoire of Sacrifice, which means that your demon pets primarily exist to provide you with a buff and an extra utility spell. If you choose to skip this talent for some reason, you will want to use the ![]() Felhunter pet for maximum DPS. If you have taken the Grimoire of Supremacy talent, this will be the
Felhunter pet for maximum DPS. If you have taken the Grimoire of Supremacy talent, this will be the ![]() Observer pet instead.
Observer pet instead.
Below are the demon pets you can summon and the spells they provide you with if sacrificed. These are the same abilities you would gain through the Command Demon ability if they were active. You also have two demons that can be summoned on a long, shared cooldown, Summon Doomguard and Summon Infernal, which we’ll cover under Damage Cooldowns below.
- Summon Felhunter: Gives you Spell Lock, a silence
- Summon Imp: Gives you Singe Magic, a friendly dispel
- Summon Succubus: Gives you Whiplash, an AoE knockback
- Summon Voidwalker: Gives you Shadow Bulwark, a temporary heal
See our Warlock Demon Pets Guide for more in-depth information about your demons and their abilities.
Important Cooldowns
In addition to your core rotation spells, you have a number of abilities with longer cooldowns that you’ll want to utilize in opportune moments.
Damage Cooldowns
- Dark Soul: Instability
This is your main DPS buff as a Destruction Warlock, granting 30% increased chance to crit for 20 seconds on a 2-minute cooldown. Use it as often as possible, making sure that you have as many Burning Embers available as possible to maximize your damage while it’s active. - Flames of Xoroth
Since you will have Grimoire of Sacrifice, you can use this to instantly re-summon your demon and sacrifice it again in case you somehow lose the buff (such as if you receive a battle rez). It’s also possible to use it to summon demons that you are not able to summon otherwise. For example, you can swap specs to Demonology, summon a Wrathguard, and swap back, and you will be able to summon it again. Demons summoned this way only last for a short time, but you will be able to summon them again every 1 minute. Note that you will not be able to sacrifice the Wrathguard. Unfortunately this ability does not work with your two big cooldown demons below.
 - Grimoire of Service (Talent)
This talent allows you to summon a second demon for 20 seconds every 2 minutes. It will use one of its abilities immediately when summoned, making this both a DPS cooldown and a utility spell. The abilities each demon will use when summoned: Grimoire: Felhunter, Grimoire: Imp, Grimoire: Succubus, or Grimoire: Voidwalker. - Summon Doomguard/Summon Terrorguard (Talent)
Your other big DPS cooldown, which shares its long 10-minute CD with your other big summon below. This one hits very hard and should be used for single-target damage. He does more damage when the target is below 20% health. You’ll want to cast this right before Bloodlust so it can benefit from the buff. - Summon Infernal/Summon Abyssal (Talent)
This demon summon shares its long 10-minute CD with your other big summon above. Use this guy when you are fighting more than 7 targets; otherwise the Doomguard/Terrorguard will do more damage. Cast it right before Bloodlust so it can get the buff when it goes out.
Defensive Cooldowns
- Dark Bargain (Talent)
Your version of a Pally bubble, but with a big downside. If you use this to absorb massive damage, be prepared with some other defensives or heals, because you’re going to take half of that damage as a DoT once it expires. - Dark Regeneration (Talent)
A self-heal for you and your demon pet on a 2-minute cooldown that offers a bonus of increasing the healing you received for the next 12 seconds. - Mortal Coil (Talent)
You have other Fear abilities, so if you use this talent, you’ll usually be using it for the 15% health it restores to you on a 45 second cooldown. - Sacrificial Pact (Talent)
Your demon gives up 25% of its health and you gain a nice big absorption shield equal to 100% of its health. Line this up ahead of a big damage spike and you’ll be good to go. With a 20 second duration and 1-minute cooldown you can have pretty good uptime on this one. - Twilight Ward
If there’s Shadow or Holy damage on a fight, you can mitigate some of it with this buff. Its cooldown and duration are both 30 seconds, so you can maintain very good uptime on this if needed.
Mana Cooldowns
As a Destruction Warlock, your Life Tap is replaced by Ember Tap, leaving you with no mana cooldowns.
Utility Spells
Destruction Warlocks have access to a variety of useful spells that are also worth mentioning.
Heals
- Create Healthstone
- Create Soulwell
- Drain Life
- Ember Tap
- Health Funnel
- Shadow Bulwark (
 Voidwalker pet)
Crowd Control
- Banish
- Blood Horror (Talent)
- Demonic Breath (Talent)
- Fear
- Howl of Terror
- Mortal Coil (Talent)
- Shadowfury (Talent)
- Soulshatter
- Spell Lock (
 Felhunter pet)
 - Subjugate Demon
- Whiplash (
 Succubus pet)
Movement
- Burning Rush (Talent)
- Demonic Circle: Summon
- Demonic Circle: Teleport
- Demonic Gateway
- Eye of Kilrogg
- Ritual of Summoning
Buffs
- Dark Intent
- Spell Power component doesn’t stack with Arcane Brilliance, Burning Wrath, or Still Water.
- Stamina component doesn’t stack with Commanding Shout, Power Word: Fortitude, or Qiraji Fortitude.
- Grimoire of Sacrifice (Talent)
- Unending Breath
Debuffs
- Curse of the Elements
- Doesn’t stack with Fire Breath, Lightning Breath, or Master Poisoner.
- Curse of Enfeeblement
- Physical damage reduction doesn’t stack with Demoralizing Screech, Earth Shock, Hammer of the Righteous, Keg Smash, Scarlet Fever, Thrash, or Thunder Clap.
- Casting speed reduction doesn’t stack with Lava Breath, Spore Cloud, Mind-numbing Poison, Necrotic Strike, or Slow.
Dispels
- Singe Magic (
 Imp pet)
 - Unbound Will (Talent)
Revive
About the Author
