- Author: Luxrah
- Date: May 22, 2025
- Updated: May 22, 2025
- Expansion: Mists of Pandaria
Mists of Pandaria Classic brings a talent overhaul for every class and removes Prime Glyphs from the game, leaving a more streamlined set of options for building your character. Demonology Warlocks will have a few significant choices to make to maximize their damage and utility in endgame PvE content.
Talents
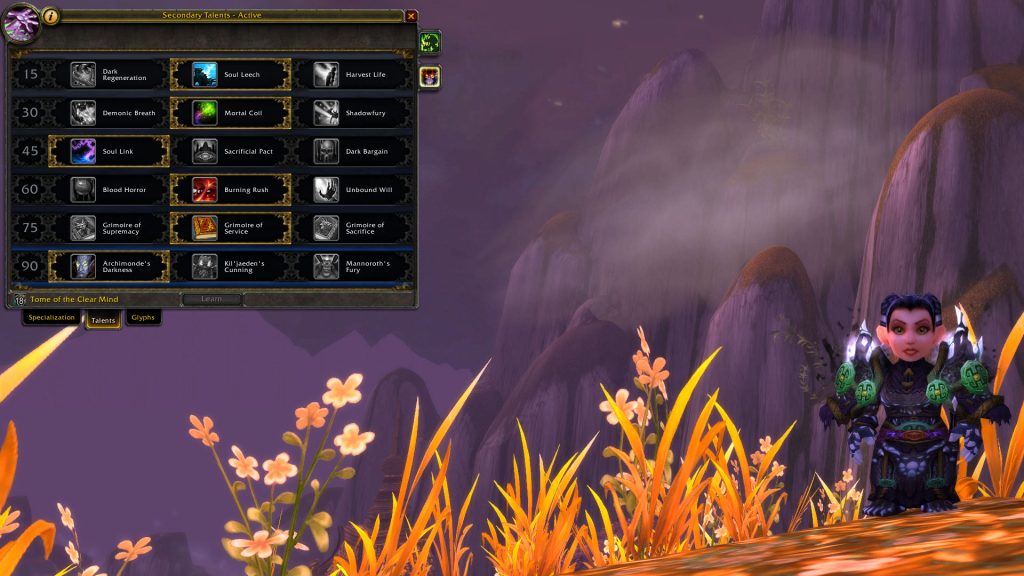
In Mists of Pandaria, talents can be changed out of combat as long as you have some Tome of the Clear Mind in your inventory. That gives you greater flexibility to swap out talents on a fight-by-fight basis, allowing you to take advantage of niche talents when the situation calls for it.
The build pictured below is a good starting point and can be used for the majority of content. We’ll cover every talent in detail below to help you know when you may want to swap in something else.

Level 15 Talents (Tier 1)
 Dark Regeneration
A solid personal defensive for you and your pet, granting you both 30% health plus a buff to healing you receive. The best option for any situation where you need a strong cooldown rather than a steady stream of healing or absorption.- Soul Leech
This talent causes several of your spells to give you and your pet an absorption shield when cast. It’s the best choice for dealing with consistent damage since you will have good uptime on the shield and it’s passive, so you don’t have to interrupt your rotation to trigger it. Recommended for most content unless you need Dark Regeneration for a particular mechanic.  Harvest Life
This talent makes Drain Life stronger, but you would need to interrupt your normal rotation to cast it, resulting in a DPS loss. Soul Leech is better for steady incoming damage as it is entirely passive and mitigates damage up front rather than healing it after the fact, which can be life saving. Dark Regeneration provides a better option for on-demand healing.
Level 30 Talents (Tier 2)
- Demonic Breath
Slows enemies in a cone in front of you. Can be good for kiting, but you already have other tools for that. - Mortal Coil
You already have Fear and Howl of Terror, so this ability may feel a bit redundant. But this ability also heals you when you use it. You’ll typically take this talent in any content where you don’t need the stun from Shadowfury so you can use it as a personal defensive. - Shadowfury
An instant AoE stun on a short 30-second cooldown is going to provide you with the best crowd control of the three options in most situations. If you are going to be responsible for CCing anything in a fight, this should be your go-to.
Level 45 Talents (Tier 3)
- Soul Link
This talent effectively reduces the damage you take by 20% by redirecting it to your demon. You will also heal yourself and your demon for 3% of any damage you deal. The damage reduction can allow you to tank hits that would otherwise kill you, making this the best default option when you don’t have a need for one of the other two. Note however that if you use Grimoire of Sacrifice, this talent is basically useless. - Sacrificial Pact
Like Soul Link, this ability uses your demon’s health to improve your own survivability, but it does so in a more up-front manner. The demon loses 25% of its health and gives you the equivalent of its entire health bar as an absorption shield. This is a very strong defensive cooldown, but you have to know the damage is coming and use the ability, whereas Soul Link is passive. It’s not quite as strong as Dark Bargain but it’s on a much shorter cooldown, so if a fight has predictable damage spikes that are less than 3 minutes apart, this is the best choice. Glyph of Demon Training is recommended to use with this talent since it gives your Felguard 20% more health, which in turn will make this ability stronger. - Dark Bargain
This ability gives you complete immunity to all damage for 8 seconds, similar to a Paladin’s Divine Shield. The downside is that you’ll take half of that damage over the next 8 seconds once it fades, so you won’t be getting away scot-free. This talent has the potential to be the most powerful of the three, but with a long cooldown and the ticking damage that follows, it requires the most planning to use.
Level 60 Talents (Tier 4)
- Blood Horror
You will almost never have a need for this in group content. Save it for solo play and PvP. Your Tier 2 talents should cover any crowd control you need. - Burning Rush
At long last, Warlocks have a sprint! Not only that, but a 50% movement speed increase that lasts until you turn it off! But of course, like many Warlock abilities, it comes at a cost. Your health will steadily tick down by 4% per second while you have this up, so you’ll need to be mindful of that when you use it. The extra speed can be invaluable in movement-heavy fights and also just really nice for convenience, so you’ll find this to be the most useful option unless you have a particular need for Unbound Will. - Unbound Will
This talent allows you to dispel many debuffs from yourself and your demon on a 1-minute cooldown. It’s invaluable in any fight where such a dispel is useful. Otherwise you can stick with Burning Rush.
Level 75 Talents (Tier 5)
- Grimoire of Supremacy
This talent replaces your demon pets with more powerful versions. It upgrades your Felguard to a
  Wrathguard. Your other demons will be stronger too, including your big cooldown summons, but not your Wild Imps. This option will provide you with the most consistent DPS boost, but Grimoire of Service will typically be stronger overall.
 - Grimoire of Service
With this talent, you’ll be able to summon a second demon for 20 seconds every 2 minutes. It will use one of its abilities immediately when summoned, making this both a DPS cooldown and a utility spell. You can use it to summon a copy of the same demon you already have active if you choose, and two Felguards casting Felstorm is pretty powerful. You will want to use this talent most of the time since it works well with Metamorphosis and offers a lot of flexibility. The abilities each demon will use when summoned: Grimoire: Felhunter, Grimoire: Imp, Grimoire: Succubus, Grimoire: Voidwalker, or Grimoire: Felguard. - Grimoire of Sacrifice
If you use this, you’ll be giving up your pet to gain a buff to your own damage, health, and regen. You’ll also get one of that pet’s abilities. If you summon your pet again, you lose the benefits. This talent will have niche usefulness at best and doesn’t compare to the steady DPS increase of Grimoire of Supremacy or the solid burst of Grimoire of Service. Abilities your character will gain depending on the demon you sacrifice: Pursuit (Felguard), Singe Magic (Imp), Spell Lock (Felhunter), Whiplash (Succubus), or Shadow Bulwark (Voidwalker).
Level 90 Talents (Tier 6)
- Archimonde’s Darkness
This talent gives your Dark Soul: Knowledge cooldown two charges, allowing you to use it twice as often. This is a strong default choice when you don’t need the AoE from Mannoroth’s Fury. - Kil’jaeden’s Cunning
Being able to cast Shadow Bolt while moving isn’t really that useful since you already have Fel Flame and Touch of Chaos. Best to skip this one. - Mannoroth’s Fury
With this talent, your AoE abilities will affect a larger area and deal twice as much damage. This is the obvious choice for fights where you’ll have at least 2 consistent targets.
Glyphs
Prime Glyphs are gone in Mists of Pandaria. You will still choose 3 Major Glyphs and 3 Minor Glyphs.
Major Glyphs
If you just want to jump in and start pew-pewing, you can stick with these basic glyph options. For optimal play, you’ll want to check out the situational choices in the next section and replace these according to the circumstances at hand.
- Glyph of Imp Swarm
With this glyph you’ll gain the Imp Swarm active ability while giving up the Wild Imps passive effect. You’ll summon fewer Wild Imps over the course of an average fight with this, but you will be able to control when they are summoned, which means you can line them up more effectively with Metamorphosis and other cooldowns. Whether this glyph results in an overall DPS gain will depend on whether you are using it on cooldown and what other buffs you are pairing it with. - Glyph of Siphon Life
A steady stream of healing from your Corruption DoT, which you’ll always want to have up anyway. A nice default option for survivability, but not mandatory if something else seems more useful for a particular encounter. - Glyph of Eternal Resolve
This glyph makes your Unending Resolve ability passive, giving you a constant 10% damage reduction instead of a greater reduction on a long cooldown. Powerful on fights with constant ticking damage, but you should trade it out for something else if you think you will need the bigger cooldown to deal with a specific mechanic.
Situational Options
Going beyond the basics, there are some really interesting and powerful glyph options for Demonology that are more situational or have caveats that need to be considered.
- Glyph of Curse of the Elements
This glyph will cause your Curse of the Elements to hit 3 targets instead of 1, making it great for any fight with multiple targets. It’s worth noting that you can already do this with Aura of the Elements, but only while you are in Metamorphosis. - Glyph of Demonic Circle
Reduces the cooldown on your Demonic Circle: Teleport. Its usefulness depends entirely on whether you wish to use your circle more than once every 30 seconds. This can be nice to have in fights with a lot of movement. - Glyph of Demon Hunting
This is a very interesting glyph that gives you the Dark Apotheosis ability, which gives your Warlock the ability to tank. Details for how this works are covered in a special section on the Rotations & Cooldowns page of this guide. You won’t use this for your standard DPS build. - Glyph of Demon Training
Gives your Felguard 20% more health, which is especially nice if you’re using the Sacrificial Pact talent since it will also improve the absorb shield you gain from that ability. It’s not as worthwhile otherwise. - Glyph of Healthstone
Your Healthstone will give you twice as much healing, but as a 10-second HoT instead of all at once. This is a major boost to its overall effect, but sometimes the instant healing will be a lot more useful, so consider the mechanics at hand before you use this. - Glyph of Life Tap
Causing your Life Tap to absorb healing instead of consuming your health makes a lot of sense if you’re not getting healed anyway, because then it just becomes free mana. So if there’s a point in the fight where you won’t be getting healed and you can safely stack this absorb on yourself, go for it. Otherwise, making yourself unhealable is usually not a great idea in group content. - Glyph of Soulstone
By default, Soulstone brings players back to life with 60% of their health, which isn’t terrible. But there are times when the extra 40% added by this glyph will make the difference between a wasted rez and a clutch save. - Glyph of Unending Resolve
Lets you use Unending Resolve more often, but at reduced effect. Not useful if you’re already using Glyph of Eternal Resolve. Good for damage spikes that occur more than once every 3 minutes.
Options to Avoid
These glyphs are typically not worth taking up a glyph slot.
- Glyph of Soul Consumption
You won’t be killing enemies that yield experience or honor often or reliably enough in boss encounters for this ability to trigger when you need it. There are better options for survivability. - Glyph of Drain Life
You can already buff your Drain Life with Soulburn when you need to.
Minor Glyphs
Minor Glyphs are usually cosmetic, but Warlocks have a surprising number of them that also have useful effects.
- Glyph of Shadow Bolt
This glyph splits your Shadow Bolt into three separate attacks that deal the same total damage, which may seem cosmetic at first, but the big difference is that each of these attacks has a separate chance to crit and a separate chance to trigger your procs, which makes it an overall DPS increase. - Glyph of Falling Meteor
Allows you to avoid falling deaths by using Demonic Leap. Elevator deaths will be a thing of the past… at least in theory. - Glyph of Hand of Gul’dan
Lets you choose where to place your Hand of Gul’dan instead of casting it at your current target. Primarily good for hitting a separate group of mobs while staying on the boss. - Glyph of Crimson Banish
This cosmetic glyph can have a niche practical use if more than one mob is being Banished and you want to be able to quickly spot which one is yours. - Glyph of Gateway Attunement
This can be beneficial or detrimental, depending on your situational awareness, since you will automatically use your Demonic Gateway if you get close enough. Saves you having to click it, but makes it so you can’t hang around too close for risk of using it accidentally. - Glyph of Health Funnel
With this, you can use Health Funnel as an instant heal for your pet on a short cooldown instead of having to channel it. You shouldn’t need to heal your pet much in group content, but this can be useful in certain situations. - Glyph of Subjugate Demon
You’re not likely to use Subjugate Demon much in group content, but if you ever find yourself needing to, this will reduce it’s relatively long cast time. (This ability and glyph were previously called “Enslave Demon,” in case you are wondering what happened to that.)
About the Author
